Part 1
요약·해설
지원표 10행, pin 표 31행, XDS110·bootloader·PM workaround를 보존했습니다.
CC2652R
48MHz
BLE · 802.15.4
XDS110
Part 2
접을 수 있는 영어 원문 전체
영어 원문 전체 펼치기
2094F571A8AFDB056C17397B3E0A709B6913FC3B3D20F60544FCBB23876DD3FF
.. _cc26x2r1_launchxl:

CC26x2R1 LaunchXL
#################

Overview
********

The Texas Instruments CC26x2R LaunchPad |trade| (LAUNCHXL-CC26X2R1) is a
development kit for the SimpleLink |trade| multi-Standard CC2652R wireless MCU.

See the `TI CC26x2R LaunchPad Product Page`_ for details.

.. figure:: ../../../../../../../boards/ti/cc26x2r1_launchxl/doc/img/cc26x2r1_launchxl.jpg
   :align: center
   :alt: TI CC26x2R LaunchPad

   Texas Instruments CC26x2R LaunchPad |trade|

Hardware
********

The CC26x2R LaunchPad |trade| development kit features the CC2652R wireless MCU.
The board is equipped with two LEDs, two push buttons and BoosterPack connectors
for expansion. It also includes an integrated (XDS110) debugger.

The CC2652 wireless MCU has a 48 MHz Arm |reg| Cortex |reg|-M4F SoC and an
integrated 2.4 GHz transceiver supporting multiple protocols including Bluetooth
|reg| Low Energy and IEEE |reg| 802.15.4.

See the `TI CC2652R Product Page`_ for additional details.

Supported Features
==================

The CC26x2R LaunchPad board configuration supports the following hardware
features:

+-----------+------------+----------------------+
| Interface | Controller | Driver/Component     |
+===========+============+======================+
| GPIO      | on-chip    | gpio                 |
+-----------+------------+----------------------+
| MPU       | on-chip    | arch/arm             |
+-----------+------------+----------------------+
| NVIC      | on-chip    | arch/arm             |
+-----------+------------+----------------------+
| PINMUX    | on-chip    | pinmux               |
+-----------+------------+----------------------+
| UART      | on-chip    | serial               |
+-----------+------------+----------------------+
| I2C       | on-chip    | i2c                  |
+-----------+------------+----------------------+
| SPI       | on-chip    | spi                  |
+-----------+------------+----------------------+
| WDT       | on-chip    | watchdog             |
+-----------+------------+----------------------+
| AUX_ADC   | on-chip    | adc                  |
+-----------+------------+----------------------+
| HWINFO    | on-chip    | hwinfo               |
+-----------+------------+----------------------+

Other hardware features have not been enabled yet for this board.

Connections and IOs
===================

All I/O signals are accessible from the BoosterPack connectors. Pin function
aligns with the LaunchPad standard.

+-------+-----------+---------------------+
| Pin   | Function  | Usage               |
+=======+===========+=====================+
| DIO0  | GPIO      |                     |
+-------+-----------+---------------------+
| DIO1  | GPIO      |                     |
+-------+-----------+---------------------+
| DIO2  | UART0_RX  | UART RXD            |
+-------+-----------+---------------------+
| DIO3  | UART0_TX  | UART TXD            |
+-------+-----------+---------------------+
| DIO4  | I2C_MSSCL | I2C SCL             |
+-------+-----------+---------------------+
| DIO5  | I2C_MSSDA | I2C SDA             |
+-------+-----------+---------------------+
| DIO6  | GPIO      | Red LED             |
+-------+-----------+---------------------+
| DIO7  | GPIO      | Green LED           |
+-------+-----------+---------------------+
| DIO8  | SSI0_RX   | SPI MISO            |
+-------+-----------+---------------------+
| DIO9  | SSI0_TX   | SPI MOSI            |
+-------+-----------+---------------------+
| DIO10 | SSI0_CLK  | SPI CLK             |
+-------+-----------+---------------------+
| DIO11 | SSIO_CS   | SPI CS              |
+-------+-----------+---------------------+
| DIO12 | GPIO      |                     |
+-------+-----------+---------------------+
| DIO13 | GPIO      | Button 1            |
+-------+-----------+---------------------+
| DIO14 | GPIO      | Button 2            |
+-------+-----------+---------------------+
| DIO15 | GPIO      |                     |
+-------+-----------+---------------------+
| DIO16 |           | JTAG TDO            |
+-------+-----------+---------------------+
| DIO17 |           | JTAG TDI            |
+-------+-----------+---------------------+
| DIO18 | UART0_RTS | UART RTS / JTAG SWO |
+-------+-----------+---------------------+
| DIO19 | UART0_CTS | UART CTS            |
+-------+-----------+---------------------+
| DIO20 | GPIO      | Flash CS            |
+-------+-----------+---------------------+
| DIO21 | GPIO      |                     |
+-------+-----------+---------------------+
| DIO22 | GPIO      |                     |
+-------+-----------+---------------------+
| DIO23 | AUX_IO    | A0                  |
+-------+-----------+---------------------+
| DIO24 | AUX_IO    | A1                  |
+-------+-----------+---------------------+
| DIO25 | AUX_IO    | A2                  |
+-------+-----------+---------------------+
| DIO26 | AUX_IO    | A3                  |
+-------+-----------+---------------------+
| DIO27 | AUX_IO    | A4                  |
+-------+-----------+---------------------+
| DIO28 | AUX_IO    | A5                  |
+-------+-----------+---------------------+
| DIO29 | AUX_IO    | A6                  |
+-------+-----------+---------------------+
| DIO30 | AUX_IO    | A7                  |
+-------+-----------+---------------------+

Programming and Debugging
*************************

Before flashing or debugging ensure the RESET, TMS, TCK, TDO, and TDI jumpers
are in place. Also place jumpers on the TXD and RXD signals for a serial
console using the XDS110 application serial port.

Prerequisites:
==============

#. Ensure the XDS-110 emulation firmware on the board is updated.

   Download and install the latest `XDS-110 emulation package`_.

   Follow these `xds110 firmware update directions
   <http://software-dl.ti.com/ccs/esd/documents/xdsdebugprobes/emu_xds110.html#updating-the-xds110-firmware>`_

   Note that the emulation package install may place the xdsdfu utility
   in ``<install_dir>/ccs_base/common/uscif/xds110/``.

#. Install OpenOCD

   You can obtain OpenOCD by following these
   :ref:`installing the latest Zephyr SDK instructions <toolchain_zephyr_sdk>`.

   After the installation, add the directory containing the OpenOCD executable
   to your environment's PATH variable. For example, use this command in Linux:

   .. code-block:: console

      export PATH=$ZEPHYR_SDK_INSTALL_DIR/sysroots/x86_64-pokysdk-linux/usr/bin/openocd:$PATH

Flashing
========

Applications for the ``CC26x2R LaunchPad`` board configuration can be built and
flashed in the usual way (see :ref:`build_an_application` and
:ref:`application_run` for more details).

Here is an example for the :ref:`hello_world` application.

First, run your favorite terminal program to listen for output.

.. code-block:: console

   $ screen <tty_device> 115200

Replace :code:`<tty_device>` with the port where the XDS110 application
serial device can be found. For example, :code:`/dev/ttyACM0`.

Then build and flash the application in the usual way.

.. zephyr-app-commands::
   :zephyr-app: samples/hello_world
   :board: cc26x2r1_launchxl
   :goals: build flash

Debugging
=========

You can debug an application in the usual way.  Here is an example for the
:ref:`hello_world` application.

.. zephyr-app-commands::
   :zephyr-app: samples/hello_world
   :board: cc26x2r1_launchxl
   :maybe-skip-config:
   :goals: debug

Bootloader
==========

The ROM bootloader on CC13x2 and CC26x2 devices is enabled by default. The
bootloader will start if there is no valid application image in flash or the
so-called backdoor is enabled (via option
:kconfig:option:`CONFIG_CC13X2_CC26X2_BOOTLOADER_BACKDOOR_ENABLE`) and BTN-1 is held
down during reset. See the bootloader documentation in chapter 10 of the `TI
CC13x2 / CC26x2 Technical Reference Manual`_ for additional information.

Power Management and UART
=========================

System and device power management are supported on this platform, and
can be enabled via the standard Kconfig options in Zephyr, such as
:kconfig:option:`CONFIG_PM`, :kconfig:option:`CONFIG_PM_DEVICE`.

When system power management is turned on (CONFIG_PM=y),
sleep state 2 (standby mode) is allowed, and polling is used to retrieve input
by calling uart_poll_in(), it is possible for characters to be missed if the
system enters standby mode between calls to uart_poll_in(). This is because
the UART is inactive while the system is in standby mode. The workaround is to
disable sleep state 2 while polling:

.. code-block:: c

    pm_policy_state_lock_get(PM_STATE_STANDBY, PM_ALL_SUBSTATES);
    <code that calls uart_poll_in() and expects input at any point in time>
    pm_policy_state_lock_put(PM_STATE_STANDBY, PM_ALL_SUBSTATES);


References
**********

CC26X2R1 LaunchPad Quick Start Guide:
  http://www.ti.com/lit/pdf/swru528

.. _TI CC26x2R LaunchPad Product Page:
   http://www.ti.com/tool/launchxl-cc26x2r1

.. _TI CC2652R Product Page:
   http://www.ti.com/product/cc2652r

.. _TI CC26x2R LaunchPad Quick Start Guide:
   http://www.ti.com/lit/pdf/swru528

.. _TI CC2652R Datasheet:
   http://www.ti.com/lit/pdf/swrs207

.. _TI CC13x2 / CC26x2 Technical Reference Manual:
   http://www.ti.com/lit/pdf/swcu185

..  _XDS-110 emulation package:
   http://processors.wiki.ti.com/index.php/XDS_Emulation_Software_Package#XDS_Emulation_Software_.28emupack.29_Download
Part 3
한국어 전문 번역
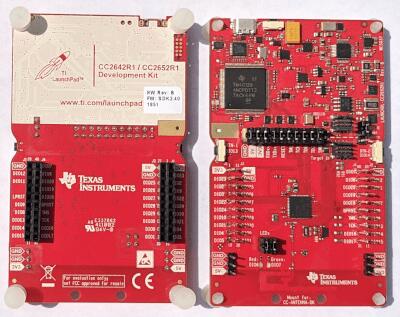
개요
Texas Instruments CC26x2R LaunchPad(LAUNCHXL-CC26X2R1)는 SimpleLink multi-standard CC2652R wireless MCU 개발 kit입니다.
하드웨어
CC2652R wireless MCU, LED 2개, push button 2개, BoosterPack connector와 integrated XDS110 debugger를 제공합니다. 48MHz Cortex-M4F SoC와 Bluetooth Low Energy(BLE)·IEEE 802.15.4 등 여러 protocol을 지원하는 2.4GHz transceiver를 내장합니다.
Zephyr 지원 기능
| Interface | Controller | Driver/Component |
|---|---|---|
| GPIO | on-chip | gpio |
| MPU | on-chip | arch/arm |
| NVIC | on-chip | arch/arm |
| PINMUX | on-chip | pinmux |
| UART | on-chip | serial |
| I2C | on-chip | i2c |
| SPI | on-chip | spi |
| WDT | on-chip | watchdog |
| AUX_ADC | on-chip | adc |
| HWINFO | on-chip | hwinfo |
그 밖의 기능은 아직 enable되지 않았습니다.
연결과 I/O
모든 I/O는 LaunchPad standard BoosterPack connector에서 접근합니다.
| Pin | Function | Usage |
|---|---|---|
| DIO0 | GPIO | |
| DIO1 | GPIO | |
| DIO2 | UART0_RX | UART RXD |
| DIO3 | UART0_TX | UART TXD |
| DIO4 | I2C_MSSCL | I2C SCL |
| DIO5 | I2C_MSSDA | I2C SDA |
| DIO6 | GPIO | Red LED |
| DIO7 | GPIO | Green LED |
| DIO8 | SSI0_RX | SPI MISO |
| DIO9 | SSI0_TX | SPI MOSI |
| DIO10 | SSI0_CLK | SPI CLK |
| DIO11 | SSIO_CS | SPI CS |
| DIO12 | GPIO | |
| DIO13 | GPIO | Button 1 |
| DIO14 | GPIO | Button 2 |
| DIO15 | GPIO | |
| DIO16 | JTAG TDO | |
| DIO17 | JTAG TDI | |
| DIO18 | UART0_RTS | UART RTS / JTAG SWO |
| DIO19 | UART0_CTS | UART CTS |
| DIO20 | GPIO | Flash CS |
| DIO21 | GPIO | |
| DIO22 | GPIO | |
| DIO23 | AUX_IO | A0 |
| DIO24 | AUX_IO | A1 |
| DIO25 | AUX_IO | A2 |
| DIO26 | AUX_IO | A3 |
| DIO27 | AUX_IO | A4 |
| DIO28 | AUX_IO | A5 |
| DIO29 | AUX_IO | A6 |
| DIO30 | AUX_IO | A7 |
프로그래밍과 디버깅
RESET·TMS·TCK·TDO·TDI jumper를 장착하고 XDS110 serial console용 TXD·RXD jumper도 연결합니다.
사전 준비
- 최신 XDS-110 emulation package를 설치하고 firmware를 update합니다.
xdsdfu는<install_dir>/ccs_base/common/uscif/xds110/에 설치될 수 있습니다. - 최신 Zephyr SDK의 OpenOCD를 설치하고 executable 경로를 PATH에 추가합니다.
export PATH=$ZEPHYR_SDK_INSTALL_DIR/sysroots/x86_64-pokysdk-linux/usr/bin/openocd:$PATHFlash
XDS110 application serial device를 terminal로 엽니다. 예시는 /dev/ttyACM0입니다.
$ screen <tty_device> 115200west build -b cc26x2r1_launchxl samples/hello_world
west flashDebug
west build -b cc26x2r1_launchxl samples/hello_world
west debug
Bootloader
CC13x2·CC26x2 ROM bootloader는 기본 enable입니다. Flash에 valid application image가 없거나 CONFIG_CC13X2_CC26X2_BOOTLOADER_BACKDOOR_ENABLE로 backdoor를 enable하고 reset 중 BTN-1을 누르면 시작합니다. 자세한 내용은 Technical Reference Manual chapter 10을 참조합니다.
Power management와 UART
CONFIG_PM과 CONFIG_PM_DEVICE로 system/device power management를 enable합니다. CONFIG_PM=y에서 sleep state 2 standby가 허용되며, uart_poll_in() 호출 사이에 standby로 진입하면 inactive UART가 문자를 놓칠 수 있습니다. Polling하는 동안 standby를 lock합니다.
pm_policy_state_lock_get(PM_STATE_STANDBY, PM_ALL_SUBSTATES);
<code that calls uart_poll_in() and expects input at any point in time>
pm_policy_state_lock_put(PM_STATE_STANDBY, PM_ALL_SUBSTATES);
참고 자료
Source
출처
영어 원문에는 문단, 문서 지시문, 표, 코드, 코드 심벌, 경로를 그대로 보존했습니다.