Part 1
요약·해설
Reset 주의, 13개 binary offset의 esptool 명령, 115200 8-N-1 검증, 두 UART connector build를 설명합니다.
ESP32
UART
ESP32 AT Bin
AT · native Wi-Fi
Part 2
접을 수 있는 영어 원문 전체
영어 원문 전체 펼치기
30364A686987C811F5DFE16B8490CD5D4BFF82A9EB2D12007975632790AA4EEE
.. _mikroe_wifi_bt_click:

MikroElektronika WIFI and BLE Shield
####################################

Overview
********

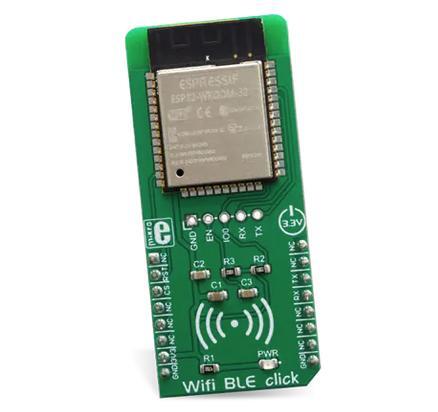
This shield contains an Espressif Systems ESP32 which is responsible
to offload the WIFI and Bluetooth tasks from the host processor. It uses
the standard MikroBus interface with UART pins plus its Espressif AT
command set. Alternatively, the Zephyr modem driver can be used,
configuring the module as a native WIFI networking interface.

.. image:: ../../../../../../../boards/shields/mikroe_wifi_bt_click/doc/wifi_click.jpg
   :align: center
   :alt: MikroE WIFI BLE Click

Pins Assignment of the Shield
=============================

+-----------------------+---------------------------------------------+
| Shield Connector Pin  | Function                                    |
+=======================+=============================================+
| RST#                  | Reset pin, in most of the boards it should  |
|                       | be disconnected because its tied to GND     |
+-----------------------+---------------------------------------------+
| TX                    | UART TX communication pin                   |
+-----------------------+---------------------------------------------+
| RX                    | UART RX communication pin                   |
+-----------------------+---------------------------------------------+

Requirements
************

This shield requires a board which provides a configuration that allows an
UART interface. (see :ref:`shields` for more details).

.. note::
   Sometimes boards declare standard headers like Arduino R3 but don't
   define all connections.  Make sure that the board you are using includes
   all required definitions to avoid build errors.

This shield should be loaded with the `ESP32 AT Bin`_ software which is
available at Espressif Systems web site. This version is command
compatible with ESP32 AT Bin 2.0.0, after getting the binary from Espressif
site, connect the J1 of the board to a serial-to-USB converter of your
preference, or to one Espressif programming boards like ESP-Prog. Install
the `ESP-Tool`_, extract the folder, navigate inside the binaries location
and type the following command to flash the device:

.. code-block:: console

   esptool.py --chip auto \
   --before default_reset \
   --after hard_reset write_flash \
   --flash_mode dio \
   --flash_freq 40m \
   --flash_size detect \
   0x10000 ota_data_initial.bin \
   0x1000 bootloader/bootloader.bin \
   0x20000 at_customize.bin \
   0x21000 customized_partitions/ble_data.bin \
   0x24000 customized_partitions/server_cert.bin \
   0x26000 customized_partitions/server_key.bin \
   0x28000 customized_partitions/server_ca.bin \
   0x2a000 customized_partitions/client_cert.bin \
   0x2c000 customized_partitions/client_key.bin \
   0x2e000 customized_partitions/client_ca.bin \
   0x30000 customized_partitions/factory_param.bin \
   0xf000 phy_init_data.bin \
   0x100000 esp-at.bin \
   0x8000 partitions_at.bin

If necessary, you can indicate a specific port and the baud rate via
``--port <Selected PORT>`` and ``--baud 115200``.

Once flashed, it is possible to verify the module. While connected, open your preferred
terminal configured as 115200, 8, N, 1 and perform a board reset. You should see an
initial log and last message should be the version of the AT firmware flashed.

.. note::
   Boards that already have a network interface:  Check the network
   documentation to understand how to properly configure both interfaces.
   To keep things simple, make sure WiFi is the only interface enabled in
   Networking -> Link Layer Options.  This will avoid problems running
   Zephyr samples.

Build and Programming
*********************

Set ``--shield <shield designation>`` when you invoke ``west build``.

See the example below for lpcxpresso55s69 board using Mikrobus serial:

.. zephyr-app-commands::
   :zephyr-app: samples/net/wifi
   :board: lpcxpresso55s69/lpc55s69/cpu0
   :shield: mikroe_wifi_bt_click_mikrobus
   :goals: build flash

And this example for the b_u585i_iot02a development kit, using the Arduino connector for the UART pins:

.. zephyr-app-commands::
   :zephyr-app: samples/net/wifi
   :board: b_u585i_iot02a
   :shield: mikroe_wifi_bt_click_arduino
   :goals: build flash

References
**********

.. target-notes::

.. _ESP32 AT Bin:
   https://docs.espressif.com/projects/esp-at/en/latest/esp32/AT_Binary_Lists/ESP32_AT_binaries.html

.. _WIFI BT Click Shield website:
   https://www.mikroe.com/

.. _ESP-Tool:
   https://github.com/espressif/esptool
Part 3
한국어 전문 번역
개요
이 shield에는 host processor의 Wi-Fi와 Bluetooth 작업을 대신 처리하는 Espressif Systems ESP32가 있습니다. UART pin을 포함한 standard MikroBus interface와 Espressif AT command set을 사용합니다. 또는 Zephyr modem driver로 module을 native Wi-Fi network interface로 구성할 수 있습니다.
Pin assignment
| Shield connector pin | Function |
|---|---|
| RST# | Reset pin. 대부분의 board에서는 GND에 묶이므로 연결을 끊어야 함 |
| TX | UART TX communication pin |
| RX | UART RX communication pin |
요구 사항
UART interface를 제공하도록 구성된 board가 필요합니다.
ESP32 AT firmware 설치
Shield에는 Espressif가 제공하는 ESP32 AT Bin software를 설치해야 합니다. 이 version은 ESP32 AT Bin 2.0.0과 command-compatible합니다.
- Espressif 사이트에서 binary를 받습니다.
- Board의
J1을 serial-to-USB converter 또는 ESP-Prog 같은 Espressif programming board에 연결합니다. - ESP-Tool을 설치하고 archive를 푼 뒤 binary directory에서 다음 명령을 실행합니다.
esptool.py --chip auto --before default_reset --after hard_reset write_flash --flash_mode dio --flash_freq 40m --flash_size detect 0x10000 ota_data_initial.bin 0x1000 bootloader/bootloader.bin 0x20000 at_customize.bin 0x21000 customized_partitions/ble_data.bin 0x24000 customized_partitions/server_cert.bin 0x26000 customized_partitions/server_key.bin 0x28000 customized_partitions/server_ca.bin 0x2a000 customized_partitions/client_cert.bin 0x2c000 customized_partitions/client_key.bin 0x2e000 customized_partitions/client_ca.bin 0x30000 customized_partitions/factory_param.bin 0xf000 phy_init_data.bin 0x100000 esp-at.bin 0x8000 partitions_at.bin필요하면 --port <Selected PORT>와 --baud 115200으로 port와 baud rate를 지정합니다.
설치 확인
연결된 상태에서 terminal을 115200, 8, N, 1로 설정하고 board를 reset합니다. 초기 log가 나타나고 마지막 message에 flash된 AT firmware version이 표시되어야 합니다.
빌드와 프로그래밍
MikroBus UART
west build -b lpcxpresso55s69/lpc55s69/cpu0   --shield mikroe_wifi_bt_click_mikrobus   samples/net/wifi
west flash
Arduino UART
west build -b b_u585i_iot02a   --shield mikroe_wifi_bt_click_arduino   samples/net/wifi
west flash
참고 자료
Source
출처
영어 원문에는 문단, 문서 지시문, 표, 코드, 코드 심벌, 경로를 그대로 보존했습니다.