Part 1
요약·해설
지원 기능 20종과 핀 65행, LCD·Ethernet·SDHC·SAI, EVK/EVKB별 probe, SWO 설정, QSPI boot header 복구를 설명합니다.
Cortex-M7 · 600 MHz · 1 MB SRAM
LCD · Ethernet · CAN · SAI
EVK/EVKB · SWO · QSPI recovery
Part 2
접을 수 있는 영어 원문 전체
영어 원문 전체 펼치기
617C3E9F32E3AE3CD8EEB1F22B1F2E3E2FB1CB47C4F84FF58DAB7C0BEB997126
.. _mimxrt1060_evk:

NXP MIMXRT1060-EVK
##################

Overview
********

The i.MX RT1060 adds to the industry's first crossover
processor series and expands the i.MX RT series to three scalable families.

The i.MX RT1060 doubles the On-Chip SRAM to 1MB while keeping pin-to-pin
compatibility with i.MX RT1050. This series introduces additional features
ideal for real-time applications such as High-Speed GPIO, CAN FD, and
synchronous parallel NAND/NOR/PSRAM controller. The i.MX RT1060 runs on the
Arm® Cortex-M7® core up to 600 MHz.

.. image:: ../../../../../../../boards/nxp/mimxrt1060_evk/doc/mimxrt1060_evk.jpg
   :align: center
   :alt: MIMXRT1060-EVK

Hardware
********

- MIMXRT1062DVL6A MCU (600 MHz, 1024 KB on-chip memory)

- Memory

  - 256 Mbit SDRAM
  - 64 Mbit QSPI Flash
  - 512 Mbit Hyper Flash
  - TF socket for SD card

- Display

  - LCD connector

- Ethernet

  - 10/100 Mbit/s Ethernet PHY

- USB

  - USB 2.0 OTG connector
  - USB 2.0 host connector

- Audio

  - 3.5 mm audio stereo headphone jack
  - Board-mounted microphone
  - Left and right speaker out connectors

- Power

  - 5 V DC jack

- Debug

  - JTAG 20-pin connector
  - OpenSDA with DAPLink

- Sensor

  - FXOS8700CQ 6-axis e-compass
  - CMOS camera sensor interface

- Expansion port

  - Arduino interface

- CAN bus connector

For more information about the MIMXRT1060 SoC and MIMXRT1060-EVK board, see
these references:

- `i.MX RT1060 Website`_
- `i.MX RT1060 Datasheet`_
- `i.MX RT1060 Reference Manual`_
- `MIMXRT1060-EVK Website`_
- `MIMXRT1060-EVK User Guide`_
- `MIMXRT1060-EVK Schematics`_
- `MIMXRT1060-EVK Debug Firmware`_

External Memory
===============

This platform has the following external memories:

+--------------------+------------+-------------------------------------+
| Device             | Controller | Status                              |
+====================+============+=====================================+
| IS25WP064AJBLE     | SEMC       | Enabled via device configuration    |
|                    |            | data block, which sets up SEMC at   |
|                    |            | boot time                           |
+--------------------+------------+-------------------------------------+
| IS42S16160J        | FLEXSPI    | Enabled via flash configurationn    |
|                    |            | block, which sets up FLEXSPI at     |
|                    |            | boot time.                          |
+--------------------+------------+-------------------------------------+

Supported Features
==================

The mimxrt1060_evk board configuration supports the hardware features listed
below.  For additional features not yet supported, please also refer to the
:ref:`mimxrt1064_evk` , which is the superset board in NXP's i.MX RT10xx family.
NXP prioritizes enabling the superset board with NXP's Full Platform Support for
Zephyr.  Therefore, the mimxrt1064_evk board may have additional features
already supported, which can also be re-used on this mimxrt1060_evk board:

+-----------+------------+-------------------------------------+
| Interface | Controller | Driver/Component                    |
+===========+============+=====================================+
| NVIC      | on-chip    | nested vector interrupt controller  |
+-----------+------------+-------------------------------------+
| SYSTICK   | on-chip    | systick                             |
+-----------+------------+-------------------------------------+
| DISPLAY   | on-chip    | eLCDIF. Tested with                 |
|           |            | :ref:`rk043fn02h_ct`, and           |
|           |            | :ref:`rk043fn66hs_ctg` shields      |
+-----------+------------+-------------------------------------+
| FLASH     | on-chip    | QSPI flash                          |
+-----------+------------+-------------------------------------+
| GPIO      | on-chip    | gpio                                |
+-----------+------------+-------------------------------------+
| SPI       | on-chip    | spi                                 |
+-----------+------------+-------------------------------------+
| I2C       | on-chip    | i2c                                 |
+-----------+------------+-------------------------------------+
| WATCHDOG  | on-chip    | watchdog                            |
+-----------+------------+-------------------------------------+
| SDHC      | on-chip    | disk access                         |
+-----------+------------+-------------------------------------+
| UART      | on-chip    | serial port-polling;                |
|           |            | serial port-interrupt               |
+-----------+------------+-------------------------------------+
| ENET      | on-chip    | ethernet                            |
+-----------+------------+-------------------------------------+
| USB       | on-chip    | USB device                          |
+-----------+------------+-------------------------------------+
| CAN       | on-chip    | can                                 |
+-----------+------------+-------------------------------------+
| DMA       | on-chip    | dma                                 |
+-----------+------------+-------------------------------------+
| ADC       | on-chip    | adc                                 |
+-----------+------------+-------------------------------------+
| SAI       | on-chip    | i2s                                 |
+-----------+------------+-------------------------------------+
| GPT       | on-chip    | gpt                                 |
+-----------+------------+-------------------------------------+
| TRNG      | on-chip    | entropy                             |
+-----------+------------+-------------------------------------+
| FLEXSPI   | on-chip    | flash programming                   |
+-----------+------------+-------------------------------------+
| PIT       | on-chip    | pit                                 |
+-----------+------------+-------------------------------------+

The default configuration can be found in
:zephyr_file:`boards/nxp/mimxrt1060_evk/mimxrt1060_evk_defconfig`

Other hardware features are not currently supported by the port.

Connections and I/Os
====================

The MIMXRT1060 SoC has five pairs of pinmux/gpio controllers.

+---------------+-----------------+---------------------------+
| Name          | Function        | Usage                     |
+===============+=================+===========================+
| GPIO_AD_B0_00 | LPSPI1_SCK      | SPI                       |
+---------------+-----------------+---------------------------+
| GPIO_AD_B0_01 | LPSPI1_SDO      | SPI                       |
+---------------+-----------------+---------------------------+
| GPIO_AD_B0_02 | LPSPI3_SDI/LCD_RST| SPI/LCD Display         |
+---------------+-----------------+---------------------------+
| GPIO_AD_B0_03 | LPSPI3_PCS0     | SPI                       |
+---------------+-----------------+---------------------------+
| GPIO_AD_B0_05 | GPIO            | SD Card                   |
+---------------+-----------------+---------------------------+
| GPIO_AD_B0_09 | GPIO/ENET_RST   | LED                       |
+---------------+-----------------+---------------------------+
| GPIO_AD_B0_10 | GPIO/ENET_INT   | GPIO/Ethernet             |
+---------------+-----------------+---------------------------+
| GPIO_AD_B0_11 | GPIO            | Touch Interrupt           |
+---------------+-----------------+---------------------------+
| GPIO_AD_B0_12 | LPUART1_TX      | UART Console              |
+---------------+-----------------+---------------------------+
| GPIO_AD_B0_13 | LPUART1_RX      | UART Console              |
+---------------+-----------------+---------------------------+
| GPIO_AD_B1_00 | LPI2C1_SCL      | I2C                       |
+---------------+-----------------+---------------------------+
| GPIO_AD_B1_01 | LPI2C1_SDA      | I2C                       |
+---------------+-----------------+---------------------------+
| GPIO_AD_B1_06 | LPUART3_TX      | UART BT HCI               |
+---------------+-----------------+---------------------------+
| GPIO_AD_B1_07 | LPUART3_RX      | UART BT HCI               |
+---------------+-----------------+---------------------------+
| WAKEUP        | GPIO            | SW0                       |
+---------------+-----------------+---------------------------+
| GPIO_B0_00    | LCD_CLK         | LCD Display               |
+---------------+-----------------+---------------------------+
| GPIO_B0_01    | LCD_ENABLE      | LCD Display               |
+---------------+-----------------+---------------------------+
| GPIO_B0_02    | LCD_HSYNC       | LCD Display               |
+---------------+-----------------+---------------------------+
| GPIO_B0_03    | LCD_VSYNC       | LCD Display               |
+---------------+-----------------+---------------------------+
| GPIO_B0_04    | LCD_DATA00      | LCD Display               |
+---------------+-----------------+---------------------------+
| GPIO_B0_05    | LCD_DATA01      | LCD Display               |
+---------------+-----------------+---------------------------+
| GPIO_B0_06    | LCD_DATA02      | LCD Display               |
+---------------+-----------------+---------------------------+
| GPIO_B0_07    | LCD_DATA03      | LCD Display               |
+---------------+-----------------+---------------------------+
| GPIO_B0_08    | LCD_DATA04      | LCD Display               |
+---------------+-----------------+---------------------------+
| GPIO_B0_09    | LCD_DATA05      | LCD Display               |
+---------------+-----------------+---------------------------+
| GPIO_B0_10    | LCD_DATA06      | LCD Display               |
+---------------+-----------------+---------------------------+
| GPIO_B0_11    | LCD_DATA07      | LCD Display               |
+---------------+-----------------+---------------------------+
| GPIO_B0_12    | LCD_DATA08      | LCD Display               |
+---------------+-----------------+---------------------------+
| GPIO_B0_13    | LCD_DATA09      | LCD Display               |
+---------------+-----------------+---------------------------+
| GPIO_B0_14    | LCD_DATA10      | LCD Display               |
+---------------+-----------------+---------------------------+
| GPIO_B0_15    | LCD_DATA11      | LCD Display               |
+---------------+-----------------+---------------------------+
| GPIO_B1_00    | LCD_DATA12      | LCD Display               |
+---------------+-----------------+---------------------------+
| GPIO_B1_01    | LCD_DATA13      | LCD Display               |
+---------------+-----------------+---------------------------+
| GPIO_B1_02    | LCD_DATA14      | LCD Display               |
+---------------+-----------------+---------------------------+
| GPIO_B1_03    | LCD_DATA15      | LCD Display               |
+---------------+-----------------+---------------------------+
| GPIO_B1_04    | ENET_RX_DATA00  | Ethernet                  |
+---------------+-----------------+---------------------------+
| GPIO_B1_05    | ENET_RX_DATA01  | Ethernet                  |
+---------------+-----------------+---------------------------+
| GPIO_B1_06    | ENET_RX_EN      | Ethernet                  |
+---------------+-----------------+---------------------------+
| GPIO_B1_07    | ENET_TX_DATA00  | Ethernet                  |
+---------------+-----------------+---------------------------+
| GPIO_B1_08    | ENET_TX_DATA01  | Ethernet                  |
+---------------+-----------------+---------------------------+
| GPIO_B1_09    | ENET_TX_EN      | Ethernet                  |
+---------------+-----------------+---------------------------+
| GPIO_B1_10    | ENET_REF_CLK    | Ethernet                  |
+---------------+-----------------+---------------------------+
| GPIO_B1_11    | ENET_RX_ER      | Ethernet                  |
+---------------+-----------------+---------------------------+
| GPIO_B1_12    | GPIO            | SD Card                   |
+---------------+-----------------+---------------------------+
| GPIO_B1_14    | USDHC1_VSELECT  | SD Card                   |
+---------------+-----------------+---------------------------+
| GPIO_B1_15    | BACKLIGHT_CTL   | LCD Display               |
+---------------+-----------------+---------------------------+
| GPIO_EMC_40   | ENET_MDC        | Ethernet                  |
+---------------+-----------------+---------------------------+
| GPIO_EMC_41   | ENET_MDIO       | Ethernet                  |
+---------------+-----------------+---------------------------+
| GPIO_AD_B0_09 | ENET_RST        | Ethernet                  |
+---------------+-----------------+---------------------------+
| GPIO_AD_B0_10 | ENET_INT        | Ethernet                  |
+---------------+-----------------+---------------------------+
| GPIO_SD_B0_00 | USDHC1_CMD/LPSPI1_SCK | SD Card/SPI         |
+---------------+-----------------+---------------------------+
| GPIO_SD_B0_01 | USDHC1_CLK/LPSPI1_PCS0 | SD Card/SPI        |
+---------------+-----------------+---------------------------+
| GPIO_SD_B0_02 | USDHC1_DATA0/LPSPI1_SDO | SD Card/SPI       |
+---------------+-----------------+---------------------------+
| GPIO_SD_B0_03 | USDHC1_DATA1/LPSPI1_SDI | SD Card/SPI       |
+---------------+-----------------+---------------------------+
| GPIO_SD_B0_04 | USDHC1_DATA2    | SD Card                   |
+---------------+-----------------+---------------------------+
| GPIO_SD_B0_05 | USDHC1_DATA3    | SD Card                   |
+---------------+-----------------+---------------------------+
| GPIO_AD_B1_11 | ADC             | ADC1 Channel 0            |
+---------------+-----------------+---------------------------+
| GPIO_AD_B1_10 | ADC             | ADC1 Channel 15           |
+---------------+-----------------+---------------------------+
| GPIO_AD_B1_09 | SAI1_MCLK       | I2S                       |
+---------------+-----------------+---------------------------+
| GPIO_AD_B1_12 | SAI1_RX         | I2S                       |
+---------------+-----------------+---------------------------+
| GPIO_AD_B1_13 | SAI1_TX         | I2S                       |
+---------------+-----------------+---------------------------+
| GPIO_AD_B1_14 | SAI1_TX_BCLK    | I2S                       |
+---------------+-----------------+---------------------------+
| GPIO_AD_B1_15 | SAI1_TX_SYNC    | I2S                       |
+---------------+-----------------+---------------------------+
| GPIO_AD_B1_02 | 1588_EVENT2_OUT | 1588                      |
+---------------+-----------------+---------------------------+
| GPIO_AD_B1_03 | 1588_EVENT2_IN  | 1588                      |
+---------------+-----------------+---------------------------+

.. note::
        In order to use the SPI peripheral on this board, resistors R278, R279,
        R280 and R281 must be populated with zero ohm resistors.

System Clock
============

The MIMXRT1060 SoC is configured to use SysTick as the system clock source,
running at 600MHz.

When power management is enabled, the 32 KHz low frequency
oscillator on the board will be used as a source for the GPT timer to
generate a system clock. This clock enables lower power states, at the
cost of reduced resolution


Serial Port
===========

The MIMXRT1060 SoC has eight UARTs. ``LPUART1`` is configured for the console,
``LPUART3`` for the Bluetooth Host Controller Interface (BT HCI), and the
remaining are not used.

Programming and Debugging
*************************

This board supports 3 debug host tools. Please install your preferred host
tool, then follow the instructions in `Configuring a Debug Probe`_ to
configure the board appropriately.

* :ref:`jlink-debug-host-tools` (Default, Supported by NXP)
* :ref:`linkserver-debug-host-tools` (Supported by NXP)
* :ref:`pyocd-debug-host-tools` (Not Supported by NXP)

Once the host tool and board are configured, build and flash applications
as usual (see :ref:`build_an_application` and :ref:`application_run` for more
details).

Configuring a Debug Probe
=========================

Two revisions of the RT1060 EVK exist. For the RT1060 EVK, J47/J48 are the SWD
isolation jumpers, J42 is the DFU mode jumper, and the 20 pin JTAG/SWD header
is present on J21. For the RT1060 EVKB, J9/J10 are the SWD isolation jumpers,
J12 is the DFU mode jumper, and the 20 pin JTAG/SWD header is present on J2.

.. include:: ../../../../../../../boards/nxp/common/rt1xxx-lpclink2-debug.rst
   :start-after: rt1xxx-lpclink2-probes

See `Using J-Link with MIMXRT1060-EVK or MIMXRT1064-EVK`_ or `Using J-Link with
MIMXRT1060-EVKB`_ for more details.

Configuring a Console
=====================

Regardless of your choice in debug probe, we will use the OpenSDA
microcontroller as a usb-to-serial adapter for the serial console. Check that
jumpers J45 and J46 are **on** (they are on by default when boards ship from
the factory) to connect UART signals to the OpenSDA microcontroller.

Connect a USB cable from your PC to J41.

Use the following settings with your serial terminal of choice (minicom, putty,
etc.):

- Speed: 115200
- Data: 8 bits
- Parity: None
- Stop bits: 1

Using SWO
---------
SWO can be used as a logging backend, by setting ``CONFIG_LOG_BACKEND_SWO=y``.
Your SWO viewer should be configured with a CPU frequency of 132MHz, and
SWO frequency of 7500KHz.

Flashing
========

Here is an example for the :ref:`hello_world` application.

.. zephyr-app-commands::
   :zephyr-app: samples/hello_world
   :board: mimxrt1060_evk
   :goals: flash

Open a serial terminal, reset the board (press the SW9 button), and you should
see the following message in the terminal:

.. code-block:: console

   ***** Booting Zephyr OS v1.14.0-rc1 *****
   Hello World! mimxrt1060_evk

Debugging
=========

Here is an example for the :ref:`hello_world` application.

.. zephyr-app-commands::
   :zephyr-app: samples/hello_world
   :board: mimxrt1060_evk
   :goals: debug

Open a serial terminal, step through the application in your debugger, and you
should see the following message in the terminal:

.. code-block:: console

   ***** Booting Zephyr OS v1.14.0-rc1 *****
   Hello World! mimxrt1060_evk

Troubleshooting
===============

If the debug probe fails to connect with the following error, it's possible
that the boot header in QSPI flash is invalid or corrupted. The boot header is
configured by :kconfig:option:`CONFIG_NXP_IMXRT_BOOT_HEADER`.

.. code-block:: console

   Remote debugging using :2331
   Remote communication error.  Target disconnected.: Connection reset by peer.
   "monitor" command not supported by this target.
   "monitor" command not supported by this target.
   You can't do that when your target is `exec'
   (gdb) Could not connect to target.
   Please check power, connection and settings.

You can fix it by erasing and reprogramming the QSPI flash with the following
steps:

#. Set the SW7 DIP switches to ON-OFF-ON-OFF to prevent booting from QSPI flash.

#. Reset by pressing SW9

#. Run ``west debug`` or ``west flash`` again with a known working Zephyr
   application.

#. Set the SW7 DIP switches to OFF-OFF-ON-OFF to boot from QSPI flash.

#. Reset by pressing SW9

If the west flash or debug commands fail, and the command hangs while executing
runners.jlink, confirm the J-Link debug probe is configured, powered, and
connected to the EVK properly.

.. _MIMXRT1060-EVK Website:
   https://www.nxp.com/design/development-boards/i-mx-evaluation-and-development-boards/i-mx-rt1060-evaluation-kit:MIMXRT1060-EVKB

.. _MIMXRT1060-EVK User Guide:
   https://www.nxp.com/webapp/Download?colCode=MIMXRT10601064EKBHUG

.. _MIMXRT1060-EVK Debug Firmware:
   https://www.nxp.com/docs/en/application-note/AN13206.pdf

.. _MIMXRT1060-EVK Schematics:
   https://www.nxp.com/webapp/Download?colCode=MIMXRT1060-EVK-DESIGNFILE-A3

.. _i.MX RT1060 Website:
   https://www.nxp.com/products/processors-and-microcontrollers/arm-based-processors-and-mcus/i.mx-applications-processors/i.mx-rt-series/i.mx-rt1060-crossover-processor-with-arm-cortex-m7-core:i.MX-RT1060

.. _i.MX RT1060 Datasheet:
   https://www.nxp.com/docs/en/nxp/data-sheets/IMXRT1060CEC.pdf

.. _i.MX RT1060 Reference Manual:
   https://www.nxp.com/webapp/Download?colCode=IMXRT1060RM

.. _Using J-Link with MIMXRT1060-EVK or MIMXRT1064-EVK:
   https://community.nxp.com/t5/i-MX-RT-Knowledge-Base/Using-J-Link-with-MIMXRT1060-EVK-or-MIMXRT1064-EVK/ta-p/1281149

.. _Using J-Link with MIMXRT1060-EVKB:
   https://community.nxp.com/t5/i-MX-RT-Knowledge-Base/Using-J-Link-with-MIMXRT1060-EVKB/ta-p/1452717
Part 3
한국어 전문 번역
개요
i.MX RT1060은 최초의 crossover processor 계열을 세 가지 확장 가능한 제품군으로 넓힙니다. i.MX RT1050과 pin-to-pin 호환성을 유지하면서 on-chip SRAM을 1 MB로 두 배 늘렸습니다. High-Speed GPIO, CAN FD, synchronous parallel NAND/NOR/PSRAM controller처럼 실시간 application에 적합한 기능을 추가했으며 Arm Cortex-M7 core가 최대 600 MHz로 동작합니다.
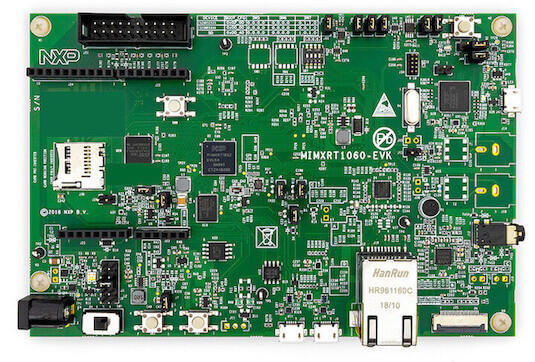
하드웨어
MIMXRT1062DVL6A: 600 MHz, 1024 KB on-chip memory- 256 Mbit SDRAM, 64 Mbit QSPI Flash, 512 Mbit HyperFlash, SD용 TF socket
- LCD connector, 10/100 Mbit/s Ethernet PHY
- USB 2.0 OTG·host connector
- 3.5 mm stereo headphone, board microphone, 좌·우 speaker output
- 5 V DC jack, JTAG 20-pin, DAPLink OpenSDA
- FXOS8700CQ 6-axis e-compass, CMOS camera interface
- Arduino expansion과 CAN bus connector
외부 메모리
다음 표는 Zephyr 3.7.0 공식 원문에 기재된 device-controller 조합을 임의 수정하지 않고 그대로 옮긴 것입니다.
| 장치 | 컨트롤러 | 상태 |
|---|---|---|
IS25WP064AJBLE | SEMC | 부팅 시 SEMC를 설정하는 device configuration data block으로 활성화 |
IS42S16160J | FLEXSPI | 부팅 시 FLEXSPI를 설정하는 flash configuration block으로 활성화 |
지원 기능
mimxrt1060_evk 구성은 아래 기능을 지원합니다. 추가 기능은 i.MX RT10xx 상위 집합 보드 mimxrt1064_evk에 우선 적용된 NXP Full Platform Support에서 재사용할 수 있습니다.
| 인터페이스 | 컨트롤러 | 드라이버/컴포넌트 |
|---|---|---|
NVIC | on-chip | nested vector interrupt controller |
SYSTICK | on-chip | systick |
DISPLAY | on-chip | eLCDIF; rk043fn02h_ct와 rk043fn66hs_ctg shield에서 시험 |
FLASH | on-chip | QSPI flash |
GPIO | on-chip | gpio |
SPI | on-chip | spi |
I2C | on-chip | i2c |
WATCHDOG | on-chip | watchdog |
SDHC | on-chip | disk access |
UART | on-chip | serial port-polling; serial port-interrupt |
ENET | on-chip | ethernet |
USB | on-chip | USB device |
CAN | on-chip | can |
DMA | on-chip | dma |
ADC | on-chip | adc |
SAI | on-chip | i2s |
GPT | on-chip | gpt |
TRNG | on-chip | entropy |
FLEXSPI | on-chip | flash programming |
PIT | on-chip | pit |
기본 구성은 boards/nxp/mimxrt1060_evk/mimxrt1060_evk_defconfig에 있습니다. 표 밖의 하드웨어 기능은 현재 port에서 지원하지 않습니다.
연결과 I/O
SoC에는 pinmux/GPIO controller 쌍이 5개 있습니다. LCD 16-bit bus, Ethernet, USDHC/SPI 공유 핀, ADC, SAI/I2S, IEEE 1588 event까지 원문 65행을 보존합니다.
| 이름 | 기능 | 용도 |
|---|---|---|
GPIO_AD_B0_00 | LPSPI1_SCK | SPI |
GPIO_AD_B0_01 | LPSPI1_SDO | SPI |
GPIO_AD_B0_02 | LPSPI3_SDI/LCD_RST | SPI/LCD Display |
GPIO_AD_B0_03 | LPSPI3_PCS0 | SPI |
GPIO_AD_B0_05 | GPIO | SD Card |
GPIO_AD_B0_09 | GPIO/ENET_RST | LED |
GPIO_AD_B0_10 | GPIO/ENET_INT | GPIO/Ethernet |
GPIO_AD_B0_11 | GPIO | Touch Interrupt |
GPIO_AD_B0_12 | LPUART1_TX | UART Console |
GPIO_AD_B0_13 | LPUART1_RX | UART Console |
GPIO_AD_B1_00 | LPI2C1_SCL | I2C |
GPIO_AD_B1_01 | LPI2C1_SDA | I2C |
GPIO_AD_B1_06 | LPUART3_TX | UART BT HCI |
GPIO_AD_B1_07 | LPUART3_RX | UART BT HCI |
WAKEUP | GPIO | SW0 |
GPIO_B0_00 | LCD_CLK | LCD Display |
GPIO_B0_01 | LCD_ENABLE | LCD Display |
GPIO_B0_02 | LCD_HSYNC | LCD Display |
GPIO_B0_03 | LCD_VSYNC | LCD Display |
GPIO_B0_04 | LCD_DATA00 | LCD Display |
GPIO_B0_05 | LCD_DATA01 | LCD Display |
GPIO_B0_06 | LCD_DATA02 | LCD Display |
GPIO_B0_07 | LCD_DATA03 | LCD Display |
GPIO_B0_08 | LCD_DATA04 | LCD Display |
GPIO_B0_09 | LCD_DATA05 | LCD Display |
GPIO_B0_10 | LCD_DATA06 | LCD Display |
GPIO_B0_11 | LCD_DATA07 | LCD Display |
GPIO_B0_12 | LCD_DATA08 | LCD Display |
GPIO_B0_13 | LCD_DATA09 | LCD Display |
GPIO_B0_14 | LCD_DATA10 | LCD Display |
GPIO_B0_15 | LCD_DATA11 | LCD Display |
GPIO_B1_00 | LCD_DATA12 | LCD Display |
GPIO_B1_01 | LCD_DATA13 | LCD Display |
GPIO_B1_02 | LCD_DATA14 | LCD Display |
GPIO_B1_03 | LCD_DATA15 | LCD Display |
GPIO_B1_04 | ENET_RX_DATA00 | Ethernet |
GPIO_B1_05 | ENET_RX_DATA01 | Ethernet |
GPIO_B1_06 | ENET_RX_EN | Ethernet |
GPIO_B1_07 | ENET_TX_DATA00 | Ethernet |
GPIO_B1_08 | ENET_TX_DATA01 | Ethernet |
GPIO_B1_09 | ENET_TX_EN | Ethernet |
GPIO_B1_10 | ENET_REF_CLK | Ethernet |
GPIO_B1_11 | ENET_RX_ER | Ethernet |
GPIO_B1_12 | GPIO | SD Card |
GPIO_B1_14 | USDHC1_VSELECT | SD Card |
GPIO_B1_15 | BACKLIGHT_CTL | LCD Display |
GPIO_EMC_40 | ENET_MDC | Ethernet |
GPIO_EMC_41 | ENET_MDIO | Ethernet |
GPIO_AD_B0_09 | ENET_RST | Ethernet |
GPIO_AD_B0_10 | ENET_INT | Ethernet |
GPIO_SD_B0_00 | USDHC1_CMD/LPSPI1_SCK | SD Card/SPI |
GPIO_SD_B0_01 | USDHC1_CLK/LPSPI1_PCS0 | SD Card/SPI |
GPIO_SD_B0_02 | USDHC1_DATA0/LPSPI1_SDO | SD Card/SPI |
GPIO_SD_B0_03 | USDHC1_DATA1/LPSPI1_SDI | SD Card/SPI |
GPIO_SD_B0_04 | USDHC1_DATA2 | SD Card |
GPIO_SD_B0_05 | USDHC1_DATA3 | SD Card |
GPIO_AD_B1_11 | ADC | ADC1 Channel 0 |
GPIO_AD_B1_10 | ADC | ADC1 Channel 15 |
GPIO_AD_B1_09 | SAI1_MCLK | I2S |
GPIO_AD_B1_12 | SAI1_RX | I2S |
GPIO_AD_B1_13 | SAI1_TX | I2S |
GPIO_AD_B1_14 | SAI1_TX_BCLK | I2S |
GPIO_AD_B1_15 | SAI1_TX_SYNC | I2S |
GPIO_AD_B1_02 | 1588_EVENT2_OUT | 1588 |
GPIO_AD_B1_03 | 1588_EVENT2_IN | 1588 |
SPI 사용 조건: R278, R279, R280, R281에 0 Ω resistor를 실장해야 합니다.
시스템 클록과 직렬 포트
SysTick은 600 MHz로 동작합니다. 전원 관리 시 32 KHz oscillator를 GPT timer source로 사용해 해상도를 낮추는 대신 저전력 상태를 지원합니다. UART 8개 중 LPUART1은 console, LPUART3은 Bluetooth Host Controller Interface(BT HCI)입니다.
프로그래밍과 디버깅
Host tool은 기본·NXP 지원 J-Link, NXP 지원 LinkServer, NXP 미지원 pyOCD의 3종입니다. LPC-Link2의 CMSIS-DAP·J-Link 공통 절차는 NXP RT1xxx LPC-Link2 Debug Probe 설정에 보존되어 있습니다.
EVK와 EVKB probe 배선
- RT1060 EVK:
J47/J48SWD isolation,J42DFU,J2120-pin JTAG/SWD. - RT1060 EVKB:
J9/J10SWD isolation,J12DFU,J220-pin JTAG/SWD.
CMSIS-DAP이나 온보드 J-Link에서는 해당 isolation jumper를 장착합니다. 온보드 J-Link firmware는 debug USB로 EVK에 전원을 공급하지 않으므로 별도 전원을 사용합니다. 외부 J-Link에서는 isolation jumper를 제거하고 해당 JTAG/SWD header에 연결합니다.
콘솔
OpenSDA를 USB-to-serial adapter로 사용합니다. J45/J46이 장착되어 있는지 확인하고 PC를 J41에 연결합니다. Terminal은 115200 baud, 8 bits, parity None, stop bit 1입니다.
SWO 사용
CONFIG_LOG_BACKEND_SWO=y로 SWO logging backend를 활성화할 수 있습니다. SWO viewer는 CPU frequency 132 MHz, SWO frequency 7500 KHz로 설정합니다.
플래시
# Zephyr 저장소 루트에서
west build -b mimxrt1060_evk samples/hello_world
west flashSW9으로 reset하면 다음 메시지가 표시됩니다.
***** Booting Zephyr OS v1.14.0-rc1 *****
Hello World! mimxrt1060_evk
디버깅
# Zephyr 저장소 루트에서
west build -b mimxrt1060_evk samples/hello_world
west debug
단계 실행 중 terminal 출력은 다음과 같습니다.
***** Booting Zephyr OS v1.14.0-rc1 *****
Hello World! mimxrt1060_evk
문제 해결
QSPI flash의 boot header가 잘못되거나 손상되고 CONFIG_NXP_IMXRT_BOOT_HEADER가 맞지 않으면 다음 오류가 발생할 수 있습니다.
Remote debugging using :2331
Remote communication error.  Target disconnected.: Connection reset by peer.
"monitor" command not supported by this target.
"monitor" command not supported by this target.
You can't do that when your target is `exec'
(gdb) Could not connect to target.
Please check power, connection and settings.SW7DIP switch를ON-OFF-ON-OFF로 설정해 QSPI boot를 막습니다.SW9을 눌러 reset합니다.- 검증된 Zephyr application으로
west debug또는west flash를 다시 실행해 QSPI를 지우고 program합니다. - SW7을
OFF-OFF-ON-OFF로 설정해 QSPI boot를 선택합니다. - SW9을 눌러 reset합니다.
west flash 또는 west debug가 runners.jlink 실행 중 멈추면 J-Link probe의 구성, 전원, EVK 연결 상태를 확인합니다.
참고 자료
Source
출처
영어 원문에는 문단, 문서 지시문, 표, 코드, 코드 심벌, 경로를 그대로 보존했습니다.