Part 1
요약·해설
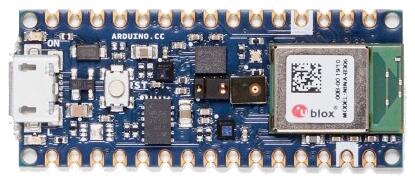
Nano 33 BLE와 BLE Sense는 같은 nRF52840 기반 board이며 Sense variant에 sensor가 더 들어갑니다. Zephyr는 ADC, I2C, radio, USB 등 SoC 기능을 지원하지만 PDM microphone은 아직 enable되지 않았습니다.
Nordic nRF52840 Cortex-M4F
Bluetooth + IEEE 802.15.4
PCB test-pad SWD 또는 TRACE32 GDB front-end
Part 2
접을 수 있는 영어 원문 전체
영어 원문 전체 펼치기
E35178A9E686505FE5ED1493028ED426A7127B6A5CFD9BBC302BBA054DF631C9
.. _arduino_nano_33_ble:

Arduino Nano 33 BLE (Sense)
#################################

Overview
********

The Arduino Nano 33 BLE is designed around Nordic Semiconductor's
nRF52840 ARM Cortex-M4F CPU. Arduino sells 2 variants of the board, the
plain `BLE`_ type and the `BLE Sense`_ type. The "Sense" variant is distinguished by
the inclusion of more sensors, but otherwise both variants are the same.

.. image:: ../../../../../../../boards/arduino/nano_33_ble/doc/img/arduino_nano_33_ble_sense.jpg
     :align: center
     :alt: Arduino Nano 33 BLE (Sense variant)

The Sense variant of the board

Hardware
********

Supported Features
==================

The package is configured to support the following hardware:

+-----------+------------+----------------------+
| Interface | Controller | Driver/Component     |
+===========+============+======================+
| ADC       | on-chip    | adc                  |
+-----------+------------+----------------------+
| CLOCK     | on-chip    | clock_control        |
+-----------+------------+----------------------+
| FLASH     | on-chip    | flash                |
+-----------+------------+----------------------+
| GPIO      | on-chip    | gpio                 |
+-----------+------------+----------------------+
| I2C0      | on-chip    | i2c                  |
+-----------+------------+----------------------+
| I2C1      | on-chip    | i2c                  |
+-----------+------------+----------------------+
| MPU       | on-chip    | arch/arm             |
+-----------+------------+----------------------+
| NVIC      | on-chip    | arch/arm             |
+-----------+------------+----------------------+
| PWM       | on-chip    | pwm                  |
+-----------+------------+----------------------+
| RADIO     | on-chip    | Bluetooth,           |
|           |            | ieee802154           |
+-----------+------------+----------------------+
| RTC       | on-chip    | system clock         |
+-----------+------------+----------------------+
| SPI       | on-chip    | spi                  |
+-----------+------------+----------------------+
| UART      | on-chip    | serial               |
+-----------+------------+----------------------+
| USB       | on-chip    | usb                  |
+-----------+------------+----------------------+
| WDT       | on-chip    | watchdog             |
+-----------+------------+----------------------+

Other hardware features have not been enabled yet for this board.

Notably, this includes the PDM (microphone) interface.

Connections and IOs
===================

The `schematic`_ will tell you everything
you need to know about the pins.

The I2C pull-ups are enabled by setting pin P1.00 high. This is automatically
done at system init. The pin is specified in the ``zephyr,user`` Devicetree node
as ``pull-up-gpios``.

Programming and Debugging
*************************

This board requires the Arduino variant of bossac. You will not
be able to flash with the bossac included with the zephyr-sdk, or
using shumatech's mainline build.

You can get this variant of bossac with one of two ways:

#. Building the binary from the `Arduino source tree <https://github.com/arduino/BOSSA/tree/nrf>`_
#. Downloading the Arduino IDE

   #. Install the board support package within the IDE
   #. Change your IDE preferences to provide verbose logging
   #. Build and flash a sample application, and read the logs to figure out where Arduino stored bossac.
   #. In most Linux based systems the path is ``$HOME/.arduino15/packages/arduino/tools/bossac/1.9.1-arduino2/bossac``.

Once you have a path to bossac, you can pass it as an argument to west:

.. code-block:: bash

   west flash --bossac="<path to the arduino version of bossac>"

For example

.. code-block:: bash

    west flash --bossac=$HOME/.arduino15/packages/arduino/tools/bossac/1.9.1-arduino2/bossac

On Windows you need to use the :file:`bossac.exe` from the `Arduino IDE`_
You will also need to specify the COM port using the --bossac-port argument:

.. code-block:: bash

    west flash --bossac=%USERPROFILE%\AppData\Local\Arduino15\packages\arduino\tools\bossac\1.9.1-arduino2\bossac.exe --bossac-port="COMx"

Flashing
========

Attach the board to your computer using the USB cable, and then

   .. zephyr-app-commands::
      :zephyr-app: samples/basic/blinky
      :board: arduino_nano_33_ble
      :goals: build
      :compact:

Double-tap the RESET button on your board. Your board should disconnect, reconnect,
and there should be a pulsing orange LED near the USB port.

Then, you can flash the image using the above script.

You should see the red LED blink.

Debugging
=========

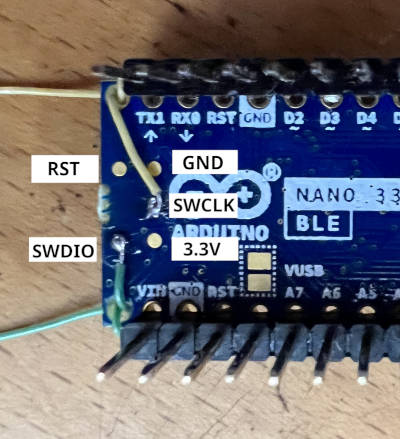
You can debug an application on the board with a debug adapter that supports
CMSIS-DAP. This board has the SWD connector for debugging but exposes it as
a test pad pattern (not a connector) on the back side of the PCB. So, It needs
bit of difficult soldering. At a minimum, SWDIO and SWCLK need soldering (As
shown in the picture). GND, 3.3V, and RESET are also available in the DIP
connector, therefore it may be easier to connect using the DIP connector
instead of soldering to them.

.. image:: ../../../../../../../boards/arduino/nano_33_ble/doc/img/nano_33_ble_swd.jpg
     :align: center
     :alt: Nano 33 BLE SWD connecting

After connecting the debug adapter, you can debug it the usual way.
Type the following command will start debugging.

.. zephyr-app-commands::
   :zephyr-app: samples/basic/blinky
   :board: arduino_nano_33_ble
   :maybe-skip-config:
   :goals: debug

Debugging with TRACE32 (GDB Front-End)
======================================

Lauterbach provides `GDB Debug version TRACE32 for Arduino Nano 33 BLE`_.
That license ties to Arduino Nano 33 BLE hardware serial number,
it also works with the ZephyrRTOS.

Follow the instruction of the tutorial for Arduino
`Lauterbach TRACE32 GDB Front-End Debugger for Nano 33 BLE`
to install the TRACE32.

After installing the TRACE32, You should set the environmental variable ``T32_DIR``.
If you installed TRACE32 into the home directory, run the following command.
(It is a good idea to put in the login script.)

.. code-block:: bash

    export T32_DIR="~/T32Arduino"


The TRACE32 is `TRACE32 as GDB Front-End`_ version.
Required to run the GDB server before launching TRACE32 with the following command.

.. zephyr-app-commands::
   :zephyr-app: samples/basic/blinky
   :board: arduino_nano_33_ble
   :goals: debugserver
   :compact:

Execute the following command after launching the GDB server to run the TRACE32
and connect the GDB server.

.. code-block:: bash

    west debug --runner=trace32 -- gdbRemote=:3333

The TRACE32 script handles arguments after the ``--`` sign.
You can set the following options.

========== ========== ==================================================================
      Name Required?  Description
---------- ---------- ------------------------------------------------------------------
 gdbRemote  Required  | Set the GDB server address or device file of the serial port.
                      | It can take <hostname>:<port> or <devicename>.
                      | e.g.) ``gdbRemote=localhost:3333``, ``gdbRemote=/dev/ttyACM0``
  terminal  Optional  | Set the device file of the serial port connected to the target console.
                      | e.g.) ``terminal=/dev/ttyACM1``
userScript  Optional  | Set user script that runs after system script execute done.
                      | e.g.) ``userScript="./user.cmm"``
========== ========== ==================================================================

References
**********

.. target-notes::

.. _BLE:
    https://store.arduino.cc/products/arduino-nano-33-ble

.. _BLE SENSE:
    https://store.arduino.cc/products/arduino-nano-33-ble-sense

.. _pinouts:
    https://learn.adafruit.com/introducing-the-adafruit-nrf52840-feather/pinouts

.. _schematic:
    https://content.arduino.cc/assets/NANO33BLE_V2.0_sch.pdf

.. _GDB Debug version TRACE32 for Arduino Nano 33 BLE:
    https://www.lauterbach.com/frames.html?register_arduino.php

.. _Lauterbach TRACE32 GDB Front-End Debugger for Nano 33 BLE:
    https://docs.arduino.cc/tutorials/nano-33-ble-sense/trace-32

.. _TRACE32 as GDB Front-End:
    https://www2.lauterbach.com/pdf/frontend_gdb.pdf

.. _Arduino IDE:
	https://www.arduino.cc/en/Main/Software
Part 3
한국어 전문 번역
개요
Arduino Nano 33 BLE는 Nordic Semiconductor nRF52840 Arm Cortex-M4F를 중심으로 설계됐습니다. Arduino는 일반 BLE와 BLE Sense 두 variant를 판매합니다. Sense는 sensor가 더 많다는 점을 제외하면 동일합니다.
지원 기능
| Interface | Controller | Driver/Component |
|---|---|---|
| ADC | on-chip | adc |
| CLOCK | on-chip | clock_control |
| FLASH | on-chip | flash |
| GPIO | on-chip | gpio |
| I2C0 | on-chip | i2c |
| I2C1 | on-chip | i2c |
| MPU | on-chip | arch/arm |
| NVIC | on-chip | arch/arm |
| PWM | on-chip | pwm |
| RADIO | on-chip | Bluetooth, ieee802154 |
| RTC | on-chip | system clock |
| SPI | on-chip | spi |
| UART | on-chip | serial |
| USB | on-chip | usb |
| WDT | on-chip | watchdog |
다른 기능은 아직 enable되지 않았으며 특히 PDM microphone interface가 포함됩니다.
연결과 I/O
pin 세부 정보는 board schematic을 참고합니다. I2C pull-up은 P1.00을 high로 설정해 enable하며 system init에서 자동으로 수행됩니다. 이 pin은 zephyr,user Devicetree node의 pull-up-gpios로 지정됩니다.
프로그래밍과 디버깅
Arduino variant bossac가 필요합니다. Arduino BOSSA source tree의 nrf branch를 build하거나 Arduino IDE와 board support package를 설치한 뒤 verbose flash log에서 binary 위치를 찾습니다. Linux의 일반적인 위치는 $HOME/.arduino15/packages/arduino/tools/bossac/1.9.1-arduino2/bossac입니다.
west flash --bossac="<path to the arduino version of bossac>"
west flash --bossac=$HOME/.arduino15/packages/arduino/tools/bossac/1.9.1-arduino2/bossac
Windows에서는 Arduino IDE의 bossac.exe와 COM port를 지정합니다.
west flash --bossac=%USERPROFILE%\AppData\Local\Arduino15\packages\arduino\tools\bossac\1.9.1-arduino2\bossac.exe --bossac-port="COMx"Flash
USB를 연결하고 blinky를 build합니다. RESET을 두 번 누르면 board가 재연결되고 USB 근처 orange LED가 pulse합니다. 위 bossac option으로 flash하면 red LED가 blink합니다.
west build -b arduino_nano_33_ble samples/basic/blinky
west flash --bossac="<arduino bossac path>"
CMSIS-DAP debug
PCB 뒷면 SWD는 connector가 아니라 test-pad pattern입니다. 최소 SWDIO·SWCLK soldering이 필요합니다. GND·3.3 V·RESET은 DIP connector에도 있으므로 그쪽을 이용하기 쉽습니다.
west debugTRACE32 GDB front-end
Lauterbach TRACE32 Arduino Nano 33 BLE license는 board hardware serial number에 묶이며 Zephyr RTOS에서도 동작합니다. 설치 directory를 설정한 뒤 GDB server를 먼저 실행합니다.
export T32_DIR="~/T32Arduino"
west debugserver
west debug --runner=trace32 -- gdbRemote=:3333| Name | 필수 | 설명 |
|---|---|---|
| gdbRemote | Required | GDB server address 또는 serial device. 예: localhost:3333, /dev/ttyACM0 |
| terminal | Optional | target console serial device. 예: /dev/ttyACM1 |
| userScript | Optional | system script 완료 뒤 실행할 user script. 예: ./user.cmm |
-- 뒤 argument는 TRACE32 script가 처리합니다.
참고 자료
Source
출처
영어 원문에는 문단, 문서 지시문, 표, 코드, 코드 심벌, 경로를 그대로 보존했습니다.