Part 1
요약·해설
MAX32670EVKIT는 복잡한 sensor 처리를 수행하면서 battery 수명을 유지하도록 설계된 MAX32670을 평가하는 board입니다. Zephyr는 MAX32670 MCU에서 실행됩니다.
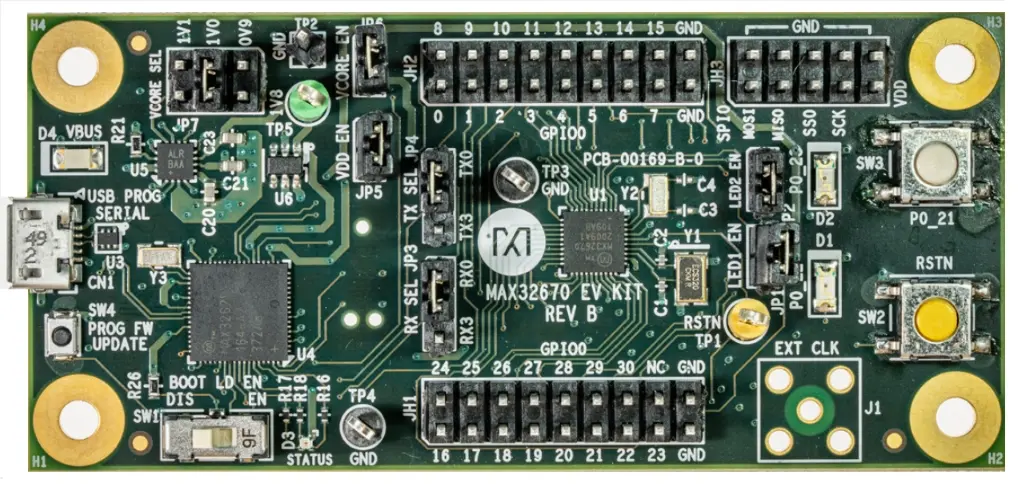
100 MHz Cortex-M4F, flash 384 KB, SRAM 160 KB
80 kHz oscillator, BACKUP retention, LPUART/LPTMR wake
MAX32625PICO DAPLink, west flash
Part 2
접을 수 있는 영어 원문 전체
영어 원문 전체 펼치기
CB74791F6F31B13EDF3C423DA42AB6054E474066FAEFE2D5FED2E783C4788045
.. _max32670_evkit:

MAX32670EVKIT
#############

Overview
********
The MAX32670 evaluation kit (EV kit) provides a platform for evaluation capabilities
of the MAX32670. The MAX32670 is an ultra-low-power, cost-effective, highly reliable
32-bit microcontroller that enables designs with complex sensor processing without
compromising battery life. It combines a flexible and versatile power management unit
with the powerful Arm® Cortex®-M4 core with floating point unit (FPU).
The MAX32670 also offers legacy designs an easy and cost optimal upgradepath
from 8-bit or 16-bit microcontrollers.

The Zephyr port is running on the MAX32670 MCU.

.. image:: ../../../../../../../boards/adi/max32670evkit/doc/img/max32670evkit.webp
   :align: center
   :alt: MAX32670 EVKIT

Hardware
********

- MAX32670 MCU:

  - High-Efficiency Microcontroller for Low-Power, High-Reliability Devices

    - Arm Cortex-M4 Core with FPU up to 100MHz
    - 384KB Flash Memory with Error Correction
    - 160KB SRAM (128KB with ECC Enabled),Optionally Preserved in Lowest Power Modes
    - 16KB Unified Cache with ECC

    - UART Bootloader

        - Dual- or Single-Supply Operation
        - Ultra-Low 0.9V to 1.1V VCORE Supply Voltage
        - Internal LDO Operation from 1.7V to 3.6V SingleSupply

    - Wide Operating Temperature: -40°C to +105°C

  - Flexible Clocking Schemes

    - Internal High-Speed 100MHz Oscillator
    - Internal Low-Power 7.3728MHz and Ultra-Low-Power 80kHz Oscillators
    - 16MHz to 32MHz Oscillator (External CrystalRequired)
    - 32.768kHz Oscillator (External Crystal Required)
    - External Clock Input for the Core
    - External Clock Input for the LPUART and LPTMR

  - Power Management Maximizes Uptime for Battery Applications

    - 44μA/MHz Active at 0.9V up to 12MHz
    - 50μA/MHz Active at 1.1V up to 100MHz
    - 2.6μA Full Memory Retention Power in BACKUPMode at VDD = 1.8V
    - 350nA Ultra-Low-Power RTC at VDD = 1.8V
    - Wake from LPUART or LPTMR

  - Optimal Peripheral Mix Provides Platform Scalability

    - Up to 31 General-Purpose I/O Pins
    - Up to Three SPI Master/Slave (up to 50MHz)
    - Up to Three 4-Wire UART
    - One Low-Power UART (LPUART)
    - Up to Three I2C Master/Slave 3.4Mbps High Speed
    - 8-Channel Standard DMA Controller
    - Up to Four 32-Bit Timers (TMR)
    - Up to Two Low-Power 32-Bit Timers (LPTMR)
    - Two Windowed Watchdog Timers
    - One I2S Slave for Digital Audio Interface

  - Security and Integrity

    - Available Secure Boot
    - AES 128/192/256 Hardware Acceleration Engine
    - 32-Bit CRC Acceleration Engine

- Benefits and Features of MAX32670EVKIT:

  - USB 2.0 Micro B to Serial UART Bridge
  - UART0 and UART3 Interface is Selectable Through On-Board Jumpers
  - On-Board MAX32625PICO-Based Debugger
  - Boot Load Enable Circuitry
  - SPI and I2C Signals Accessed Through 0.1in Headers
  - GPIOs and Miscellaneous Signals Accessed Through 0.1in Headers
  - Board Power Provided by USB Port
  - On-Board SIMO Regulator and LDO for IC and Peripherals
  - Individual Power Measurement on all IC Rails Through Jumpers
  - Two General-Purpose LED and One GeneralPurpose Pushbutton Switch

Supported Features
==================

Below interfaces are supported by Zephyr on MAX32670EVKIT.

+-----------+------------+-------------------------------------+
| Interface | Controller | Driver/Component                    |
+===========+============+=====================================+
| NVIC      | on-chip    | nested vector interrupt controller  |
+-----------+------------+-------------------------------------+
| SYSTICK   | on-chip    | systick                             |
+-----------+------------+-------------------------------------+
| CLOCK     | on-chip    | clock and reset control             |
+-----------+------------+-------------------------------------+
| GPIO      | on-chip    | gpio                                |
+-----------+------------+-------------------------------------+
| UART      | on-chip    | serial                              |
+-----------+------------+-------------------------------------+


Connections and IOs
===================

+-----------+---------------+---------------+--------------------------------------------------------------------------------------------------+
| Name      | Name          | Settings      | Description                                                                                      |
+===========+===============+===============+==================================================================================================+
| JP1       | P0_22         |               |                                                                                                  |
|           |               | +-----------+ |  +-------------------------------------------------------------------------------+               |
|           |               | | Open      | |  | Disconnects red LED from P0_22.                                               |               |
|           |               | +-----------+ |  +-------------------------------------------------------------------------------+               |
|           |               | | Close     | |  | Connects red to P0_22.                                                        |               |
|           |               | +-----------+ |  +-------------------------------------------------------------------------------+               |
|           |               |               |                                                                                                  |
+-----------+---------------+---------------+--------------------------------------------------------------------------------------------------+
| JP2       | P0_23         | +-----------+ |  +-------------------------------------------------------------------------------+               |
|           |               | | Open      | |  | Disconnects green LED from P0_23.                                             |               |
|           |               | +-----------+ |  +-------------------------------------------------------------------------------+               |
|           |               | | Close     | |  | Connects green LED to P0_23.                                                  |               |
|           |               | +-----------+ |  +-------------------------------------------------------------------------------+               |
|           |               |               |                                                                                                  |
+-----------+---------------+---------------+--------------------------------------------------------------------------------------------------+
| JP3       | P0_20         | +-----------+ |  +-------------------------------------------------------------------------------+               |
|           | P0_26         | | 2-1       | |  | Connects the USB to serial port P0_8 (UART0_RX).                              |               |
|           |               | +-----------+ |  +-------------------------------------------------------------------------------+               |
|           |               | | 2-3       | |  | Connects the USB to serial port P0_26 (LPUART0_RX).                           |               |
|           |               | +-----------+ |  +-------------------------------------------------------------------------------+               |
|           |               |               |                                                                                                  |
+-----------+---------------+---------------+--------------------------------------------------------------------------------------------------+
| JP4       | P0_9          | +-----------+ |  +-------------------------------------------------------------------------------+               |
|           | P0_27         | | 2-1       | |  | Connects the USB to serial port P0_9 (UART0_TX).                              |               |
|           |               | +-----------+ |  +-------------------------------------------------------------------------------+               |
|           |               | | 2-3       | |  | Connects the USB to serial port P0_27 (LPUART0_TX).                           |               |
|           |               | +-----------+ |  +-------------------------------------------------------------------------------+               |
|           |               |               |                                                                                                  |
+-----------+---------------+---------------+--------------------------------------------------------------------------------------------------+
| JP5       | VDD           | +-----------+ |  +-------------------------------------------------------------------------------+               |
|           |               | | Open      | |  | Disconnects power to VDD.                                                     |               |
|           |               | +-----------+ |  +-------------------------------------------------------------------------------+               |
|           |               | | Close     | |  | Connects power to VDD.                                                        |               |
|           |               | +-----------+ |  +-------------------------------------------------------------------------------+               |
|           |               |               |                                                                                                  |
+-----------+---------------+---------------+--------------------------------------------------------------------------------------------------+
| JP6       | VCORE         | +-----------+ |  +-------------------------------------------------------------------------------+               |
|           |               | | Open      | |  | Disconnects power to VCORE.                                                   |               |
|           |               | +-----------+ |  +-------------------------------------------------------------------------------+               |
|           |               | | Close     | |  | Connects power to VCORE.                                                      |               |
|           |               | +-----------+ |  +-------------------------------------------------------------------------------+               |
|           |               |               |                                                                                                  |
+-----------+---------------+---------------+--------------------------------------------------------------------------------------------------+
| JP7       | SIMO RSEL2    | +-----------+ |  +-------------------------------------------------------------------------------+               |
|           |               | | 1-2       | |  | Sets output 2 of the SIMO regulator to 0.9V.                                  |               |
|           |               | +-----------+ |  +-------------------------------------------------------------------------------+               |
|           |               | | 3-4       | |  | Sets output 2 of the SIMO regulator to 1.0V.                                  |               |
|           |               | +-----------+ |  +-------------------------------------------------------------------------------+               |
|           |               | | 5-6       | |  | Sets output 2 of the SIMO regulator to 1.1V.                                  |               |
|           |               | +-----------+ |  +-------------------------------------------------------------------------------+               |
|           |               |               |                                                                                                  |
+-----------+---------------+---------------+--------------------------------------------------------------------------------------------------+

Programming and Debugging
*************************

Flashing
========

The MAX32670 EVKIT integrates a MAX32625PICO based debugger for DAPLink functionality.


Once the debug probe is connected to your host computer, then you can simply run the
``west flash`` command to write a firmware image into flash.

Debugging
=========

Please refer to the `Flashing`_ section and run the ``west debug`` command
instead of ``west flash``.

References
**********

- `MAX32670EVKIT web page`_

.. _MAX32670EVKIT web page:
   https://www.analog.com/en/design-center/evaluation-hardware-and-software/evaluation-boards-kits/max32670evkit.html
Part 3
한국어 전문 번역
개요
MAX32670 evaluation kit(EV kit)는 MAX32670의 기능을 평가하는 platform입니다. MAX32670은 battery 수명을 희생하지 않고 복잡한 sensor 처리를 수행하는 초저전력·저비용·고신뢰 32-bit microcontroller입니다. 유연한 power management unit과 FPU가 있는 강력한 Arm Cortex-M4 core를 결합하며, 기존 8-bit 또는 16-bit MCU 설계를 비용 효율적으로 업그레이드할 수 있습니다.
Zephyr port는 MAX32670 MCU에서 실행됩니다.
하드웨어
MAX32670 MCU
- 고효율 MCU: 최대 100 MHz FPU 포함 Cortex-M4, ECC가 있는 flash 384 KB, SRAM 160 KB(ECC 사용 시 128 KB)와 최저 전력 mode의 선택적 보존, ECC가 있는 unified cache 16 KB, UART bootloader, dual/single supply, VCORE 0.9~1.1 V, internal LDO single supply 1.7~3.6 V, -40~+105°C.
- Clock: internal 100 MHz high-speed, 7.3728 MHz low-power, 80 kHz ultra-low-power oscillator, external crystal이 필요한 16~32 MHz 및 32.768 kHz oscillator, core·LPUART·LPTMR external clock input.
- Power: 0.9 V·12 MHz 이하 44 μA/MHz, 1.1 V·100 MHz 이하 50 μA/MHz, VDD 1.8 V BACKUP mode의 full-memory retention 2.6 μA, RTC 350 nA, LPUART 또는 LPTMR wake-up.
- Peripheral: GPIO 최대 31개, 50 MHz SPI master/slave 최대 3개, 4-wire UART 최대 3개와 LPUART 1개, 3.4 Mbit/s I2C 최대 3개, 8-channel standard DMA, 32-bit timer 최대 4개와 low-power timer 최대 2개, windowed watchdog 2개, I2S slave 1개.
- 보안: optional secure boot, AES-128/192/256 accelerator, 32-bit CRC accelerator.
MAX32670EVKIT 기능
- USB 2.0 Micro-B serial UART bridge와 jumper로 선택하는 UART0/UART3 interface
- MAX32625PICO 기반 on-board debugger와 boot-load enable circuit
- 0.1-inch header로 노출된 SPI·I2C·GPIO·기타 signal
- USB power, on-board SIMO regulator와 LDO, 각 IC rail별 power measurement jumper
- general-purpose LED 2개와 pushbutton 1개
지원 기능
Zephyr는 다음 interface를 지원합니다.
| Interface | Controller | Driver/Component |
|---|---|---|
| NVIC | on-chip | nested vector interrupt controller |
| SYSTICK | on-chip | systick |
| CLOCK | on-chip | clock and reset control |
| GPIO | on-chip | gpio |
| UART | on-chip | serial |
연결과 I/O
| Name | Signal | Setting | 설명 |
|---|---|---|---|
| JP1 | P0_22 | Open | red LED를 P0_22에서 분리 |
| JP1 | P0_22 | Close | red LED를 P0_22에 연결 |
| JP2 | P0_23 | Open | green LED를 P0_23에서 분리 |
| JP2 | P0_23 | Close | green LED를 P0_23에 연결 |
| JP3 | P0_20 / P0_26 | 2-1 | USB serial port를 P0_8(UART0_RX)에 연결 |
| JP3 | P0_20 / P0_26 | 2-3 | USB serial port를 P0_26(LPUART0_RX)에 연결 |
| JP4 | P0_9 / P0_27 | 2-1 | USB serial port를 P0_9(UART0_TX)에 연결 |
| JP4 | P0_9 / P0_27 | 2-3 | USB serial port를 P0_27(LPUART0_TX)에 연결 |
| JP5 | VDD | Open | VDD power 분리 |
| JP5 | VDD | Close | VDD power 연결 |
| JP6 | VCORE | Open | VCORE power 분리 |
| JP6 | VCORE | Close | VCORE power 연결 |
| JP7 | SIMO RSEL2 | 1-2 | SIMO regulator output 2를 0.9 V로 설정 |
| JP7 | SIMO RSEL2 | 3-4 | output 2를 1.0 V로 설정 |
| JP7 | SIMO RSEL2 | 5-6 | output 2를 1.1 V로 설정 |
프로그래밍과 디버깅
on-board DAPLink를 사용합니다. MAX32625PICO 기반 debugger가 DAPLink 기능을 제공하며 별도 점퍼 설정 없이 USB로 연결할 수 있습니다.
debug probe를 host computer에 연결한 뒤 다음 명령으로 firmware image를 flash에 기록합니다.
west flash디버깅
flash 절차와 같은 연결을 사용하되 west flash 대신 다음 명령을 실행합니다.
west debug참고 자료
Source
출처
영어 원문에는 문단, 문서 지시문, 표, 코드, 코드 심벌, 경로를 그대로 보존했습니다.