Part 1
요약·해설
QT Py RP2040은 RP2040, RGB NeoPixel, USB와 STEMMA QT connector를 작은 보드에 구성합니다. SWD pin을 외부에 노출하지 않으므로 BOOTSEL을 누른 채 켜고 UF2 file을 mass-storage drive로 복사해야 합니다.
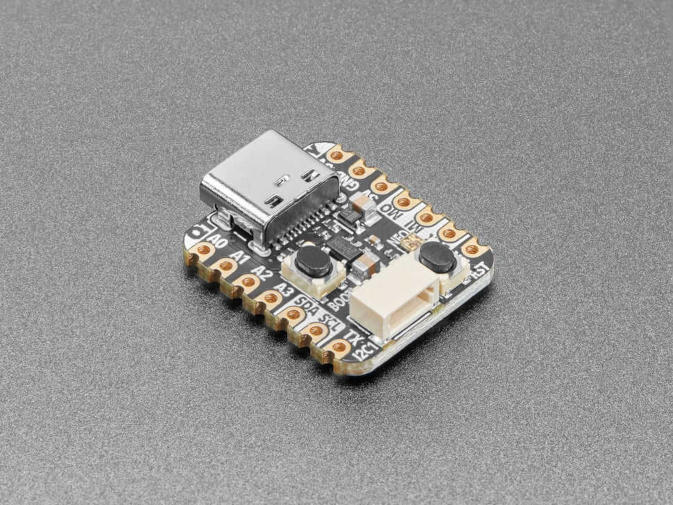
최대 133 MHz dual Cortex-M0+, SRAM 264 KB
XIP 가능한 on-board QSPI flash 8 MB
BOOTSEL + build/zephyr/zephyr.uf2 drag-and-drop
Part 2
접을 수 있는 영어 원문 전체
영어 원문 전체 펼치기
0D66F3230B3661C171D7DDDFF5EFD1BC766271F8BEB6B470609A8A939C9A550D
.. _adafruit_qt_py_rp2040:

Adafruit QT Py RP2040
#####################

Overview
********

The Adafruit QT Py RP2040 is a small, low-cost, versatile board from
Adafruit. It is equipped with an RP2040 SoC, an on-board RGB Neopixel,
a USB connector, and a STEMMA QT connector. The USB bootloader allows
it to be flashed without any adapter, in a drag-and-drop manner.

Hardware
********
- Dual core Arm Cortex-M0+ processor running up to 133MHz
- 264KB on-chip SRAM
- 8MB on-board QSPI flash with XIP capabilities
- 11 GPIO pins
- 4 Analog inputs
- 2 UART peripherals
- 2 SPI controllers
- 2 I2C controllers (one via STEMMA QT connector)
- 16 PWM channels
- USB 1.1 controller (host/device)
- 8 Programmable I/O (PIO) for custom peripherals
- On-board RGB LED
- 1 Watchdog timer peripheral


.. figure:: ../../../../../../../boards/adafruit/qt_py_rp2040/doc/img/qtpy_rp2040.jpg
     :align: center
     :alt: Adafruit QT Py RP2040

     Adafruit QT Py RP2040 (Image courtesy of Adafruit)

Supported Features
==================

The adafruit_qt_py_rp2040 board configuration supports the following
hardware features:

.. list-table::
   :header-rows: 1

   * - Peripheral
     - Kconfig option
     - Devicetree compatible
   * - NVIC
     - N/A
     - :dtcompatible:`arm,v6m-nvic`
   * - UART
     - :kconfig:option:`CONFIG_SERIAL`
     - :dtcompatible:`raspberrypi,pico-uart`
   * - GPIO
     - :kconfig:option:`CONFIG_GPIO`
     - :dtcompatible:`raspberrypi,pico-gpio`
   * - ADC
     - :kconfig:option:`CONFIG_ADC`
     - :dtcompatible:`raspberrypi,pico-adc`
   * - I2C
     - :kconfig:option:`CONFIG_I2C`
     - :dtcompatible:`snps,designware-i2c`
   * - SPI
     - :kconfig:option:`CONFIG_SPI`
     - :dtcompatible:`raspberrypi,pico-spi`
   * - USB Device
     - :kconfig:option:`CONFIG_USB_DEVICE_STACK`
     - :dtcompatible:`raspberrypi,pico-usbd`
   * - HWINFO
     - :kconfig:option:`CONFIG_HWINFO`
     - N/A
   * - Watchdog Timer (WDT)
     - :kconfig:option:`CONFIG_WATCHDOG`
     - :dtcompatible:`raspberrypi,pico-watchdog`
   * - PWM
     - :kconfig:option:`CONFIG_PWM`
     - :dtcompatible:`raspberrypi,pico-pwm`
   * - Flash
     - :kconfig:option:`CONFIG_FLASH`
     - :dtcompatible:`raspberrypi,pico-flash`
   * - UART (PIO)
     - :kconfig:option:`CONFIG_SERIAL`
     - :dtcompatible:`raspberrypi,pico-uart-pio`

Pin Mapping
===========

The peripherals of the RP2040 SoC can be routed to various pins on the board.
The configuration of these routes can be modified through DTS. Please refer to
the datasheet to see the possible routings for each peripheral.

Default Zephyr Peripheral Mapping:
----------------------------------

.. rst-class:: rst-columns

- UART1_TX : P20
- UART1_RX : P5
- I2C0_SDA : P24
- I2C0_SCL : P25
- I2C1_SDA : P22
- I2C1_SCL : P23
- SPI0_RX : P4
- SPI0_SCK : P6
- SPI0_TX : P3

Programming and Debugging
*************************

Flashing
========

Using UF2
---------

Since it doesn't expose the SWD pins, you must flash the Adafruit QT Py RP2040 with
a UF2 file. By default, building an app for this board will generate a
`build/zephyr/zephyr.uf2` file. If the QT Py RP2040 is powered on with the `BOOTSEL`
button pressed, it will appear on the host as a mass storage device. The
UF2 file should be drag-and-dropped to the device, which will flash the QT Py RP2040.

.. target-notes::

.. _Getting Started with Raspberry Pi Pico:
  https://datasheets.raspberrypi.com/pico/getting-started-with-pico.pdf

.. _Primary Guide\: Adafruit QT Py RP2040:
  https://learn.adafruit.com/adafruit-qt-py-2040
Part 3
한국어 전문 번역
개요
Adafruit QT Py RP2040은 Adafruit의 작고 저렴하며 다용도인 board입니다. RP2040 SoC, on-board RGB NeoPixel, USB connector와 STEMMA QT connector를 갖습니다. USB bootloader를 이용하면 adapter 없이 drag-and-drop 방식으로 flash할 수 있습니다.
하드웨어
- 최대 133 MHz로 동작하는 dual-core Arm Cortex-M0+ processor
- on-chip SRAM 264 KB
- XIP를 지원하는 on-board QSPI flash 8 MB
- GPIO pin 11개
- analog input 4개
- UART peripheral 2개
- SPI controller 2개
- I2C controller 2개, 그중 하나는 STEMMA QT connector 사용
- PWM channel 16개
- USB 1.1 host/device controller
- custom peripheral용 PIO 8개
- on-board RGB LED
- watchdog timer peripheral 1개
지원 기능
adafruit_qt_py_rp2040 board configuration은 다음 hardware 기능을 지원합니다.
| Peripheral | Kconfig option | Devicetree compatible |
|---|---|---|
| NVIC | N/A | arm,v6m-nvic |
| UART | CONFIG_SERIAL | raspberrypi,pico-uart |
| GPIO | CONFIG_GPIO | raspberrypi,pico-gpio |
| ADC | CONFIG_ADC | raspberrypi,pico-adc |
| I2C | CONFIG_I2C | snps,designware-i2c |
| SPI | CONFIG_SPI | raspberrypi,pico-spi |
| USB Device | CONFIG_USB_DEVICE_STACK | raspberrypi,pico-usbd |
| HWINFO | CONFIG_HWINFO | N/A |
| Watchdog Timer (WDT) | CONFIG_WATCHDOG | raspberrypi,pico-watchdog |
| PWM | CONFIG_PWM | raspberrypi,pico-pwm |
| Flash | CONFIG_FLASH | raspberrypi,pico-flash |
| UART (PIO) | CONFIG_SERIAL | raspberrypi,pico-uart-pio |
Pin mapping
RP2040 SoC peripheral은 board의 여러 pin으로 route할 수 있습니다. route 설정은 DTS에서 바꿀 수 있으며, peripheral별 가능한 route는 datasheet를 확인합니다.
Zephyr 기본 peripheral mapping
| Signal | Pin |
|---|---|
| UART1_TX | P20 |
| UART1_RX | P5 |
| I2C0_SDA | P24 |
| I2C0_SCL | P25 |
| I2C1_SDA | P22 |
| I2C1_SCL | P23 |
| SPI0_RX | P4 |
| SPI0_SCK | P6 |
| SPI0_TX | P3 |
프로그래밍과 디버깅
UF2 사용
QT Py RP2040은 SWD pin을 노출하지 않으므로 UF2 file로 flash해야 합니다. 이 board용 application을 build하면 기본적으로 build/zephyr/zephyr.uf2가 생성됩니다. BOOTSEL button을 누른 상태에서 전원을 켜면 host에 mass-storage device로 나타납니다. UF2 file을 해당 device로 drag-and-drop하면 QT Py RP2040이 flash됩니다.
참고 자료
Source
출처
영어 원문에는 문단, 문서 지시문, 표, 코드, 코드 심벌, 경로를 그대로 보존했습니다.