Part 1
요약·해설
nRF52 Adafruit Bluefruit Feather는 64 MHz nRF52832, LiPo charger, USB serial converter와 Bluetooth LE radio를 제공합니다. Pro version은 SWD header와 Mynewt bootloader가 준비돼 있고, 일반 LE version은 SWD header를 직접 납땜해야 합니다.
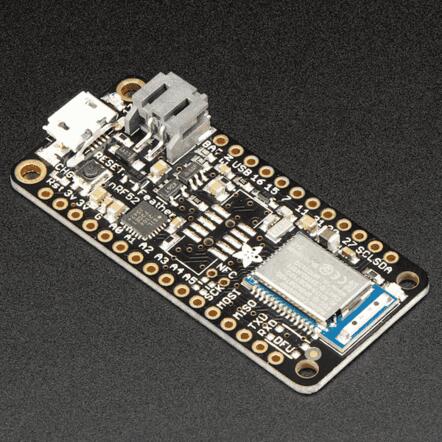
64 MHz nRF52832 Cortex-M4F, flash 512 KiB, SRAM 64 KiB
SWD header가 실장된 nRF52 Pro + Mynewt bootloader
USB serial, <tty_device>, 115200 baud
Part 2
접을 수 있는 영어 원문 전체
영어 원문 전체 펼치기
3483BD0EE3BD790F2628A3DB91B92ED07A94679B924923BA8FCE029E530D28AD
.. _nrf52_adafruit_feather:

nRF52 Adafruit Feather
######################

Overview
********

The nRF52 Adafruit Bluefruit Feather hardware provides
support for the Nordic Semiconductor nRF52832 ARM Cortex-M4F CPU and
the following devices:

* :abbr:`NVIC (Nested Vectored Interrupt Controller)`
* :abbr:`RTC (nRF RTC System Clock)`
* UART
* GPIO
* FLASH
* RADIO (Bluetooth Low Energy)
* Segger RTT (RTT Console)

.. figure:: ../../../../../../../boards/adafruit/nrf52_adafruit_feather/doc/img/nrf52_adafruit_feather.jpg
     :align: center
     :alt: nRF52 Adafruit Feather Board

     nRF52 Adafruit Feather Board (Credit: Adafruit)

More information about the board and its features can be found at the
`Adafruit Feather nRF52 Bluefruit Learning Guide`_. The `Nordic Semiconductor Infocenter`_
contains the processor's information and the datasheet.

Hardware
********

- nRF52832 ARM Cortex-M4F processor at 64 MHz
- 32.768 kHz crystal oscillator
- 512 KiB flash memory and 64 KiB of SRAM
- Battery connector and charger for 3.7 V lithium polymer batteries
- Charging indicator LED
- 2 User LEDs
- Reset button
- SWD connector
- USB serial converter

Supported Features
==================

The nRF52 Adafruit Feather board configuration supports the following
hardware features:

+-----------+------------+----------------------+
| Interface | Controller | Driver/Component     |
+===========+============+======================+
| NVIC      | on-chip    | nested vectored      |
|           |            | interrupt controller |
+-----------+------------+----------------------+
| RTC       | on-chip    | system clock         |
+-----------+------------+----------------------+
| UART      | on-chip    | serial port          |
+-----------+------------+----------------------+
| GPIO      | on-chip    | gpio                 |
+-----------+------------+----------------------+
| FLASH     | on-chip    | flash                |
+-----------+------------+----------------------+
| RADIO     | on-chip    | Bluetooth            |
+-----------+------------+----------------------+
| RTT       | on-chip    | console              |
+-----------+------------+----------------------+

Other hardware features have not been enabled yet for this board.

Connections and IOs
===================

The `Adafruit Feather nRF52 Bluefruit Learning Guide`_ has detailed
information about the board including `pinouts`_ and the `schematic`_.

LED
---

* LED0 (red) = P0.17
* LED1 (blue) = P0.19

Push buttons
------------

* DFU = SW0 = P0.20
* RESET = SW1 = P0.21/reset

Programming and Debugging
*************************

The ``nrf52_adafruit_feather`` board is available in two different versions:

- `Adafruit Feather nRF52 Pro with myNewt Bootloader`_
   This board version is the recommended one to use. It has the SWD header
   already populated and comes with the  Mynewt serial bootloader installed by
   default.

- `Adafruit Feather nRF52 Bluefruit LE`_
   This board is identical to the board above, but the SWD header is not
   populated and ships with an Arduino friendly bootloader. To be able to work
   with this version a 2*5pin 0.5" SWD header (e.g. `Adafruit SWD connector`_)
   needs to be soldered.

Applications for the ``nrf52_adafruit_feather`` board configuration can be
built, flashed, and debugged in the usual way. See :ref:`build_an_application`
and :ref:`application_run` for more details on building and running.

Flashing
========

Flashing Zephyr onto the ``nrf52_adafruit_feather`` board requires an external
J-Link programmer. The programmer is attached to the X1 SWD header.

Follow the instructions in the :ref:`nordic_segger` page to install
and configure all the necessary software. Further information can be
found in :ref:`nordic_segger_flashing`. Then build and flash
applications as usual (see :ref:`build_an_application` and
:ref:`application_run` for more details).

Here is an example for the :ref:`hello_world` application.


#. Build the Zephyr kernel and the :ref:`hello_world` sample application:

   .. zephyr-app-commands::
      :zephyr-app: samples/hello_world
      :board: nrf52_adafruit_feather
      :goals: build
      :compact:

#. Connect the Adafruit nRF52 Feather to your host computer using USB

#. Run your favorite terminal program to listen for output.

   .. code-block:: console

      $ minicom -D <tty_device> -b 115200

   Replace :code:`<tty_device>` with the port where the nRF52 Adafruit Feather
   board can be found. For example, under Linux, :code:`/dev/ttyUSB0`.

#. Flash the image:

   .. zephyr-app-commands::
      :zephyr-app: samples/hello_world
      :board: nrf52_adafruit_feather
      :goals: flash
      :compact:

   You should see "Hello World! nrf52_adafruit_feather" in your terminal.


Debugging
=========

The ``nrf52_adafruit_feather`` board does not have an on-board J-Link debug IC
as some nRF5x development boards, however, instructions from the
:ref:`nordic_segger` page also apply to this board, with the additional step
of connecting an external debugger.


Testing the LEDs and buttons on the nRF52 Adafruit Feather
**********************************************************

There are several samples that allow you to test that the buttons (switches) and LEDs on
the board are working properly with Zephyr:

- :zephyr:code-sample:`blinky`
- :zephyr:code-sample:`button`
- :zephyr:code-sample:`fade-led`
- :zephyr:code-sample:`pwm-blinky`
- :zephyr:code-sample:`multi-thread-blinky`

You can build and flash the examples to make sure Zephyr is running correctly on
your board. The button and LED definitions can be found in
:zephyr_file:`boards/adafruit/nrf52_adafruit_feather/board.h`.


References
**********

.. target-notes::

.. _Adafruit Feather nRF52 Bluefruit Learning Guide: https://learn.adafruit.com/bluefruit-nrf52-feather-learning-guide/introduction
.. _schematic: https://learn.adafruit.com/assets/39913
.. _pinouts: https://cdn-learn.adafruit.com/assets/assets/000/046/210/original/Feather_NRF52_Pinout_v1.2.pdf?1504807075
.. _Nordic Semiconductor Infocenter: https://infocenter.nordicsemi.com
.. _J-Link Software and documentation pack: https://www.segger.com/jlink-software.html
.. _Adafruit Feather nRF52 Bluefruit LE: https://www.adafruit.com/product/3406
.. _Adafruit Feather nRF52 Pro with myNewt Bootloader: https://www.adafruit.com/product/3574
.. _Adafruit SWD connector: https://www.adafruit.com/product/752
Part 3
한국어 전문 번역
개요
nRF52 Adafruit Bluefruit Feather hardware는 Nordic Semiconductor nRF52832 Arm Cortex-M4F CPU와 NVIC, RTC, UART, GPIO, FLASH, Bluetooth Low Energy RADIO, Segger RTT console을 지원합니다.
Adafruit Feather nRF52 Bluefruit Learning Guide에서 board 기능을, Nordic Semiconductor Infocenter에서 processor 정보와 datasheet를 확인할 수 있습니다.
하드웨어
- 64 MHz nRF52832 Arm Cortex-M4F processor
- 32.768 kHz crystal oscillator
- flash memory 512 KiB, SRAM 64 KiB
- 3.7 V lithium polymer battery connector와 charger
- charging indicator LED
- user LED 2개
- reset button
- SWD connector
- USB serial converter
지원 기능
| Interface | Controller | Driver/Component |
|---|---|---|
| NVIC | on-chip | nested vectored interrupt controller |
| RTC | on-chip | system clock |
| UART | on-chip | serial port |
| GPIO | on-chip | gpio |
| FLASH | on-chip | flash |
| RADIO | on-chip | Bluetooth |
| RTT | on-chip | console |
그 밖의 hardware 기능은 아직 이 board에서 활성화되지 않았습니다.
연결과 I/O
Bluefruit Learning Guide에서 pinout과 schematic을 확인할 수 있습니다.
LED
LED0(red) =P0.17LED1(blue) =P0.19
Push button
DFU = SW0 = P0.20RESET = SW1 = P0.21/reset
프로그래밍과 디버깅
nrf52_adafruit_feather board는 두 version이 있습니다.
- Adafruit Feather nRF52 Pro with myNewt Bootloader: 권장 version입니다. SWD header가 이미 실장돼 있고 Mynewt serial bootloader가 기본 설치됩니다.
- Adafruit Feather nRF52 Bluefruit LE: 위 board와 동일하지만 SWD header가 실장되지 않았고 Arduino-friendly bootloader로 출하됩니다. 사용하려면 2×5-pin 0.5-inch SWD header를 납땜해야 합니다.
application은 일반적인 방법으로 build, flash, debug할 수 있습니다.
Flashing
Zephyr flashing에는 X1 SWD header에 연결한 external J-Link programmer가 필요합니다. Zephyr의 Nordic Segger 안내에 따라 필요한 software를 설치·설정합니다.
hello_world를 build합니다.west build -b nrf52_adafruit_feather samples/hello_world- USB로 board를 host에 연결합니다.
terminal에서 output을 기다립니다.
$ minicom -D <tty_device> -b 115200<tty_device>는 board가 연결된 port로 바꿉니다. Linux 예시는/dev/ttyUSB0입니다.image를 flash합니다.
west flash
Hello World! nrf52_adafruit_feather가 terminal에 표시돼야 합니다.
Debugging
이 board에는 일부 nRF5x development board와 달리 on-board J-Link debug IC가 없습니다. Nordic Segger 절차는 동일하지만 external debugger를 추가로 연결해야 합니다.
LED와 button 시험
blinky, button, fade-led, pwm-blinky, multi-thread-blinky sample로 switch와 LED 동작을 확인할 수 있습니다. 정의는 boards/adafruit/nrf52_adafruit_feather/board.h에 있습니다.
참고 자료
Source
출처
영어 원문에는 문단, 문서 지시문, 표, 코드, 코드 심벌, 경로를 그대로 보존했습니다.