Part 1
요약·해설
Carbon은 application을 실행하는 STM32F401RET와 Bluetooth controller 역할의 nRF51822를 한 board에 배치합니다. 두 chip은 SPI로 연결되지만 별도로 program해야 하며, 보통 STM32에는 사용자 application을, nRF51에는 Zephyr hci_spi sample을 넣습니다.
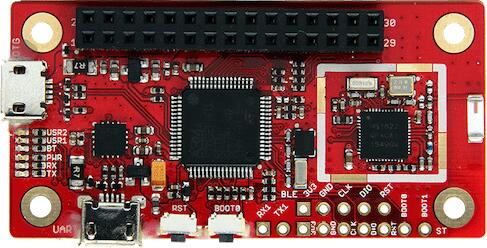
84 MHz STM32F401RET Cortex-M4F, flash 512 KB, SRAM 96 KB
nRF51822에 별도 hci_spi firmware, STM32와 SPI HCI 연결
USB ROM DFU 또는 별도 SWD probe
Part 2
접을 수 있는 영어 원문 전체
영어 원문 전체 펼치기
42F425D4FBB636F96C655956F10D7B1378A1562E10004C0AD5DE47271704F25F
.. _96b_carbon_board:

96Boards Carbon
###############

Overview
********

The 96Boards is based on the STMicroelectronics STM32F401RET Cortex-M4 CPU and
also contains a nRF51822 chip connected over SPI for BLE connectivity.

The 96Boards Carbon board is built with two chips: an STMicroelectronics
STM32F401RET Cortex-M4 CPU and an nRF51822 chip connected to
the Cortex-M4 CPU over SPI for Bluetooth LE connectivity.  Even though
both chips exist on the same physical board, they must be programmed
separately:

- The ``96b_carbon/stm32f401xe`` configuration is used when developing programs for
  the main chip on the board, the STM32F401RET. Users will likely want to
  write applications targeting this chip, using the ``96b_carbon``
  configuration, since it is connected to all of the breakout
  I/O headers.

- The ``96b_carbon/nrf51822`` configuration should be used for programming
  the secondary nRF51822 chip. Most users will likely not develop
  applications for this chip, since Zephyr already provides a
  sample application that can be flashed onto the nRF51822
  to provide Bluetooth functionality to applications on the main
  STM32F401RET chip.

For instructions on how to set up the nRF51822 to develop Bluetooth
applications, see :ref:`96b_carbon_nrf51_bluetooth`.

After you have flashed your nRF51, you can perform basic validation
of this Bluetooth setup using the instructions
:ref:`below <96b_carbon_verify_bluetooth>`.

.. figure:: ../../../../../../../boards/96boards/carbon/doc/img/96b_carbon.jpg
     :align: center
     :alt: 96Boards Carbon

     96Boards Carbon

Hardware
********

96Boards Carbon provides the following hardware components:

- STM32F401RET6 in LQFP64 package
- ARM |reg| 32-bit Cortex |reg|-M4 CPU with FPU
- 84 MHz max CPU frequency
- VDD from 1.7 V to 3.6 V
- 512 KB Flash
- 96 KB SRAM
- GPIO with external interrupt capability
- 12-bit ADC with 16 channels
- RTC
- Advanced-control Timer
- General Purpose Timers (7)
- Watchdog Timers (2)
- USART/UART (4)
- I2C (3)
- SPI (3)
- SDIO
- USB 2.0 OTG FS
- DMA Controller
- Bluetooth LE over SPI, provided by nRF51822

More information about STM32F401RE can be found here:
       - `STM32F401RE on www.st.com`_
       - `STM32F401 reference manual`_

Supported Features
==================

The Zephyr ``96b_carbon/stm32f401xe`` board configuration supports the following
hardware features:

+------------+------------+-------------------------------------+
| Interface  | Controller | Driver/Component                    |
+============+============+=====================================+
| NVIC       | on-chip    | nested vector interrupt controller  |
+------------+------------+-------------------------------------+
| SYSTICK    | on-chip    | system clock                        |
+------------+------------+-------------------------------------+
| UART       | on-chip    | serial port                         |
+------------+------------+-------------------------------------+
| GPIO       | on-chip    | gpio                                |
+------------+------------+-------------------------------------+
| PINMUX     | on-chip    | pinmux                              |
+------------+------------+-------------------------------------+
| FLASH      | on-chip    | flash                               |
+------------+------------+-------------------------------------+
| SPI        | on-chip    | spi                                 |
+------------+------------+-------------------------------------+
| I2C        | on-chip    | i2c                                 |
+------------+------------+-------------------------------------+
| USB OTG FS | on-chip    | USB device                          |
+------------+------------+-------------------------------------+

More details about the board can be found at `96Boards website`_.

The default configuration can be found in
:zephyr_file:`boards/96boards/carbon/96b_carbon_stm32f401xe_defconfig`

Connections and IOs
===================

LED
---

- LED1 / User1 LED = PD2
- LED2 / User2 LED = PA15
- LED3 / BT LED = PB5
- LED4 / Power LED = VCC

Push buttons
------------

- BUTTON = BOOT0 (SW1)
- BUTTON = RST

External Connectors
-------------------

Low Speed Header

+--------+-------------+----------------------+
| PIN #  | Signal Name | STM32F401 Functions  |
+========+=============+======================+
| 1      | UART2_CTS   | PA0                  |
+--------+-------------+----------------------+
| 3      | UART2_TX    | PA2                  |
+--------+-------------+----------------------+
| 5      | UART2_RX    | PA3                  |
+--------+-------------+----------------------+
| 7      | UART2_RTS   | PA1                  |
+--------+-------------+----------------------+
| 9      | GND         | GND                  |
+--------+-------------+----------------------+
| 11     | USB5V       | USB5V                |
+--------+-------------+----------------------+
| 13     | AIN12       | PC2                  |
+--------+-------------+----------------------+
| 15     | AIN14       | PC4                  |
+--------+-------------+----------------------+
| 17     | UART6_TX    | PC6                  |
+--------+-------------+----------------------+
| 19     | GPIO        | PC8                  |
+--------+-------------+----------------------+
| 21     | I2C1_SCL    | PB6                  |
+--------+-------------+----------------------+
| 23     | I2C1_SCA    | PB7                  |
+--------+-------------+----------------------+
| 25     | I2C2_SCA    | PB3                  |
+--------+-------------+----------------------+
| 27     | I2C2_SCL    | PB10                 |
+--------+-------------+----------------------+
| 29     | RST_BTN     | RST_BTN              |
+--------+-------------+----------------------+

+--------+-------------+----------------------+
| PIN #  | Signal Name | STM32F401 Functions  |
+========+=============+======================+
| 2      | SPI2_SS     | PB12                 |
+--------+-------------+----------------------+
| 4      | SPI2_MOSI   | PB15                 |
+--------+-------------+----------------------+
| 6      | SPI2_MISO   | PB14                 |
+--------+-------------+----------------------+
| 8      | SPI2_SCK    | PB13                 |
+--------+-------------+----------------------+
| 10     | GND         | GND                  |
+--------+-------------+----------------------+
| 12     | VCC2        | VCC2                 |
+--------+-------------+----------------------+
| 14     | AIN13       | PC3                  |
+--------+-------------+----------------------+
| 16     | AIN15       | PC5                  |
+--------+-------------+----------------------+
| 18     | UART6_RX    | PC7                  |
+--------+-------------+----------------------+
| 20     | GPIO        | PC9                  |
+--------+-------------+----------------------+
| 22     | I2C1_SCL    | PB8                  |
+--------+-------------+----------------------+
| 24     | I2C1_SDA    | PB9                  |
+--------+-------------+----------------------+
| 26     | AIN10       | PC0                  |
+--------+-------------+----------------------+
| 28     | AIN11       | PC1                  |
+--------+-------------+----------------------+
| 30     | NC          | NC                   |
+--------+-------------+----------------------+

More detailed information about the connectors can be found in
`96Boards IE Specification`_.

External Clock Sources
----------------------

STM32F4 has two external oscillators. The frequency of the slow clock is
32.768 kHz. The frequency of the main clock is 16 MHz.

Serial Port
-----------

96Boards Carbon board has up to 4 U(S)ARTs. The Zephyr console output is
assigned to USART1. Default settings are 115200 8N1.

I2C
---

96Boards Carbon board has up to 2 I2Cs. The default I2C mapping for Zephyr is:

- I2C1_SCL : PB6
- I2C1_SDA : PB7
- I2C2_SCL : PB10
- I2C2_SDA : PB3

SPI
---

96Boards Carbon board has up to 2 SPIs. SPI1 is used for Bluetooth communication
over HCI. The default SPI mapping for Zephyr is:

- SPI1_NSS  : PA4
- SPI1_SCK  : PA5
- SPI1_MISO : PA6
- SPI1_MOSI : PA7
- SPI2_NSS  : PB12
- SPI2_SCK  : PB13
- SPI2_MISO : PB14
- SPI2_MOSI : PB15

USB
===

96Boards Carbon board has a USB OTG dual-role device (DRD) controller that
supports both device and host functions through its mini "OTG" USB connector.
Only USB device functions are supported in Zephyr at the moment.

- USB_DM : PA11
- USB_DP : PA12

Programming and Debugging
*************************

There are 2 main entry points for flashing STM32F4X SoCs, one using the ROM
bootloader, and another by using the SWD debug port (which requires additional
hardware). Flashing using the ROM bootloader requires a special activation
pattern, which can be triggered by using the BOOT0 pin. The ROM bootloader
supports flashing via USB (DFU), UART, I2C and SPI. You can read more about
how to enable and use the ROM bootloader by checking the application
note `AN2606`_, page 109.

Flashing
========

Installing dfu-util
-------------------

It is recommended to use at least v0.8 of `dfu-util`_. The package available in
debian/ubuntu can be quite old, so you might have to build dfu-util from source.

Flashing an Application to 96Boards Carbon
------------------------------------------

Connect the micro-USB cable to the USB OTG Carbon port and to your computer.
The board should power ON. Force the board into DFU mode by keeping the BOOT0
switch pressed while pressing and releasing the RST switch.

Confirm that the board is in DFU mode:

.. code-block:: console

   $ sudo dfu-util -l
   dfu-util 0.8
   Copyright 2005-2009 Weston Schmidt, Harald Welte and OpenMoko Inc.
   Copyright 2010-2014 Tormod Volden and Stefan Schmidt
   This program is Free Software and has ABSOLUTELY NO WARRANTY
   Please report bugs to [email protected]
   Found DFU: [0483:df11] ver=2200, devnum=15, cfg=1, intf=0, alt=3, name="@Device Feature/0xFFFF0000/01*004 e", serial="3574364C3034"
   Found DFU: [0483:df11] ver=2200, devnum=15, cfg=1, intf=0, alt=2, name="@OTP Memory /0x1FFF7800/01*512 e,01*016 e", serial="3574364C3034"
   Found DFU: [0483:df11] ver=2200, devnum=15, cfg=1, intf=0, alt=1, name="@Option Bytes /0x1FFFC000/01*016 e", serial="3574364C3034"
   Found DFU: [0483:df11] ver=2200, devnum=15, cfg=1, intf=0, alt=0, name="@Internal Flash /0x08000000/04*016Kg,01*064Kg,03*128Kg", serial="3574364C3034"
   Found Runtime: [05ac:8290] ver=0104, devnum=2, cfg=1, intf=5, alt=0, name="UNKNOWN", serial="UNKNOWN"

You should see following confirmation on your Linux host:

.. code-block:: console

   $ dmesg
   usb 1-2.1: new full-speed USB device number 14 using xhci_hcd
   usb 1-2.1: New USB device found, idVendor=0483, idProduct=df11
   usb 1-2.1: New USB device strings: Mfr=1, Product=2, SerialNumber=3
   usb 1-2.1: Product: STM32 BOOTLOADER
   usb 1-2.1: Manufacturer: STMicroelectronics
   usb 1-2.1: SerialNumber: 3574364C3034

Then build and flash an application. Here is an example for the
:ref:`hello_world` application.

.. zephyr-app-commands::
   :zephyr-app: samples/hello_world
   :board: 96b_carbon/stm32f401xe
   :goals: build flash

Connect the micro-USB cable to the USB UART (FTDI) port and to your computer.
Run your favorite terminal program to listen for output.

.. code-block:: console

   $ minicom -D <tty_device> -b 115200

Replace :code:`<tty_device>` with the port where the board 96Boards Carbon
can be found. For example, under Linux, :code:`/dev/ttyUSB0`.
The ``-b`` option sets baud rate ignoring the value from config.

Press the Reset button and you should see the following message in your
terminal:

.. code-block:: console

   Hello World! arm

.. _96b_carbon_verify_bluetooth:

Verifying Bluetooth Functionality
---------------------------------

This section contains instructions for verifying basic Bluetooth
functionality on the board. For help on Zephyr applications
in general, see :ref:`build_an_application`.

1. Flash the nRF51 with the hci_spi sample application as described in
   :ref:`96b_carbon_nrf51_bluetooth`.

#. Install the dfu-util flashing app, as described above.

#. Build and flash the ``samples/bluetooth/peripheral_hr`` application for
   96b_carbon. See the instructions above for how to put your board
   into DFU mode if you haven't done this before:

   .. zephyr-app-commands::
      :zephyr-app: samples/bluetooth/peripheral_hr
      :board: 96b_carbon/stm32f401xe
      :goals: build flash

#. Refer to the instructions in :ref:`peripheral_hr` for how
   to verify functionality.

Congratulations! Your 96Boards Carbon now has Bluetooth
connectivity. Refer to :ref:`bluetooth` for additional information on
further Bluetooth application development.

Debugging
=========

The ``96b_carbon/stm32f401xe`` board can be debugged by installing a 100 mil (0.1 inch) header
into the header at the bottom right hand side of the board, and
attaching an SWD debugger to the 3V3 (3.3V), GND, CLK, DIO, and RST
pins on that header. Then apply power to the 96Boards Carbon via one
of its USB connectors. You can now attach your debugger to the
STM32F401RET using an SWD scan.

.. _dfu-util:
   http://dfu-util.sourceforge.net/build.html

.. _AN2606:
   https://www.st.com/content/ccc/resource/technical/document/application_note/b9/9b/16/3a/12/1e/40/0c/CD00167594.pdf/files/CD00167594.pdf/jcr:content/translations/en.CD00167594.pdf

.. _96Boards website:
   http://www.96boards.org/documentation

.. _STM32F401RE on www.st.com:
   https://www.st.com/en/microcontrollers/stm32f401re.html

.. _STM32F401 reference manual:
   https://www.st.com/resource/en/reference_manual/dm00096844.pdf

.. _96Boards IE Specification:
    https://linaro.co/ie-specification
Part 3
한국어 전문 번역
개요
96Boards Carbon은 STMicroelectronics STM32F401RET Cortex-M4 CPU 기반이며, BLE 연결을 위해 SPI로 연결된 nRF51822 chip도 포함합니다.
두 chip이 같은 physical board에 있지만 각각 program해야 합니다.
96b_carbon/stm32f401xe설정은 main chip인 STM32F401RET의 program을 개발할 때 사용합니다. 모든 breakout I/O header가 이 chip에 연결되므로 대부분의 사용자는 이 설정을 대상으로 application을 작성합니다. 원문은 같은 맥락에서 짧은 board 이름96b_carbon도 언급합니다.96b_carbon/nrf51822설정은 secondary nRF51822 chip을 program할 때 사용합니다. Zephyr가 STM32 application에 Bluetooth 기능을 제공하는 nRF51822용 sample을 이미 제공하므로, 대부분의 사용자가 이 chip의 application을 직접 개발할 필요는 없습니다.
Bluetooth application을 위해 nRF51822를 설정하는 방법은 Carbon nRF51 Bluetooth 문서를 참고합니다. nRF51을 flash한 뒤에는 아래의 “Bluetooth 기능 검증” 절차로 기본 동작을 확인할 수 있습니다.
하드웨어
- LQFP64 package의 STM32F401RET6
- FPU를 갖춘 Arm 32-bit Cortex-M4 CPU
- 최대 CPU 주파수 84 MHz
- VDD 1.7~3.6 V
- flash 512 KB, SRAM 96 KB
- 외부 interrupt 가능한 GPIO
- 16-channel 12-bit ADC
- RTC
- advanced-control timer 1개, general-purpose timer 7개, watchdog timer 2개
- USART/UART 4개, I2C 3개, SPI 3개
- SDIO, USB 2.0 OTG FS, DMA controller
- nRF51822가 제공하는 SPI 연결 Bluetooth LE
STM32F401RE의 자세한 정보는 ST product page와 STM32F401 reference manual을 참고합니다.
지원 기능
Zephyr의 96b_carbon/stm32f401xe board 설정은 다음 기능을 지원합니다.
| Interface | Controller | Driver/Component |
|---|---|---|
| NVIC | on-chip | nested vector interrupt controller |
| SYSTICK | on-chip | system clock |
| UART | on-chip | serial port |
| GPIO | on-chip | gpio |
| PINMUX | on-chip | pinmux |
| FLASH | on-chip | flash |
| SPI | on-chip | spi |
| I2C | on-chip | i2c |
| USB OTG FS | on-chip | USB device |
기본 설정은 boards/96boards/carbon/96b_carbon_stm32f401xe_defconfig에서 확인할 수 있습니다.
연결과 I/O
LED
LED1 / User1 LED = PD2LED2 / User2 LED = PA15LED3 / BT LED = PB5LED4 / Power LED = VCC
Push button
BUTTON = BOOT0 (SW1)BUTTON = RST
외부 connector: Low Speed Header 홀수 pin
| PIN # | Signal Name | STM32F401 Functions |
|---|---|---|
| 1 | UART2_CTS | PA0 |
| 3 | UART2_TX | PA2 |
| 5 | UART2_RX | PA3 |
| 7 | UART2_RTS | PA1 |
| 9 | GND | GND |
| 11 | USB5V | USB5V |
| 13 | AIN12 | PC2 |
| 15 | AIN14 | PC4 |
| 17 | UART6_TX | PC6 |
| 19 | GPIO | PC8 |
| 21 | I2C1_SCL | PB6 |
| 23 | I2C1_SCA | PB7 |
| 25 | I2C2_SCA | PB3 |
| 27 | I2C2_SCL | PB10 |
| 29 | RST_BTN | RST_BTN |
외부 connector: Low Speed Header 짝수 pin
| PIN # | Signal Name | STM32F401 Functions |
|---|---|---|
| 2 | SPI2_SS | PB12 |
| 4 | SPI2_MOSI | PB15 |
| 6 | SPI2_MISO | PB14 |
| 8 | SPI2_SCK | PB13 |
| 10 | GND | GND |
| 12 | VCC2 | VCC2 |
| 14 | AIN13 | PC3 |
| 16 | AIN15 | PC5 |
| 18 | UART6_RX | PC7 |
| 20 | GPIO | PC9 |
| 22 | I2C1_SCL | PB8 |
| 24 | I2C1_SDA | PB9 |
| 26 | AIN10 | PC0 |
| 28 | AIN11 | PC1 |
| 30 | NC | NC |
원문 홀수 pin 표의 I2C1_SCA, I2C2_SCA 표기는 그대로 보존했습니다. 이어지는 기본 mapping 설명에서는 이 신호를 SDA로 표기합니다. connector의 자세한 정보는 96Boards IE Specification을 참고합니다.
외부 clock source
STM32F4에는 외부 oscillator가 두 개 있습니다. slow clock은 32.768 kHz, main clock은 16 MHz입니다.
Serial port
Carbon에는 최대 4개의 U(S)ART가 있습니다. Zephyr console output은 USART1에 할당되며 기본 설정은 115200 8N1입니다.
I2C
최대 2개의 I2C를 사용할 수 있습니다. 기본 mapping은 다음과 같습니다.
I2C1_SCL: PB6I2C1_SDA: PB7I2C2_SCL: PB10I2C2_SDA: PB3
SPI
최대 2개의 SPI를 사용할 수 있으며 SPI1은 HCI를 통한 Bluetooth 통신에 사용됩니다. 기본 mapping은 다음과 같습니다.
SPI1_NSS: PA4SPI1_SCK: PA5SPI1_MISO: PA6SPI1_MOSI: PA7SPI2_NSS: PB12SPI2_SCK: PB13SPI2_MISO: PB14SPI2_MOSI: PB15
USB
Carbon에는 mini “OTG” USB connector를 통해 device와 host 기능을 모두 제공하는 USB OTG dual-role device(DRD) controller가 있습니다. 현재 Zephyr에서는 USB device 기능만 지원합니다. 신호는 USB_DM: PA11, USB_DP: PA12입니다.
프로그래밍과 디버깅
STM32F4X SoC를 flash하는 주요 진입점은 ROM bootloader와 SWD debug port 두 가지입니다. SWD에는 추가 하드웨어가 필요합니다. ROM bootloader는 BOOT0 pin으로 특별한 활성화 pattern을 입력하며 USB DFU, UART, I2C, SPI flashing을 지원합니다. 자세한 활성화 방법은 ST application note AN2606 109쪽을 참고합니다.
dfu-util 설치
dfu-util v0.8 이상을 권장합니다. Debian/Ubuntu package가 오래된 버전일 수 있으므로 source build가 필요할 수도 있습니다.
Carbon에 application flash
micro-USB cable로 Carbon의 USB OTG port와 computer를 연결합니다. 전원이 켜지면 BOOT0 switch를 누른 상태에서 RST switch를 눌렀다 놓아 DFU mode로 진입합니다.
다음 명령으로 DFU mode를 확인합니다.
$ sudo dfu-util -l
dfu-util 0.8
Copyright 2005-2009 Weston Schmidt, Harald Welte and OpenMoko Inc.
Copyright 2010-2014 Tormod Volden and Stefan Schmidt
This program is Free Software and has ABSOLUTELY NO WARRANTY
Please report bugs to [email protected]
Found DFU: [0483:df11] ver=2200, devnum=15, cfg=1, intf=0, alt=3, name="@Device Feature/0xFFFF0000/01*004 e", serial="3574364C3034"
Found DFU: [0483:df11] ver=2200, devnum=15, cfg=1, intf=0, alt=2, name="@OTP Memory /0x1FFF7800/01*512 e,01*016 e", serial="3574364C3034"
Found DFU: [0483:df11] ver=2200, devnum=15, cfg=1, intf=0, alt=1, name="@Option Bytes /0x1FFFC000/01*016 e", serial="3574364C3034"
Found DFU: [0483:df11] ver=2200, devnum=15, cfg=1, intf=0, alt=0, name="@Internal Flash /0x08000000/04*016Kg,01*064Kg,03*128Kg", serial="3574364C3034"
Found Runtime: [05ac:8290] ver=0104, devnum=2, cfg=1, intf=5, alt=0, name="UNKNOWN", serial="UNKNOWN"
Linux host에서는 다음과 같은 확인 메시지가 보여야 합니다.
$ dmesg
usb 1-2.1: new full-speed USB device number 14 using xhci_hcd
usb 1-2.1: New USB device found, idVendor=0483, idProduct=df11
usb 1-2.1: New USB device strings: Mfr=1, Product=2, SerialNumber=3
usb 1-2.1: Product: STM32 BOOTLOADER
usb 1-2.1: Manufacturer: STMicroelectronics
usb 1-2.1: SerialNumber: 3574364C3034hello_world를 build하고 flash합니다.
# Zephyr 저장소 루트에서
west build -b 96b_carbon/stm32f401xe samples/hello_world
west flash
micro-USB cable로 USB UART(FTDI) port와 computer를 연결하고 terminal program을 실행합니다.
$ minicom -D <tty_device> -b 115200<tty_device>를 Carbon이 연결된 port로 바꿉니다. Linux에서는 예를 들어 /dev/ttyUSB0입니다. -b option은 설정값을 무시하고 baud rate를 지정합니다. Reset button을 누르면 다음 메시지가 보여야 합니다.
Hello World! armBluetooth 기능 검증
다음 절차로 board의 기본 Bluetooth 기능을 확인합니다.
- Carbon nRF51 Bluetooth 문서에 따라 nRF51에
hci_spisample을 flash합니다. - 위 설명에 따라
dfu-util을 설치합니다. samples/bluetooth/peripheral_hrapplication을 Carbon용으로 build하고 flash합니다. 처음이라면 위의 DFU mode 진입 절차를 따릅니다.
# Zephyr 저장소 루트에서
west build -b 96b_carbon/stm32f401xe samples/bluetooth/peripheral_hr
west flash
Peripheral HR sample 문서에 따라 기능을 검증합니다. 이 과정이 끝나면 Carbon에서 Bluetooth 연결을 사용할 수 있습니다. 추가 개발 정보는 Zephyr Bluetooth 문서를 참고합니다.
Debugging
96b_carbon/stm32f401xe board는 오른쪽 아래 header에 100 mil(0.1 inch) header를 설치하고, 그 header의 3V3, GND, CLK, DIO, RST pin에 SWD debugger를 연결해 debug할 수 있습니다. USB connector 중 하나로 Carbon에 전원을 공급한 뒤 SWD scan으로 STM32F401RET에 debugger를 attach합니다.
참고 자료
Source
출처
영어 원문에는 문단, 문서 지시문, 표, 코드, 코드 심벌, 경로를 그대로 보존했습니다.