Part 1
요약·해설
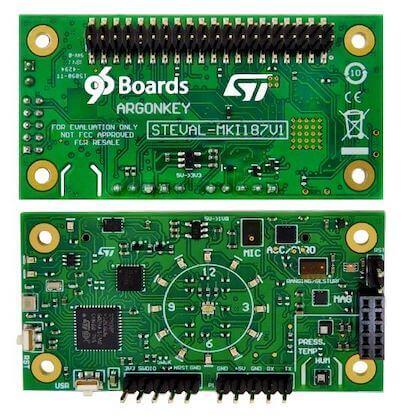
Argonkey는 96Boards 제품군의 sensor hub로 설계됐지만 독립형 STM32F412 보드로도 사용할 수 있습니다. 센서가 여덟 종류이고 LED가 많으며, AP와 연결하는 SPI slave와 센서용 SPI master를 분리한 구성이 특징입니다.
100 MHz STM32F412CG Cortex-M4F, flash 1,024 KB, SRAM 256 KB
습도, 압력, 조도, 거리, IMU, 지자기, Hall, microphone 내장
USART1, 115200 8N1
Part 2
접을 수 있는 영어 원문 전체
영어 원문 전체 펼치기
D4ABA3563685D0E4B13D7882984F2D87A2285BF0134463BE763E7A427D090110
.. _96b_argonkey:

96Boards Argonkey
#################

Overview
********

96Boards Argonkey board is based on the ST Microelectronics STM32F412CG
Cortex M4 CPU.

This board acts as a sensor hub platform for all 96Boards compliant
family products. It can also be used as a standalone board.

.. figure:: ../../../../../../../boards/96boards/argonkey/doc/img/96b_argonkey.jpg
     :align: center
     :alt: 96Boards Argonkey

     96Boards Argonkey

Hardware
********

96Boards Argonkey provides the following hardware components:

- STM32F412CG in UFQFPN48 package
- ARM |reg| 32-bit Cortex |reg|-M4 CPU with FPU
- 100 MHz max CPU frequency
- 1.8V work voltage
- 1024 KB Flash
- 256 KB SRAM
- On board sensors:

  - Humidity: STMicro HTS221
  - Temperature/Pressure: STMicro LPS22HB
  - ALS: Intersil ISL29034
  - Proximity: STMicro VL53L0X
  - Accelerometer/Gyroscope: STMicro LSM6DSL
  - Geomagnetic: STMicro LIS2MDL
  - AMR Hall sensor: MRMS501A
  - Microphone: STMicro MP34DT05

- 2 User LEDs
- 16 General purpose LEDs
- GPIO with external interrupt capability
- UART
- I2C (3)
- SPI (1)
- I2S (1)

Supported Features
==================

The Zephyr 96b_argonkey board configuration supports the following hardware
features:

+-----------+------------+-------------------------------------+
| Interface | Controller | Driver/Component                    |
+===========+============+=====================================+
| NVIC      | on-chip    | nested vector interrupt controller  |
+-----------+------------+-------------------------------------+
| SYSTICK   | on-chip    | system clock                        |
+-----------+------------+-------------------------------------+
| UART      | on-chip    | serial port                         |
+-----------+------------+-------------------------------------+
| GPIO      | on-chip    | gpio                                |
+-----------+------------+-------------------------------------+
| PINMUX    | on-chip    | pinmux                              |
+-----------+------------+-------------------------------------+
| FLASH     | on-chip    | flash                               |
+-----------+------------+-------------------------------------+
| SPI       | on-chip    | spi                                 |
+-----------+------------+-------------------------------------+
| I2C       | on-chip    | i2c                                 |
+-----------+------------+-------------------------------------+

More information about the board can be found at the
`ARGONKEY website`_.

The default board configuration can be found in
:zephyr_file:`boards/96boards/argonkey/96b_argonkey_defconfig`

Connections and IOs
===================

LED
---

- LED1 / User1 LED = PB2
- LED2 / User2 LED = PC13

Push buttons
------------

- BUTTON = RST (BT1)
- BUTTON = USR (BT2)

System Clock
============

96Boards Argonkey can be driven by an internal oscillator as well as the main
PLL clock. In default board configuration, the 16MHz external oscillator is
used to drive the main PLL clock to generate a System Clock (SYSCLK) at 84MHz.
On the bus side, AHB clock runs at 84MHz, while APB1/APB2 clock runs at 42MHz.

Serial Port
===========

On 96Boards Argonkey, Zephyr console output is assigned to USART1.
Default settings are 115200 8N1.

I2C
---

96Boards Argonkey board has up to 3 I2Cs. The default I2C mapping is:

- I2C1_SCL  : PB6
- I2C1_SDA  : PB7
- I2C2_SCL  : PB10
- I2C2_SDA  : PB9
- I2C3_SCL  : PA8
- I2C3_SCL  : PB4

I2C3 goes to the P2 connector and can be used to attach external sensors.
It goes to 100Kbit maximum.

SPI
---
96Boards Argonkey board has 2 SPIs. SPI1 is used in slave mode as the communication
bus with the AP. SPI2 is used in master mode to control the LSM6DSL sensor.
The default SPI mapping is:

- SPI1_NSS  : PA4
- SPI1_SCK  : PA5
- SPI1_MISO : PA6
- SPI1_MOSI : PA7
- SPI2_NSS  : PB12
- SPI2_SCK  : PB13
- SPI2_MISO : PB14
- SPI2_MOSI : PB15

Programming and Debugging
*************************

Building
========

Here is an example for building the :ref:`hello_world` application.

.. zephyr-app-commands::
   :zephyr-app: samples/hello_world
   :board: 96b_argonkey
   :goals: build

Flashing
========

96Boards Argonkey can be flashed by two methods, one using the ROM
bootloader and another using the SWD debug port (which requires additional
hardware).

Flashing using the ROM bootloader requires a special activation pattern,
which can be triggered by using the BOOT0 pin. The ROM bootloader supports
flashing via USB (DFU), UART, I2C and SPI, but this document describes the
UART case only. You can read more about how to enable and use the ROM
bootloader by checking the application note `AN2606`_ .

Using ROM bootloader:
---------------------

Hereafter the documents describes basic steps to perform ArgonKey firmware
flashing on a Linux PC using UART as communication channel.

1. Connect ArgonKey UART to your Linux PC using, for example, a USB-TTL serial
   cable. The flashing procedure has been tested using a `TTL-232RG`_ cable with
   FTDI chip. The UART pins on ArgonKey can be found on the P3 low speed
   expansion connector on the back of the board.

   - GND (black)  to ArgonKey GND (P3.1)
   - TXD (orange) to ArgonKey UART0_TXD (P3.5)
   - RXD (yellow) to ArgonKey UART0_RXD (P3.7)

   When the USB cable is inserted to the Linux PC the following device will be
   created: /dev/ttyUSBx (x is usually '0').

2. Force STM32F412CG to enter in Bootloader mode

   - Connect BOOT0 to 1V8 (link P2.1 to P3.30)
   - Press and release the RST button

3. Use stm32flash utility to flash the ArgonKey:

.. code-block:: console

    $ stm32flash  -w zephyr.bin -v -g 0x08000000 /dev/ttyUSB0

See References section for more info on `stm32flash`_.

Using SWD debugger:
-------------------

Select a commercial JTAG/SWD h/w tool and connect it to ArgonKey P4 connector.

The ArgonKey has been tested using the `ST-LINK/V2`_ tool. Once that the tool
is connected to the PC through USB, it presents itself as a USB composite
device with mass storage capability. The device can be then mounted in linux
and the f/w can be actually copied there and will be automatically flashed by
the ST-LINK onto the ArgonKey.

Example:

.. code-block:: console

   $ mount /dev/sdb /mnt
   $ cp zephyr.bin /mnt
   $ umount /mnt

Debugging
=========

References
**********

.. target-notes::

.. _ARGONKEY website:
   https://www.st.com/en/evaluation-tools/steval-mki187v1.html

.. _AN2606:
   https://www.st.com/resource/en/application_note/cd00167594.pdf

.. _stm32flash:
   https://sourceforge.net/p/stm32flash/wiki/Home/

.. _ST-LINK/V2:
   https://www.st.com/en/development-tools/st-link-v2.html

.. _TTL-232RG:
   http://www.ftdichip.com/Support/Documents/DataSheets/Cables/DS_TTL-232RG_CABLES.pdf
Part 3
한국어 전문 번역
개요
96Boards Argonkey 보드는 STMicroelectronics의 STM32F412CG Cortex-M4 CPU를 기반으로 합니다.
이 보드는 96Boards 규격 제품군 전체를 위한 sensor hub platform으로 동작합니다. 독립형 보드로도 사용할 수 있습니다.
하드웨어
96Boards Argonkey는 다음 하드웨어 구성요소를 제공합니다.
- UFQFPN48 package의 STM32F412CG
- FPU를 갖춘 Arm 32-bit Cortex-M4 CPU, 최대 CPU 주파수 100 MHz
- 동작 전압 1.8 V
- flash 1,024 KB, SRAM 256 KB
- 내장 센서
- 습도: STMicro HTS221
- 온도/압력: STMicro LPS22HB
- 주변광(ALS): Intersil ISL29034
- 근접: STMicro VL53L0X
- 가속도계/gyroscope: STMicro LSM6DSL
- 지자기: STMicro LIS2MDL
- AMR Hall sensor: MRMS501A
- microphone: STMicro MP34DT05
- user LED 2개와 general-purpose LED 16개
- 외부 interrupt 기능을 갖춘 GPIO
- UART, I2C 3개, SPI 1개, I2S 1개
지원 기능
Zephyr의 96b_argonkey 보드 설정은 다음 하드웨어 기능을 지원합니다.
| Interface | Controller | Driver/Component |
|---|---|---|
| NVIC | on-chip | nested vector interrupt controller |
| SYSTICK | on-chip | system clock |
| UART | on-chip | serial port |
| GPIO | on-chip | gpio |
| PINMUX | on-chip | pinmux |
| FLASH | on-chip | flash |
| SPI | on-chip | spi |
| I2C | on-chip | i2c |
보드에 관한 자세한 내용은 ARGONKEY website에서 확인할 수 있습니다. 기본 보드 설정 파일은 boards/96boards/argonkey/96b_argonkey_defconfig입니다.
연결과 I/O
LED
LED1 / User1 LED = PB2LED2 / User2 LED = PC13
Push button
BUTTON = RST (BT1)BUTTON = USR (BT2)
System clock
96Boards Argonkey는 internal oscillator 또는 main PLL clock으로 구동할 수 있습니다. 기본 보드 설정에서는 16 MHz external oscillator가 main PLL을 구동해 84 MHz System Clock(SYSCLK)을 생성합니다. bus 쪽에서 AHB clock은 84 MHz, APB1/APB2 clock은 42 MHz로 동작합니다.
Serial port
Zephyr console output은 USART1에 할당됩니다. 기본 설정은 115200 8N1입니다.
I2C
Argonkey에는 최대 3개의 I2C가 있습니다. 기본 mapping은 다음과 같습니다.
I2C1_SCL: PB6I2C1_SDA: PB7I2C2_SCL: PB10I2C2_SDA: PB9I2C3_SCL: PA8I2C3_SCL: PB4
I2C3는 P2 connector로 연결되며 외부 sensor를 부착할 수 있습니다. 최대 속도는 100 Kbit입니다.
SPI
Argonkey에는 SPI가 2개 있습니다. SPI1은 AP와 통신하는 bus로서 slave mode에서 사용하고, SPI2는 LSM6DSL sensor를 제어하는 master mode로 사용합니다.
SPI1_NSS: PA4SPI1_SCK: PA5SPI1_MISO: PA6SPI1_MOSI: PA7SPI2_NSS: PB12SPI2_SCK: PB13SPI2_MISO: PB14SPI2_MOSI: PB15
프로그래밍과 디버깅
빌드
hello_world 애플리케이션 빌드 예는 다음과 같습니다.
# Zephyr 저장소 루트에서
west build -b 96b_argonkey samples/hello_world
Flashing
Argonkey는 ROM bootloader 또는 별도 하드웨어가 필요한 SWD debug port로 flash할 수 있습니다. ROM bootloader는 BOOT0 pin의 특별한 활성화 pattern으로 진입합니다. USB(DFU), UART, I2C, SPI flashing을 지원하지만 이 문서는 UART 방식만 설명합니다. 자세한 bootloader 정보는 application note AN2606을 참고합니다.
ROM bootloader 사용
다음은 Linux PC와 UART를 이용한 기본 firmware flashing 단계입니다.
USB-TTL serial cable 등으로 Argonkey UART를 Linux PC에 연결합니다. 문서는 FTDI chip이 있는 TTL-232RG cable로 시험했습니다. UART pin은 보드 뒤쪽 P3 low-speed expansion connector에 있습니다.
- GND(검정) → Argonkey GND(
P3.1) - TXD(주황) → Argonkey
UART0_TXD(P3.5) - RXD(노랑) → Argonkey
UART0_RXD(P3.7)
USB cable을 연결하면 Linux에
/dev/ttyUSBx장치가 생성되며, x는 보통 0입니다.- GND(검정) → Argonkey GND(
STM32F412CG를 bootloader mode로 강제 진입시킵니다.
- BOOT0를 1.8 V에 연결:
P2.1과P3.30연결 - RST button을 눌렀다 놓기
- BOOT0를 1.8 V에 연결:
stm32flashutility로 Argonkey를 flash합니다.$ stm32flash -w zephyr.bin -v -g 0x08000000 /dev/ttyUSB0
SWD debugger 사용
상용 JTAG/SWD hardware tool을 골라 Argonkey P4 connector에 연결합니다. 이 보드는 ST-LINK/V2로 시험되었습니다. USB로 PC에 연결하면 mass-storage 기능을 가진 USB composite device로 나타납니다. Linux에서 mount한 뒤 firmware를 복사하면 ST-LINK가 Argonkey에 자동으로 flash합니다.
$ mount /dev/sdb /mnt
$ cp zephyr.bin /mnt
$ umount /mnt
Debugging
Zephyr 3.7.0 원문에는 이 제목 아래에 추가 설명이 없습니다.
참고 자료
- ARGONKEY website
- AN2606 application note
- stm32flash
- ST-LINK/V2
- TTL-232RG cable datasheet
Source
출처
영어 원문에는 문단, 문서 지시문, 표, 코드, 코드 심벌, 경로를 그대로 보존했습니다.