Part 1
요약·해설
지원표 14행, 공식 이미지, pin 16개와 9개 명령 블록, adapter cache와 원문 제품명 오기를 보존했습니다.
Dual Cortex-M0+ · 133MHz
264K SRAM · 16M QSPI
W5500 Ethernet
J-Link · OpenOCD · UF2
Part 2
접을 수 있는 영어 원문 전체
영어 원문 전체 펼치기
878DF97C66EC3E52DEC11B4A8C31BCC7E612C76121A463E5AB8A86F5C22CC2CE
.. _w5500_evb_pico:

Wiznet W5500 Evaluation Pico
############################

Overview
********

W5500-EVB-Pico is a microcontroller evaluation board based on the Raspberry
Pi RP2040 and fully hardwired TCP/IP controller W5500 - and basically works
the same as Raspberry Pi Pico board but with additional Ethernet via W5500.
The USB bootloader allows the ability to flash without any adapter, in a
drag-and-drop manner. It is also possible to flash and debug the boards with
their SWD interface, using an external adapter.

Hardware
********
- Dual core Arm Cortex-M0+ processor running up to 133MHz
- 264KB on-chip SRAM
- 16MB on-board QSPI flash with XIP capabilities
- 26 GPIO pins
- 3 Analog inputs
- 2 UART peripherals
- 2 SPI controllers
- 2 I2C controllers
- 16 PWM channels
- USB 1.1 controller (host/device)
- 8 Programmable I/O (PIO) for custom peripherals
- On-board LED
- 1 Watchdog timer peripheral
- Wiznet W5500 Ethernet MAC/PHY


.. figure:: ../../../../../../../boards/wiznet/w5500_evb_pico/doc/img/w5500_evb_pico_side.png
     :align: center
     :alt: W5500 Evaluation Board

     Wiznet W5500_EVB_PICO evaluation board (Image courtesy of Wiznet)

Supported Features
==================

The w5500_evb_pico board configuration supports the following
hardware features:

.. list-table::
   :header-rows: 1

   * - Peripheral
     - Kconfig option
     - Devicetree compatible
   * - NVIC
     - N/A
     - :dtcompatible:`arm,v6m-nvic`
   * - UART
     - :kconfig:option:`CONFIG_SERIAL`
     - :dtcompatible:`raspberrypi,pico-uart`
   * - GPIO
     - :kconfig:option:`CONFIG_GPIO`
     - :dtcompatible:`raspberrypi,pico-gpio`
   * - ADC
     - :kconfig:option:`CONFIG_ADC`
     - :dtcompatible:`raspberrypi,pico-adc`
   * - I2C
     - :kconfig:option:`CONFIG_I2C`
     - :dtcompatible:`snps,designware-i2c`
   * - SPI
     - :kconfig:option:`CONFIG_SPI`
     - :dtcompatible:`raspberrypi,pico-spi`
   * - USB Device
     - :kconfig:option:`CONFIG_USB_DEVICE_STACK`
     - :dtcompatible:`raspberrypi,pico-usbd`
   * - HWINFO
     - :kconfig:option:`CONFIG_HWINFO`
     - N/A
   * - Watchdog Timer (WDT)
     - :kconfig:option:`CONFIG_WATCHDOG`
     - :dtcompatible:`raspberrypi,pico-watchdog`
   * - PWM
     - :kconfig:option:`CONFIG_PWM`
     - :dtcompatible:`raspberrypi,pico-pwm`
   * - Flash
     - :kconfig:option:`CONFIG_FLASH`
     - :dtcompatible:`raspberrypi,pico-flash`
   * - UART (PIO)
     - :kconfig:option:`CONFIG_SERIAL`
     - :dtcompatible:`raspberrypi,pico-uart-pio`
   * - SPI (PIO)
     - :kconfig:option:`CONFIG_SPI`
     - :dtcompatible:`raspberrypi,pico-spi-pio`
   * - W5500 Ethernet
     - :kconfig:option:`CONFIG_NETWORKING`
     - :dtcompatible:`wiznet,w5500`

Pin Mapping
===========

The peripherals of the RP2040 SoC can be routed to various pins on the board.
The configuration of these routes can be modified through DTS. Please refer to
the datasheet to see the possible routings for each peripheral.

External pin mapping on the W5500_EVB_PICO is identical to the Raspberry Pi
Pico. Since GPIO 25 is routed to the on-board LED on, similar to the Raspberry
Pi Pico, the blinky example works as intended. The W5500 is routed to the SPI0
(P16-P19), with the reset and interrupt signal for the W5500 routed to P20 and
P21, respectively. All of these are shared with the edge connector on the
board.

Refer to `W55500 Evaluation Board Documentation`_ for a board schematic and
other certifications.

Default Zephyr Peripheral Mapping:
----------------------------------

.. rst-class:: rst-columns

- UART0_TX : P0
- UART0_RX : P1
- I2C0_SDA : P4
- I2C0_SCL : P5
- I2C1_SDA : P14
- I2C1_SCL : P15
- SPI0_RX : P16
- SPI0_CSN : P17
- SPI0_SCK : P18
- SPI0_TX : P19
- W5500 Reset : P20
- W5500 Interrupt : P21
- ADC_CH0 : P26
- ADC_CH1 : P27
- ADC_CH2 : P28
- ADC_CH3 : P29

Programming and Debugging
*************************

Flashing
========

Using SEGGER JLink
------------------

You can Flash the w5500_evb_pico with a SEGGER JLink debug probe as described in
:ref:`Building, Flashing and Debugging <west-flashing>`.

Here is an example of building and flashing the :zephyr:code-sample:`blinky` application.

.. zephyr-app-commands::
   :zephyr-app: samples/basic/blinky
   :board: w5500_evb_pico
   :goals: build

.. code-block:: bash

  west flash --runner jlink

Using OpenOCD
-------------

To use PicoProbe, You must configure **udev**.

Create a file in /etc/udev.rules.d with any name, and write the line below.

.. code-block:: bash

   ATTRS{idVendor}=="2e8a", ATTRS{idProduct}=="000c", MODE="660", GROUP="plugdev", TAG+="uaccess"

This example is valid for the case that the user joins to `plugdev` groups.

The Raspberry Pi Pico, and thus the W55500 Evaluation Board, has an SWD
interface that can be used to program and debug the on board RP2040. This
interface can be utilized by OpenOCD. To use it with the RP2040, OpenOCD
version 0.12.0 or later is needed.

If you are using a Debian based system (including RaspberryPi OS, Ubuntu. and
more), using the `pico_setup.sh`_ script is a convenient way to set up the
forked version of OpenOCD.

Depending on the interface used (such as JLink), you might need to
checkout to a branch that supports this interface, before proceeding.
Build and install OpenOCD as described in the README.

Here is an example of building and flashing the :zephyr:code-sample:`blinky`
application.

.. zephyr-app-commands::
   :zephyr-app: samples/basic/blinky
   :board: w5500_evb_pico
   :goals: build flash
   :gen-args: -DOPENOCD=/usr/local/bin/openocd -DOPENOCD_DEFAULT_PATH=/usr/local/share/openocd/scripts -DRPI_PICO_DEBUG_ADAPTER=picoprobe

Set the environment variables **OPENOCD** to `/usr/local/bin/openocd` and
**OPENOCD_DEFAULT_PATH** to `/usr/local/share/openocd/scripts`. This should
work with the OpenOCD that was installed with the default configuration. This
configuration also works with an environment that is set up by the
`pico_setup.sh`_ script.

**RPI_PICO_DEBUG_ADAPTER** specifies what debug adapter is used for debugging.

If **RPI_PICO_DEBUG_ADAPTER** was not assigned, `picoprobe` is used by default.
The other supported adapters are `raspberrypi-swd`, `jlink` and
`blackmagicprobe`. How to connect `picoprobe` and `raspberrypi-swd` is
described in `Getting Started with Raspberry Pi Pico`_. Any other SWD debug
adapter maybe also work with this configuration.

The value of **RPI_PICO_DEBUG_ADAPTER** is cached, so it can be omitted from
`west flash` and `west debug` if it was previously set while running
`west build`.

**RPI_PICO_DEBUG_ADAPTER** is used in an argument to OpenOCD as
`"source [find interface/${RPI_PICO_DEBUG_ADAPTER}.cfg]"`. Thus,
**RPI_PICO_DEBUG_ADAPTER** needs to be assigned the file name of the debug
adapter.

You can also flash the board with the following
command that directly calls OpenOCD (assuming a SEGGER JLink adapter is used):

.. code-block:: console

   $ openocd -f interface/jlink.cfg -c 'transport select swd' -f target/rp2040.cfg -c "adapter speed 2000" -c 'targets rp2040.core0' -c 'program path/to/zephyr.elf verify reset exit'

Using UF2
---------

If you don't have an SWD adapter, you can flash the Raspberry Pi Pico with
a UF2 file. By default, building an app for this board will generate a
`build/zephyr/zephyr.uf2` file. If the Pico is powered on with the `BOOTSEL`
button pressed, it will appear on the host as a mass storage device. The
UF2 file should be drag-and-dropped to the device, which will flash the Pico.

Debugging
=========

The SWD interface can also be used to debug the board. To achieve this, you can
either use SEGGER JLink or OpenOCD.

Using SEGGER JLink
------------------

Use a SEGGER JLink debug probe and follow the instruction in
:ref:`Building, Flashing and Debugging<west-debugging>`.


Using OpenOCD
-------------

Install OpenOCD as described for flashing the board.

Here is an example for debugging the :zephyr:code-sample:`blinky` application.

.. zephyr-app-commands::
   :zephyr-app: samples/basic/blinky
   :board: w5500_evb_pico
   :maybe-skip-config:
   :goals: debug
   :gen-args: -DOPENOCD=/usr/local/bin/openocd -DOPENOCD_DEFAULT_PATH=/usr/local/share/openocd/scripts -DRPI_PICO_DEBUG_ADAPTER=raspberrypi-swd

As with flashing, you can specify the debug adapter by specifying
**RPI_PICO_DEBUG_ADAPTER** at `west build` time. No needs to specify it at
`west debug` time.

You can also debug with OpenOCD and gdb launching from command-line.
Run the following command:

.. code-block:: console

   $ openocd -f interface/jlink.cfg -c 'transport select swd' -f target/rp2040.cfg -c "adapter speed 2000" -c 'targets rp2040.core0'

On another terminal, run:

.. code-block:: console

   $ gdb-multiarch

Inside gdb, run:

.. code-block:: console

   (gdb) tar ext :3333
   (gdb) file path/to/zephyr.elf

You can then start debugging the board.

.. target-notes::

.. _pico_setup.sh:
  https://raw.githubusercontent.com/raspberrypi/pico-setup/master/pico_setup.sh

.. _Getting Started with Raspberry Pi Pico:
  https://datasheets.raspberrypi.com/pico/getting-started-with-pico.pdf

.. _W55500 Evaluation Board Documentation:
  https://docs.wiznet.io/Product/iEthernet/W5500/w5500-evb-pico
Part 3
한국어 전문 번역
개요
W5500-EVB-Pico는 Raspberry Pi RP2040 microcontroller와 완전 hardwired TCP/IP controller인 W5500을 결합한 evaluation board입니다. 기본 동작은 Raspberry Pi Pico와 같지만 W5500을 통한 Ethernet이 추가됩니다. USB bootloader를 이용하면 별도 adapter 없이 drag-and-drop 방식으로 플래시할 수 있고, external adapter를 SWD interface에 연결해 플래시와 디버깅을 수행할 수도 있습니다.
하드웨어
- 최대 133MHz로 동작하는 dual-core Arm Cortex-M0+ processor
- On-chip SRAM 264KB
- XIP를 지원하는 on-board QSPI flash 16MB
- GPIO pin 26개
- Analog input 3개
- UART peripheral 2개
- SPI controller 2개
- I2C controller 2개
- PWM channel 16개
- USB 1.1 host/device controller
- Custom peripheral 구현용 Programmable I/O(PIO) 8개
- On-board LED
- Watchdog timer peripheral 1개
- WIZnet W5500 Ethernet MAC/PHY
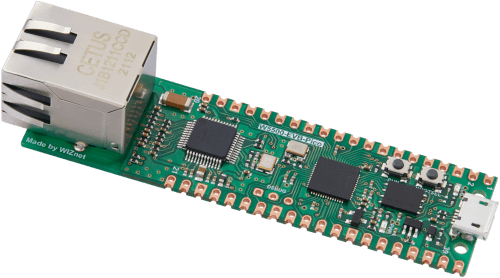
지원 기능
w5500_evb_pico board configuration은 다음 hardware 기능을 지원합니다.
| Peripheral | Kconfig option | Devicetree compatible |
|---|---|---|
| NVIC | N/A | arm,v6m-nvic |
| UART | CONFIG_SERIAL | raspberrypi,pico-uart |
| GPIO | CONFIG_GPIO | raspberrypi,pico-gpio |
| ADC | CONFIG_ADC | raspberrypi,pico-adc |
| I2C | CONFIG_I2C | snps,designware-i2c |
| SPI | CONFIG_SPI | raspberrypi,pico-spi |
| USB Device | CONFIG_USB_DEVICE_STACK | raspberrypi,pico-usbd |
| HWINFO | CONFIG_HWINFO | N/A |
| Watchdog Timer (WDT) | CONFIG_WATCHDOG | raspberrypi,pico-watchdog |
| PWM | CONFIG_PWM | raspberrypi,pico-pwm |
| Flash | CONFIG_FLASH | raspberrypi,pico-flash |
| UART (PIO) | CONFIG_SERIAL | raspberrypi,pico-uart-pio |
| SPI (PIO) | CONFIG_SPI | raspberrypi,pico-spi-pio |
| W5500 Ethernet | CONFIG_NETWORKING | wiznet,w5500 |
Pin mapping
RP2040 SoC의 peripheral은 board의 여러 pin으로 route할 수 있으며, DTS에서 route 설정을 바꿀 수 있습니다. Peripheral별 가능한 route는 datasheet를 참조해야 합니다.
W5500_EVB_PICO의 external pin mapping은 Raspberry Pi Pico와 같습니다. GPIO 25가 Raspberry Pi Pico와 마찬가지로 on-board LED에 연결되므로 blinky example이 의도대로 동작합니다. W5500은 SPI0의 P16~P19에 연결되고 reset과 interrupt signal은 각각 P20과 P21에 연결됩니다. 이 pin들은 모두 board edge connector와 공유됩니다.
Board schematic과 인증 자료는 W5500 Evaluation Board 문서를 참조하십시오.
기본 Zephyr peripheral mapping
- UART0_TX: P0
- UART0_RX: P1
- I2C0_SDA: P4
- I2C0_SCL: P5
- I2C1_SDA: P14
- I2C1_SCL: P15
- SPI0_RX: P16
- SPI0_CSN: P17
- SPI0_SCK: P18
- SPI0_TX: P19
- W5500 Reset: P20
- W5500 Interrupt: P21
- ADC_CH0: P26
- ADC_CH1: P27
- ADC_CH2: P28
- ADC_CH3: P29
Programming과 debugging
플래시
SEGGER J-Link 사용
Zephyr의 일반적인 빌드·플래시 절차에 따라 SEGGER J-Link debug probe로 w5500_evb_pico를 플래시할 수 있습니다. 다음은 blinky application을 빌드하는 예입니다.
west build -b w5500_evb_pico samples/basic/blinkyJ-Link runner로 플래시합니다.
west flash --runner jlinkOpenOCD 사용
PicoProbe를 사용하려면 udev를 설정해야 합니다. /etc/udev.rules.d 아래에 임의 이름의 파일을 만들고 다음 한 줄을 기록합니다.
ATTRS{idVendor}=="2e8a", ATTRS{idProduct}=="000c", MODE="660", GROUP="plugdev", TAG+="uaccess"이 예는 사용자가 plugdev group에 가입되어 있다는 전제에서 유효합니다.
Raspberry Pi Pico와 W5500 Evaluation Board의 SWD interface는 on-board RP2040의 programming과 debugging에 사용할 수 있습니다. RP2040에서 이 interface를 이용하려면 OpenOCD 0.12.0 이상이 필요합니다.
Debian 계열 시스템(Raspberry Pi OS, Ubuntu 등)에서는 pico_setup.sh script로 fork된 OpenOCD를 편리하게 설정할 수 있습니다. J-Link처럼 사용하는 interface에 따라 해당 interface를 지원하는 branch를 checkout해야 할 수 있으며, 이후 README 절차대로 OpenOCD를 빌드하고 설치합니다.
다음은 blinky를 빌드하고 PicoProbe로 플래시하는 예입니다.
west build -b w5500_evb_pico samples/basic/blinky -- -DOPENOCD=/usr/local/bin/openocd -DOPENOCD_DEFAULT_PATH=/usr/local/share/openocd/scripts -DRPI_PICO_DEBUG_ADAPTER=picoprobe
west flashOPENOCD는 /usr/local/bin/openocd, OPENOCD_DEFAULT_PATH는 /usr/local/share/openocd/scripts로 설정합니다. 이는 default configuration으로 설치한 OpenOCD와 pico_setup.sh 환경 모두에서 동작해야 합니다.
RPI_PICO_DEBUG_ADAPTER는 사용할 debug adapter를 지정합니다. 값을 생략하면 기본값은 picoprobe이며, 그 밖에 raspberrypi-swd, jlink, blackmagicprobe를 지원합니다. PicoProbe와 raspberrypi-swd 연결법은 Raspberry Pi Pico Getting Started 문서에 설명되어 있습니다. 이 구성으로 다른 SWD adapter도 동작할 수 있습니다.
이 값은 cache되므로 이전 west build에서 설정했다면 이후 west flash와 west debug에서 생략할 수 있습니다. OpenOCD에는 source [find interface/${RPI_PICO_DEBUG_ADAPTER}.cfg] 형태로 전달되므로 adapter configuration file 이름을 지정해야 합니다.
SEGGER J-Link adapter를 사용한다고 가정하면 OpenOCD를 직접 호출해 다음처럼 플래시할 수도 있습니다.
$ openocd -f interface/jlink.cfg -c 'transport select swd' -f target/rp2040.cfg -c "adapter speed 2000" -c 'targets rp2040.core0' -c 'program path/to/zephyr.elf verify reset exit'UF2 사용
SWD adapter가 없다면 UF2 file로 플래시할 수 있습니다. 이 board용 application을 빌드하면 기본적으로 build/zephyr/zephyr.uf2가 생성됩니다. BOOTSEL button을 누른 상태로 board 전원을 켜면 host에서 mass storage device로 나타납니다. UF2 file을 이 device에 drag-and-drop하면 Pico가 플래시됩니다.
디버깅
SWD interface는 board 디버깅에도 사용할 수 있으며 SEGGER J-Link 또는 OpenOCD 중 하나를 선택할 수 있습니다.
SEGGER J-Link 사용
SEGGER J-Link debug probe를 연결하고 Zephyr의 Building, Flashing and Debugging 지침을 따릅니다.
OpenOCD 사용
플래시 절차에서 설명한 대로 OpenOCD를 설치합니다. 다음은 blinky application을 raspberrypi-swd adapter로 디버깅하는 예입니다.
west build -b w5500_evb_pico samples/basic/blinky -- -DOPENOCD=/usr/local/bin/openocd -DOPENOCD_DEFAULT_PATH=/usr/local/share/openocd/scripts -DRPI_PICO_DEBUG_ADAPTER=raspberrypi-swd
west debug
플래시와 마찬가지로 RPI_PICO_DEBUG_ADAPTER는 west build 시점에 지정할 수 있으며 west debug에서 다시 지정할 필요가 없습니다.
Command line에서 OpenOCD와 GDB를 따로 실행할 수도 있습니다. 먼저 OpenOCD를 실행합니다.
$ openocd -f interface/jlink.cfg -c 'transport select swd' -f target/rp2040.cfg -c "adapter speed 2000" -c 'targets rp2040.core0'다른 terminal에서 GDB를 시작합니다.
$ gdb-multiarchGDB 내부에서 remote target과 ELF file을 지정합니다.
(gdb) tar ext :3333
(gdb) file path/to/zephyr.elf
이제 board 디버깅을 시작할 수 있습니다.
참고 자료
Source
출처
영어 원문에는 문단, 문서 지시문, 표, 코드, 코드 심벌, 경로를 그대로 보존했습니다.