Part 1
요약·해설
공식 이미지, PCP bit 표와 원문 include로 확장되는 UEFI·network boot 절차까지 전문 번역했습니다.
Pentium · Celeron · Atom
Altera MAX 10
UEFI · PXE
up to 3.6864Mbps
Part 2
접을 수 있는 영어 원문 전체
영어 원문 전체 펼치기
38EEC087675B5D6A84866A98234BCB05D0FF1201E47B65C73BACF62D72BB6002
.. _up_squared:

UP Squared
##########

Overview
********

UP |sup2| (UP Squared) is an ultra compact single board computer with high
performance and low power consumption. It features the latest Intel |reg| Apollo
Lake Celeron |trade| and Pentium |trade| Processors with only 4W of Scenario Design Power and
a powerful and flexible Intel |reg| FPGA Altera MAX 10 onboard.

.. figure:: ../../../../../../../boards/up-bridge-the-gap/up_squared/doc/img/up_squared.jpg
   :align: center
   :alt: UP Squared

   Up Squared (Credit: https://up-board.org)

This board configuration enables kernel support for the `UP Squared`_ board.

.. note::
   This board configuration works on all three variants of `UP Squared`_
   boards containing Intel |reg| Pentium |trade| SoC,
   Intel |reg| Celeron |trade| SoC, or Intel |reg| Atom |trade| SoC.

Hardware
********

General information about the board can be found at the `UP Squared`_ website.

.. include:: ../../../../../../../soc/intel/apollo_lake/doc/supported_features.txt

GPIO
----

GPIOs are exposed through the HAT header, and can be referred using
predefined macros such as ``UP2_HAT_PIN3``. The physical pins are
connected to the on-board FPGA acting as level shifter. Therefore,
to actually utilize these GPIO pins, the function of the pins and
directions (input/output) must be set in the BIOS. This can be
accomplished in BIOS, under menu ``Advanced``, and option
``HAT Configurations``. When a corresponding pin is set to act as
GPIO, there is an option to set the direction of the pin. This needs
to be set accordingly for the GPIO to function properly.

Connections and IOs
===================

Refer to the `UP Squared`_ website and `UP Squared Pinout`_ website
for connection diagrams.

Programming and Debugging
*************************

Use the following procedures for booting an image on a UP Squared board.

.. contents::
   :depth: 1
   :local:
   :backlinks: top

Build Zephyr application
========================

#. Build a Zephyr application; for instance, to build the ``hello_world``
   application on UP Squared:

   .. zephyr-app-commands::
      :zephyr-app: samples/hello_world
      :board: up_squared
      :goals: build

   .. note::

      A Zephyr EFI image file named :file:`zephyr.efi` is automatically
      created in the build directory after the application is built.

Booting the UP Squared Board using UEFI
=======================================

.. include:: ../../../../../../../boards/intel/common/efi_boot.rst
   :start-after: start_include_here

.. note::
   Refer to the `UP Squared Serial Console Wiki page
   <https://wiki.up-community.org/Serial_console>`_ for instructions on how to
   connect serial console.

.. note::
   You can safely ignore this message if it appears:

   .. code-block:: console

      WARNING: no console will be available to OS

Booting the UP Squared Board over network
=========================================

.. include:: ../../../../../../../boards/intel/common/net_boot.rst
   :start-after: start_include_here

.. note::
   Refer to the `UP Squared Serial Console Wiki page
   <https://wiki.up-community.org/Serial_console>`_ for instructions on how to
   connect serial console.

.. note::
   To enable PXE boot for Up Squared board do the following:

   #. Enable network from BIOS settings.

      .. code-block:: console

         Advanced -> Network Stack Configuration -> Enable Network Stack -> Enable Ipv4 PXE Support

   #. Make network boot as the first boot option.

      .. code-block:: console

         Boot -> Boot Option #1 : [Network]

.. _UP Squared: https://www.up-board.org/upsquared/specifications

.. _UP Squared Pinout: https://wiki.up-community.org/Pinout
Part 3
한국어 전문 번역
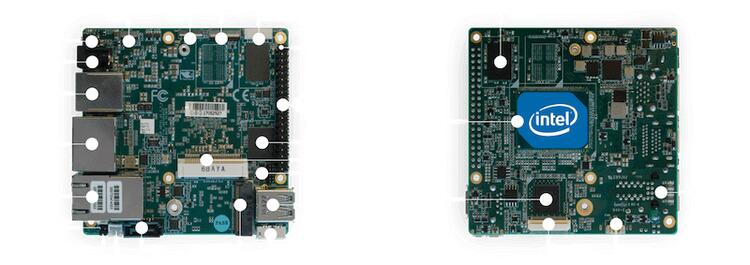
개요
UP²(UP Squared)는 고성능과 저전력을 갖춘 초소형 single-board computer입니다. Scenario Design Power가 4W에 불과한 Intel Apollo Lake Celeron·Pentium processor와 유연한 Intel FPGA Altera MAX 10을 board에 탑재합니다. 이 configuration은 UP Squared용 Zephyr kernel 지원을 활성화합니다.
하드웨어
일반 사양은 UP Squared 웹사이트를 참고합니다.
지원 기능
HPET, local APIC, I/O APIC 같은 표준 architecture device 외에 Apollo Lake 전용 HSUART, GPIO, I2C를 지원합니다.
HSUART high-speed serial port
Apollo Lake UART는 NS16550 compatible이며 high-speed 기능을 갖습니다. 추가 구성으로 115.2kbps를 넘어 최대 3.6864Mbps까지 지원합니다. Master clock은 PLL에 입력되고 PLL이 baud master clock을 만듭니다. PLL은 UART마다 있는 32-bit PRV_CLOCK_PARAMS, 즉 PCP register로 제어합니다.
| [31] | [30:16] | [15:1] | [0] |
|---|---|---|---|
| enable | m | n | toggle |
결과 baud master clock frequency는 (n/m) * master입니다. 보통 master clock은 100MHz이고 firmware default PCP는 0x3d090240, 즉 n = 288, m = 15625입니다. 결과는 사실상 표준인 1.8432MHz master clock과 최대 115.2k baud입니다. 더 높은 속도는 PCP를 바꾸고 결과 master clock을 Zephyr에 알려 활성화합니다.
대상 UART block의 PRV_CLOCK_PARAMS 값을 devicetree로 지정합니다. Application directory의 board-specific overlay, 예를 들어 up_squared.overlay는 다음과 같습니다.
/ {
    soc {
        uart@0 {
            pcp = <0x3d090900>;
            clock-frequency = <7372800>;
            current-speed = <230400>;
        };
    };
};pcp는 PRV_CLOCK_PARAMS 값이고 clock-frequency는 결과 baud master clock입니다. current-speed는 평소처럼 초기 baud rate를 뜻합니다.
GPIO
GPIO는 HAT header로 노출되며 UP2_HAT_PIN3 같은 predefined macro로 참조합니다. 실제 pin은 level shifter 역할을 하는 onboard FPGA에 연결됩니다. 따라서 GPIO를 사용하려면 BIOS의 Advanced → HAT Configurations에서 pin 기능과 input/output direction을 지정해야 합니다.
연결과 I/O
연결도는 UP Squared와 UP Squared Pinout을 참고합니다.
Programming과 debugging
Zephyr application build
예를 들어 UP Squared용 hello_world를 다음처럼 build합니다.
# From the root of the zephyr repository
west build -b up_squared samples/hello_worldUEFI로 UP Squared boot
Boot device 준비
Zephyr image를 boot할 USB flash drive를 준비합니다.
- USB flash drive를 FAT32로 format합니다. Windows에서는 File Explorer의 Format에서 FAT32를 선택하고, Linux에서는 gparted 또는 아래 명령을 사용합니다.
- Zephyr EFI image
zephyr/zephyr.efi를 USB drive에 복사합니다.
mkfs.vfat -F 32 <device-node>Board에서 Zephyr boot
- 준비한 USB flash drive를 board에 연결합니다.
- Serial cable로 host에 연결하고 115200 baud로 출력을 관찰합니다.
- Board 전원을 켭니다.
- 아래 문구가 보이면
F7을 누릅니다. - Menu에서 해당 EFI shell 항목을 선택합니다.
- EFI shell에서 Zephyr EFI image를 선택해 boot합니다.
- Boot가 끝나면 Zephyr application image 실행이 완료됩니다.
Press <DEL> or <ESC> to enter setup.Shell> fs0:zephyr.efiSerial 연결은 UP Squared Serial Console Wiki를 참고합니다. 다음 message는 안전하게 무시할 수 있습니다.
WARNING: no console will be available to OSNetwork로 UP Squared boot
Linux host 준비
- DHCP·TFTP server로
dnsmasq를 설치합니다. - DHCP server가 사용할 interface와 주소 범위를 구성합니다.
- TFTP root와 boot file을 구성합니다.
zephyr/zephyr.efi를/srv/tftp로 복사합니다.- TFTP root tree를 확인합니다.
dnsmasqservice를 재시작합니다.
sudo apt-get install dnsmasq# Only listen to this interface
interface=eno2
dhcp-range=10.1.1.20,10.1.1.30,12h# tftp
enable-tftp
tftp-root=/srv/tftp
dhcp-boot=zephyr.eficp zephyr/zephyr.efi /srv/tftptree /srv/tftp
/srv/tftp
└── zephyr.efisudo systemctl restart dnsmasq.serviceNetwork boot용 board 준비
- BIOS setting에서 PXE network를 활성화합니다.
- Network boot를 첫 번째 boot option으로 지정합니다.
Board boot
- Serial cable로 host에 연결하고 115200 baud로 출력을 관찰합니다.
- Board 전원을 켭니다.
- Linux host에서
dnsmasqlog를 보고 board가 IP address를 받았는지 확인합니다. - TFTP로
zephyr.efi가 전송됐는지 확인합니다. - Boot가 완료되면 Zephyr application image 실행이 끝납니다.
journalctl -f -u dnsmasq
dnsmasq-dhcp[5386]: DHCPDISCOVER(eno2) 00:07:32:52:25:88
dnsmasq-dhcp[5386]: DHCPOFFER(eno2) 10.1.1.28 00:07:32:52:25:88
dnsmasq-dhcp[5386]: DHCPREQUEST(eno2) 10.1.1.28 00:07:32:52:25:88
dnsmasq-dhcp[5386]: DHCPACK(eno2) 10.1.1.28 00:07:32:52:25:88
journalctl -f -u dnsmasq
dnsmasq-tftp[5386]: sent /srv/tftp/zephyr.efi to 10.1.1.28UP Squared에서 PXE boot를 활성화하는 정확한 BIOS 경로는 다음과 같습니다.
Advanced -> Network Stack Configuration -> Enable Network Stack -> Enable Ipv4 PXE SupportBoot -> Boot Option #1 : [Network]Source
출처
영어 원문에는 문단, 문서 지시문, 표, 코드, 코드 심벌, 경로를 그대로 보존했습니다.