Part 1
요약·해설
지원표 12행, 공식 이미지 2개, limitation 5개와 명령 블록 11개를 보존했습니다.
32-bit RISC-V
48MHz
BLE · 802.15.4
ICEman
Part 2
접을 수 있는 영어 원문 전체
영어 원문 전체 펼치기
B8CBB1231900AEA1699A6C4D910BBA0DB709DCDB159D72EA8B76D2B21E2C19CF
.. _tlsr9518adk80d:

Telink TLSR9518ADK80D
#####################

Overview
********

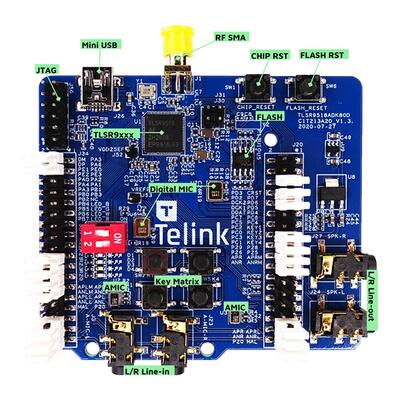
The TLSR9518A Generic Starter Kit is a hardware platform which
can be used to verify the `Telink TLSR951x series chipset`_ and develop applications
for several 2.4 GHz air interface standards including Bluetooth 5.2 (Basic data
rate, Enhanced data rate, LE, Indoor positioning and BLE Mesh),
Zigbee 3.0, Homekit, 6LoWPAN, Thread and 2.4 Ghz proprietary.

.. figure:: ../../../../../../../boards/telink/tlsr9518adk80d/doc/img/tlsr9518adk80d.jpg
     :align: center
     :alt: TLSR9518ADK80D

More information about the board can be found at the `Telink B91 Generic Starter Kit Hardware Guide`_ website.

Hardware
********

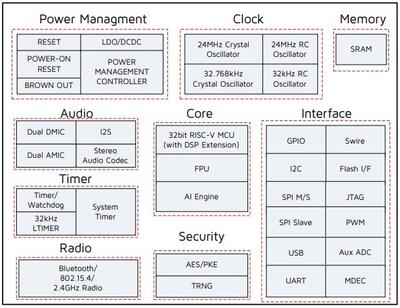
The TLSR9518A SoC integrates a powerful 32-bit RISC-V MCU, DSP, AI Engine, 2.4 GHz ISM Radio, 256
KB SRAM (128 KB of Data Local Memory and 128 KB of Instruction Local Memory), external Flash memory,
stereo audio codec, 14 bit AUX ADC, analog and digital Microphone input, PWM, flexible IO interfaces,
and other peripheral blocks required for advanced IoT, hearable, and wearable devices.

.. figure:: ../../../../../../../boards/telink/tlsr9518adk80d/doc/img/tlsr9518_block_diagram.jpg
     :align: center
     :alt: TLSR9518ADK80D_SOC

The TLSR9518ADK80D default board configuration provides the following hardware components:

- RF conducted antenna
- 1 MB External Flash memory with reset button
- Chip reset button
- Mini USB interface
- 4-wire JTAG
- 4 LEDs, Key matrix up to 4 keys
- 2 line-in function (Dual Analog microphone supported when switching jumper from microphone path)
- Dual Digital microphone
- Stereo line-out

Supported Features
==================

The Zephyr TLSR9518ADK80D board configuration supports the following hardware features:

+----------------+------------+------------------------------+
| Interface      | Controller | Driver/Component             |
+================+============+==============================+
| PLIC           | on-chip    | interrupt_controller         |
+----------------+------------+------------------------------+
| RISC-V Machine | on-chip    | timer                        |
| Timer (32 KHz) |            |                              |
+----------------+------------+------------------------------+
| PINCTRL        | on-chip    | pinctrl                      |
+----------------+------------+------------------------------+
| GPIO           | on-chip    | gpio                         |
+----------------+------------+------------------------------+
| UART           | on-chip    | serial                       |
+----------------+------------+------------------------------+
| PWM            | on-chip    | pwm                          |
+----------------+------------+------------------------------+
| TRNG           | on-chip    | entropy                      |
+----------------+------------+------------------------------+
| FLASH (MSPI)   | on-chip    | flash                        |
+----------------+------------+------------------------------+
| RADIO          | on-chip    | Bluetooth,                   |
|                |            | ieee802154, OpenThread       |
+----------------+------------+------------------------------+
| SPI (Master)   | on-chip    | spi                          |
+----------------+------------+------------------------------+
| I2C (Master)   | on-chip    | i2c                          |
+----------------+------------+------------------------------+
| ADC            | on-chip    | adc                          |
+----------------+------------+------------------------------+

.. note::
   To support "button" example project PC3-KEY3 (J20-19, J20-20) jumper needs to be removed and KEY3 (J20-19) should be connected to VDD3_DCDC (J51-13) externally.

   For the rest example projects use the default jumpers configuration.

Other hardware features and example projects are not supported yet.

Limitations
-----------

- Maximum 3 GPIO pins could be configured to generate interrupts simultaneously. All pins must be related to different ports and use different IRQ numbers.
- DMA mode is not supported by I2C, SPI and Serial Port.
- UART hardware flow control is not implemented.
- SPI Slave mode is not implemented.
- I2C Slave mode is not implemented.

Default configuration and IOs
=============================

System Clock
------------

The TLSR9518ADK80D board is configured to use the 24 MHz external crystal oscillator
with the on-chip PLL/DIV generating the 48 MHz system clock.
The following values also could be assigned to the system clock in the board DTS file
:zephyr_file:`boards/telink/tlsr9518adk80d/tlsr9518adk80d.dts`:

- 16000000
- 24000000
- 32000000
- 48000000
- 64000000
- 96000000

.. code-block::

   &cpu0 {
       clock-frequency = <48000000>;
   };

PINs Configuration
------------------

The TLSR9518A SoC has five GPIO controllers (PORT_A to PORT_E), but only two are
currently enabled (PORT_B for LEDs control and PORT_C for buttons) in the board DTS file:

- LED0 (blue): PB4, LED1 (green): PB5, LED2 (white): PB6, LED3 (red): PB7
- Key Matrix SW0: PC2_PC3, SW1: PC2_PC1, SW2: PC0_PC3, SW3: PC0_PC1

Peripheral's pins on the SoC are mapped to the following GPIO pins in the
:zephyr_file:`boards/telink/tlsr9518adk80d/tlsr9518adk80d.dts` file:

- UART0 TX: PB2, RX: PB3
- UART1 TX: PC6, RX: PC7
- PWM Channel 0: PB4
- PSPI CS0: PC4, CLK: PC5, MISO: PC6, MOSI: PC7
- HSPI CS0: PA1, CLK: PA2, MISO: PA3, MOSI: PA4
- I2C SCL: PE1, SDA: PE3

Serial Port
-----------

The TLSR9518A SoC has 2 UARTs. The Zephyr console output is assigned to UART0.
The default settings are 115200 8N1.

Programming and debugging
*************************

Building
========

.. important::

   These instructions assume you've set up a development environment as
   described in the :ref:`getting_started`.

To build applications using the default RISC-V toolchain from Zephyr SDK, just run the west build command.
Here is an example for the "hello_world" application.

.. code-block:: console

   # From the root of the zephyr repository
   west build -b tlsr9518adk80d samples/hello_world

To use `Telink RISC-V Linux Toolchain`_, ``ZEPHYR_TOOLCHAIN_VARIANT`` and ``CROSS_COMPILE`` variables need to be set.
In addition ``CONFIG_FPU=y`` must be selected in :zephyr_file:`boards/telink/tlsr9518adk80d/tlsr9518adk80d_defconfig` file since this
toolchain is compatible only with the float point unit usage.

.. code-block:: console

   # Set Zephyr toolchain variant to cross-compile
   export ZEPHYR_TOOLCHAIN_VARIANT=cross-compile
   # Specify the Telink RISC-V Toolchain location
   export CROSS_COMPILE=~/toolchains/nds32le-elf-mculib-v5f/bin/riscv32-elf-
   # From the root of the zephyr repository
   west build -b tlsr9518adk80d samples/hello_world

`Telink RISC-V Linux Toolchain`_ is available on the `Burning and Debugging Tools for TLSR9 Series in Linux`_ page.

Open a serial terminal with the following settings:

- Speed: 115200
- Data: 8 bits
- Parity: None
- Stop bits: 1

Flash the board, reset and observe the following messages on the selected
serial port:

.. code-block:: console

   *** Booting Zephyr OS version 2.5.0  ***
   Hello World! tlsr9518adk80d


Flashing
========

To flash the TLSR9518ADK80D board see the sources below:

- `Burning and Debugging Tools for all Series`_
- `Burning and Debugging Tools for TLSR9 Series`_
- `Burning and Debugging Tools for TLSR9 Series in Linux`_

It is also possible to use the west flash command, but additional steps are required to set it up:

- Download `Telink RISC-V Linux Toolchain`_. The toolchain contains tools for the board flashing as well.
- Since the ICEman tool is created for the 32-bit OS version it is necessary to install additional packages in case of the 64-bit OS version.

.. code-block:: console

   sudo dpkg --add-architecture i386
   sudo apt-get update
   sudo apt-get install -y libc6:i386 libncurses5:i386 libstdc++6:i386

-  Run the "ICEman.sh" script.

.. code-block:: console

   # From the root of the {path to the Telink RISC-V Linux Toolchain}/ice repository
   sudo ./ICEman.sh

- Now you should be able to run the west flash command with the toolchain path specified (TELINK_TOOLCHAIN_PATH).

.. code-block:: console

   west flash --telink-tools-path=$TELINK_TOOLCHAIN_PATH

- You can also run the west flash command without toolchain path specification if add SPI_burn and ICEman to PATH.

.. code-block:: console

    export PATH=$TELINK_TOOLCHAIN_PATH/flash/bin:"$PATH"
    export PATH=$TELINK_TOOLCHAIN_PATH/ice:"$PATH"

Debugging
=========

This port supports UART debug and OpenOCD+GDB. The `west debug` command also supported. You may run
it in a simple way, like:

.. code-block:: console

   west debug

Or with additional arguments, like:

.. code-block:: console

   west debug --gdb-port=<port_number> --gdb-ex=<additional_ex_arguments>

Example:

.. code-block:: console

   west debug --gdb-port=1111 --gdb-ex="-ex monitor reset halt -ex b main -ex continue"

References
**********

.. target-notes::

.. _Telink TLSR951x series chipset: https://wiki.telink-semi.cn/wiki/chip-series/TLSR951x-Series/
.. _Telink B91 Generic Starter Kit Hardware Guide: https://wiki.telink-semi.cn/wiki/Hardware/B91_Generic_Starter_Kit_Hardware_Guide/
.. _Telink RISC-V Linux Toolchain: https://wiki.telink-semi.cn/tools_and_sdk/Tools/IDE/telink_riscv_linux_toolchain.zip
.. _Burning and Debugging Tools for all Series: https://wiki.telink-semi.cn/wiki/IDE-and-Tools/Burning-and-Debugging-Tools-for-all-Series/
.. _Burning and Debugging Tools for TLSR9 Series: https://wiki.telink-semi.cn/wiki/IDE-and-Tools/Burning-and-Debugging-Tools-for-TLSR9-Series/
.. _Burning and Debugging Tools for TLSR9 Series in Linux: https://wiki.telink-semi.cn/wiki/IDE-and-Tools/BDT_for_TLSR9_Series_in_Linux/
Part 3
한국어 전문 번역
개요
TLSR9518A Generic Starter Kit은 Telink TLSR951x chipset 검증과 여러 2.4GHz air-interface application 개발용 hardware platform입니다. Bluetooth 5.2 Basic/Enhanced data rate, LE, indoor positioning, BLE Mesh, Zigbee 3.0, HomeKit, 6LoWPAN, Thread와 proprietary 2.4GHz를 지원합니다.
하드웨어
TLSR9518A는 32-bit RISC-V MCU, DSP, AI Engine, 2.4GHz ISM radio, SRAM 256KB(DLM 128KB+ILM 128KB), external Flash, stereo audio codec, 14-bit AUX ADC, analog/digital microphone input, PWM과 flexible I/O를 통합해 advanced IoT·hearable·wearable device를 구성합니다.
기본 board component
- RF conducted antenna
- reset button이 있는 external Flash 1MB
- chip reset button
- Mini USB
- 4-wire JTAG
- LED 4개와 최대 4-key matrix
- jumper로 microphone path를 전환하면 dual analog microphone을 지원하는 line-in 2개
- dual digital microphone
- stereo line-out
Zephyr 지원 기능
| Interface | Controller | Driver/Component |
|---|---|---|
| PLIC | on-chip | interrupt_controller |
| RISC-V Machine Timer (32 KHz) | on-chip | timer |
| PINCTRL | on-chip | pinctrl |
| GPIO | on-chip | gpio |
| UART | on-chip | serial |
| PWM | on-chip | pwm |
| TRNG | on-chip | entropy |
| FLASH (MSPI) | on-chip | flash |
| RADIO | on-chip | Bluetooth; ieee802154; OpenThread |
| SPI (Master) | on-chip | spi |
| I2C (Master) | on-chip | i2c |
| ADC | on-chip | adc |
그 밖의 하드웨어 기능과 sample은 아직 지원되지 않습니다.
제한 사항
- 동시에 interrupt를 생성할 수 있는 GPIO는 최대 3개이며 서로 다른 port와 IRQ number를 사용해야 합니다.
- I2C·SPI·Serial Port DMA mode 미지원
- UART hardware flow control 미구현
- SPI Slave mode 미구현
- I2C Slave mode 미구현
System clock
external 24MHz crystal과 on-chip PLL/DIV로 기본 48MHz를 생성합니다. tlsr9518adk80d.dts에서 16·24·32·48·64·96MHz 중 하나를 선택할 수 있습니다.
&cpu0 {
    clock-frequency = <48000000>;
};
Pin 구성
GPIO controller는 PORT_A~PORT_E 다섯 개지만 board DTS에서는 LED용 PORT_B와 button용 PORT_C만 enable됩니다.
- LED0 blue PB4, LED1 green PB5, LED2 white PB6, LED3 red PB7
- key matrix SW0 PC2_PC3, SW1 PC2_PC1, SW2 PC0_PC3, SW3 PC0_PC1
- UART0 TX PB2 / RX PB3
- UART1 TX PC6 / RX PC7
- PWM channel 0 PB4
- PSPI CS0 PC4 / CLK PC5 / MISO PC6 / MOSI PC7
- HSPI CS0 PA1 / CLK PA2 / MISO PA3 / MOSI PA4
- I2C SCL PE1 / SDA PE3
Serial port
UART 2개 중 console은 UART0, 기본 설정은 115200 8N1입니다.
빌드
Zephyr SDK 기본 RISC-V toolchain:
# Zephyr repository root
west build -b tlsr9518adk80d samples/hello_world
Telink RISC-V Linux Toolchain을 쓰려면 ZEPHYR_TOOLCHAIN_VARIANT와 CROSS_COMPILE을 설정합니다. 이 toolchain은 FPU 사용과만 호환되므로 tlsr9518adk80d_defconfig에서 CONFIG_FPU=y도 선택해야 합니다.
export ZEPHYR_TOOLCHAIN_VARIANT=cross-compile
export CROSS_COMPILE=~/toolchains/nds32le-elf-mculib-v5f/bin/riscv32-elf-
west build -b tlsr9518adk80d samples/hello_world
serial은 115200, 8 data bits, parity none, stop bit 1입니다. Flash·reset 뒤 예시:
*** Booting Zephyr OS version 2.5.0  ***
Hello World! tlsr9518adk80d
Flash
west flash에는 Telink toolchain의 flash 도구가 필요합니다. ICEman이 32-bit OS용이므로 64-bit OS에서는 i386 package를 설치합니다.
sudo dpkg --add-architecture i386
sudo apt-get update
sudo apt-get install -y libc6:i386 libncurses5:i386 libstdc++6:i386
toolchain ice directory에서 ICEman을 실행합니다.
sudo ./ICEman.shtoolchain 경로를 직접 지정:
west flash --telink-tools-path=$TELINK_TOOLCHAIN_PATH또는 SPI_burn과 ICEman을 PATH에 추가합니다.
export PATH=$TELINK_TOOLCHAIN_PATH/flash/bin:"$PATH"
export PATH=$TELINK_TOOLCHAIN_PATH/ice:"$PATH"
Debug
UART debug, OpenOCD+GDB와 west debug를 지원합니다.
west debugwest debug --gdb-port=<port_number> --gdb-ex=<additional_ex_arguments>예시:
west debug --gdb-port=1111 --gdb-ex="-ex monitor reset halt -ex b main -ex continue"참고 자료
Source
출처
영어 원문에는 문단, 문서 지시문, 표, 코드, 코드 심벌, 경로를 그대로 보존했습니다.