Part 1
요약·해설
공식 이미지, build 1개와 code block 3개, xmodem 준비·실행 출력을 보존했습니다.
SoC
JH7110
ISA
64-bit RISC-V
Mode
M-Mode
Transfer
UART · xmodem
Part 2
접을 수 있는 영어 원문 전체
영어 원문 전체 펼치기
원문 SHA-256
053B34475AA8E9C3492EF0E388C4893006D3CB36FEE52EF4017DD7792058E4D5
.. _visionfive2:

Starfive VisionFive 2 JH7110
############################

Overview
********

The StarFive VisionFive 2 is a development board with a StarFive JH7110
multi-core 64bit RISC-V SoC.

.. image:: ../../../../../../../boards/starfive/visionfive2/doc/img/visionfive2.webp
   :align: center
   :alt: StarFive VisionFive 2 Board

Programming and debugging
*************************

Building
========

Applications for the ``visionfive2`` board configuration can be built
as usual (see :ref:`build_an_application`) using the corresponding board name:

.. zephyr-app-commands::
   :board: visionfive2
   :goals: build

`spl_tool <https://github.com/starfive-tech/Tools/tree/master/spl_tool/>`_
is a jh7110 signature tool used to generate spl header information
and generate ``zephyr.bin.normal.out``.

.. code-block:: console

   ./spl_tool -c -f build/zephyr/zephyr.bin

This will create a new file ``build/zephyr/zephyr.bin.normal.out`` that can be flashed.
This step is necessary as zephyr binary must contain the SPL header info in order
to run it in M-Mode (Machine Mode) since S-Mode (Supervisor Mode) is
currently not supported.

Flashing
========

.. note::
   The following steps use minicom for serial communication, feel free to use
   any other serial terminal that supports xmodem based file transfers.
   Thanks to @orangecms for his vf2-loader tool which makes the flashing process easier

git clone the vf2-loader tool from https://github.com/orangecms/vf2-loader.git and
xmodem tool from https://github.com/orangecms/xmodem.rs.git side by side.

VisionFive2 uses uart for flashing. Refer to
`VisionFive2 Recovery Quick Start Guide
<https://doc-en.rvspace.org/VisionFive2/Quick_Start_Guide/VisionFive2_SDK_QSG/recovering_bootloader%20-%20vf2.html>`_
to connect your serial-to-usb converter. Now power on the board and using
minicom access board's serial and press the reset switch on the board until you see CCCCCC... prompt

Copy the ``zephyr.bin.normal.out`` from ``build/zephyr/zephyr.bin.normal.out``
to previously git cloned vf2-loader/ directory and cd into it.
Flash the ``zephyr.bin.normal.out`` using this command:

.. code-block:: console

   cargo run -- zephyr.bin.normal.out && minicom -D /dev/ttyUSB0

.. code-block:: text

   cargo run -- zephyr.bin.normal.out && minicom -D /dev/ttyUSB0
   Finished dev [unoptimized + debuginfo] target(s) in 0.03s
   Running `target/debug/vf2-loader zephyr.bin.normal.out`
   Welcome to minicom 2.7.1
   OPTIONS: I18n
   Compiled on Dec 23 2019, 02:06:26.
   Port /dev/ttyUSB0, 14:59:24
   Press CTRL-A Z for help on special keys
   6*** Booting Zephyr OS build v3.6.0-rc3 ***
   Hello World! visionfive2
Part 3
한국어 전문 번역
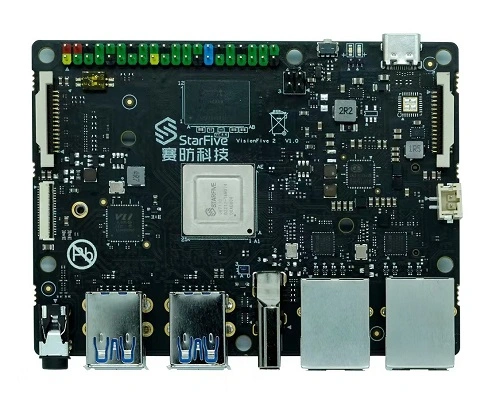
개요
StarFive VisionFive 2는 StarFive JH7110 multi-core 64-bit RISC-V SoC를 탑재한 개발 보드입니다.
프로그래밍과 디버깅
빌드
visionfive2 board 이름으로 일반적인 Zephyr application build 절차를 사용합니다.
west build -b visionfive2SPL header 생성
spl_tool은 JH7110 signature tool입니다. SPL header 정보를 만들고 zephyr.bin.normal.out을 생성합니다.
./spl_tool -c -f build/zephyr/zephyr.bin결과 파일은 build/zephyr/zephyr.bin.normal.out입니다. 현재 S-Mode(Supervisor Mode)는 지원되지 않고 M-Mode(Machine Mode)에서 실행해야 하므로 Zephyr binary에 SPL header가 반드시 있어야 합니다.
플래시 준비
vf2-loader와xmodem.rsrepository를 나란히 clone합니다.- VisionFive2 Recovery Quick Start Guide에 따라 serial-to-USB converter를 연결합니다.
- board power를 켜고 minicom으로 serial에 접속합니다.
- reset switch를 눌러
CCCCCC...prompt가 나타날 때까지 기다립니다. - 생성한
zephyr.bin.normal.out을 clone한vf2-loader/directory로 복사하고 그 경로로 이동합니다.
사용 repository:
UART flash
cargo run -- zephyr.bin.normal.out && minicom -D /dev/ttyUSB0공식 실행 예시:
cargo run -- zephyr.bin.normal.out && minicom -D /dev/ttyUSB0
Finished dev [unoptimized + debuginfo] target(s) in 0.03s
Running `target/debug/vf2-loader zephyr.bin.normal.out`
Welcome to minicom 2.7.1
OPTIONS: I18n
Compiled on Dec 23 2019, 02:06:26.
Port /dev/ttyUSB0, 14:59:24
Press CTRL-A Z for help on special keys
6*** Booting Zephyr OS build v3.6.0-rc3 ***
Hello World! visionfive2
Source
출처
영어 원문에는 문단, 문서 지시문, 표, 코드, 코드 심벌, 경로를 그대로 보존했습니다.