Part 1
요약·해설
지원표 13행, Ethernet 수정 이미지 2개, display shield와 core target 오기를 보존했습니다.
STM32H747XI
400 / 200MHz
MIPI DSI
Ethernet mod
Part 2
접을 수 있는 영어 원문 전체
영어 원문 전체 펼치기
23A0CCE7083136A1AD81FCCFA12DF9E8D48674F38DD13C17EE47F12333AC7901
.. _stm32h747i_disco_board:

ST STM32H747I Discovery
#######################

Overview
********

The discovery kit enables a wide diversity of applications taking benefit
from audio, multi-sensor support, graphics, security, video,
and high-speed connectivity features.

The board includes an STM32H747XI SoC with a high-performance DSP, Arm Cortex-M7 + Cortex-M4 MCU,
with 2MBytes of Flash memory, 1MB RAM, 480 MHz CPU, Art Accelerator, L1 cache, external memory interface,
large set of peripherals, SMPS, and MIPI-DSI.

Additionally, the board features:

- On-board ST-LINK/V3E supporting USB reenumeration capability
- USB ST-LINK functions: virtual COM port, mass storage, debug port
- Flexible power-supply options:

  - ST-LINK USB VBUS, USB OTG HS connector, or external sources

- 4” capacitive touch LCD display module with MIPI® DSI interface
- Ethernet compliant with IEEE802.3-2002
- USB OTG HS
- Stereo speaker outputs
- ST-MEMS digital microphones
- 2 x 512-Mbit QUAD-SPI NOR Flash memory
- 256-Mbit SDRAM
- 4 color user LEDs
- 1 user and reset push-button
- 4-direction joystick with selection button
- Arduino Uno V3 connectors

.. image:: ../../../../../../../boards/st/stm32h747i_disco/doc/img/stm32h747i_disco.jpg
     :align: center
     :alt: STM32H747I-DISCO

More information about the board can be found at the `STM32H747I-DISCO website`_.
More information about STM32H747XIH6 can be found here:

- `STM32H747XI on www.st.com`_
- `STM32H747xx reference manual`_
- `STM32H747xx datasheet`_

Supported Features
==================

The current Zephyr stm32h747i_disco board configuration supports the following hardware features:

+-----------+------------+-------------------------------------+
| Interface | Controller | Driver/Component                    |
+===========+============+=====================================+
| NVIC      | on-chip    | nested vector interrupt controller  |
+-----------+------------+-------------------------------------+
| UART      | on-chip    | serial port-polling;                |
|           |            | serial port-interrupt               |
+-----------+------------+-------------------------------------+
| PINMUX    | on-chip    | pinmux                              |
+-----------+------------+-------------------------------------+
| GPIO      | on-chip    | gpio                                |
+-----------+------------+-------------------------------------+
| FLASH     | on-chip    | flash memory                        |
+-----------+------------+-------------------------------------+
| ETHERNET  | on-chip    | ethernet  (*)                       |
+-----------+------------+-------------------------------------+
| RNG       | on-chip    | True Random number generator        |
+-----------+------------+-------------------------------------+
| FMC       | on-chip    | memc (SDRAM)                        |
+-----------+------------+-------------------------------------+
| SPI       | on-chip    | spi                                 |
+-----------+------------+-------------------------------------+
| QSPI NOR  | on-chip    | off-chip flash                      |
+-----------+------------+-------------------------------------+
| SDMMC     | on-chip    | disk access                         |
+-----------+------------+-------------------------------------+
| IPM       | on-chip    | virtual mailbox based on HSEM       |
+-----------+------------+-------------------------------------+
| DISPLAY   | on-chip    | MIPI DSI Host with shield (MP1166)  |
|           |            | st_b_lcd40_dsi1_mb1166              |
+-----------+------------+-------------------------------------+

(*) From UM2411 Rev 4:
   With the default setting, the Ethernet feature is not working because of
   a conflict between ETH_MDC and SAI4_D1 of the MEMs digital microphone.
   Make sure you have SB8 closed and SB21 open to get Ethernet working.

Other hardware features are not yet supported on Zephyr porting.

The default configuration per core can be found in the defconfig files:
:zephyr_file:`boards/st/stm32h747i_disco/stm32h747i_disco_stm32h747xx_m7_defconfig` and
:zephyr_file:`boards/st/stm32h747i_disco/stm32h747i_disco_stm32h747xx_m4_defconfig`

Pin Mapping
===========

STM32H747I Discovery kit has 9 GPIO controllers. These controllers are responsible for pin muxing,
input/output, pull-up, etc.

For more details please refer to `STM32H747I-DISCO website`_.

Default Zephyr Peripheral Mapping:
----------------------------------

- UART_1 TX/RX : PA9/PA10 (ST-Link Virtual Port Com)
- UART_8 TX/RX : PJ8/PJ9 (Arduino Serial)
- SPI_5 NSS/SCK/MISO/MOSI : PK1/PK0/PJ11/PJ10 (Arduino SPI)
- SDMMC_1 D0/D1/D2/D3/CK/CMD: PC8/PC9/PC10/PC11/PC12/PD2
- LD1 : PI12
- LD2 : PI13
- LD3 : PI14
- LD4 : PI15
- W-UP : PC13
- J-CENTER : PK2
- J-DOWN : PK3
- J-LEFT : PK4
- J-RIGHT : PK5
- J-UP : PK6

System Clock
============

The STM32H747I System Clock can be driven by an internal or external oscillator,
as well as by the main PLL clock. By default, the CPU1 (Cortex-M7) System clock
is driven by the PLL clock at 400MHz, and the CPU2 (Cortex-M4) System clock
is driven at 200MHz. PLL clock is feed by a 25MHz high speed external clock.

Serial Port
===========

The STM32H747I Discovery kit has up to 8 UARTs.
Default configuration assigns USART1 and UART8 to the CPU1. The Zephyr console
output is assigned to UART1 which connected to the onboard ST-LINK/V3.0. Virtual
COM port interface. Default communication settings are 115200 8N1.

Ethernet
========

**Disclaimer:** This section is mostly copy-paste of corresponding
`DISCO_H747I modifications for Ethernet`_ mbed blog post. The author of this
article sincerely allowed to use the images and his knowledge about necessary
HW modifications to get Ethernet working with this board.

To get Ethernet working following HW modifications are required:

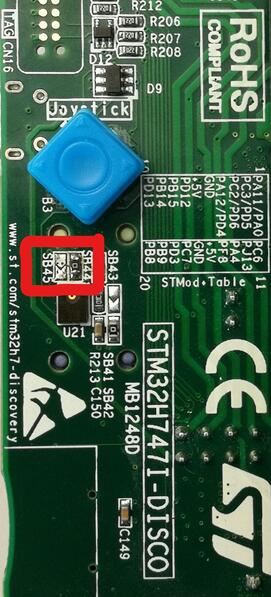
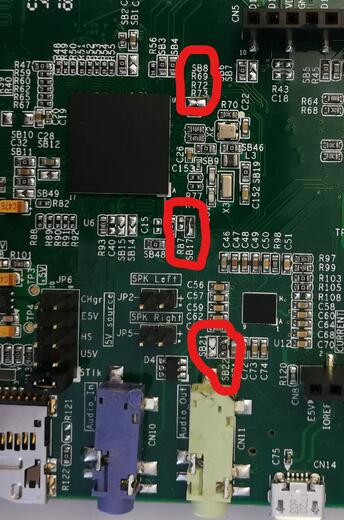
- **SB21**, **SB45** and **R87** should be opened
- **SB22**, **SB44**, **SB17** and **SB8** should be closed

Following two images shows necessary changes on the board marked:

.. image:: ../../../../../../../boards/st/stm32h747i_disco/doc/img/disco_h747i_ethernet_modification_1.jpg
     :align: center
     :alt: STM32H747I-DISCO - Ethernet modification 1 (**SB44**, **SB45**)

.. image:: ../../../../../../../boards/st/stm32h747i_disco/doc/img/disco_h747i_ethernet_modification_2.jpg
     :align: center
     :alt: STM32H747I-DISCO - Ethernet modification 2 (**SB21**, **R87**, **SB22**, **SB17** and **SB8**)

Display
=======

The STM32H747I Discovery kit has a dedicated DSI LCD connector **CN15**, where
the MB1166 (B-LCD40-DSI1) display extension board can be mounted. Enable display
support in Zephyr by adding the shield ``st_b_lcd40_dsi1_mb1166`` or
``st_b_lcd40_dsi1_mb1166_a09`` to your build command, for example:

.. zephyr-app-commands::
   :zephyr-app: samples/drivers/display
   :board: stm32h747i_disco/stm32h747xx/m7
   :shield: st_b_lcd40_dsi1_mb1166
   :goals: build flash

.. note::
   The shield comes in different hardware revisions, the MB1166-A09
   is utilizing a NT35510 panel controller and shall specifically
   use ``st_b_lcd40_dsi1_mb1166_a09`` as SHIELD when building.
   Prior versions are utilizing an OTM8009a controller and shall
   use shield name without postfix, that is: ``st_b_lcd40_dsi1_mb1166``.
   Shield version is printed on a sticker placed below the two bottom
   mounting holes and has the format: MB1166-Axx.

Resources sharing
=================

The dual core nature of STM32H747 SoC requires sharing HW resources between the
two cores. This is done in 3 ways:

- **Compilation**: Clock configuration is only accessible to M7 core. M4 core only
  has access to bus clock activation and deactivation.
- **Static pre-compilation assignment**: Peripherals such as a UART are assigned in
  devicetree before compilation. The user must ensure peripherals are not assigned
  to both cores at the same time.
- **Run time protection**: Interrupt-controller and GPIO configurations could be
  accessed by both cores at run time. Accesses are protected by a hardware semaphore
  to avoid potential concurrent access issues.

Programming and Debugging
*************************

Applications for the ``stm32h747i_disco`` board should be built per core target,
using either ``stm32h747i_disco/stm32h747xx/m7`` or ```stm32h747i_disco/stm32h747xx/m4`` as the target.
See :ref:`build_an_application` for more information about application builds.

.. note::

   If using OpenOCD you will need a recent development version as the last
   official release does not support H7 dualcore yet.
   Also, with OpenOCD, sometimes, flashing is not working. It is necessary to
   erase the flash (with STM32CubeProgrammer for example) to make it work again.
   Debugging with OpenOCD is currently working for this board only with Cortex M7,
   not Cortex M4.


Flashing
========

Flashing operation will depend on the target to be flashed and the SoC
option bytes configuration.
It is advised to use `STM32CubeProgrammer`_ to check and update option bytes
configuration and flash ``stm32h747i_disco/stm32h747xx/m7`` and
``stm32h747i_disco/stm32h747xx/m7`` targets.

By default:

  - CPU1 (Cortex-M7) boot address is set to 0x80000000 (OB: BOOT_CM7_ADD0)
  - CPU2 (Cortex-M4) boot address is set to 0x81000000 (OB: BOOT_CM4_ADD0)

Also, default out of the box board configuration enables CM7 and CM4 boot when
board is powered (Option bytes BCM7 and BCM4 are checked).
It is possible to change Option Bytes so that CM7 boots first in stand alone,
and CM7 will wakeup CM4 after clock initialization.
Drivers are able to take into account both Option Bytes configurations
automatically.

Zephyr flash configuration has been set to meet these default settings.

Alternatively, west `STM32CubeProgrammer`_ runner can be used, after installing
it, to flash applications for both cores. The target core is detected automatically.

.. code-block:: console

   $ west flash --runner stm32cubeprogrammer

Flashing an application to STM32H747I M7 Core
---------------------------------------------

First, connect the STM32H747I Discovery kit to your host computer using
the USB port to prepare it for flashing. Then build and flash your application.

Here is an example for the :ref:`hello_world` application.

.. zephyr-app-commands::
   :zephyr-app: samples/hello_world
   :board: stm32h747i_disco/stm32h747xx/m7
   :goals: build flash

Run a serial host program to connect with your board:

.. code-block:: console

   $ minicom -D /dev/ttyACM0

You should see the following message on the console:

.. code-block:: console

   Hello World! stm32h747i_disco

.. note::
  Sometimes, flashing is not working. It is necessary to erase the flash
  (with STM32CubeProgrammer for example) to make it work again.

Similarly, you can build and flash samples on the M4 target. For this, please
take care of the resource sharing (UART port used for console for instance).

Here is an example for the :zephyr:code-sample:`blinky` application on M4 core.

.. zephyr-app-commands::
   :zephyr-app: samples/basic/blinky
   :board: stm32h747i_disco/stm32h747xx/m7
   :goals: build flash

Debugging
=========

You can debug an application in the usual way.  Here is an example for the
:ref:`hello_world` application.

.. zephyr-app-commands::
   :zephyr-app: samples/hello_world
   :board: stm32h747i_disco/stm32h747xx/m7
   :goals: debug

Debugging with west is currently not available on Cortex M4 side.
In order to debug a Zephyr application on Cortex M4 side, you can use
`STM32CubeIDE`_.

.. _STM32H747I-DISCO website:
   https://www.st.com/en/evaluation-tools/stm32h747i-disco.html

.. _STM32H747XI on www.st.com:
   https://www.st.com/content/st_com/en/products/microcontrollers-microprocessors/stm32-32-bit-arm-cortex-mcus/stm32-high-performance-mcus/stm32h7-series/stm32h747-757/stm32h747xi.html

.. _STM32H747xx reference manual:
   https://www.st.com/resource/en/reference_manual/dm00176879.pdf

.. _STM32H747xx datasheet:
   https://www.st.com/resource/en/datasheet/stm32h747xi.pdf

.. _STM32CubeProgrammer:
   https://www.st.com/en/development-tools/stm32cubeprog.html

.. _DISCO_H747I modifications for Ethernet:
   https://os.mbed.com/teams/ST/wiki/DISCO_H747I-modifications-for-Ethernet

.. _STM32CubeIDE:
   https://www.st.com/en/development-tools/stm32cubeide.html
Part 3
한국어 전문 번역
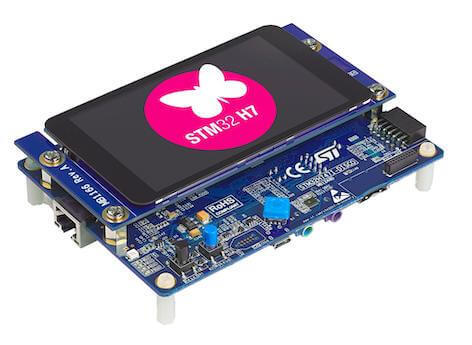
개요
STM32H747I-DISCO는 audio, multi-sensor, graphics, security, video, high-speed connectivity를 위한 Cortex-M7+Cortex-M4 board입니다. STM32H747XI는 Flash 2MB, RAM 1MB, 480MHz CPU, Art Accelerator, L1 cache, external-memory interface, SMPS, MIPI-DSI를 제공합니다.
- USB re-enumeration ST-LINK/V3E
- VCP·mass storage·debug ST-LINK USB
- ST-LINK USB VBUS·USB OTG HS·external power
- MIPI DSI 4-inch capacitive touch LCD
- IEEE802.3-2002 Ethernet
- USB OTG HS
- stereo speaker
- ST-MEMS digital microphone
- 512Mbit Quad-SPI NOR Flash 2개
- 256Mbit SDRAM
- color user LED 4개
- USER·RESET button
- 4-direction+select joystick
- Arduino Uno V3
Zephyr 지원 기능
| Interface | Controller | Driver/Component |
|---|---|---|
| NVIC | on-chip | nested vector interrupt controller |
| UART | on-chip | serial port-polling; serial port-interrupt |
| PINMUX | on-chip | pinmux |
| GPIO | on-chip | gpio |
| FLASH | on-chip | flash memory |
| ETHERNET | on-chip | ethernet (*) |
| RNG | on-chip | True Random number generator |
| FMC | on-chip | memc (SDRAM) |
| SPI | on-chip | spi |
| QSPI NOR | on-chip | off-chip flash |
| SDMMC | on-chip | disk access |
| IPM | on-chip | virtual mailbox based on HSEM |
| DISPLAY | on-chip | MIPI DSI Host with shield MP1166 / st_b_lcd40_dsi1_mb1166 |
core별 기본 설정은 M7/M4 defconfig 두 개입니다.
Pin mapping
GPIO controller 9개가 pin muxing과 I/O를 담당합니다.
기본 Zephyr peripheral mapping
UART_1 TX/RX : PA9/PA10 (ST-Link Virtual Port Com)UART_8 TX/RX : PJ8/PJ9 (Arduino Serial)SPI_5 NSS/SCK/MISO/MOSI : PK1/PK0/PJ11/PJ10 (Arduino SPI)SDMMC_1 D0/D1/D2/D3/CK/CMD : PC8/PC9/PC10/PC11/PC12/PD2LD1 : PI12LD2 : PI13LD3 : PI14LD4 : PI15W-UP : PC13J-CENTER : PK2J-DOWN : PK3J-LEFT : PK4J-RIGHT : PK5J-UP : PK6
Clock·serial
25MHz HSE가 PLL을 공급하며 CPU1 M7은 기본 400MHz, CPU2 M4는 200MHz입니다. USART1·UART8은 CPU1에 배정되고 console은 ST-LINK VCP의 UART1, 115200 8N1입니다.
Ethernet hardware modification
Ethernet을 사용하려면 SB21·SB45·R87 open, SB22·SB44·SB17·SB8 closed가 필요합니다.
Display
전용 DSI connector CN15에 MB1166(B-LCD40-DSI1)을 장착합니다. Zephyr build에 shield를 추가합니다.
west build -b stm32h747i_disco/stm32h747xx/m7 --shield st_b_lcd40_dsi1_mb1166 samples/drivers/display
west flash
MB1166-A09는 NT35510 controller이므로 st_b_lcd40_dsi1_mb1166_a09를 사용합니다. 이전 OTM8009a revision은 postfix 없는 shield를 사용합니다. revision은 아래쪽 mounting hole 사이 sticker의 MB1166-Axx로 확인합니다.
Resource sharing
dual-core SoC의 hardware resource 공유는 세 방식으로 관리합니다.
- Compilation: clock configuration은 M7만 접근하며 M4는 bus clock enable/disable만 접근합니다.
- Static pre-compilation assignment: UART 같은 peripheral을 devicetree에서 core별로 배정하고, 동시에 두 core에 배정하지 않도록 사용자가 보장합니다.
- Run-time protection: 두 core가 접근할 수 있는 interrupt-controller·GPIO configuration은 hardware semaphore로 concurrent access를 막습니다.
Programming and debugging
target은 M7 또는 M4입니다. OpenOCD는 H7 dual-core를 지원하는 최근 development version이 필요하고, flash 실패 시 STM32CubeProgrammer erase가 필요할 수 있습니다. OpenOCD debug는 M7만 지원합니다.
Boot option
- CPU1 M7: 0x80000000, BOOT_CM7_ADD0
- CPU2 M4: 0x81000000, BOOT_CM4_ADD0
- 출고 상태는 BCM7·BCM4 모두 enable
- CM7 단독 boot 후 clock 초기화 뒤 M4 wakeup 방식으로 option byte 변경 가능
- driver는 두 구성 모두 자동 처리
$ west flash --runner stm32cubeprogrammerM7 hello_world
west build -b stm32h747i_disco/stm32h747xx/m7 samples/hello_world
west flash
$ minicom -D /dev/ttyACM0Hello World! stm32h747i_disco원문 M4 blinky example
west build -b stm32h747i_disco/stm32h747xx/m7 samples/basic/blinky
west flash
Debug
west build -b stm32h747i_disco/stm32h747xx/m7 samples/hello_world
west debug
M4는 west debug 대신 STM32CubeIDE를 사용합니다.
참고 자료
Source
출처
영어 원문에는 문단, 문서 지시문, 표, 코드, 코드 심벌, 경로를 그대로 보존했습니다.