Part 1
요약·해설
지원표 6행, sensor 3종, UART·I2C·PWM pin, external ST-LINK P8와 FT232 P7 연결을 전문 번역했습니다.
MCU
STM32F401CC
Clock
84MHz
Sensors
LSM6DSL · LIS2MDL · LPS22HD
Flash
External ST-LINK
Part 2
접을 수 있는 영어 원문 전체
영어 원문 전체 펼치기
원문 SHA-256
B903B6DE6F3BAE5CE114C2777ADC8F9DE97E35D4D2F085DF6C32C32665766DEB
.. _steval_fcu001v1:

ST STM32 Flight Controller Unit
###############################

Overview
********

The STEVAL-FCU001V1 is a Cortex M4 MCU-based flight controller unit for toy quad-copter drones.

.. figure:: ../../../../../../../boards/st/steval_fcu001v1/doc/img/steval_fcu001v1.jpg
     :align: center
     :alt: STM32 Flight Controller Unit

Hardware
********

STM32 Flight Controller Unit provides the following hardware components:

- STM32F401CC in UFQFPN48 package
- ARM |reg| 32-bit Cortex |reg|-M4 MCU with FPU
- 84MHz max MCU frequency
- VDD from 1.7 V to 3.6 V
- 256 KB FLASH
- 64 KB SRAM
- General Purpose Timers
- Watchdog Timers (2)
- On board sensors:

  - 3D Accelerometer and 3D Gyroscope: LSM6DSL
  - 3D Magnetometer: LIS2MDL
  - MEMS Pressure sensor: LPS22HD

- 2 User LEDS
- USART/UART (1)
- I2C (1)
- Bluetooth LE over SPI

More information about the STM32 Flight Controller Unit
can be found in these documents:

- `STEVAL_FCU001V1 website`_
- `STM32F401 reference manual`_
- `STM32F401CC on www.st.com`_

Supported Features
==================

The Zephyr steval_fcu001v1 board configuration supports the following hardware features:

+-----------+------------+------------------------------------+
| Interface | Controller | Driver/Component                   |
+===========+============+====================================+
| NVIC      | on-chip    | nested vector interrupt controller |
+-----------+------------+------------------------------------+
| UART      | on-chip    | serial port-polling;               |
|           |            | serial port-interrupt              |
+-----------+------------+------------------------------------+
| PINMUX    | on-chip    | pinmux                             |
+-----------+------------+------------------------------------+
| GPIO      | on-chip    | gpio                               |
+-----------+------------+------------------------------------+
| PWM       | on-chip    | pwm                                |
+-----------+------------+------------------------------------+
| I2C       | on-chip    | i2c                                |
+-----------+------------+------------------------------------+


The default configuration can be found in
:zephyr_file:`boards/st/steval_fcu001v1/steval_fcu001v1_defconfig`

Default Zephyr Peripheral Mapping:
----------------------------------

- UART_1 TX/RX : PA9/PA10
- I2C2 SCL/SDA : PB10/PB3
- PWM_2_CH1    : PA0
- LD1          : PB5
- LD2          : PB4

System Clock
============

The steval_fcu001v1 system clock can be driven by an internal or external oscillator,
as well as by the main PLL clock. By default, the system clock is driven by the PLL clock at 84MHz,
driven by a 16MHz high-speed external clock.

Serial Port
===========

The steval_fcu001v1 board has one UART. The Zephyr console output is assigned to UART1.
Default settings are 115200 8N1.

I2C
===

The steval_fcu001v1 board has one I2C. The default I2C mapping for Zephyr is:

- I2C2_SCL : PB10
- I2C2_SDA : PB3

Programming and Debugging
*************************

Applications for the ``steval_fcu001v1`` board configuration can be built and
flashed in the usual way (see :ref:`build_an_application` and
:ref:`application_run` for more details).

Flashing
========

Flashing Zephyr onto the steval_fcu001v1 board requires an external ST-LINK/V2-1 programmer.
The programmer is attached to the P8 programming header with ARM-JTAG-20-10-Plug-in Adapter.

Flashing an application to STEVAL_FCU001V1
------------------------------------------

Connect the FT232-to-USB port to host system, and RX, TX, Gnd pins to
the P7 header of the steval_fcu001v1 board.  Then run a serial host
program to connect with your steval_fcu001v1 via the FT232 board:

.. code-block:: console

   $ minicom -D /dev/ttyUSB0

Now build and flash an application. Here is an example for :ref:`hello_world`

.. zephyr-app-commands::
   :zephyr-app: samples/hello_world
   :board: steval_fcu001v1
   :goals: build flash

You should see the following message on the console:

.. code-block:: console

   Hello World! steval_fcu001v1

Debugging
=========

You can debug an application in the usual way. Here is an example for the
:ref:`hello_world` application.

.. zephyr-app-commands::
   :zephyr-app: samples/hello_world
   :board: steval_fcu001v1
   :maybe-skip-config:
   :goals: debug

.. _STEVAL_FCU001V1 website:
   https://www.st.com/en/evaluation-tools/steval-fcu001v1.html

.. _STM32F401CC on www.st.com:
   https://www.st.com/en/microcontrollers-microprocessors/stm32f401cc.html

.. _STM32F401 reference manual:
    https://www.st.com/resource/en/reference_manual/dm00096844.pdf
Part 3
한국어 전문 번역
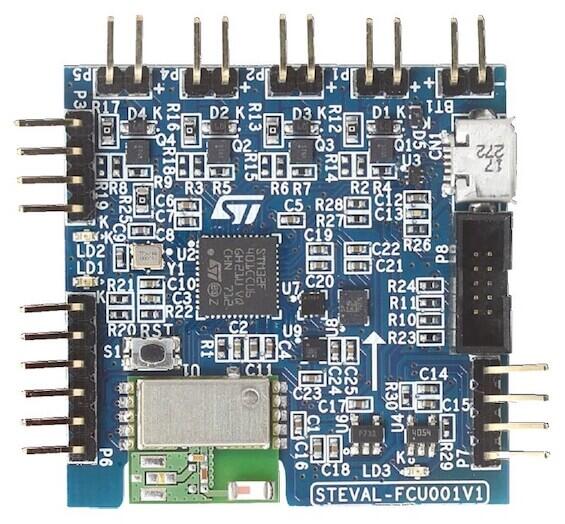
개요
STEVAL-FCU001V1은 toy quadcopter drone용 Cortex-M4 flight-controller unit입니다.
Hardware
- UFQFPN48 STM32F401CC
- FPU를 갖춘 32-bit Cortex-M4, 최대 84MHz
- VDD 1.7~3.6V
- Flash 256KB, SRAM 64KB
- General-purpose timer와 watchdog 2개
- On-board sensor
- LSM6DSL 3D accelerometer·3D gyroscope
- LIS2MDL 3D magnetometer
- LPS22HD MEMS pressure sensor
- User LED 2개
- USART/UART 1개, I2C 1개
- SPI를 통한 Bluetooth LE
Zephyr 지원 기능
| Interface | Controller | Driver/Component |
|---|---|---|
| NVIC | on-chip | nested vector interrupt controller |
| UART | on-chip | serial port-polling; serial port-interrupt |
| PINMUX | on-chip | pinmux |
| GPIO | on-chip | gpio |
| PWM | on-chip | pwm |
| I2C | on-chip | i2c |
기본 설정은 boards/st/steval_fcu001v1/steval_fcu001v1_defconfig입니다.
기본 Zephyr peripheral mapping
UART_1 TX/RX : PA9/PA10I2C2 SCL/SDA : PB10/PB3PWM_2_CH1 : PA0LD1 : PB5LD2 : PB4
System clock
Internal·external oscillator 또는 main PLL을 사용할 수 있고 기본값은 16MHz HSE가 구동하는 PLL의 84MHz입니다.
Serial과 I2C
UART 1개 중 console은 UART1, 115200 8N1입니다. I2C는 I2C2 한 개이며 SCL/SDA는 PB10/PB3입니다.
Programming and debugging
Flash에는 external ST-LINK/V2-1 programmer가 필요하며 ARM-JTAG-20-10 plug-in adapter로 P8 header에 연결합니다. Console은 FT232-to-USB의 RX·TX·GND를 P7에 연결합니다.
$ minicom -D /dev/ttyUSB0west build -b steval_fcu001v1 samples/hello_world
west flashHello World! steval_fcu001v1Debugging
west build -b steval_fcu001v1 samples/hello_world
west debug
참고 자료
Source
출처
영어 원문에는 문단, 문서 지시문, 표, 코드, 코드 심벌, 경로를 그대로 보존했습니다.