Part 1
요약·해설
지원 peripheral 14개, LED·button·USB/UART·battery·SIM과 ns target 선택, Segger flashing을 설명합니다.
LTE-M · NB-IoT
nRF9160
nano 4FF
UART MCUboot
Part 2
접을 수 있는 영어 원문 전체
영어 원문 전체 펼치기
6A0468D5AAD7B6E8A590D447ED6CCC4C7EB17B1FCEB21C8FA7573D4C74E7557E
.. _sparkfun_thing_plus_nrf9160:

nRF9160 Thing Plus
##################

.. figure:: ../../../../../../../boards/sparkfun/thing_plus/doc/img/sparkfun_thing_plus_nrf9160.jpg
     :align: center
     :alt: Sparkfun nRF9160 Thing Plus

     nRF9160 Thing Plus (Credit: Sparkfun)

Overview
********

The nRF9160 Thing Plus designed by Circuit Dojo is a single-board development
for bringing your LTE-M and NB-IoT applications to life. The sparkfun_thing_plus_nrf9160
board configuration leverages the pre-existing support for the Nordic Semiconductor
nRF9160. Supported nRF9160 peripherals include:

* :abbr:`ADC (Analog to Digital Converter)`
* CLOCK
* FLASH
* :abbr:`GPIO (General Purpose Input Output)`
* :abbr:`I2C (Inter-Integrated Circuit)`
* :abbr:`MPU (Memory Protection Unit)`
* :abbr:`NVIC (Nested Vectored Interrupt Controller)`
* :abbr:`PWM (Pulse Width Modulation)`
* :abbr:`RTC (nRF RTC System Clock)`
* Segger RTT (RTT Console)
* :abbr:`SPI (Serial Peripheral Interface)`
* :abbr:`UARTE (Universal asynchronous receiver-transmitter with EasyDMA)`
* :abbr:`WDT (Watchdog Timer)`
* :abbr:`IDAU (Implementation Defined Attribution Unit)`

More information about the board can be found at the
`nRF9160 Thing Plus Documentation`_.


Hardware
********

Connections and IOs
===================

The nRF9160 Thing Plus has everything you know and love about
the Feather platform. Here are some of the highlights:

LED
---

* D7 (blue) = P0.03

Push buttons and Switches
-------------------------

* MODE = P0.12
* RESET

USB
---

Contains a USB/UART connection for both debugging and loading new
code using a UART Enabled MCUBoot.

Standard Battery Connection
----------------------------

The nRF9160 Thing Plus has a 2 pin battery connector on board. Lithium Polymer batteries >
300mA required.

Nano SIM Holder
---------------

The nRF9160 Thing Plus has a built-in nano SIM (4FF) holder located
on the bottom side.


Programming and Debugging
*************************

sparkfun_thing_plus_nrf9160 can be used with most programmers like:

* J-Link (the nRF53-DK is recommended)
* CMSIS-DAP based programmers

Check out `Getting Started`_ for more info.

Building an application
=======================

In most cases you'll want to use the ``ns`` target with any of the Zephyr
or Nordic based examples.

Some of the examples do not use secure mode, so they do not required the ``ns`` suffix.
A great example of this is the `hello_world` below.

Flashing
========

Follow the instructions in the :ref:`nordic_segger` page to install
and configure all the necessary software. Further information can be
found in :ref:`nordic_segger_flashing`. Then build and flash
applications as usual (see :ref:`build_an_application` and
:ref:`application_run` for more details).

Here is an example for the :ref:`hello_world` application.

First, run your favorite terminal program to listen for output.

.. code-block:: console

   $ screen /dev/<tty_device> 115200

Replace :code:`<tty_device>` with the port where the nRF9160 Thing Plus
can be found. In most cases (On Linux/Mac) it will be: :code:`/dev/tty.SLAB_USBtoUART`.

Then build and flash the application in the usual way.

.. zephyr-app-commands::
   :zephyr-app: samples/hello_world
   :board: sparkfun_thing_plus_nrf9160
   :goals: build flash

Debugging
=========

Refer to the :ref:`nordic_segger` page to learn about debugging Nordic boards with a
Segger IC.


Testing the LEDs and buttons on the nRF9160 Thing Plus
******************************************************

There are 2 samples that allow you to test that the buttons (switches) and LEDs on
the board are working properly with Zephyr:

* :zephyr:code-sample:`blinky`
* :zephyr:code-sample:`button`

You can build and flash the examples to make sure Zephyr is running correctly on
your board. The button and LED definitions can be found in
:zephyr_file:`boards/sparkfun/thing_plus/sparkfun_thing_plus_nrf9160_common.dtsi`.

References
**********

.. target-notes::

**Side note** This page was based on the documentation for the nRF9160 DK. Thanks to Nordic for
developing a great platform!

.. _nRF9160 Thing Plus Documentation: https://docs.jaredwolff.com/nrf9160-introduction.html
.. _Getting Started: https://docs.jaredwolff.com/nrf9160-getting-started.html
Part 3
한국어 전문 번역
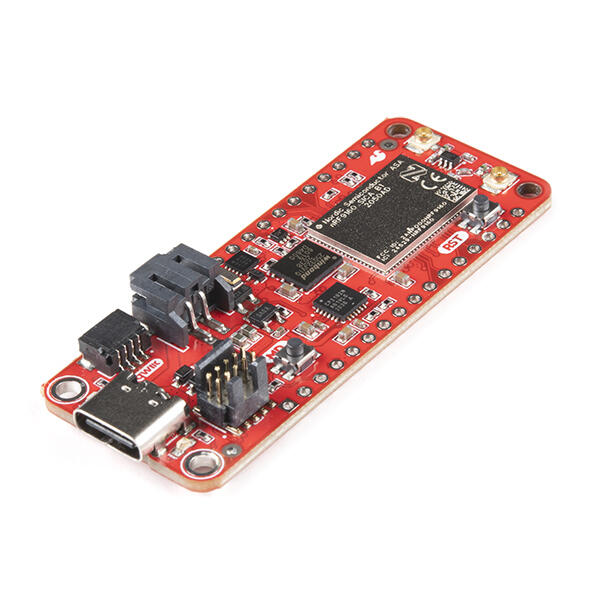
개요
Circuit Dojo가 설계한 nRF9160 Thing Plus는 LTE-M과 NB-IoT application을 구현하기 위한 single-board development platform입니다. sparkfun_thing_plus_nrf9160 configuration은 Nordic Semiconductor nRF9160의 기존 Zephyr 지원을 활용합니다.
지원 nRF9160 peripheral은 다음과 같습니다.
- ADC(Analog to Digital Converter)
- CLOCK
- FLASH
- GPIO(General Purpose Input Output)
- I2C(Inter-Integrated Circuit)
- MPU(Memory Protection Unit)
- NVIC(Nested Vectored Interrupt Controller)
- PWM(Pulse Width Modulation)
- RTC(nRF RTC System Clock)
- Segger RTT(RTT Console)
- SPI(Serial Peripheral Interface)
- UARTE(Universal asynchronous receiver-transmitter with EasyDMA)
- WDT(Watchdog Timer)
- IDAU(Implementation Defined Attribution Unit)
상세 정보는 nRF9160 Thing Plus Documentation을 참고합니다.
Hardware
Feather platform에서 익숙한 connection과 I/O를 제공합니다.
LED
Blue D7 LED는 P0.03에 연결됩니다.
Button과 switch
MODE = P0.12RESET
USB
Debugging과 UART Enabled MCUboot로 새 code를 load하는 USB/UART connection이 있습니다.
Battery
2-pin battery connector를 onboard로 제공하며 300mA보다 큰 Lithium Polymer battery가 필요합니다.
Nano SIM
Board underside에 builtin nano SIM(4FF) holder가 있습니다.
Programming and debugging
sparkfun_thing_plus_nrf9160은 J-Link와 CMSIS-DAP 기반 programmer를 포함한 대부분의 programmer를 사용할 수 있으며 nRF53-DK를 권장합니다. 자세한 시작 절차는 Getting Started를 참고합니다.
Application build
대부분의 Zephyr 또는 Nordic example에서는 ns target을 사용합니다. 일부 example은 secure mode를 사용하지 않으므로 ns suffix가 필요하지 않으며 아래 hello_world가 그 예입니다.
Flashing
Nordic Segger 지침에 따라 software를 설치·설정합니다. 먼저 terminal에서 output을 기다립니다.
screen /dev/<tty_device> 115200<tty_device>는 nRF9160 Thing Plus가 연결된 port입니다. Linux/macOS에서는 대개 /dev/tty.SLAB_USBtoUART입니다. 그런 다음 application을 build하고 flash합니다.
west build -b sparkfun_thing_plus_nrf9160 samples/hello_world
west flash
Debugging
Nordic board와 Segger IC를 위한 표준 Nordic Segger debugging 절차를 사용합니다.
LED와 button test
blinky와 button sample로 board의 switch·LED와 Zephyr 실행을 확인합니다. Button과 LED 정의는 boards/sparkfun/thing_plus/sparkfun_thing_plus_nrf9160_common.dtsi에 있습니다.
참고 자료
이 page는 nRF9160 DK 문서를 바탕으로 작성되었으며 원문은 Nordic의 platform 개발에 감사를 전합니다.
Source
출처
영어 원문에는 문단, 문서 지시문, 표, 코드, 코드 심벌, 경로를 그대로 보존했습니다.