Part 1
요약·해설
HSDK의 다음 개정판인 HS4x/HS4xD의 pinmux 표 전체와 UART-only Zephyr 3.7.0 지원 상태를 함께 보존합니다.
ARC HS4xD
24
>= 0.15.2
UART
Part 2
접을 수 있는 영어 원문 전체
영어 원문 전체 펼치기
340A990F50D0294D669E160153D169C7DD0972D8D6C72014AD73672914A0D0E8
.. _hsdk4xd:

DesignWare(R) ARC(R) HS4x/HS4xD Development Kit
###############################################

Overview
********

The ARC HS4x/HS4xD Development Kit is the next revision of :ref:`Synopsys HSDK board <hsdk>`.
It includes a multicore ARC HS4xD-based chip that integrates a wide range of interfaces
including Ethernet, HDMI, WiFi, Bluetooth, USB, SDIO, I2C, SPI, UART, I2S, ADC, PWM and GPIO,
as well as a Think Silicon GPU.

.. image:: ../../../../../../../boards/snps/hsdk4xd/doc/hsdk4xd.jpg
   :align: center
   :alt: DesignWare(R) ARC(R) HS4x/HS4xD Development Kit (synopsys.com)

For details about the board, see: `ARC HS4x/HS4xD Development Kit
(HSDK4xD) <https://www.synopsys.com/dw/ipdir.php?ds=arc-hs-development-kit>`__

Hardware
********

The ARC HSDK4xD has 24 general GPIOs, which divided into 8 groups named from ``GPIO_SEL_0`` to ``GPIO_SEL_7``.
Each sel can configured for different functions, such as: GPIO, UART, SPI, I2C and PWM. We can program
``CREG_GPIO_MUX`` register to do configuration for each sel. Tables below show the bit definition for
``CREG_GPIO_MUX`` register and the details configuration for each pin.

+--------+-------------+---------+--------------+---------------------------------+
| Bit    | Name        | Access  | Reset value  | Description                     |
+--------+-------------+---------+--------------+---------------------------------+
| 2:0    | GPIO_SEL_0  | RW      | 0x0          | GPIO mux select for gpio[3:0]   |
+--------+-------------+---------+--------------+---------------------------------+
| 5:3    | GPIO_SEL_1  | RW      | 0x0          | GPIO mux select for gpio[7:4]   |
+--------+-------------+---------+--------------+---------------------------------+
| 8:6    | GPIO_SEL_2  | RW      | 0x0          | GPIO mux select for gpio[11:8]  |
+--------+-------------+---------+--------------+---------------------------------+
| 11:9   | GPIO_SEL_3  | RW      | 0x0          | GPIO mux select for gpio[15:12] |
+--------+-------------+---------+--------------+---------------------------------+
| 14:12  | GPIO_SEL_4  | RW      | 0x0          | GPIO mux select for gpio[17:16] |
+--------+-------------+---------+--------------+---------------------------------+
| 17:15  | GPIO_SEL_5  | RW      | 0x0          | GPIO mux select for gpio[19:18] |
+--------+-------------+---------+--------------+---------------------------------+
| 20:18  | GPIO_SEL_6  | RW      | 0x0          | GPIO mux select for gpio[21:20] |
+--------+-------------+---------+--------------+---------------------------------+
| 23:21  | GPIO_SEL_7  | RW      | 0x0          | GPIO mux select for gpio[23:22] |
+--------+-------------+---------+--------------+---------------------------------+

+------+-----------+----------+-----------+------------+----------+-----------+-------------+-----------+-------------+
| SELS | GPIO PINS | FUN0     | FUN1      | FUN2       | FUN3     | FUN4      | FUN5        | FUN6      | FUN7        |
+------+-----------+----------+-----------+------------+----------+-----------+-------------+-----------+-------------+
| SEL0 | 0         | gpio[0]  | uart0_cts | spi1_cs[0] | gpio[0]  | gpio[0]   | pwm_ch[6]   | pwm_ch[6] | pwm_ch[1]   |
|      +-----------+----------+-----------+------------+----------+-----------+-------------+-----------+-------------+
|      | 1         | gpio[1]  | uart0_txd | spi1_mosi  | gpio[1]  | pwm_ch[0] | gpio[1]     | pwm_ch[0] | pwm_ch[0]   |
|      +-----------+----------+-----------+------------+----------+-----------+-------------+-----------+-------------+
|      | 2         | gpio[2]  | uart0_rxd | spi1 _miso | i2c1_scl | gpio[2]   | gpio[2]     | gpio[2]   | gpio[2]     |
|      +-----------+----------+-----------+------------+----------+-----------+-------------+-----------+-------------+
|      | 3         | gpio[3]  | uart0_rts | spi1_clk   | i2c1_sda | gpio[3]   | gpio[3]     | gpio[3]   | gpio[3]     |
+------+-----------+----------+-----------+------------+----------+-----------+-------------+-----------+-------------+
| SEL1 | 4         | gpio[4]  | uart1_cts | spi2_cs[0] | gpio[4]  | gpio[4]   | pwm_ch[4]   | pwm_ch[4] | pwm_ch[3]   |
|      +-----------+----------+-----------+------------+----------+-----------+-------------+-----------+-------------+
|      | 5         | gpio[5]  | uart1_txd | spi2_mosi  | gpio[5]  | pwm_ch[2] | gpio[5]     | pwm_ch[2] | pwm_ch[2]   |
|      +-----------+----------+-----------+------------+----------+-----------+-------------+-----------+-------------+
|      | 6         | gpio[6]  | uart1_rxd | spi2_miso  | i2c2_scl | gpio[6]   | gpio[6]     | gpio[6]   | gpio[6]     |
|      +-----------+----------+-----------+------------+----------+-----------+-------------+-----------+-------------+
|      | 7         | gpio[7]  | uart1_rts | spi2_clk   | i2c2_sda | gpio[7]   | gpio[7]     | gpio[7]   | gpio[7]     |
+------+-----------+----------+-----------+------------+----------+-----------+-------------+-----------+-------------+
| SEL2 | 8         | gpio[8]  | uart2_cts | spi1_cs[1] | gpio[8]  | gpio[8]   | pwm_ch[2]   | pwm_ch[2] | pwm_ch[5]   |
|      +-----------+----------+-----------+------------+----------+-----------+-------------+-----------+-------------+
|      | 9         | gpio[9]  | uart2_txd | spi1_mosi  | gpio[9]  | pwm_ch[4] | gpio[9]     | pwm_ch[4] | pwm_ch[4]   |
|      +-----------+----------+-----------+------------+----------+-----------+-------------+-----------+-------------+
|      | 10        | gpio[10] | uart2_rxd | spi1_miso  | i2c1_scl | gpio[10]  | gpio[10]    | gpio[10]  | gpio[10]    |
|      +-----------+----------+-----------+------------+----------+-----------+-------------+-----------+-------------+
|      | 11        | gpio[11] | uart2_rts | spi1_clk   | i2c1_sda | gpio[11]  | gpio[11]    | gpio[11]  | gpio[11]    |
+------+-----------+----------+-----------+------------+----------+-----------+-------------+-----------+-------------+
| SEL3 | 12        | gpio[12] | uart0_cts | spi2_cs[1] | gpio[12] | gpio[12]  | pwm_ch[0]   | pwm_ch[0] | pwm_ch[7]   |
|      +-----------+----------+-----------+------------+----------+-----------+-------------+-----------+-------------+
|      | 13        | gpio[13] | uart0_txd | spi2_mosi  | gpio[13] | pwm_ch[6] | gpio[13]    | pwm_ch[6] | pwm_ch[6]   |
|      +-----------+----------+-----------+------------+----------+-----------+-------------+-----------+-------------+
|      | 14        | gpio[14] | uart0_rxd | spi2_miso  | i2c2_scl | gpio[14]  | gpio[14]    | gpio[14]  | gpio[14]    |
|      +-----------+----------+-----------+------------+----------+-----------+-------------+-----------+-------------+
|      | 15        | gpio[15] | uart0_rts | spi2_clk   | i2c2_sda | gpio[15]  | gpio[15]    | gpio[15]  | gpio[15]    |
+------+-----------+----------+-----------+------------+----------+-----------+-------------+-----------+-------------+
| SEL4 | 16        | gpio[16] | uart1_txd | spi1_cs[2] | i2c1_scl | gpio[16]  | pwm_fault_0 | gpio[16]  | pwm_fault_0 |
|      +-----------+----------+-----------+------------+----------+-----------+-------------+-----------+-------------+
|      | 17        | gpio[17] | uart1_rxd | spi1_mosi  | i2c1_sda | pwm_ch[0] | pwm_ch[0]   | pwm_ch[5] | pwm_ch[5]   |
+------+-----------+----------+-----------+------------+----------+-----------+-------------+-----------+-------------+
| SEL5 | 18        | gpio[18] | uart2_txd | spi1_miso  | i2c2_scl | gpio[18]  | gpio[18]    | gpio[18]  | gpio[18]    |
|      +-----------+----------+-----------+------------+----------+-----------+-------------+-----------+-------------+
|      | 19        | gpio[19] | uart2_rxd | spi1_clk   | i2c2_sda | gpio[19]  | gpio[19]    | gpio[19]  | gpio[19]    |
+------+-----------+----------+-----------+------------+----------+-----------+-------------+-----------+-------------+
| SEL6 | 20        | gpio[20] | uart0_txd | spi2_cs[2] | i2c1_scl | gpio[20]  | pwm_fault_1 | gpio[20]  | pwm_fault_1 |
|      +-----------+----------+-----------+------------+----------+-----------+-------------+-----------+-------------+
|      | 21        | gpio[21] | uart0_rxd | spi2_mosi  | i2c1_sda | pwm_ch[6] | pwm_ch[6]   | pwm_ch[3] | pwm_ch[3]   |
+------+-----------+----------+-----------+------------+----------+-----------+-------------+-----------+-------------+
| SEL7 | 22        | gpio[22] | uart2_txd | spi2_miso  | i2c2_scl | gpio[22]  | gpio[22]    | gpio[22]  | gpio[22]    |
|      +-----------+----------+-----------+------------+----------+-----------+-------------+-----------+-------------+
|      | 23        | gpio[23] | uart2_rxd | spi2_clk   | i2c2_sda | gpio[23]  | gpio[23]    | gpio[23]  | gpio[23]    |
+------+-----------+----------+-----------+------------+----------+-----------+-------------+-----------+-------------+

Digilent Pmod
=============

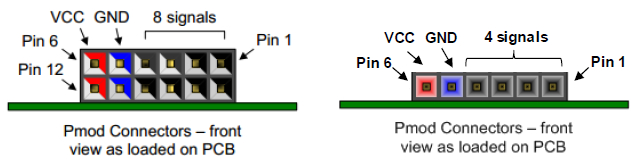
The ARC HSDK4xD features two 12-pin Pmod connectors ``Pmod_A`` and ``Pmod_B`` and one 6-pin Pmod connector ``Pmod_C``.
The functionality of the Pmod connectors is programmable and includes GPIO, UART, SPI, I2C and PWM.
The location of the pins on the Pmod connectors is shown in Figure below. Detailed pin descriptions
depending on the pin multiplexer settings are provided in the subsequent sections.

.. image:: ../../../../../../../boards/snps/hsdk4xd/doc/pinout_diagram_of_the_pmod.jpg
   :align: center
   :alt: Pinout Diagram of the Pmod

Pmod_A Connector
----------------

Table below lists the pin assignment of valid protocols that can be multiplexed on the ``Pmod_A``
connector. The GPIO column is the default assignment after Reset.

+------+-----------+------------+-------------+-----------+------------+-----------+
| Pin  | GPIO      | UART       | SPI         | I2C       | PWM_1      | PWM_2     |
+------+-----------+------------+-------------+-----------+------------+-----------+
| A1   | gpio[8]   | uart2_cts  | spi1_cs[1]  | gpio[8]   | gpio[8]    | pwm_ch[2] |
+------+-----------+------------+-------------+-----------+------------+-----------+
| A2   | gpio[9]   | uart2_txd  | spi1_mosi   | gpio[9]   | pwm_ch[4]  | gpio[9]   |
+------+-----------+------------+-------------+-----------+------------+-----------+
| A3   | gpio[10]  | uart2_rxd  | spi1_miso   | i2c1_scl  | gpio[10]   | gpio[10]  |
+------+-----------+------------+-------------+-----------+------------+-----------+
| A4   | gpio[11]  | uart2_rts  | spi1_clk    | i2c1_sda  | gpio[11]   | gpio[11]  |
+------+-----------+------------+-------------+-----------+------------+-----------+
| A5   | GND       | GND        | GND         | GND       | GND        | GND       |
+------+-----------+------------+-------------+-----------+------------+-----------+
| A6   | 3V3       | 3V3        | 3V3         | 3V3       | 3V3        | 3V3       |
+------+-----------+------------+-------------+-----------+------------+-----------+
| A7   | gpio[20]  | gpio[20]   | gpio[20]    | gpio[20]  | gpio[20]   | gpio[20]  |
+------+-----------+------------+-------------+-----------+------------+-----------+
| A8   | gpio[21]  | gpio[21]   | gpio[21]    | gpio[21]  | gpio[21]   | gpio[21]  |
+------+-----------+------------+-------------+-----------+------------+-----------+
| A9   | n.c.      | n.c.       | n.c.        | n.c.      | n.c.       | n.c.      |
+------+-----------+------------+-------------+-----------+------------+-----------+
| A10  | n.c.      | n.c.       | n.c.        | n.c.      | n.c.       | n.c.      |
+------+-----------+------------+-------------+-----------+------------+-----------+
| A11  | GND       | GND        | GND         | GND       | GND        | GND       |
+------+-----------+------------+-------------+-----------+------------+-----------+
| A12  | 3V3       | 3V3        | 3V3         | 3V3       | 3V3        | 3V3       |
+------+-----------+------------+-------------+-----------+------------+-----------+

Pmod_B Connector
----------------

Table below lists the pin assignment of valid protocols that can be multiplexed on the ``Pmod_B``
connector. The GPIO column is the default assignment after Reset.

+------+-----------+------------+-------------+-----------+------------+-----------+
| Pin  | GPIO      | UART       | SPI         | I2C       | PWM_1      | PWM_2     |
+------+-----------+------------+-------------+-----------+------------+-----------+
| B1   | gpio[12]  | uart0_cts  | spi2_cs[1]  | gpio[12]  | gpio[12]   | pwm_ch[0] |
+------+-----------+------------+-------------+-----------+------------+-----------+
| B2   | gpio[13]  | uart0_txd  | spi2_mosi   | gpio[13]  | pwm_ch[6]  | gpio[13]  |
+------+-----------+------------+-------------+-----------+------------+-----------+
| B3   | gpio[14]  | uart0_rxd  | spi2_miso   | i2c2_scl  | gpio[14]   | gpio[14]  |
+------+-----------+------------+-------------+-----------+------------+-----------+
| B4   | gpio[15]  | uart0_rts  | spi2_clk    | i2c2_sda  | gpio[15]   | gpio[15]  |
+------+-----------+------------+-------------+-----------+------------+-----------+
| B5   | GND       | GND        | GND         | GND       | GND        | GND       |
+------+-----------+------------+-------------+-----------+------------+-----------+
| B6   | 3V3       | 3V3        | 3V3         | 3V3       | 3V3        | 3V3       |
+------+-----------+------------+-------------+-----------+------------+-----------+
| B7   | gpio[22]  | gpio[22]   | gpio[22]    | gpio[22]  | gpio[22]   | gpio[22]  |
+------+-----------+------------+-------------+-----------+------------+-----------+
| B8   | gpio[23]  | gpio[23]   | gpio[23]    | gpio[23]  | gpio[23]   | gpio[23]  |
+------+-----------+------------+-------------+-----------+------------+-----------+
| B9   | n.c.      | n.c.       | n.c.        | n.c.      | n.c.       | n.c.      |
+------+-----------+------------+-------------+-----------+------------+-----------+
| B10  | n.c.      | n.c.       | n.c.        | n.c.      | n.c.       | n.c.      |
+------+-----------+------------+-------------+-----------+------------+-----------+
| B11  | GND       | GND        | GND         | GND       | GND        | GND       |
+------+-----------+------------+-------------+-----------+------------+-----------+
| B12  | 3V3       | 3V3        | 3V3         | 3V3       | 3V3        | 3V3       |
+------+-----------+------------+-------------+-----------+------------+-----------+

Pmod_C Connector
----------------

Table below lists the pin assignment of valid protocols that can be multiplexed on the ``Pmod_C``
connector. The GPIO column is the default assignment after Reset.

+------+-----------+------------+-------------+-----------+-----------+
| Pin  | GPIO      | UART       | SPI         | I2C       | PWM       |
+------+-----------+------------+-------------+-----------+-----------+
| C1   | gpio[16]  | uart1_txd  | spi1_cs[2]  | i2c1_scl  | gpio[16]  |
+------+-----------+------------+-------------+-----------+-----------+
| C2   | gpio[17]  | uart1_rxd  | spi1_mosi   | i2c1_sda  | pwm_ch[0] |
+------+-----------+------------+-------------+-----------+-----------+
| C3   | gpio[18]  | uart2_txd  | spi1_miso   | i2c2_scl  | gpio[18]  |
+------+-----------+------------+-------------+-----------+-----------+
| C4   | gpio[19]  | uart2_rxd  | spi1_clk    | i2c2_sda  | gpio[19]  |
+------+-----------+------------+-------------+-----------+-----------+
| C5   | GND       | GND        | GND         | GND       | GND       |
+------+-----------+------------+-------------+-----------+-----------+
| C6   | 3V3       | 3V3        | 3V3         | 3V3       | 3V3       |
+------+-----------+------------+-------------+-----------+-----------+

Mikrobus
========

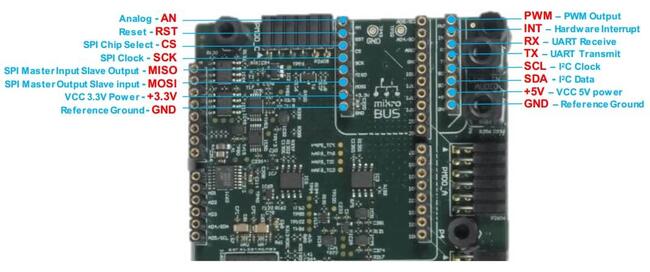
The ARC HSDK4xD features a set of MikroBUS headers. Figure below shows the relevant function assignments,
fully compatible with the MikroBUS standard. Table below shows the pin assignment on the I/O Multiplexer.

.. image:: ../../../../../../../boards/snps/hsdk4xd/doc/mikrobus_header.jpg
   :align: center
   :alt: mikrobus header

+-------+-----------------+------+-----------+
| Pin   | I/O             | Pin  | I/O       |
+-------+-----------------+------+-----------+
| AN    | ADC VIN6*       | PWM  | pwm_ch[0] |
+-------+-----------------+------+-----------+
| RST   | GPX_Port0_bit1  | INT  | gpio[16]  |
+-------+-----------------+------+-----------+
| CS    | spi2_cs[1]      | RX   | uart2_rxd |
+-------+-----------------+------+-----------+
| SCK   | spi2_clk        | TX   | uart2_txd |
+-------+-----------------+------+-----------+
| MISO  | spi2_miso       | SCL  | i2c2_scl  |
+-------+-----------------+------+-----------+
| MOSI  | spi2_mosi       | SDA  | i2c2_sda  |
+-------+-----------------+------+-----------+

.. note::
    ADC VIN6 is available through the on-board ADC and is
    read though SPI0 using SPI chip select 1.

Arduino
=======

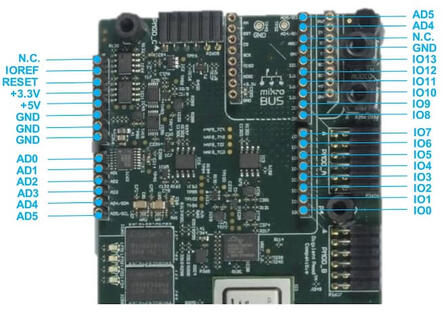
The ARC HSDK4xD provides an Arduino shield interface. Figure below shows the relevant
function assignments. The Arduino shield interface is compatible with the Arduino UNO
R3 with the following exceptions: 5 Volt shields are not supported, the IOREF voltage on
the ARC HSDK4xD board is fixed to 3V3. Note that the ICSP header is also not available. Most
shields do not require this ICSP header as the SPI master interface on this ICSP header
is also available on the ``IO10`` to ``IO13`` pins.

.. image:: ../../../../../../../boards/snps/hsdk4xd/doc/arduino_shield_interface.jpg
   :align: center
   :alt: arduino shield interface

Table below shows the pin assignment on the I/O Multiplexer. Multiplexing is controlled by software
using the ``CREG_GPIO_MUX`` register (see Pinmux ). After a reset, all ports are configured as GPIO inputs.

+-------+------------+-----------------+------------+
| Pin   | I/O-1      | I/O-2           | I/O-3      |
+-------+------------+-----------------+------------+
| AD0   | ADC VIN0*  | GPX_port0_bit2  | -          |
+-------+------------+-----------------+------------+
| AD1   | ADC VIN1*  | GPX_port0_bit3  | -          |
+-------+------------+-----------------+------------+
| AD2   | ADC VIN2*  | GPX_port0_bit4  | -          |
+-------+------------+-----------------+------------+
| AD3   | ADC VIN3*  | GPX_port0_bit5  | -          |
+-------+------------+-----------------+------------+
| AD4   | ADC VIN4*  | gpio[18]        | i2c2_sda   |
+-------+------------+-----------------+------------+
| AD5   | ADC VIN5*  | gpio[19]        | i2c2_scl   |
+-------+------------+-----------------+------------+
| IO0   | gpio[23]   | uart2_rxd       | -          |
+-------+------------+-----------------+------------+
| IO1   | gpio[22]   | uart2_txd       | -          |
+-------+------------+-----------------+------------+
| IO2   | gpio[16]   | -               | -          |
+-------+------------+-----------------+------------+
| IO3   | gpio[17]   | pwm_ch[5]       | -          |
+-------+------------+-----------------+------------+
| IO4   | gpio[11]   | -               |            |
+-------+------------+-----------------+------------+
| IO5   | gpio[9]    | pwm_ch[4]       | -          |
+-------+------------+-----------------+------------+
| IO6   | gpio[21]   | pwm_ch[3]       | -          |
+-------+------------+-----------------+------------+
| IO7   | gpio[20]   | -               | -          |
+-------+------------+-----------------+------------+
| IO8   | gpio[10]   | -               | -          |
+-------+------------+-----------------+------------+
| IO9   | gpio[8]    | pwm_ch[2]       | -          |
+-------+------------+-----------------+------------+
| IO10  | gpio[12]   | pwm_ch[0]       | spi2_cs[1] |
+-------+------------+-----------------+------------+
| IO11  | gpio[13]   | pwm_ch[6]       | spi2_mosi  |
+-------+------------+-----------------+------------+
| IO12  | gpio[14]   | -               | spi2_miso  |
+-------+------------+-----------------+------------+
| IO13  | gpio[15]   | -               | spi2_clk   |
+-------+------------+-----------------+------------+

I/O expander
============

The ARC HSDK4xD board includes a CY8C9520A I/O expander from `Cypress CY8C9520A
<https://www.cypress.com/file/37971/download>`__. The I/O
expander offers additional GPIO signals and board control signals and can be accessed
through the on-board I2C bus, we have implemented a basic driver for it.
Tables below shows an overview of relevant I/O signals.

+------------+---------------------------------------------+
| Pins       | Usage                                       |
+------------+---------------------------------------------+
| port0_bit0 | RS9113 Bluetooth I2S RX enable (active low) |
+------------+---------------------------------------------+
| port0_bit1 | mikroBUS Reset (active low)                 |
+------------+---------------------------------------------+
| port0_bit2 | GPIO for Arduino AD0                        |
+------------+---------------------------------------------+
| port0_bit3 | GPIO for Arduino AD1                        |
+------------+---------------------------------------------+
| port0_bit4 | GPIO for Arduino AD2                        |
+------------+---------------------------------------------+
| port0_bit5 | GPIO for Arduino AD3                        |
+------------+---------------------------------------------+
| port1_bit4 | On-board user LED0                          |
+------------+---------------------------------------------+
| port1_bit5 | On-board user LED1                          |
+------------+---------------------------------------------+
| port1_bit6 | On-board user LED2                          |
+------------+---------------------------------------------+
| port1_bit7 | On-board user LED3                          |
+------------+---------------------------------------------+

On-board user LEDS
==================

The ARC HSDK4xD includes 4 user LEDs(active high), which can be controlled through the I/O expander pins.

+-------+-----------------+
| LEDs  | PINs            |
+-------+-----------------+
| LED0  | GPX_port1_bit4  |
+-------+-----------------+
| LED1  | GPX_port1_bit5  |
+-------+-----------------+
| LED2  | GPX_port1_bit6  |
+-------+-----------------+
| LED3  | GPX_port1_bit7  |
+-------+-----------------+

For hardware feature details, refer to : `Designware HS4x/HS4xD Development Kit website
<https://www.synopsys.com/dw/ipdir.php?ds=arc-hs-development-kit>`__.

Programming and Debugging
*************************

Required Hardware and Software
==============================

To use Zephyr RTOS applications on the HS4x/HS4xD Development Kit board, a few
additional pieces of hardware are required.

* A micro USB cable provides USB-JTAG debug and USB-UART communication
  to the board

* A universal switching power adaptor (110-240V
  AC to 12V DC), provided in the package, provides power to the board.

* :ref:`The Zephyr SDK <toolchain_zephyr_sdk>`

* Terminal emulator software for use with the USB-UART. Suggestion:
  `Putty Website`_.

* (optional) A collection of Pmods, Arduino modules, or Mikro modules.
  See `Digilent Pmod Modules`_ or develop your custom interfaces to attach
  to the Pmod connector.

Set up the ARC HS4x/HS4xD Development Kit
=========================================

To run Zephyr application on ARC HS4x/HS4xD Development Kit, you need to
set up the board correctly.

* Connect the digilent USB cable from your host to the board.

* Connect the 12V DC power supply to your board

Set up Zephyr Software
======================

Building Sample Applications
==============================

You can try many of the :ref:`sample applications and demos
<samples-and-demos>`.  We'll use :ref:`hello_world`, found in
:zephyr_file:`samples/hello_world` as an example.

Configuring
-----------

You may need to write a ``prj.conf`` file if the sample doesn't have one.
Next, you can use the menuconfig rule to configure the target. By specifying
``hsdk4xd`` as the board configuration, you can select the ARC HS4x/HS4xD Development
Kit board support for Zephyr.

.. zephyr-app-commands::
   :board: hsdk4xd
   :zephyr-app: samples/hello_world
   :goals: menuconfig


Building
--------

You can build an application in the usual way.  Refer to
:ref:`build_an_application` for more details. Here is an example for
:ref:`hello_world`.

.. zephyr-app-commands::
   :board: hsdk4xd
   :zephyr-app: samples/hello_world
   :maybe-skip-config:
   :goals: build


Connecting Serial Output
=========================

In the default configuration, Zephyr's HS4x/HS4xD Development Kit images support
serial output via the USB-UART on the board.  To enable serial output:

* Open a serial port emulator (i.e. on Linux minicom, putty, screen, etc)

* Specify the tty driver name, for example, on Linux this may be
  :file:`/dev/ttyUSB0`

* Set the communication settings to:


========= =====
Parameter Value
========= =====
Baud:     115200
Data:     8 bits
Parity:    None
Stopbits:  1
========= =====

Debugging
==========

Using the latest version of Zephyr SDK(>=0.15.2), you can debug and
flash (run) HS4x/HS4xD Development Kit directly.

One option is to build and debug the application using the usual
Zephyr build system commands.

.. zephyr-app-commands::
   :board: hsdk4xd
   :app: <my app>
   :goals: debug

At this point you can do your normal debug session. Set breakpoints and then
:kbd:`c` to continue into the program.

The other option is to launch a debug server, as follows.

.. zephyr-app-commands::
   :board: hsdk4xd
   :app: <my app>
   :goals: debugserver

Then connect to the debug server at the HS4x/HS4xD Development Kit from a second
console, from the build directory containing the output :file:`zephyr.elf`.

.. code-block:: console

   $ cd <my app>
   $ $ZEPHYR_SDK_INSTALL_DIR/arc-zephyr-elf/arc-zephyr-elf-gdb zephyr.elf
   (gdb) target remote localhost:3333
   (gdb) load
   (gdb) b main
   (gdb) c

Flashing
========

If you just want to download the application to the HS4x/HS4xD Development Kit's DDR
and run, you can do so in the usual way.

.. zephyr-app-commands::
   :board: hsdk4xd
   :app: <my app>
   :goals: flash

This command still uses openocd and gdb to load the application elf file to
HS4x/HS4xD Development Kit, but it will load the application and immediately run. If
power is removed, the application will be lost since it wasn't written to flash.

Most of the time you will not be flashing your program but will instead debug
it using openocd and gdb. The program can be download via the USB cable into
the code and data memories.

The HS4x/HS4xD Development Kit also supports flashing the Zephyr application
with the U-Boot bootloader, a powerful and flexible tool for loading
an executable from different sources and running it on the target platform.

The U-Boot implementation for the HS4x/HS4xD Development Kit was further extended with
additional functionality that allows users to better manage the broad
configurability of the HS4x/HS4xD Development Kit

When you are ready to deploy the program so that it boots up automatically on
reset or power-up, you can follow the steps to place the program on SD card.

For details, see: `Uboot-HS4x/HS4xD-Command-Reference
<https://github.com/foss-for-synopsys-dwc-arc-processors/linux/wiki/Uboot-HSDK-4xD-Command-Reference#launching-baremetal-application-on-hsdk-4xd>`__

Supported peripheral
====================

The following list indicates the state of HS4x/HS4xD Development Kit peripherals’ support

+------------+---------+
| Peripheral | Support |
+------------+---------+
| ADC        | No      |
+------------+---------+
| Bluetooth  | No      |
+------------+---------+
| Ethernet   | No      |
+------------+---------+
| GPIO       | No      |
+------------+---------+
| GPU        | No      |
+------------+---------+
| HDMI       | No      |
+------------+---------+
| I2C        | No      |
+------------+---------+
| I2S        | No      |
+------------+---------+
| PWM        | No      |
+------------+---------+
| SDIO       | No      |
+------------+---------+
| SPI        | No      |
+------------+---------+
| UART       | Yes     |
+------------+---------+
| USB        | No      |
+------------+---------+
| WiFi       | No      |
+------------+---------+

References
**********

.. _embARC website: https://www.embarc.org

.. _Designware HS Development Kit website: https://www.synopsys.com/dw/ipdir.php?ds=arc-hs-development-kit

.. _Digilent Pmod Modules: http://store.digilentinc.com/pmod-modules

.. _Putty website: http://www.putty.org
Part 3
한국어 전문 번역
개요
ARC HS4x/HS4xD Development Kit는 Synopsys HSDK의 다음 개정판입니다. Multi-core ARC HS4xD 기반 chip에 Ethernet, HDMI, WiFi, Bluetooth, USB, SDIO, I2C, SPI, UART, I2S, ADC, PWM, GPIO와 Think Silicon GPU를 통합합니다.
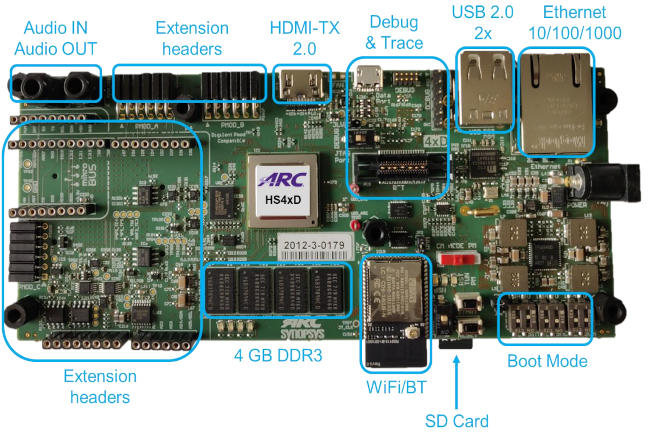
상세 정보는 ARC HS4x/HS4xD Development Kit를 참고합니다.
하드웨어
General GPIO 24개는 GPIO_SEL_0~GPIO_SEL_7의 8 group으로 나뉩니다. 각 group은 GPIO, UART, SPI, I2C, PWM으로 설정할 수 있으며 CREG_GPIO_MUX register가 제어합니다.
| Bit | Name | Access | Reset value | Description |
|---|---|---|---|---|
| 2:0 | GPIO_SEL_0 | RW | 0x0 | GPIO mux select for gpio[3:0] |
| 5:3 | GPIO_SEL_1 | RW | 0x0 | GPIO mux select for gpio[7:4] |
| 8:6 | GPIO_SEL_2 | RW | 0x0 | GPIO mux select for gpio[11:8] |
| 11:9 | GPIO_SEL_3 | RW | 0x0 | GPIO mux select for gpio[15:12] |
| 14:12 | GPIO_SEL_4 | RW | 0x0 | GPIO mux select for gpio[17:16] |
| 17:15 | GPIO_SEL_5 | RW | 0x0 | GPIO mux select for gpio[19:18] |
| 20:18 | GPIO_SEL_6 | RW | 0x0 | GPIO mux select for gpio[21:20] |
| 23:21 | GPIO_SEL_7 | RW | 0x0 | GPIO mux select for gpio[23:22] |
| SELS | GPIO PINS | FUN0 | FUN1 | FUN2 | FUN3 | FUN4 | FUN5 | FUN6 | FUN7 |
|---|---|---|---|---|---|---|---|---|---|
| SEL0 | 0 | gpio[0] | uart0_cts | spi1_cs[0] | gpio[0] | gpio[0] | pwm_ch[6] | pwm_ch[6] | pwm_ch[1] |
| SEL0 | 1 | gpio[1] | uart0_txd | spi1_mosi | gpio[1] | pwm_ch[0] | gpio[1] | pwm_ch[0] | pwm_ch[0] |
| SEL0 | 2 | gpio[2] | uart0_rxd | spi1 _miso | i2c1_scl | gpio[2] | gpio[2] | gpio[2] | gpio[2] |
| SEL0 | 3 | gpio[3] | uart0_rts | spi1_clk | i2c1_sda | gpio[3] | gpio[3] | gpio[3] | gpio[3] |
| SEL1 | 4 | gpio[4] | uart1_cts | spi2_cs[0] | gpio[4] | gpio[4] | pwm_ch[4] | pwm_ch[4] | pwm_ch[3] |
| SEL1 | 5 | gpio[5] | uart1_txd | spi2_mosi | gpio[5] | pwm_ch[2] | gpio[5] | pwm_ch[2] | pwm_ch[2] |
| SEL1 | 6 | gpio[6] | uart1_rxd | spi2_miso | i2c2_scl | gpio[6] | gpio[6] | gpio[6] | gpio[6] |
| SEL1 | 7 | gpio[7] | uart1_rts | spi2_clk | i2c2_sda | gpio[7] | gpio[7] | gpio[7] | gpio[7] |
| SEL2 | 8 | gpio[8] | uart2_cts | spi1_cs[1] | gpio[8] | gpio[8] | pwm_ch[2] | pwm_ch[2] | pwm_ch[5] |
| SEL2 | 9 | gpio[9] | uart2_txd | spi1_mosi | gpio[9] | pwm_ch[4] | gpio[9] | pwm_ch[4] | pwm_ch[4] |
| SEL2 | 10 | gpio[10] | uart2_rxd | spi1_miso | i2c1_scl | gpio[10] | gpio[10] | gpio[10] | gpio[10] |
| SEL2 | 11 | gpio[11] | uart2_rts | spi1_clk | i2c1_sda | gpio[11] | gpio[11] | gpio[11] | gpio[11] |
| SEL3 | 12 | gpio[12] | uart0_cts | spi2_cs[1] | gpio[12] | gpio[12] | pwm_ch[0] | pwm_ch[0] | pwm_ch[7] |
| SEL3 | 13 | gpio[13] | uart0_txd | spi2_mosi | gpio[13] | pwm_ch[6] | gpio[13] | pwm_ch[6] | pwm_ch[6] |
| SEL3 | 14 | gpio[14] | uart0_rxd | spi2_miso | i2c2_scl | gpio[14] | gpio[14] | gpio[14] | gpio[14] |
| SEL3 | 15 | gpio[15] | uart0_rts | spi2_clk | i2c2_sda | gpio[15] | gpio[15] | gpio[15] | gpio[15] |
| SEL4 | 16 | gpio[16] | uart1_txd | spi1_cs[2] | i2c1_scl | gpio[16] | pwm_fault_0 | gpio[16] | pwm_fault_0 |
| SEL4 | 17 | gpio[17] | uart1_rxd | spi1_mosi | i2c1_sda | pwm_ch[0] | pwm_ch[0] | pwm_ch[5] | pwm_ch[5] |
| SEL5 | 18 | gpio[18] | uart2_txd | spi1_miso | i2c2_scl | gpio[18] | gpio[18] | gpio[18] | gpio[18] |
| SEL5 | 19 | gpio[19] | uart2_rxd | spi1_clk | i2c2_sda | gpio[19] | gpio[19] | gpio[19] | gpio[19] |
| SEL6 | 20 | gpio[20] | uart0_txd | spi2_cs[2] | i2c1_scl | gpio[20] | pwm_fault_1 | gpio[20] | pwm_fault_1 |
| SEL6 | 21 | gpio[21] | uart0_rxd | spi2_mosi | i2c1_sda | pwm_ch[6] | pwm_ch[6] | pwm_ch[3] | pwm_ch[3] |
| SEL7 | 22 | gpio[22] | uart2_txd | spi2_miso | i2c2_scl | gpio[22] | gpio[22] | gpio[22] | gpio[22] |
| SEL7 | 23 | gpio[23] | uart2_rxd | spi2_clk | i2c2_sda | gpio[23] | gpio[23] | gpio[23] | gpio[23] |
Digilent Pmod
12-pin Pmod_A·Pmod_B와 6-pin Pmod_C는 GPIO, UART, SPI, I2C, PWM으로 programmable합니다.
Pmod_A
Reset 후 GPIO column이 기본 assignment입니다.
| Pin | GPIO | UART | SPI | I2C | PWM_1 | PWM_2 |
|---|---|---|---|---|---|---|
| A1 | gpio[8] | uart2_cts | spi1_cs[1] | gpio[8] | gpio[8] | pwm_ch[2] |
| A2 | gpio[9] | uart2_txd | spi1_mosi | gpio[9] | pwm_ch[4] | gpio[9] |
| A3 | gpio[10] | uart2_rxd | spi1_miso | i2c1_scl | gpio[10] | gpio[10] |
| A4 | gpio[11] | uart2_rts | spi1_clk | i2c1_sda | gpio[11] | gpio[11] |
| A5 | GND | GND | GND | GND | GND | GND |
| A6 | 3V3 | 3V3 | 3V3 | 3V3 | 3V3 | 3V3 |
| A7 | gpio[20] | gpio[20] | gpio[20] | gpio[20] | gpio[20] | gpio[20] |
| A8 | gpio[21] | gpio[21] | gpio[21] | gpio[21] | gpio[21] | gpio[21] |
| A9 | n.c. | n.c. | n.c. | n.c. | n.c. | n.c. |
| A10 | n.c. | n.c. | n.c. | n.c. | n.c. | n.c. |
| A11 | GND | GND | GND | GND | GND | GND |
| A12 | 3V3 | 3V3 | 3V3 | 3V3 | 3V3 | 3V3 |
Pmod_B
| Pin | GPIO | UART | SPI | I2C | PWM_1 | PWM_2 |
|---|---|---|---|---|---|---|
| B1 | gpio[12] | uart0_cts | spi2_cs[1] | gpio[12] | gpio[12] | pwm_ch[0] |
| B2 | gpio[13] | uart0_txd | spi2_mosi | gpio[13] | pwm_ch[6] | gpio[13] |
| B3 | gpio[14] | uart0_rxd | spi2_miso | i2c2_scl | gpio[14] | gpio[14] |
| B4 | gpio[15] | uart0_rts | spi2_clk | i2c2_sda | gpio[15] | gpio[15] |
| B5 | GND | GND | GND | GND | GND | GND |
| B6 | 3V3 | 3V3 | 3V3 | 3V3 | 3V3 | 3V3 |
| B7 | gpio[22] | gpio[22] | gpio[22] | gpio[22] | gpio[22] | gpio[22] |
| B8 | gpio[23] | gpio[23] | gpio[23] | gpio[23] | gpio[23] | gpio[23] |
| B9 | n.c. | n.c. | n.c. | n.c. | n.c. | n.c. |
| B10 | n.c. | n.c. | n.c. | n.c. | n.c. | n.c. |
| B11 | GND | GND | GND | GND | GND | GND |
| B12 | 3V3 | 3V3 | 3V3 | 3V3 | 3V3 | 3V3 |
Pmod_C
| Pin | GPIO | UART | SPI | I2C | PWM |
|---|---|---|---|---|---|
| C1 | gpio[16] | uart1_txd | spi1_cs[2] | i2c1_scl | gpio[16] |
| C2 | gpio[17] | uart1_rxd | spi1_mosi | i2c1_sda | pwm_ch[0] |
| C3 | gpio[18] | uart2_txd | spi1_miso | i2c2_scl | gpio[18] |
| C4 | gpio[19] | uart2_rxd | spi1_clk | i2c2_sda | gpio[19] |
| C5 | GND | GND | GND | GND | GND |
| C6 | 3V3 | 3V3 | 3V3 | 3V3 | 3V3 |
MikroBUS
MikroBUS header의 I/O multiplexer assignment는 다음과 같습니다.
| Pin | I/O | Pin | I/O |
|---|---|---|---|
| AN | ADC VIN6* | PWM | pwm_ch[0] |
| RST | GPX_Port0_bit1 | INT | gpio[16] |
| CS | spi2_cs[1] | RX | uart2_rxd |
| SCK | spi2_clk | TX | uart2_txd |
| MISO | spi2_miso | SCL | i2c2_scl |
| MOSI | spi2_mosi | SDA | i2c2_sda |
Arduino
Arduino UNO R3 shield와 호환되지만 5V shield는 지원하지 않고 IOREF는 3V3로 고정됩니다. ICSP header도 없지만 그 SPI master interface는 IO10~IO13에도 있습니다. CREG_GPIO_MUX가 multiplexing을 제어하며 reset 후 모든 port는 GPIO input입니다.
| Pin | I/O-1 | I/O-2 | I/O-3 |
|---|---|---|---|
| AD0 | ADC VIN0* | GPX_port0_bit2 | - |
| AD1 | ADC VIN1* | GPX_port0_bit3 | - |
| AD2 | ADC VIN2* | GPX_port0_bit4 | - |
| AD3 | ADC VIN3* | GPX_port0_bit5 | - |
| AD4 | ADC VIN4* | gpio[18] | i2c2_sda |
| AD5 | ADC VIN5* | gpio[19] | i2c2_scl |
| IO0 | gpio[23] | uart2_rxd | - |
| IO1 | gpio[22] | uart2_txd | - |
| IO2 | gpio[16] | - | - |
| IO3 | gpio[17] | pwm_ch[5] | - |
| IO4 | gpio[11] | - | |
| IO5 | gpio[9] | pwm_ch[4] | - |
| IO6 | gpio[21] | pwm_ch[3] | - |
| IO7 | gpio[20] | - | - |
| IO8 | gpio[10] | - | - |
| IO9 | gpio[8] | pwm_ch[2] | - |
| IO10 | gpio[12] | pwm_ch[0] | spi2_cs[1] |
| IO11 | gpio[13] | pwm_ch[6] | spi2_mosi |
| IO12 | gpio[14] | - | spi2_miso |
| IO13 | gpio[15] | - | spi2_clk |
I/O expander
Cypress CY8C9520A expander는 onboard I2C bus를 통해 추가 GPIO와 board control signal을 제공하며 기본 driver가 구현되어 있습니다.
| Pins | Usage |
|---|---|
| port0_bit0 | RS9113 Bluetooth I2S RX enable (active low) |
| port0_bit1 | mikroBUS Reset (active low) |
| port0_bit2 | GPIO for Arduino AD0 |
| port0_bit3 | GPIO for Arduino AD1 |
| port0_bit4 | GPIO for Arduino AD2 |
| port0_bit5 | GPIO for Arduino AD3 |
| port1_bit4 | On-board user LED0 |
| port1_bit5 | On-board user LED1 |
| port1_bit6 | On-board user LED2 |
| port1_bit7 | On-board user LED3 |
Onboard user LED
Active-high user LED 4개는 I/O expander pin으로 제어합니다.
| LEDs | PINs |
|---|---|
| LED0 | GPX_port1_bit4 |
| LED1 | GPX_port1_bit5 |
| LED2 | GPX_port1_bit6 |
| LED3 | GPX_port1_bit7 |
Programming and debugging
필요 hardware와 software
- USB-JTAG debug와 USB-UART용 micro USB cable
- 110-240V AC를 12V DC로 변환하는 포함 adaptor
- Zephyr SDK
- USB-UART terminal emulator
- 선택 사항인 Pmod·Arduino·Mikro module
Board 설정
- Host와 board를 Digilent USB cable로 연결
- 12V DC power supply 연결
Configure
west build -b hsdk4xd samples/hello_world -t menuconfigBuild
west build -b hsdk4xd samples/hello_worldSerial output
USB-UART를 사용하며 Linux에서는 예를 들어 /dev/ttyUSB0을 엽니다.
| Parameter | Value |
|---|---|
| Baud | 115200 |
| Data | 8 bits |
| Parity | None |
| Stop bits | 1 |
Debugging
Zephyr SDK 0.15.2 이상에서 직접 debug·run할 수 있습니다.
west build -b hsdk4xd <my app>
west debug
또는 debug server를 실행합니다.
west build -b hsdk4xd <my app>
west debugserver
cd <my app>
$ZEPHYR_SDK_INSTALL_DIR/arc-zephyr-elf/arc-zephyr-elf-gdb zephyr.elf
(gdb) target remote localhost:3333
(gdb) load
(gdb) b main
(gdb) cFlashing
Application을 DDR로 내려받아 즉시 실행합니다.
west build -b hsdk4xd <my app>
west flash
OpenOCD와 GDB가 ELF를 load해 실행하므로 power가 끊기면 application이 사라집니다. USB로 code/data memory에 내려받아 debug하는 방식입니다.
HS4x/HS4xD Development Kit는 U-Boot bootloader를 통한 Zephyr application load도 지원합니다. U-Boot은 다양한 source의 executable을 target에서 실행하며 HS4x/HS4xD Development Kit의 폭넓은 configurability를 관리하는 기능이 확장되어 있습니다. Reset·power-up에서 자동 boot하려면 program을 SD card에 배치하고 U-Boot HS4x/HS4xD command reference를 따릅니다.
지원 peripheral
Zephyr 3.7.0에서 HS4x/HS4xD board peripheral 지원 상태는 다음과 같습니다. 현재 목록에서는 UART만 지원됩니다.
| Peripheral | Support |
|---|---|
| ADC | No |
| Bluetooth | No |
| Ethernet | No |
| GPIO | No |
| GPU | No |
| HDMI | No |
| I2C | No |
| I2S | No |
| PWM | No |
| SDIO | No |
| SPI | No |
| UART | Yes |
| USB | No |
| WiFi | No |
참고 자료
Source
출처
영어 원문에는 문단, 문서 지시문, 표, 코드, 코드 심벌, 경로를 그대로 보존했습니다.