Part 1
요약·해설
지원 interface 7개와 pin 10개, USART0 console, J-Link 기반 build·flash 절차를 원문 표와 함께 설명합니다.
EFM32GG12
Cortex-M4 + FPU
72MHz
J-Link
Part 2
접을 수 있는 영어 원문 전체
영어 원문 전체 펼치기
1D17428800176888CF38EE3B0164940EE380762BBE832DDA15876AD64B59B80D
.. _efm32gg_sltb009a:

EFM32GG12 Thunderboard (SLTB009A)
#################################

Overview
********

The EFM32GG12 Thunderboard Kit (SLTB009A) is an evaluation platform for the
EFM32GG12 Giant Gecko Microcontroller, featuring an ARM Cortex-M4 with FPU,
1024kB flash, and 192kB RAM.

.. figure:: ../../../../../../../../boards/silabs/dev_kits/sltb009a/doc/sltb009a.jpg
   :align: center
   :alt: SLTB009A

   SLTB009A (Credit: Silicon Labs)

Hardware
********

- PDM stereo microphones
- USB connectivity
- On-board Segger J-Link USB debugger
- 2 user buttons and 2 LEDs
- USB C connector

For more information about the WGM160P and SLTB009A board:

- `SLTB009A Website`_
- `SLTB009A User Guide`_
- `EFM32GG12 Datasheet`_
- `EFM32GG12 Reference Manual`_

Supported Features
==================

The efm32gg_sltb009a board configuration supports the following hardware
features:

+-----------+------------+-------------------------------------+
| Interface | Controller | Driver/Component                    |
+===========+============+=====================================+
| MPU       | on-chip    | memory protection unit              |
+-----------+------------+-------------------------------------+
| COUNTER   | on-chip    | rtcc                                |
+-----------+------------+-------------------------------------+
| FLASH     | on-chip    | flash memory                        |
+-----------+------------+-------------------------------------+
| GPIO      | on-chip    | gpio                                |
+-----------+------------+-------------------------------------+
| I2C       | on-chip    | i2c port-polling                    |
+-----------+------------+-------------------------------------+
| NVIC      | on-chip    | nested vector interrupt controller  |
+-----------+------------+-------------------------------------+
| UART      | on-chip    | serial port-polling;                |
|           |            | serial port-interrupt               |
+-----------+------------+-------------------------------------+

The default configuration can be found in
:zephyr_file:`boards/silabs/dev_kits/sltb009a/sltb009a_defconfig`

Connections and IOs
===================

The EFM32GG12 MCU has six GPIO controllers (PORTA to PORTF), all of which are
currently enabled for the SLTB009A board.

In the following table, the column **Name** contains pin names. For example, PE1
means pin number 1 on PORTE, as used in the board's datasheets and manuals.

+-------+-------------+-------------------------------------+
| Name  | Function    | Usage                               |
+=======+=============+=====================================+
| PE12  | GPIO        | LED0                                |
+-------+-------------+-------------------------------------+
| PA13  | GPIO        | LED1                                |
+-------+-------------+-------------------------------------+
| PD5   | GPIO        | Push Button PB0                     |
+-------+-------------+-------------------------------------+
| PD8   | GPIO        | Push Button PB1                     |
+-------+-------------+-------------------------------------+
| PE7   | UART_TX     | UART TX Console VCOM_TX US0_TX #1   |
+-------+-------------+-------------------------------------+
| PE6   | UART_RX     | UART RX Console VCOM_RX US0_RX #1   |
+-------+-------------+-------------------------------------+
| PC0   | I2C_SDA     | SENSOR_I2C_SDA I2C0_SDA #1          |
+-------+-------------+-------------------------------------+
| PC1   | I2C_SCL     | SENSOR_I2C_SCL I2C0_SCL #1          |
+-------+-------------+-------------------------------------+
| PC4   | I2C_SDA     | SENSOR_I2C_SDA I2C1_SDA #1          |
+-------+-------------+-------------------------------------+
| PC5   | I2C_SCL     | SENSOR_I2C_SCL I2C1_SCL #1          |
+-------+-------------+-------------------------------------+


System Clock
============

The EFM32GG12 MCU is configured to work at 72 MHz.

Serial Port
===========

The EFM32GG12 SoC has five USARTs, two UARTs and two Low Energy UARTs (LEUART).
USART0 is connected to the board controller and is used for the console.

Programming and Debugging
*************************

.. note::
   Before using the kit the first time, you should update the J-Link firmware
   from `J-Link-Downloads`_

Flashing
========

The SLTB009A includes an `J-Link`_ serial and debug adaptor built into the
board. The adaptor provides:

- A USB connection to the host computer
- A physical UART connection which is relayed over interface USB serial port.

Flashing an application to SLTB009A
-----------------------------------

Connect the SLTB009A to your host computer using the USB port.

Here is an example to build and flash the :ref:`hello_world` application.

.. zephyr-app-commands::
   :zephyr-app: samples/hello_world
   :board: sltb009a
   :goals: flash

Open a serial terminal (minicom, putty, etc.) with the following settings:

- Speed: 115200
- Data: 8 bits
- Parity: None
- Stop bits: 1

Reset the board and you'll see the following message on the corresponding serial port
terminal session:

.. code-block:: console

   Hello World! sltb009a

.. _SLTB009A Website:
   https://www.silabs.com/development-tools/thunderboard/thunderboard-gg12-kit

.. _SLTB009A User Guide:
   https://www.silabs.com/documents/public/user-guides/ug371-sltb009a-user-guide.pdf

.. _EFM32GG12 Datasheet:
   https://www.silabs.com/documents/public/data-sheets/efm32gg12-datasheet.pdf

.. _EFM32GG12 Reference Manual:
   https://www.silabs.com/documents/public/reference-manuals/efm32gg12-rm.pdf

.. _J-Link:
   https://www.segger.com/jlink-debug-probes.html

.. _J-Link-Downloads:
   https://www.segger.com/downloads/jlink
Part 3
한국어 전문 번역
개요
EFM32GG12 Thunderboard Kit(SLTB009A)는 FPU가 있는 ARM Cortex-M4, 1,024kB flash, 192kB RAM을 탑재한 EFM32GG12 Giant Gecko microcontroller 평가 플랫폼입니다.
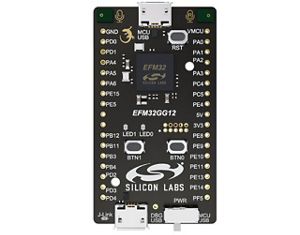
하드웨어
- PDM stereo microphone
- USB 연결
- on-board SEGGER J-Link USB debugger
- 사용자 button 2개와 LED 2개
- USB-C connector
상세 정보는 SLTB009A 웹사이트, SLTB009A User Guide, EFM32GG12 Datasheet, EFM32GG12 Reference Manual을 참고합니다.
지원 기능
efm32gg_sltb009a board configuration은 다음 hardware 기능을 지원합니다.
| Interface | Controller | Driver/Component |
|---|---|---|
| MPU | on-chip | memory protection unit |
| COUNTER | on-chip | rtcc |
| FLASH | on-chip | flash memory |
| GPIO | on-chip | gpio |
| I2C | on-chip | i2c port-polling |
| NVIC | on-chip | nested vector interrupt controller |
| UART | on-chip | serial port-polling; serial port-interrupt |
기본 설정은 boards/silabs/dev_kits/sltb009a/sltb009a_defconfig에 있습니다.
연결과 I/O
EFM32GG12 MCU에는 PORTA부터 PORTF까지 GPIO controller 6개가 있으며, 모두 SLTB009A에서 활성화되어 있습니다. 표의 Name은 pin 이름이며, 예를 들어 PE1은 board datasheet와 manual에서 사용하는 PORTE의 1번 pin을 뜻합니다.
| Name | Function | Usage |
|---|---|---|
| PE12 | GPIO | LED0 |
| PA13 | GPIO | LED1 |
| PD5 | GPIO | Push Button PB0 |
| PD8 | GPIO | Push Button PB1 |
| PE7 | UART_TX | UART TX Console VCOM_TX US0_TX #1 |
| PE6 | UART_RX | UART RX Console VCOM_RX US0_RX #1 |
| PC0 | I2C_SDA | SENSOR_I2C_SDA I2C0_SDA #1 |
| PC1 | I2C_SCL | SENSOR_I2C_SCL I2C0_SCL #1 |
| PC4 | I2C_SDA | SENSOR_I2C_SDA I2C1_SDA #1 |
| PC5 | I2C_SCL | SENSOR_I2C_SCL I2C1_SCL #1 |
System clock
EFM32GG12 MCU는 72MHz로 동작하도록 구성됩니다.
Serial port
EFM32GG12 SoC에는 USART 5개, UART 2개, Low Energy UART(LEUART) 2개가 있습니다. USART0는 board controller에 연결되어 console로 사용됩니다.
Programming and debugging
Flashing
SLTB009A에는 J-Link serial/debug adapter가 내장되어 있습니다. Adapter는 host computer와의 USB 연결 및 USB serial port로 relay되는 physical UART 연결을 제공합니다.
SLTB009A에 application 쓰기
USB port로 SLTB009A를 host computer에 연결하고 hello_world application을 build한 뒤 flash합니다.
west build -b sltb009a samples/hello_world
west flash
Serial terminal은 115200 baud, data 8 bit, parity 없음, stop bit 1로 설정합니다. Board를 reset하면 다음 메시지가 표시됩니다.
Hello World! sltb009aSource
출처
영어 원문에는 문단, 문서 지시문, 표, 코드, 코드 심벌, 경로를 그대로 보존했습니다.