Part 1
요약·해설
ESP-01 pinout, 1MB의 V1.6.2 호환 조건과 2MB 이상 1.7.x 권장, flash partition·74880bps 진단, 세 connector variation을 설명합니다.
IEEE 802.11 b/g/n
UART
AT Bin 1.6.2/1.7.x
Overlay · Arduino · MikroBus
Part 2
접을 수 있는 영어 원문 전체
영어 원문 전체 펼치기
FE144C991FBACE624FEFBEE827C7C3340E30B2EA851EEA4C7B4ABF657EA60DCF
.. _module_esp_8266:

ESP-8266 Modules
################

Overview
********

ESP-8266 radio is a cost-effective Wi-Fi SOC module which allows any
microcontrollers to easily access to WiFi network. This module supports
the standard IEEE802.11 b/g/n protocol, built-in complete TCP/IP protocol
stack. Users can use this series of modules to add networking capabilities
to existing devices.

The simplest module that uses ESP-8266 is ESP-01. This is a generic shield
configuration that allows any ESP-8266 module variation including ESP-12E/F.

.. image:: ../../../../../../../boards/shields/esp_8266/doc/esp-01.jpg
   :align: center
   :alt: ESP-01

Pins Assignment of the ESP-01 Module
====================================

+---------------+-------------------------------------+
| Connector Pin | Function                            |
+===============+=====================================+
| GND           | POWER GND                           |
+---------------+-------------------------------------+
| GPIO1         | U0_TXD                              |
+---------------+-------------------------------------+
| GPIO2         |                                     |
+---------------+-------------------------------------+
| CHIP_EN       | ENABLE (VDD = RUN, GND = LOW POWER) |
+---------------+-------------------------------------+
| GPIO0         |                                     |
+---------------+-------------------------------------+
| EXT_RST       |                                     |
+---------------+-------------------------------------+
| GPIO3         | U0_RXD                              |
+---------------+-------------------------------------+
| VDD           | POWER +3.3V                         |
+---------------+-------------------------------------+

Requirements
************

This shield requires a board which provides a configuration that allows an
UART interface. (see :ref:`shields` for more details).

.. note::
   Sometimes boards declare standard headers like Arduino R3 but not define
   all connections.  Make sure that the board you are using have all
   definitions to avoid build errors.

The ESP-8266 should be loaded with the `ESP8266 AT Bin`_ software which is
available at Espressif Systems web site. The ESP-01 module have up to 1MB of
flash and the last available stack that fits on this device is ESP8266 AT Bin
V1.6.2. This version is command compatible with ESP8266 AT Bin 1.7.x which is
the minimal version supported by the ESP WIFI driver.

The ESP-8266 Modules that have 2MB or more is highly recommended upgrade to
version 1.7.x for better future compatibility.

This tutorial won't explain how firmware must be upgraded. However, it will
present some tips to easily success. The ESP WIFI was tested with an ESP-01
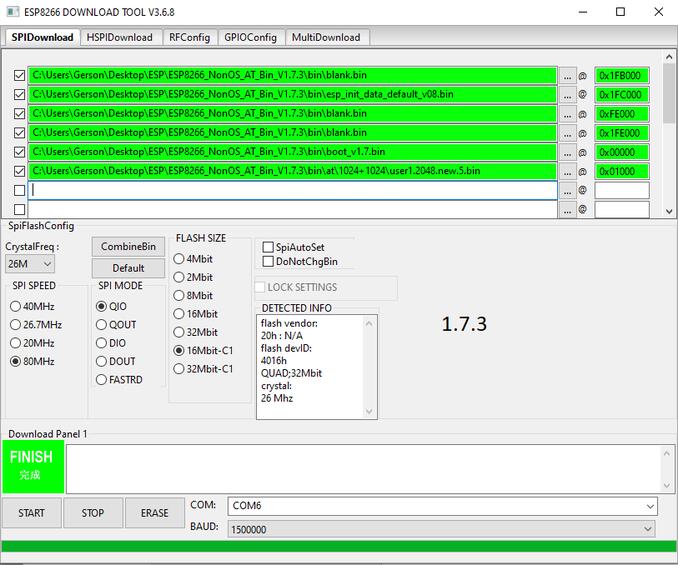
with 1MB flash using Boot Mode and with Flash size 8Mbit: 512KB + 512KB. The
ESP8266 AT Bin 1.7.x available requires the following partition configuration
to works:

.. image:: ../../../../../../../boards/shields/esp_8266/doc/esp_at_173.jpg
   :align: center
   :alt: ESP8266 AT Bin V1.7.3

- Tips

        - Don't forget to erase Flash before upgrade
        - Upgrade all binaries at same time.
        - ESP-8266 bootloader won't send garbage. Try connect at 74880 bps if
          you module have 26MHz crystal to detect boot fails.

.. note::
	Boards that already have a network interface:  Check network
	documentation to understand how properly configure both interfaces.
	To keep simple, make sure WiFi is the only interface enabled at
	Networking -> Link Layer Options.  This will avoid problems running
	Zephyr samples.

Supported variations
====================

The below table suggests shield variation accordingly with end user
application.  When a standard connector (arduino, mikrobus) is available on
board, user should select the matching shield configuration. When esp_8266
shield is used with a board that doesn't feature a standard connector, a
dedicated <board>.overlay file should be provided.  The remaining
configurations should be used based on the board standard headers available.

+-----------------------------+------------------------------+-----------+
| Connector Standard          | Shield Designation           | Variation |
+=============================+==============================+===========+
| Without standard (overlay)  | `esp_8266`_                  |     1     |
+-----------------------------+------------------------------+-----------+
| Arduino                     | `esp_8266_arduino`_          |     2     |
+-----------------------------+------------------------------+-----------+
| MikroBus                    | `esp_8266_mikrobus`_         |     3     |
+-----------------------------+------------------------------+-----------+


Build and Programming
*********************

Set ``--shield <shield designation>`` when you invoke ``west build``.

To build shield with specific overlay:

.. zephyr-app-commands::
   :zephyr-app: samples/net/wifi
   :board: sam4e_xpro
   :shield: esp_8266
   :goals: build flash

To build shield with standard headers:

.. zephyr-app-commands::
   :zephyr-app: samples/net/wifi
   :board: [disco_l475_iot1 | frdm_k64f | lpcxpresso55s69_ns | nucleo_f767zi]
   :shield: [esp_8266_arduino | esp_8266_mikrobus]
   :goals: build flash

References
**********

.. target-notes::

.. _ESP8266 AT Bin:
   https://www.espressif.com/en/support/download/at

.. _esp_8266:
   https://github.com/zephyrproject-rtos/zephyr/blob/master/boards/shields/esp_8266/esp_8266.overlay

.. _esp_8266_arduino:
   https://github.com/zephyrproject-rtos/zephyr/blob/master/boards/shields/esp_8266/esp_8266_arduino.overlay

.. _esp_8266_mikrobus:
   https://github.com/zephyrproject-rtos/zephyr/blob/master/boards/shields/esp_8266/esp_8266_mikrobus.overlay
Part 3
한국어 전문 번역
개요
ESP-8266 radio는 microcontroller가 Wi-Fi network에 쉽게 접근하도록 해 주는 경제적인 Wi-Fi SoC module입니다. IEEE 802.11 b/g/n protocol과 완전한 TCP/IP protocol stack을 내장해 기존 device에 network 기능을 추가할 수 있습니다.
가장 단순한 ESP-8266 module은 ESP-01입니다. 이 generic shield configuration은 ESP-12E/F를 포함한 모든 ESP-8266 module variation에 사용할 수 있습니다.
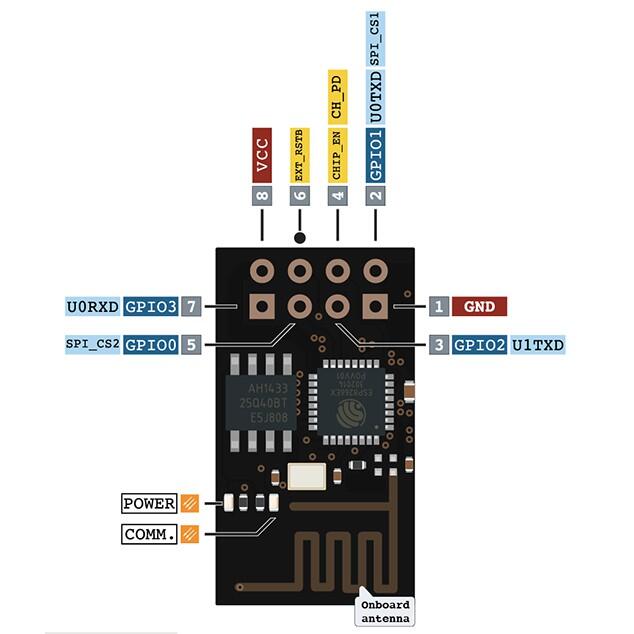
ESP-01 pin assignment
| Connector pin | Function |
|---|---|
| GND | POWER GND |
| GPIO1 | U0_TXD |
| GPIO2 | |
| CHIP_EN | ENABLE (VDD = RUN, GND = LOW POWER) |
| GPIO0 | |
| EXT_RST | |
| GPIO3 | U0_RXD |
| VDD | POWER +3.3V |
요구 사항
UART interface를 제공하도록 구성된 board가 필요합니다.
ESP8266 AT firmware
ESP-8266에는 Espressif Systems가 제공하는 ESP8266 AT Bin software를 설치해야 합니다.
- ESP-01은 flash가 최대 1MB이며 여기에 들어가는 마지막 stack은 ESP8266 AT Bin V1.6.2입니다.
- V1.6.2는 ESP Wi-Fi driver가 지원하는 최소 version인 ESP8266 AT Bin 1.7.x와 command-compatible합니다.
- 2MB 이상 flash가 있는 ESP-8266 module은 향후 호환성을 위해 version 1.7.x로 upgrade할 것을 강력히 권장합니다.
공식 문서는 firmware upgrade 전체 절차를 설명하지 않지만 성공 가능성을 높이는 조건을 제시합니다. ESP Wi-Fi는 1MB flash ESP-01에서 Boot Mode와 8Mbit: 512KB + 512KB flash size 설정으로 시험했습니다. ESP8266 AT Bin 1.7.x에는 아래 그림과 같은 partition configuration이 필요합니다.
Upgrade 팁
- Upgrade 전에 Flash를 지우는 것을 잊지 마십시오.
- 모든 binary를 동시에 upgrade하십시오.
- ESP-8266 bootloader는 의미 없는 문자를 보내지 않습니다. Module에 26MHz crystal이 있다면 74880bps로 연결해 boot failure를 확인하십시오.
지원 variation
Board에 Arduino 또는 MikroBus standard connector가 있으면 일치하는 shield configuration을 선택합니다. Standard connector가 없는 board에서 esp_8266을 쓸 때는 전용 <board>.overlay 파일을 제공해야 합니다.
| Connector standard | Shield designation | Variation |
|---|---|---|
| Without standard (overlay) | esp_8266 | 1 |
| Arduino | esp_8266_arduino | 2 |
| MikroBus | esp_8266_mikrobus | 3 |
빌드와 프로그래밍
west build를 실행할 때 --shield <shield designation>을 지정합니다.
전용 overlay 사용
west build -b sam4e_xpro   --shield esp_8266   samples/net/wifi
west flash
Standard header 사용
west build -b [disco_l475_iot1 | frdm_k64f | lpcxpresso55s69_ns | nucleo_f767zi]   --shield [esp_8266_arduino | esp_8266_mikrobus]   samples/net/wifi
west flash
참고 자료
Source
출처
영어 원문에는 문단, 문서 지시문, 표, 코드, 코드 심벌, 경로를 그대로 보존했습니다.