Part 1
요약·해설
지원 controller 14개, binary blob, simple boot와 MCUboot/sysbuild, procpu target, serial monitor, OpenOCD 0.12.0과 built-in JTAG을 설명합니다.
ESP32-S3 · dual-core Xtensa LX7
2.4 GHz Wi-Fi · BLE
Simple boot · MCUboot · sysbuild
USB-JTAG · OpenOCD 0.12.0+
Part 2
접을 수 있는 영어 원문 전체
영어 원문 전체 펼치기
78F143389D3D64601297E244FC06A008CB6039A6274CC106D396AA5C38ED6DCF
.. _xiao_esp32s3:

XIAO ESP32S3
############

Overview
********

Seeed Studio XIAO ESP32S3 is an IoT mini development board based on the
Espressif ESP32-S3 WiFi/Bluetooth dual-mode chip.

For more details see the `Seeed Studio XIAO ESP32S3`_ wiki page.

.. figure:: ../../../../../../../boards/seeed/xiao_esp32s3/doc/img/xiao_esp32s3.jpg
   :align: center
   :alt: XIAO ESP32S3

   XIAO ESP32S3

Hardware
********

This board is based on the ESP32-S3 with 8MB of flash, WiFi and BLE support. It
has an USB-C port for programming and debugging, integrated battery charging
and an U.FL external antenna connector. It is based on a standard XIAO 14 pin
pinout.

ESP32-S3 is a low-power MCU-based system on a chip (SoC) with integrated 2.4 GHz Wi-Fi
and Bluetooth® Low Energy (Bluetooth LE). It consists of high-performance dual-core microprocessor
(Xtensa® 32-bit LX7), a low power coprocessor, a Wi-Fi baseband, a Bluetooth LE baseband,
RF module, and numerous peripherals.

Supported Features
==================

Current Zephyr's XIAO ESP32S3 board supports the following features:

+------------+------------+-------------------------------------+
| Interface  | Controller | Driver/Component                    |
+============+============+=====================================+
| UART       | on-chip    | serial port                         |
+------------+------------+-------------------------------------+
| GPIO       | on-chip    | gpio                                |
+------------+------------+-------------------------------------+
| PINMUX     | on-chip    | pinmux                              |
+------------+------------+-------------------------------------+
| USB-JTAG   | on-chip    | hardware interface                  |
+------------+------------+-------------------------------------+
| SPI Master | on-chip    | spi                                 |
+------------+------------+-------------------------------------+
| TWAI/CAN   | on-chip    | can                                 |
+------------+------------+-------------------------------------+
| ADC        | on-chip    | adc                                 |
+------------+------------+-------------------------------------+
| Timers     | on-chip    | counter                             |
+------------+------------+-------------------------------------+
| Watchdog   | on-chip    | watchdog                            |
+------------+------------+-------------------------------------+
| TRNG       | on-chip    | entropy                             |
+------------+------------+-------------------------------------+
| LEDC       | on-chip    | pwm                                 |
+------------+------------+-------------------------------------+
| MCPWM      | on-chip    | pwm                                 |
+------------+------------+-------------------------------------+
| PCNT       | on-chip    | qdec                                |
+------------+------------+-------------------------------------+
| GDMA       | on-chip    | dma                                 |
+------------+------------+-------------------------------------+

Connections and IOs
===================

The board uses a standard XIAO pinout, the default pin mapping is the following:

.. figure:: ../../../../../../../boards/seeed/xiao_esp32s3/doc/img/xiao_esp32s3_pinout.jpg
   :align: center
   :alt: XIAO ESP32S3 Pinout

   XIAO ESP32S3 Pinout

Prerequisites
-------------

Espressif HAL requires WiFi and Bluetooth binary blobs in order work. Run the command
below to retrieve those files.

.. code-block:: console

   west blobs fetch hal_espressif

.. note::

   It is recommended running the command above after :file:`west update`.

Building & Flashing
*******************

Simple boot
===========

The board could be loaded using the single binary image, without 2nd stage bootloader.
It is the default option when building the application without additional configuration.

.. note::

   Simple boot does not provide any security features nor OTA updates.

MCUboot bootloader
==================

User may choose to use MCUboot bootloader instead. In that case the bootloader
must be build (and flash) at least once.

There are two options to be used when building an application:

1. Sysbuild
2. Manual build

.. note::

   User can select the MCUboot bootloader by adding the following line
   to the board default configuration file.

   .. code:: cfg

      CONFIG_BOOTLOADER_MCUBOOT=y

Sysbuild
========

The sysbuild makes possible to build and flash all necessary images needed to
bootstrap the board with the ESP32 SoC.

To build the sample application using sysbuild use the command:

.. zephyr-app-commands::
   :tool: west
   :app: samples/hello_world
   :board: xiao_esp32s3
   :goals: build
   :west-args: --sysbuild
   :compact:

By default, the ESP32 sysbuild creates bootloader (MCUboot) and application
images. But it can be configured to create other kind of images.

Build directory structure created by sysbuild is different from traditional
Zephyr build. Output is structured by the domain subdirectories:

.. code-block::

  build/
  ├── hello_world
  │   └── zephyr
  │       ├── zephyr.elf
  │       └── zephyr.bin
  ├── mcuboot
  │    └── zephyr
  │       ├── zephyr.elf
  │       └── zephyr.bin
  └── domains.yaml

.. note::

   With ``--sysbuild`` option the bootloader will be re-build and re-flash
   every time the pristine build is used.

For more information about the system build please read the :ref:`sysbuild` documentation.

Manual build
============

During the development cycle, it is intended to build & flash as quickly possible.
For that reason, images can be build one at a time using traditional build.

The instructions following are relevant for both manual build and sysbuild.
The only difference is the structure of the build directory.

.. note::

   Remember that bootloader (MCUboot) needs to be flash at least once.

Build and flash applications as usual (see :ref:`build_an_application` and
:ref:`application_run` for more details).

.. zephyr-app-commands::
   :zephyr-app: samples/hello_world
   :board: xiao_esp32s3/esp32s3/procpu
   :goals: build

The usual ``flash`` target will work with the ``xiao_esp32s3`` board
configuration. Here is an example for the :ref:`hello_world`
application.

.. zephyr-app-commands::
   :zephyr-app: samples/hello_world
   :board: xiao_esp32s3/esp32s3/procpu
   :goals: flash

Open the serial monitor using the following command:

.. code-block:: shell

   west espressif monitor

After the board has automatically reset and booted, you should see the following
message in the monitor:

.. code-block:: console

   ***** Booting Zephyr OS vx.x.x-xxx-gxxxxxxxxxxxx *****
   Hello World! xiao_esp32s3

Debugging
*********

ESP32-S3 support on OpenOCD is available upstream as of version 0.12.0.
Download and install OpenOCD from `OpenOCD`_.

ESP32-S3 has a built-in JTAG circuitry and can be debugged without any additional chip. Only an USB cable connected to the D+/D- pins is necessary.

Further documentation can be obtained from the SoC vendor in `JTAG debugging
for ESP32-S3`_.

Here is an example for building the :ref:`hello_world` application.

.. zephyr-app-commands::
   :zephyr-app: samples/hello_world
   :board: xiao_esp32s3/esp32/procpu
   :goals: build flash

You can debug an application in the usual way. Here is an example for the :ref:`hello_world` application.

.. zephyr-app-commands::
   :zephyr-app: samples/hello_world
   :board: xiao_esp32s3/esp32/procpu
   :goals: debug
.. _`JTAG debugging for ESP32-S3`: https://docs.espressif.com/projects/esp-idf/en/latest/esp32s3/api-guides/jtag-debugging/
.. _`OpenOCD`: https://github.com/openocd-org/openocd

References
**********

.. target-notes::

.. _`Seeed Studio XIAO ESP32S3`: https://wiki.seeedstudio.com/xiao_esp32s3_getting_started/
Part 3
한국어 전문 번역
개요
Seeed Studio XIAO ESP32S3는 Espressif ESP32-S3 Wi-Fi/Bluetooth dual-mode chip 기반 IoT mini development board입니다. 자세한 내용은 Seeed Studio XIAO ESP32S3 Wiki를 참고합니다.
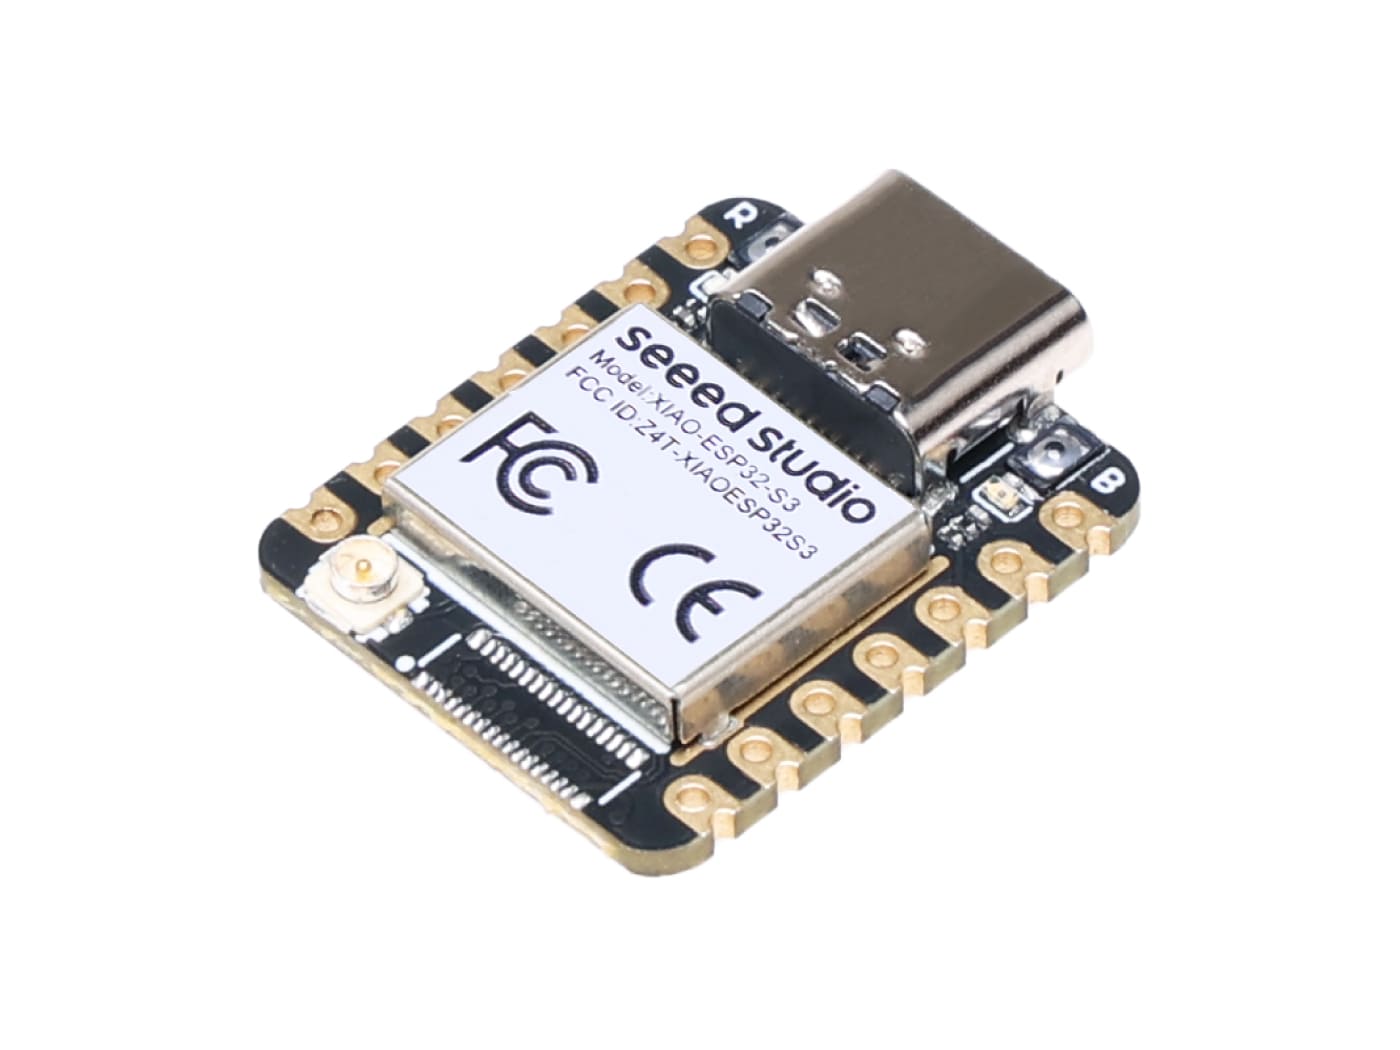
하드웨어
ESP32-S3와 8 MB flash를 기반으로 Wi-Fi와 BLE를 지원합니다. Programming과 debugging용 USB-C port, integrated battery charging, U.FL external antenna connector를 갖추며 standard XIAO 14-pin pinout을 사용합니다.
ESP32-S3는 2.4 GHz Wi-Fi와 Bluetooth Low Energy를 통합한 low-power MCU SoC입니다. High-performance dual-core Xtensa 32-bit LX7 microprocessor, low-power coprocessor, Wi-Fi baseband, Bluetooth LE baseband, RF module과 여러 peripheral로 구성됩니다.
지원 기능
현재 Zephyr XIAO ESP32S3 board는 다음 기능을 지원합니다.
| Interface | Controller | Driver / Component |
|---|---|---|
| UART | on-chip | serial port |
| GPIO | on-chip | gpio |
| PINMUX | on-chip | pinmux |
| USB-JTAG | on-chip | hardware interface |
| SPI Master | on-chip | spi |
| TWAI/CAN | on-chip | can |
| ADC | on-chip | adc |
| Timers | on-chip | counter |
| Watchdog | on-chip | watchdog |
| TRNG | on-chip | entropy |
| LEDC | on-chip | pwm |
| MCPWM | on-chip | pwm |
| PCNT | on-chip | qdec |
| GDMA | on-chip | dma |
연결과 I/O
Board는 standard XIAO pinout을 사용합니다. 기본 pin mapping은 다음 그림과 같습니다.
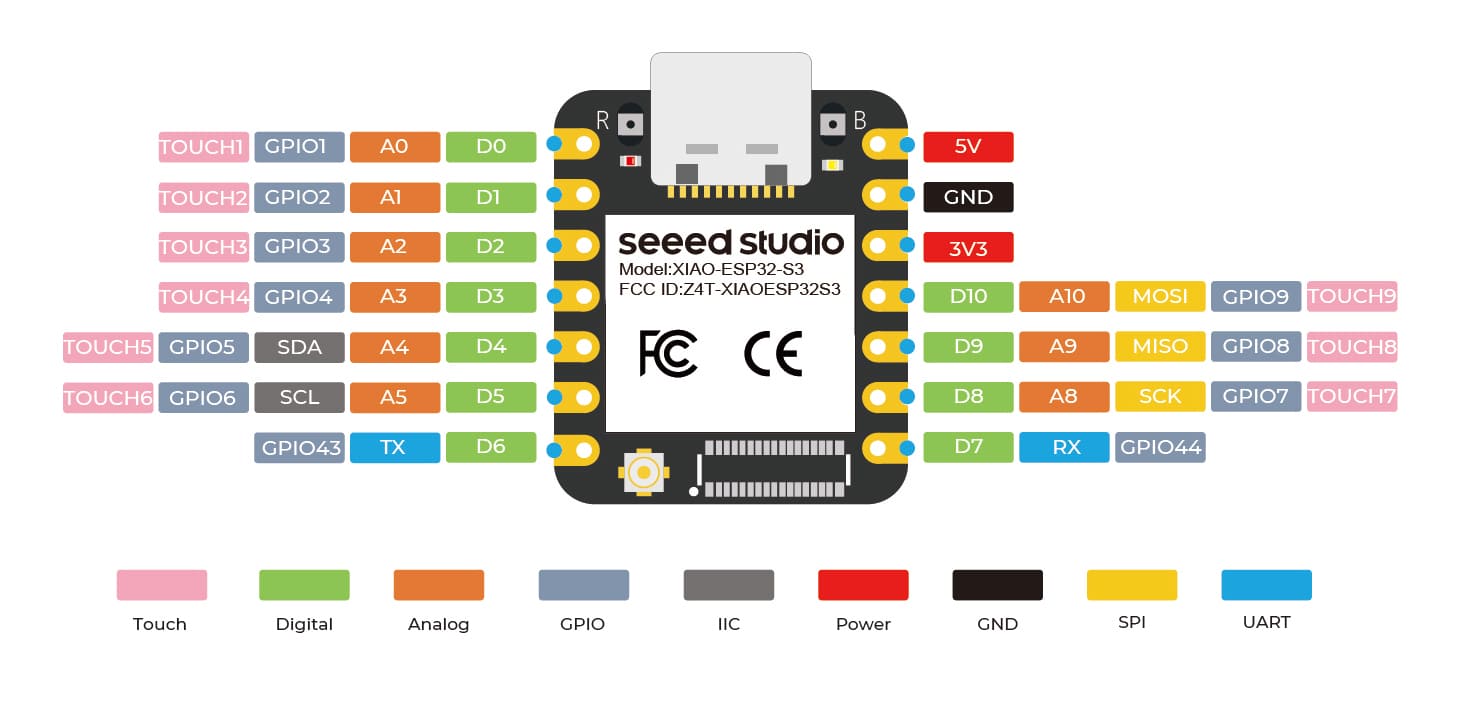
선행 조건
Espressif HAL이 Wi-Fi와 Bluetooth를 동작시키려면 binary blob이 필요합니다. 다음 명령으로 해당 file을 가져옵니다.
west blobs fetch hal_espressifwest update를 실행한 뒤 위 명령을 실행하는 것이 권장됩니다.
Build와 flash
Simple boot
2nd-stage bootloader 없이 single binary image를 board에 적재할 수 있습니다. 추가 configuration 없이 application을 build할 때의 기본 option입니다.
MCUboot bootloader
대신 MCUboot bootloader를 선택할 수 있습니다. 이 경우 bootloader를 최소 한 번 build하고 flash해야 합니다. Application build 방법은 sysbuild와 manual build 두 가지입니다.
Board default configuration file에 다음 line을 추가해 MCUboot를 선택할 수 있습니다.
CONFIG_BOOTLOADER_MCUBOOT=ySysbuild
Sysbuild를 사용하면 ESP32 SoC board를 bootstrap하는 데 필요한 모든 image를 함께 build하고 flash할 수 있습니다.
west build --sysbuild -b xiao_esp32s3 samples/hello_world기본 ESP32 sysbuild는 bootloader(MCUboot)와 application image를 만들지만 다른 종류의 image를 만들도록 설정할 수도 있습니다.
Sysbuild의 output은 domain subdirectory 단위로 구성됩니다.
build/
├── hello_world
│   └── zephyr
│       ├── zephyr.elf
│       └── zephyr.bin
├── mcuboot
│   └── zephyr
│       ├── zephyr.elf
│       └── zephyr.bin
└── domains.yaml
--sysbuild option을 사용하면 pristine build를 할 때마다 bootloader도 다시 build하고 flash합니다.
Manual build
Development cycle에서는 빠른 반복을 위해 전통적인 build로 image를 하나씩 만들 수 있습니다. 이후 지침은 manual build와 sysbuild 모두에 적용되며 차이는 build directory 구조뿐입니다. MCUboot bootloader는 최소 한 번 flash해야 합니다.
hello_world application을 먼저 build합니다.
west build -b xiao_esp32s3/esp32s3/procpu samples/hello_world일반 flash target은 xiao_esp32s3 board configuration에서 동작합니다.
west flash다음 명령으로 serial monitor를 엽니다.
west espressif monitorBoard가 자동 reset하고 boot하면 monitor에 다음 message가 나타납니다.
***** Booting Zephyr OS vx.x.x-xxx-gxxxxxxxxxxxx *****
Hello World! xiao_esp32s3
Debugging
ESP32-S3 지원은 OpenOCD 0.12.0부터 upstream에 포함됩니다. OpenOCD를 내려받아 설치합니다.
ESP32-S3에는 JTAG circuitry가 내장되어 있어 추가 chip 없이 debug할 수 있습니다. D+/D- pin에 USB cable만 연결하면 됩니다. 자세한 내용은 Espressif의 ESP32-S3 JTAG debugging 문서를 참고합니다.
원문이 제시하는 다음 target qualifier로 hello_world를 build하고 flash합니다.
west build -b xiao_esp32s3/esp32/procpu samples/hello_world
west flash
일반적인 방식으로 application을 debug합니다.
west debug참고 자료
Seeed Studio XIAO ESP32S3 · OpenOCD · JTAG debugging for ESP32-S3
Source
출처
영어 원문에는 문단, 문서 지시문, 표, 코드, 코드 심벌, 경로를 그대로 보존했습니다.