Part 1
요약·해설
CR7 boot, 지원 interface 7종, SCIF1 console, CAN 125 kbit/s, Olimex probe와 GDB workflow를 설명합니다.
R-Car H3 CR7 · 800 MHz
Kingfisher · COM Express
Olimex ARM-USB-OCD-H · OpenOCD
Part 2
접을 수 있는 영어 원문 전체
영어 원문 전체 펼치기
284641606CD1CA3B5820C29AF1638ACCCEF40931AED6502D58059A2E1AD31E3E
.. _rcar_h3ulcb_boards:

Renesas R-Car H3ULCB
####################

Overview
********
- The H3 Starter Kit board is designed for evaluating the features and performance of the R-CAR H3 device from Renesas Electronics and it is also used for developing and evaluating application software for these R-CAR H3.

- The H3 Starter Kit, based on the R-CAR H3 SIP, comes with LPDDR4 @4GB in 2-channel, each 64-bit wide+Hyperflash @64MB, CSI2 interfaces and several communication interfaces like USB, Ethernet, HDMI and can work standalone or can be adapted to other boards, via 440pin connector on bottom side.

It is possible to order 2 different types of H3 Starter Kit Boards, one with Ethernet connection onboard and one with Ethernet connection on ComExpress.

.. figure:: ../../../../../../../boards/renesas/rcar_h3ulcb/doc/img/rcar_h3ulcb_starter_kit.jpg
   :align: center
   :alt: R-Car starter kit

.. note:: The H3ULCB board can be plugged on a Renesas Kingfisher Infotainment daughter board through COM Express connector in order to physically access more I/O. CAUTION: In this case, power supply is managed by the daughter board.

More information about the board can be found at `Renesas R-Car Starter Kit website`_.

Hardware
********

Hardware capabilities for the H3ULCB for can be found on the `eLinux H3SK page`_ of the board.

.. figure:: ../../../../../../../boards/renesas/rcar_h3ulcb/doc/img/rcar_h3ulcb_features.jpg
   :align: center
   :alt: R-Car starter kit features

.. note:: Zephyr will be booted on the CR7 processor provided for RTOS purpose.

More information about the SoC that equips the board can be found here:

- `Renesas R-Car H3 chip`_

Supported Features
==================

Here is the current supported features when running Zephyr Project on the R-Car ULCB CR7:

+-----------+------------------------------+--------------------------------+
| Interface | Driver/components            | Support level                  |
+===========+==============================+================================+
| PINMUX    | pinmux                       |                                |
+-----------+------------------------------+--------------------------------+
| CLOCK     | clock_control                |                                |
+-----------+------------------------------+--------------------------------+
| GPIO      | gpio                         |                                |
+-----------+------------------------------+--------------------------------+
| UART      | uart                         | serial port-polling            |
+           +                              +                                +
|           | FT232RQ / CP2102             | serial port-interrupt          |
+-----------+------------------------------+--------------------------------+
| CAN       | can                          | normal mode                    |
+           +                              +                                +
|           | TCAN332GDCNT                 | loopback mode                  |
+-----------+------------------------------+--------------------------------+
| I2C       | i2c                          | interrupt driven               |
+-----------+------------------------------+--------------------------------+
| PWM       | pwm                          | All channels                   |
+-----------+------------------------------+--------------------------------+

It's also currently possible to write on the ram console.

More features will be supported soon.

Connections and IOs
===================

H3ULCB Board
------------

Here are official IOs figures from eLinux for H3ULCB board:

`H3SK top view`_

`H3SK bottom view`_

Kingfisher Infotainment daughter board
--------------------------------------

When connected to Kingfisher Infotainment board through COMExpress connector, the board is exposing much more IOs.

Here are official IOs figures from eLinux for Kingfisher Infotainment board:

`Kingfisher top view`_

`Kingfisher bottom view`_

GPIO
----

By running Zephyr on H3ULCB, the software readable push button 'SW3' can be used as input, and the software controllable LED 'LED5' can be used as output.

UART
----

H3ULCB board is providing two serial ports, only one is commonly available on the board, however, the second one can be made available either by welding components or by plugging the board on a Kingfisher Infotainment daughter board.

Here is information about these serial ports:

+--------------------+-------------------+--------------------+-----------+--------------------------------------+
| Physical Interface | Physical Location | Software Interface | Converter | Further Information                  |
+====================+===================+====================+===========+======================================+
| CN12 DEBUG SERIAL  | ULCB Board        | SCIF2              | FT232RQ   | Used by U-BOOT & Linux               |
+--------------------+-------------------+--------------------+-----------+--------------------------------------+
| CN10 DEBUG SERIAL  | ULCB Board        | SCIF1              | CP2102    | Non-welded                           |
+--------------------+-------------------+--------------------+-----------+--------------------------------------+
| CN04 DEBUG SERIAL  | Kingfisher        | SCIF1              |           | Secondary UART // Through ComExpress |
+--------------------+-------------------+--------------------+-----------+--------------------------------------+

.. note:: The Zephyr console output is assigned to SCIF1 (commonly used on Kingfisher daughter board) with settings 115200 8N1 without hardware flow control by default.

Here is CN04 UART interface pinout (depending on your Kingfisher board version):

+--------+----------+----------+
| Signal | Pin KF03 | Pin KF04 |
+========+==========+==========+
| RXD    | 3        | 4        |
+--------+----------+----------+
| TXD    | 5        | 2        |
+--------+----------+----------+
| RTS    | 4        | 1        |
+--------+----------+----------+
| CTS    | 6        | 3        |
+--------+----------+----------+
| GND    | 9        | 6        |
+--------+----------+----------+

CAN
---

H3ULCB board provides two CAN interfaces. Both interfaces are available on the Kingfisher daughter board.

+--------------------+--------------------+--------------+
| Physical Interface | Software Interface | Transceiver  |
+====================+====================+==============+
| CN17               | CAN0               | TCAN332GDCNT |
+--------------------+--------------------+--------------+
| CN18               | CAN1               | TCAN332GDCNT |
+--------------------+--------------------+--------------+

.. note:: Interfaces are set to 125 kbit/s by default.

The following table lists CAN physical interfaces pinout:

+-----+--------+
| Pin | Signal |
+=====+========+
| 1   | CANH   |
+-----+--------+
| 2   | CANL   |
+-----+--------+
| 3   | GND    |
+-----+--------+

I2C
---

H3ULCB board provides two I2C buses. Unfortunately direct access to these buses is not available through connectors.

I2C is mainly used to manage and power on multiple of onboard chips on the H3ULCB and Kingfisher daughter board.

Embedded I2C devices and I/O expanders are not yet supported. The current I2C support therefore does not make any devices available to the user at this time.

PWM
---

ULCB boards provide one PWM controller with a maximum of 7 channels [0..6]. H3ULCB does provide the pwm0 from test pin CP8 only.

When plugged on a Kingfisher daughter board, pwm4 channel is available on CN7 LVDS connector.

Programming and Debugging
*************************

Build and flash applications as usual (see :ref:`build_an_application` and
:ref:`application_run` for more details).

Supported Debug Probe
=====================

The "Olimex ARM-USB-OCD-H" probe is the only officially supported probe. This probe is supported by OpenOCD that is shipped with the Zephyr SDK.

The "Olimex ARM-USB-OCD-H" probe needs to be connected with a SICA20I2P adapter to CN3 on H3ULCB.

.. note::
    See `eLinux Kingfisher page`_ "Known issues" section if you encounter problem with JTAG.

Configuring a Console
=====================

Connect a USB cable from your PC to CN04 of your Kingfisher daughter board.

Use the following settings with your serial terminal of choice (minicom, putty,
etc.):

- Speed: 115200
- Data: 8 bits
- Parity: None
- Stop bits: 1

Flashing
========

First of all, open your serial terminal.

Applications for the ``rcar_h3ulcb/r8a77951/r7`` board configuration can be built in the usual way (see :ref:`build_an_application` for more details).

.. zephyr-app-commands::
   :zephyr-app: samples/hello_world
   :board: rcar_h3ulcb/r8a77951/r7
   :goals: flash

You should see the following message in the terminal:

.. code-block:: console

	*** Booting Zephyr OS build v2.6.0-rc1 ***
	Hello World! rcar_h3ulcb

Debugging
=========

First of all, open your serial terminal.

Here is an example for the :ref:`hello_world` application.

.. zephyr-app-commands::
   :zephyr-app: samples/hello_world
   :board: rcar_h3ulcb/r8a77951/r7
   :goals: debug

You will then get access to a GDB session for debug.

By continuing the app, you should see the following message in the terminal:

.. code-block:: console

	*** Booting Zephyr OS build v2.6.0-rc1 ***
	Hello World! rcar_h3ulcb

References
**********

- `Renesas R-Car Starter Kit website`_
- `Renesas R-Car H3 chip`_
- `eLinux H3SK page`_
- `eLinux Kingfisher page`_

.. _Renesas R-Car Starter Kit website:
   https://www.renesas.com/br/en/products/automotive-products/automotive-system-chips-socs/r-car-h3-m3-starter-kit

.. _Renesas R-Car H3 chip:
	https://www.renesas.com/eu/en/products/automotive-products/automotive-system-chips-socs/r-car-h3-high-end-automotive-system-chip-soc-vehicle-infotainment-and-driving-safety-support

.. _eLinux H3SK page:
	https://elinux.org/R-Car/Boards/H3SK

.. _H3SK top view:
	https://elinux.org/images/1/1f/R-Car-H3-topview.jpg

.. _H3SK bottom view:
	https://elinux.org/images/c/c2/R-Car-H3-bottomview.jpg

.. _eLinux Kingfisher page:
	https://elinux.org/R-Car/Boards/Kingfisher

.. _Kingfisher top view:
	https://elinux.org/images/0/08/Kfisher_top_specs.png

.. _Kingfisher bottom view:
	https://elinux.org/images/0/06/Kfisher_bot_specs.png

.. _Install a toolchain:
	https://docs.zephyrproject.org/latest/getting_started/index.html#install-a-toolchain
Part 3
한국어 전문 번역
개요
- H3 Starter Kit board는 Renesas Electronics R-Car H3 device의 기능과 성능을 평가하고 R-Car H3용 application software를 개발·평가하도록 설계되었습니다.
- R-Car H3 SIP 기반 kit에는 64-bit 폭 2-channel LPDDR4 4 GB, HyperFlash 64 MB, CSI2 interface, USB·Ethernet·HDMI 같은 여러 communication interface가 있습니다. 단독으로 동작하거나 하단 440-pin connector로 다른 보드에 연결할 수 있습니다.
H3 Starter Kit은 on-board Ethernet형과 ComExpress Ethernet형 두 종류를 주문할 수 있습니다.
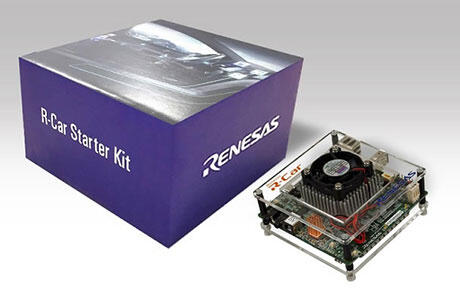
자세한 정보는 Renesas R-Car Starter Kit website에 있습니다.
하드웨어
H3ULCB hardware capability는 eLinux H3SK page에서 확인할 수 있습니다.
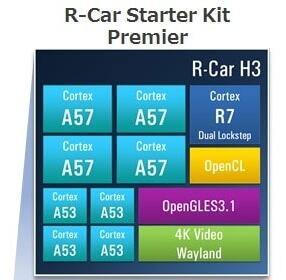
보드의 SoC 정보는 Renesas R-Car H3 chip page에서 확인할 수 있습니다.
지원 기능
R-Car ULCB CR7에서 Zephyr Project를 실행할 때 현재 지원되는 기능은 다음과 같습니다.
| 인터페이스 | 드라이버/컴포넌트 | 지원 수준 |
|---|---|---|
PINMUX | pinmux | |
CLOCK | clock_control | |
GPIO | gpio | |
UART | uart · FT232RQ / CP2102 | serial polling · interrupt |
CAN | can · TCAN332GDCNT | normal · loopback |
I2C | i2c | interrupt driven |
PWM | pwm | all channels |
RAM console에 쓰는 것도 현재 가능합니다. 더 많은 기능이 향후 지원될 예정입니다.
연결과 I/O
H3ULCB board
eLinux 공식 그림은 H3SK top view와 H3SK bottom view에서 볼 수 있습니다.


Kingfisher Infotainment daughterboard
COM Express connector로 Kingfisher Infotainment board에 연결하면 훨씬 더 많은 I/O가 노출됩니다. 공식 그림은 Kingfisher top view와 Kingfisher bottom view에 있습니다.


GPIO
H3ULCB에서 Zephyr를 실행하면 software-readable push button SW3를 input으로, software-controllable LED LED5를 output으로 사용할 수 있습니다.
UART
H3ULCB board는 serial port 2개를 제공합니다. 일반적으로 보드에서 사용할 수 있는 것은 하나이며, 두 번째 port는 component를 납땜하거나 Kingfisher Infotainment daughterboard를 연결해야 사용할 수 있습니다.
| 물리 인터페이스 | 물리 위치 | Software interface | Converter | 추가 정보 |
|---|---|---|---|---|
CN12 DEBUG SERIAL | ULCB board | SCIF2 | FT232RQ | U-Boot 및 Linux 사용 |
CN10 DEBUG SERIAL | ULCB board | SCIF1 | CP2102 | 미납땜 |
CN04 DEBUG SERIAL | Kingfisher | SCIF1 | | ComExpress 경유 secondary UART |
Kingfisher board version에 따른 CN04 UART pinout은 다음과 같습니다.
| Signal | Pin KF03 | Pin KF04 |
|---|---|---|
RXD | 3 | 4 |
TXD | 5 | 2 |
RTS | 4 | 1 |
CTS | 6 | 3 |
GND | 9 | 6 |
CAN
H3ULCB board는 CAN interface 2개를 제공하며 둘 다 Kingfisher daughterboard에서 사용할 수 있습니다.
| 물리 인터페이스 | Software interface | Transceiver |
|---|---|---|
CN17 | CAN0 | TCAN332GDCNT |
CN18 | CAN1 | TCAN332GDCNT |
CAN physical interface pinout은 다음과 같습니다.
| Pin | Signal |
|---|---|
1 | CANH |
2 | CANL |
3 | GND |
I2C
H3ULCB board는 I2C bus 2개를 제공하지만 connector를 통한 직접 접근은 불가능합니다. I2C는 주로 H3ULCB와 Kingfisher daughterboard의 여러 on-board chip을 관리하고 켜는 데 사용합니다. Embedded I2C device와 I/O expander가 아직 지원되지 않아 현재 I2C support가 사용자에게 제공하는 device는 없습니다.
PWM
ULCB board에는 최대 7 channel(0~6)의 PWM controller 1개가 있습니다. H3ULCB에서는 test pin CP8에서 pwm0만 제공합니다. Kingfisher daughterboard에 연결하면 CN7 LVDS connector에서 pwm4 channel을 사용할 수 있습니다.
프로그래밍과 디버깅
Application은 일반적인 방법으로 build하고 flash합니다.
지원 debug probe
공식 지원 probe는 Olimex ARM-USB-OCD-H뿐입니다. Zephyr SDK에 포함된 OpenOCD가 이 probe를 지원합니다. SICA20I2P adapter를 사용해 probe를 H3ULCB의 CN3에 연결해야 합니다.
Console 구성
PC에서 Kingfisher daughterboard의 CN04로 USB cable을 연결하고 terminal을 속도 115200, data 8 bits, parity None, stop bits 1로 설정합니다.
플래시
먼저 serial terminal을 엽니다. rcar_h3ulcb/r8a77951/r7 board configuration용 application을 build하고 flash합니다.
west build -b rcar_h3ulcb/r8a77951/r7 samples/hello_world
west flash
Terminal에 다음 메시지가 표시되어야 합니다.
*** Booting Zephyr OS build v2.6.0-rc1 ***
Hello World! rcar_h3ulcb
디버깅
먼저 serial terminal을 엽니다. 다음은 hello_world application 예입니다.
west build -b rcar_h3ulcb/r8a77951/r7 samples/hello_world
west debug
그러면 GDB debug session에 접근할 수 있습니다. Application을 계속 실행하면 terminal에 다음 메시지가 표시됩니다.
*** Booting Zephyr OS build v2.6.0-rc1 ***
Hello World! rcar_h3ulcb
참고 자료
Source
출처
영어 원문에는 문단, 문서 지시문, 표, 코드, 코드 심벌, 경로를 그대로 보존했습니다.