Part 1
요약·해설
두 EPD variant, 48개 GPIO pin, 19개 jumper/testpoint, debug adapter와 link board BASE 운용법을 설명합니다.
nRF52840 Cortex-M4F
GDEH0213B1 · GDEH0213B72
ADPS9960 · HDC1010 · MMA8652FC
Built-in DAPLink · MK20DX128VFM5
Part 2
접을 수 있는 영어 원문 전체
영어 원문 전체 펼치기
779C1A5464699F318EB122C1710014F1505F624AF9A992553E981033DAD25D09
.. _reel_board:

reel board
##########

Overview
********

`reel board`_ is a evaluation board based on the Nordic Semiconductor
nRF52840 SoC. The board was developed by PHYTEC Messtechnik GmbH in
cooperation with Zephyr Project for the Hackathon - "Get Connected".
The board has a built-in debug adapter based on the DAPLink interface
firmware and NXP MK20DX128VFM5 SoC.

It is equipped with the Electrophoretic (electronic ink) Display (EPD),
environmental (temperature, humidity, light, accelerometer) sensors, and
Bluetooth connectivity making it easy to experiment and evaluate the
Zephyr OS in these kinds of use cases:

* battery powered sensor node
* low-power, low-cost human-machine interface (HMI) for remote
  control and environmental sensor monitoring
* temperature and humidity monitor on your table
* product, name or price tag
* interactive badge for meetings and conferences

The board provides support for the Nordic Semiconductor nRF52840 ARM |reg|
Cortex |reg|-M4F SoC with an integrated 2.4 GHz transceiver supporting Bluetooth
|reg| Low Energy and IEEE |reg| 802.15.4.

The schematic can be found on the `reel board website`_.

Hardware
********

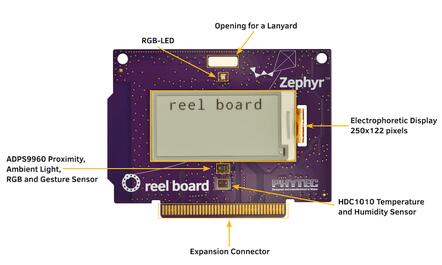
On the front of the board are RGB-LED, ADPS9960 and HDC1010 sensors,
and Electrophoretic Display.
The RGB-LED is controlled by the nRF52840 via GPIO pins.
Display is controlled by the nRF52840 via SPI and 3 GPIOs.

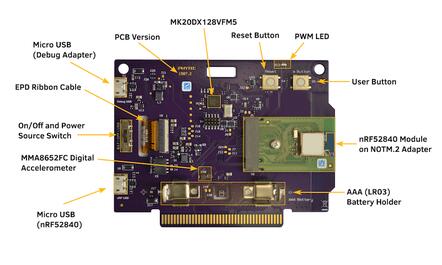
On the back side of the board are all other components such as nRF52840,
a circuit for the Debug Adapter, On/Off and power source switch, battery holder,
buttons and the MMA8652FC (accelerometer) sensor.

ADPS9960 is a Digital Proximity, Ambient Light, RGB and Gesture sensor.
HDC1010 is a digital humidity and temperature sensor.
MMA8652FC is a 12-bit Digital Accelerometer.
All sensors are connected to the I2C bus and one GPIO pin each,
which can be used as an interrupt source.

.. figure:: ../../../../../../../boards/phytec/reel_board/doc/img/reel_board.jpg
     :align: center
     :alt: reel board front

     reel board front (Credit: PHYTEC)

.. figure:: ../../../../../../../boards/phytec/reel_board/doc/img/reel_board_descr_back.jpg
     :align: center
     :alt: reel board back

     reel board back (Credit: PHYTEC)

Since PCB version 1507.2, the nRF52840 SoC is not soldered directly to
the board but integrated as a module on a NOTM.2 adapter.
The wiring is identical for versions 1507.1 and 1507.2.

.. _reel_board_display:

Display
=======

GDEH0213B1 is the display with which the board was introduced
in 2018. Unfortunately, this display has been discontinued.
Currently the board is delivered with the display GDEH0213B72.
It is expected that the display will be replaced over time
due the short product lifecycle of this type of displays.
The following table lists the displays used on the reel board.
The label on the ribbon cable can help to distinguish the displays.
According to the display type, the correct designation must be
used for building an application.

+--------------+--------------------+----------------------+-------------------+
| Display      | Ribbon Cable Label | Controller / Driver  | Board Designation |
+==============+====================+======================+===================+
| Good Display | HINK-E0213         | SSD1673 /            | reel_board        |
| GDEH0213B1   |                    | ssd16xx              |                   |
+--------------+--------------------+----------------------+-------------------+
| Good Display | HINK-E0213A22      | SSD1675A /           | reel_board@2      |
| GDEH0213B72  |                    | ssd16xx              |                   |
+--------------+--------------------+----------------------+-------------------+

Power supply
============

The board is optimized for low power applications and supports two
power source configurations, battery and micro USB connector.

The On/Off switch can choose which power source is used.

reel board uses a TPS610981 boost converter to generate supply voltage
for nRF52840 and peripherals (sensors and EPD).
The boost converter has two modes:

* Active mode - supply voltages for nRF52840 and peripherals are on
* Low Power mode - only supply voltage for nRF52840 is on

The mode is controlled by MODE pin (P1.00).

.. note::
   Actually there is no possibility to reduce energy consumption by the
   Low Power mode. Both voltages are always on, see:
   :zephyr_file:`boards/phytec/reel_board/board.c`

Supported Features
==================

The reel_board board configuration supports the following
hardware features:

+-----------+------------+----------------------+
| Interface | Controller | Driver/Component     |
+===========+============+======================+
| NVIC      | on-chip    | nested vectored      |
|           |            | interrupt controller |
+-----------+------------+----------------------+
| RTC       | on-chip    | system clock         |
+-----------+------------+----------------------+
| UART      | on-chip    | serial port          |
+-----------+------------+----------------------+
| I2C       | on-chip    | i2c                  |
+-----------+------------+----------------------+
| PWM       | on-chip    | pwm                  |
+-----------+------------+----------------------+
| SPI       | on-chip    | spi                  |
+-----------+------------+----------------------+
| GPIO      | on-chip    | gpio                 |
+-----------+------------+----------------------+
| FLASH     | on-chip    | flash                |
+-----------+------------+----------------------+
| RADIO     | on-chip    | Bluetooth            |
+-----------+------------+----------------------+
| SENSOR    | off-chip   | MMA8652FC polling:   |
|           |            | ADPS9960 polling:    |
|           |            | HDC1010 polling      |
+-----------+------------+----------------------+

Other hardware features have not been enabled yet for this board.

Connections and IOs
===================

Port P0
-------

+-------+----------------------------+---------------------------+
| Name  | Function                   | Usage                     |
+=======+============================+===========================+
| P0.00 | XL1                        | 32.768 kHz oscillator     |
+-------+----------------------------+---------------------------+
| P0.01 | XL2                        | 32.768 kHz oscillator     |
+-------+----------------------------+---------------------------+
| P0.02 | expansion connector pin 30 | None                      |
+-------+----------------------------+---------------------------+
| P0.03 | expansion connector pin 31 | None                      |
+-------+----------------------------+---------------------------+
| P0.04 | expansion connector pin 19 | None                      |
+-------+----------------------------+---------------------------+
| P0.05 | expansion connector pin 11 | None                      |
+-------+----------------------------+---------------------------+
| P0.06 | UART0_TX                   | UART Console over USB     |
+-------+----------------------------+---------------------------+
| P0.07 | Button                     | user button (S5)          |
+-------+----------------------------+---------------------------+
| P0.08 | UART0_RX                   | UART Console over USB     |
+-------+----------------------------+---------------------------+
| P0.09 | expansion connector pin 27 | None                      |
+-------+----------------------------+---------------------------+
| P0.10 | expansion connector pin 29 | None                      |
+-------+----------------------------+---------------------------+
| P0.11 | RGB LED (red)              | GPIO                      |
+-------+----------------------------+---------------------------+
| P0.12 | RGB LED (green)            | GPIO                      |
+-------+----------------------------+---------------------------+
| P0.13 | PWM LED | Buzzer           | GPIO                      |
+-------+----------------------------+---------------------------+
| P0.14 | EPD Busy output            | GPIO                      |
+-------+----------------------------+---------------------------+
| P0.15 | EPD Reset input            | GPIO                      |
+-------+----------------------------+---------------------------+
| P0.16 | EPD DC input               | GPIO                      |
+-------+----------------------------+---------------------------+
| P0.17 | EPD SPI3_CS                | SPI                       |
+-------+----------------------------+---------------------------+
| P0.18 | CPU Reset                  | Reset (S4)                |
+-------+----------------------------+---------------------------+
| P0.19 | EPD SPI3_CLK               | SPI                       |
+-------+----------------------------+---------------------------+
| P0.20 | EPD SPI3_MOSI              | SPI                       |
+-------+----------------------------+---------------------------+
| P0.21 | SPI3_MISO                  | SPI (not connected)       |
+-------+----------------------------+---------------------------+
| P0.22 | HDC1010 DRDYn              | GPIO                      |
+-------+----------------------------+---------------------------+
| P0.23 | APDS9960 INT               | GPIO                      |
+-------+----------------------------+---------------------------+
| P0.24 | MMA8652FC INT1             | GPIO                      |
+-------+----------------------------+---------------------------+
| P0.25 | MMA8652FC INT2             | GPIO                      |
+-------+----------------------------+---------------------------+
| P0.26 | I2C_0                      | I2C                       |
+-------+----------------------------+---------------------------+
| P0.27 | I2C_0                      | I2C                       |
+-------+----------------------------+---------------------------+
| P0.28 | expansion connector pin 3  | None                      |
+-------+----------------------------+---------------------------+
| P0.29 | expansion connector pin 52 | None                      |
+-------+----------------------------+---------------------------+
| P0.30 | expansion connector pin 1  | None                      |
+-------+----------------------------+---------------------------+
| P0.31 | expansion connector pin 37 | None                      |
+-------+----------------------------+---------------------------+

Port P1
-------

+-------+----------------------------+---------------------------+
| Name  | Function                   | Usage                     |
+=======+============================+===========================+
| P1.00 | peripheral power on        | GPIO                      |
+-------+----------------------------+---------------------------+
| P1.01 | expansion connector pin 32 | None                      |
+-------+----------------------------+---------------------------+
| P1.02 | expansion connector pin 34 | None                      |
+-------+----------------------------+---------------------------+
| P1.03 | expansion connector pin 17 | None                      |
+-------+----------------------------+---------------------------+
| P1.04 | expansion connector pin 15 | None                      |
+-------+----------------------------+---------------------------+
| P1.05 | expansion connector pin 13 | None                      |
+-------+----------------------------+---------------------------+
| P1.06 | expansion connector pin 33 | None                      |
+-------+----------------------------+---------------------------+
| P1.07 | expansion connector pin 35 | None                      |
+-------+----------------------------+---------------------------+
| P1.08 | expansion connector pin 45 | None                      |
+-------+----------------------------+---------------------------+
| P1.09 | RGB LED (blue)             | GPIO                      |
+-------+----------------------------+---------------------------+
| P1.10 | expansion connector pin 47 | None                      |
+-------+----------------------------+---------------------------+
| P1.11 | expansion connector pin 49 | None                      |
+-------+----------------------------+---------------------------+
| P1.12 | expansion connector pin 51 | None                      |
+-------+----------------------------+---------------------------+
| P1.13 | expansion connector pin 36 | None                      |
+-------+----------------------------+---------------------------+
| P1.14 | expansion connector pin 48 | None                      |
+-------+----------------------------+---------------------------+
| P1.15 | expansion connector pin 50 | None                      |
+-------+----------------------------+---------------------------+

Solder Jumper and Testpoints
============================

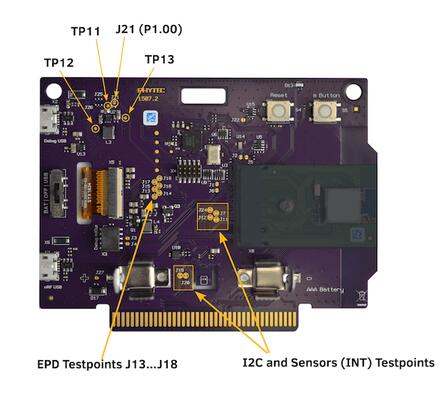
There are several labeled solder jumpers on the board.
These can be used to connect a logic analyzer to check the behavior of a
driver or to measure the voltage of a signal.

.. figure:: ../../../../../../../boards/phytec/reel_board/doc/img/reel_board_tp.jpg
     :align: center
     :alt: reel board Jumper and Testpoints

     reel board testpoints (Credit: PHYTEC)

I2C bus and sensors testpoints
------------------------------

+-------+-----------------------+---------------------------+
| Name  | Type                  | Usage                     |
+=======+=======================+===========================+
| J19   | closed solder jumper  | testpoint I2C SDA         |
+-------+-----------------------+---------------------------+
| J20   | closed solder jumper  | testpoint I2C SCL         |
+-------+-----------------------+---------------------------+
| J7    | closed solder jumper  | testpoint INT1 MMA8652FC  |
+-------+-----------------------+---------------------------+
| J24   | closed solder jumper  | testpoint INT2 MMA8652FC  |
+-------+-----------------------+---------------------------+
| J11   | closed solder jumper  | testpoint INT APDS9960    |
+-------+-----------------------+---------------------------+
| J12   | closed solder jumper  | testpoint DRDYn HDC1010   |
+-------+-----------------------+---------------------------+

EPD testpoints
--------------

+-------+-----------------------+---------------------------+
| Name  | Type                  | Usage                     |
+=======+=======================+===========================+
| J13   | closed solder jumper  | testpoint EPD Busy        |
+-------+-----------------------+---------------------------+
| J14   | closed solder jumper  | testpoint EPD Reset       |
+-------+-----------------------+---------------------------+
| J15   | closed solder jumper  | testpoint EPD DC          |
+-------+-----------------------+---------------------------+
| J16   | closed solder jumper  | testpoint EPD SPI_CS      |
+-------+-----------------------+---------------------------+
| J17   | closed solder jumper  | testpoint EPD SPI_CLK     |
+-------+-----------------------+---------------------------+
| J18   | closed solder jumper  | testpoint EPD SPI_MOSI    |
+-------+-----------------------+---------------------------+

Power supply testpoint
----------------------

+-------+-----------------------+-------------------------------------------+
| Name  | Type                  | Usage                                     |
+=======+=======================+===========================================+
| J21   | closed solder jumper  | testpoint peripheral voltage on/off       |
+-------+-----------------------+-------------------------------------------+
| TP11  | testpoint             | testpoint peripheral voltage              |
+-------+-----------------------+-------------------------------------------+
| TP12  | testpoint             | testpoint nRF52840 supply voltage VDD_nRF |
+-------+-----------------------+-------------------------------------------+
| TP13  | testpoint             | testpoint boost converter input voltage   |
+-------+-----------------------+-------------------------------------------+

Built-in Debug Adapter
======================

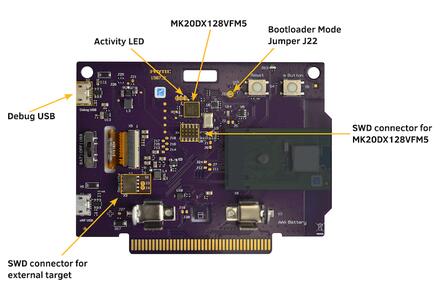
The debug adapter is based on the DAPLink interface firmware and
NXP MK20DX128VFM5 SoC. The adapter is powered via a micro USB connector and
is always on when the board is connected to the USB host.
reel board can be flashed and debugged, powered either from battery or USB.
If the Adapter is powered via USB, the Adapter circuit heats the board
slightly and the temperature sensor can output values up to 1.5 degrees higher.

.. figure:: ../../../../../../../boards/phytec/reel_board/doc/img/reel_board_debug.jpg
     :align: center
     :alt: reel board Debug Adapter

     reel board Debug Adapter overview (Credit: PHYTEC)

Debug Adapter Firmware
----------------------

DAPLink firmware for the adapter can be found at `DAPLink reel board Firmware`_.
To update the firmware (if necessary), the adapter must be started in bootloader
mode. For this, the board should be disconnected from the USB host,
the J22 should be closed (use tweezers for this) and the board reconnected to
the USB host.

Debug Adapter Jumper
--------------------

+-------+-----------------------+----------------------------------------------+
| Name  | Type                  | Usage                                        |
+=======+=======================+==============================================+
| J3    | open solder jumper    | close to pass UART TX to external adapter    |
+-------+-----------------------+----------------------------------------------+
| J4    | open solder jumper    | close to pass UART RX to external adapter    |
+-------+-----------------------+----------------------------------------------+
| J22   | open solder jumper    | close to start adapter in bootloader mode    |
+-------+-----------------------+----------------------------------------------+

Adapter LEDs
------------

+-------+-----------------------+--------------------------------+
| Name  | Type                  | Usage                          |
+=======+=======================+================================+
| D11   | green                 | flashes when adapter is active |
+-------+-----------------------+--------------------------------+
| D14   | red                   | reserved                       |
+-------+-----------------------+--------------------------------+
| D15   | yellow                | reserved                       |
+-------+-----------------------+--------------------------------+

Expansion Connector
************************

The expansion connector has the same dimensions and similar pinout
as the BBC MicroBit edge connector. The expansion components that are
designed especially for the reel board are called link boards.

.. figure:: ../../../../../../../boards/phytec/reel_board/doc/img/reel_board_excon.jpg
     :align: center
     :alt: reel board Expansion Connector

     reel board Expansion Connector (Credit: PHYTEC)

link board BASE
===============

link board BASE is a passive expansion board and allows other link boards or
third party shields in Arduino UNO R3 format to be connected to the reel board.
In addition, it includes a NOTM.2 connector and more powerful DCDC converter
then reel board.

.. figure:: ../../../../../../../boards/phytec/reel_board/doc/img/rb_lb_shield.jpg
     :align: center
     :alt: reel board and link board BASE

     reel board and link board BASE (Credit: PHYTEC)

link board BASE can be used in combination with other link boards or
third party shields in two ways:

    As an adapter
        reel board is plugged into the link board BASE. Both peripherals on
        reel board and shields can be used as long as there is no conflict
        between I2C devices. Care should be taken to provide enough power
        to the complete circuit.

    Stand-alone
        NOTM.2 adapter is removed from the reel board and
        connected to NOTM.2 connector on the link board BASE.
        The wiring to the shield connector is identical to the
        configuration above and no software modifications for the shield
        are necessary.
        Stand-alone configuration is more suitable for applications where
        peripherals on the reel board are not used or in conflict,
        power provided by the reel board is not enough,
        or for prototypes in the field.

.. figure:: ../../../../../../../boards/phytec/reel_board/doc/img/link_board_base.jpg
     :align: center
     :alt: link board BASE

     link board BASE (Credit: PHYTEC)

Components on the link board BASE:

    reel board Connector:
        2x40 position edge connector.

    Micro USB Connector:
        USB can be used as power source. USB data lines are wired
        to NOTM.2 connector.

    NOTM.2 Connector:
        Connector for NOTM.2 adapter. If the connector is used then
        reel board should be removed from reel board connector.

    SWD Connector X11:
        Wired to NOTM.2 connector. A debug probe can
        be connected to program or debug MCU in Stand-alone configuration.

    Alternative Power Source X5 or X9:
        Positive pin is closer to the + character. Nominal voltage is
        3.3V, there is no protection against reverse polarity or overvoltage.
        Use it with care.

    Shield Connector:
        Connector for link boards and third party shields in Arduino UNO R3
        format. Only shields designed for 3.3V supply voltage are supported.

Meaning of the Power Source Switch positions:

    EXT
        link board BASE is powered from Alternative Power Source Connector
        X9 or X5.

    USB
        link board BASE is powered from USB connector (via DCDC converter).

    RB
        link board BASE is powered from reel board. The available power is
        below 0.3W and depends on which source is used to power the reel board.

Programming and Debugging
*************************

Applications for the ``reel_board`` board configuration can be
built and flashed in the usual way (see :ref:`build_an_application`
and :ref:`application_run` for more details).

Flashing
========

If you use Linux, create a udev rule (as ``root``) to fix a permission issue
when not using root for flashing.

.. code-block:: console

   # echo 'ATTR{idProduct}=="0204", ATTR{idVendor}=="0d28", MODE="0666", GROUP="plugdev"' > /etc/udev/rules.d/50-cmsis-dap.rules

Reload the rules and replug the device.

.. code-block:: console

   $ sudo udevadm control --reload-rules

Finally, unplug and plug the board again for the rules to take effect.

Build and flash
applications as usual (see :ref:`build_an_application` and
:ref:`application_run` for more details).

Here is an example for the :ref:`hello_world` application.

First, run your favorite terminal program to listen for output.

.. code-block:: console

   $ minicom -D <tty_device> -b 115200

Replace :code:`<tty_device>` with the port where the reel board
can be found. For example, under Linux, :code:`/dev/ttyACM0`.

Then build and flash the application in the usual way.

.. zephyr-app-commands::
   :zephyr-app: samples/hello_world
   :board: reel_board
   :goals: build flash

.. note::
   Please use reel_board@2 to build a application for the board equipped with
   the GDEH0213B72, see :ref:`reel_board_display`.

.. zephyr-app-commands::
   :zephyr-app: samples/hello_world
   :board: reel_board@2
   :goals: build flash

Debugging
=========

You can debug an application in the usual way.  Here is an example for the
:ref:`hello_world` application.

.. zephyr-app-commands::
   :zephyr-app: samples/hello_world
   :board: reel_board
   :maybe-skip-config:
   :goals: debug


Testing the LEDs and buttons
****************************

There are 2 samples that allow you to test that the buttons (switches) and
LEDs on the board are working properly with Zephyr:

* :zephyr:code-sample:`blinky`
* :zephyr:code-sample:`button`

You can build and flash the examples to make sure Zephyr is running correctly on
your board.

References
**********

.. _reel board Website:
   https://www.phytec.de/reelboard/

.. target-notes::

.. _reel board:
   https://www.phytec.de/reelboard/

.. _DAPLink reel board Firmware:
   https://github.com/PHYTEC-Messtechnik-GmbH/DAPLink/tree/reel-board
Part 3
한국어 전문 번역
개요
reel board는 Nordic Semiconductor nRF52840 SoC 기반 evaluation board입니다. PHYTEC Messtechnik GmbH가 Zephyr Project와 함께 Get Connected
hackathon을 위해 개발했습니다. Built-in debug adapter는 DAPLink interface firmware와 NXP MK20DX128VFM5 SoC를 사용합니다.
Electrophoretic display(EPD, electronic ink), 온도·습도·빛·가속도 환경 sensor, Bluetooth connectivity를 갖추어 다음 용도를 쉽게 시험하고 평가할 수 있습니다.
- battery-powered sensor node
- remote control과 환경 sensor monitoring용 저전력·저비용 HMI
- 탁상 온·습도 monitor
- 상품·이름·가격 tag
- 회의와 conference용 interactive badge
nRF52840 Arm Cortex-M4F SoC의 integrated 2.4 GHz transceiver는 Bluetooth Low Energy와 IEEE 802.15.4를 지원합니다. 회로도는 reel board 웹사이트에서 확인할 수 있습니다.
하드웨어
앞면에는 RGB LED, ADPS9960 및 HDC1010 sensor, EPD가 있습니다. RGB LED는 nRF52840 GPIO가 제어하고 display는 SPI와 GPIO 3개로 제어합니다.
뒷면에는 nRF52840, debug adapter circuit, on/off 및 power-source switch, battery holder, button, MMA8652FC accelerometer가 있습니다. ADPS9960은 digital proximity·ambient light·RGB·gesture sensor, HDC1010은 digital humidity·temperature sensor, MMA8652FC는 12-bit digital accelerometer입니다. 모든 sensor는 I2C bus와 interrupt source로 쓸 수 있는 GPIO pin 하나씩에 연결됩니다.
PCB version 1507.2부터 nRF52840 SoC는 board에 직접 solder되지 않고 NOTM.2 adapter 위의 module로 통합됩니다. Version 1507.1과 1507.2의 wiring은 동일합니다.
Display
GDEH0213B1은 2018년 board 출시 당시 display였으나 단종됐습니다. 현재는 GDEH0213B72가 제공됩니다. 이런 display는 product lifecycle이 짧아 앞으로도 바뀔 수 있습니다. Ribbon cable label로 display를 구분하고, application build 때 display type에 맞는 board designation을 사용해야 합니다.
| Display | Ribbon cable label | Controller / Driver | Board designation |
|---|---|---|---|
| Good Display GDEH0213B1 | HINK-E0213 | SSD1673 / ssd16xx | reel_board |
| Good Display GDEH0213B72 | HINK-E0213A22 | SSD1675A / ssd16xx | reel_board@2 |
전원
저전력 application에 맞춰 battery와 micro USB 두 전원 구성을 지원하며 on/off switch로 power source를 선택합니다. TPS610981 boost converter가 nRF52840, sensor, EPD의 supply voltage를 만듭니다.
- Active mode: nRF52840와 peripheral supply가 모두 켜집니다.
- Low Power mode: nRF52840 supply만 켜집니다.
Mode는 P1.00의 MODE pin으로 제어합니다.
지원 기능
| 인터페이스 | 컨트롤러 | 드라이버/컴포넌트 |
|---|---|---|
NVIC | on-chip | nested vectored interrupt controller |
RTC | on-chip | system clock |
UART | on-chip | serial port |
I2C | on-chip | i2c |
PWM | on-chip | pwm |
SPI | on-chip | spi |
GPIO | on-chip | gpio |
FLASH | on-chip | flash |
RADIO | on-chip | Bluetooth |
SENSOR | off-chip | MMA8652FC polling; ADPS9960 polling; HDC1010 polling |
그 밖의 하드웨어 기능은 아직 이 board에서 활성화되지 않았습니다.
연결과 I/O
Port P0
| 이름 | 기능 | 용도 |
|---|---|---|
P0.00 | XL1 | 32.768 kHz oscillator |
P0.01 | XL2 | 32.768 kHz oscillator |
P0.02 | expansion connector pin 30 | None |
P0.03 | expansion connector pin 31 | None |
P0.04 | expansion connector pin 19 | None |
P0.05 | expansion connector pin 11 | None |
P0.06 | UART0_TX | UART console over USB |
P0.07 | Button | user button (S5) |
P0.08 | UART0_RX | UART console over USB |
P0.09 | expansion connector pin 27 | None |
P0.10 | expansion connector pin 29 | None |
P0.11 | RGB LED (red) | GPIO |
P0.12 | RGB LED (green) | GPIO |
P0.13 | PWM LED | Buzzer | GPIO |
P0.14 | EPD Busy output | GPIO |
P0.15 | EPD Reset input | GPIO |
P0.16 | EPD DC input | GPIO |
P0.17 | EPD SPI3_CS | SPI |
P0.18 | CPU Reset | Reset (S4) |
P0.19 | EPD SPI3_CLK | SPI |
P0.20 | EPD SPI3_MOSI | SPI |
P0.21 | SPI3_MISO | SPI (not connected) |
P0.22 | HDC1010 DRDYn | GPIO |
P0.23 | APDS9960 INT | GPIO |
P0.24 | MMA8652FC INT1 | GPIO |
P0.25 | MMA8652FC INT2 | GPIO |
P0.26 | I2C_0 | I2C |
P0.27 | I2C_0 | I2C |
P0.28 | expansion connector pin 3 | None |
P0.29 | expansion connector pin 52 | None |
P0.30 | expansion connector pin 1 | None |
P0.31 | expansion connector pin 37 | None |
Port P1
| 이름 | 기능 | 용도 |
|---|---|---|
P1.00 | peripheral power on | GPIO |
P1.01 | expansion connector pin 32 | None |
P1.02 | expansion connector pin 34 | None |
P1.03 | expansion connector pin 17 | None |
P1.04 | expansion connector pin 15 | None |
P1.05 | expansion connector pin 13 | None |
P1.06 | expansion connector pin 33 | None |
P1.07 | expansion connector pin 35 | None |
P1.08 | expansion connector pin 45 | None |
P1.09 | RGB LED (blue) | GPIO |
P1.10 | expansion connector pin 47 | None |
P1.11 | expansion connector pin 49 | None |
P1.12 | expansion connector pin 51 | None |
P1.13 | expansion connector pin 36 | None |
P1.14 | expansion connector pin 48 | None |
P1.15 | expansion connector pin 50 | None |
Solder jumper와 testpoint
Board에는 label이 붙은 solder jumper가 여러 개 있습니다. Logic analyzer를 연결해 driver 동작을 확인하거나 signal voltage를 측정할 때 사용할 수 있습니다.
I2C bus와 sensor testpoint
| 이름 | 종류 | 용도 |
|---|---|---|
J19 | closed solder jumper | testpoint I2C SDA |
J20 | closed solder jumper | testpoint I2C SCL |
J7 | closed solder jumper | testpoint INT1 MMA8652FC |
J24 | closed solder jumper | testpoint INT2 MMA8652FC |
J11 | closed solder jumper | testpoint INT APDS9960 |
J12 | closed solder jumper | testpoint DRDYn HDC1010 |
EPD testpoint
| 이름 | 종류 | 용도 |
|---|---|---|
J13 | closed solder jumper | testpoint EPD Busy |
J14 | closed solder jumper | testpoint EPD Reset |
J15 | closed solder jumper | testpoint EPD DC |
J16 | closed solder jumper | testpoint EPD SPI_CS |
J17 | closed solder jumper | testpoint EPD SPI_CLK |
J18 | closed solder jumper | testpoint EPD SPI_MOSI |
Power supply testpoint
| 이름 | 종류 | 용도 |
|---|---|---|
J21 | closed solder jumper | testpoint peripheral voltage on/off |
TP11 | testpoint | testpoint peripheral voltage |
TP12 | testpoint | testpoint nRF52840 supply voltage VDD_nRF |
TP13 | testpoint | testpoint boost converter input voltage |
Built-in debug adapter
Debug adapter는 DAPLink interface firmware와 NXP MK20DX128VFM5 SoC 기반입니다. Micro USB connector로 전원을 공급받으며 board가 USB host에 연결되어 있으면 항상 켜집니다. Reel board는 battery 또는 USB로 전원을 받는 상태에서 flash와 debug가 가능합니다.
Debug adapter firmware
Adapter용 DAPLink firmware는 DAPLink reel board Firmware에서 받을 수 있습니다. Firmware를 갱신해야 한다면 USB host에서 board를 분리하고, tweezer로 J22를 닫은 채 다시 USB host에 연결해 adapter를 bootloader mode로 시작합니다.
Debug adapter jumper
| 이름 | 종류 | 용도 |
|---|---|---|
J3 | open solder jumper | close to pass UART TX to external adapter |
J4 | open solder jumper | close to pass UART RX to external adapter |
J22 | open solder jumper | close to start adapter in bootloader mode |
Adapter LED
| 이름 | 종류 | 용도 |
|---|---|---|
D11 | green | adapter가 active일 때 점멸 |
D14 | red | reserved |
D15 | yellow | reserved |
Expansion connector
Expansion connector는 BBC MicroBit edge connector와 크기가 같고 pinout도 유사합니다. Reel board를 위해 특별히 설계된 expansion component를 link board
라고 부릅니다.
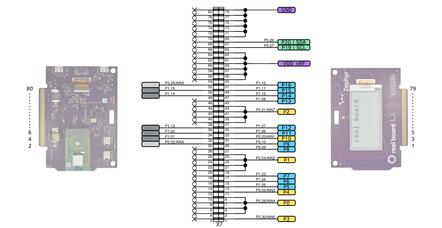
link board BASE
link board BASE는 passive expansion board입니다. 다른 link board나 Arduino UNO R3 form factor의 third-party shield를 reel board에 연결할 수 있습니다. NOTM.2 connector와 reel board보다 강력한 DCDC converter도 갖춥니다.
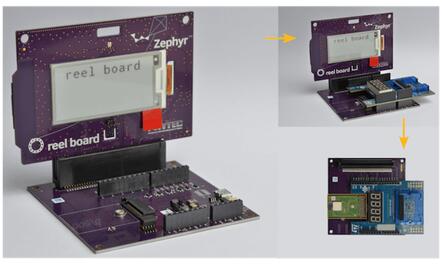
두 방식으로 사용할 수 있습니다.
- Adapter 방식
- Reel board를 link board BASE에 꽂습니다. I2C device 충돌이 없는 한 reel board peripheral과 shield를 함께 쓸 수 있습니다. 전체 circuit에 충분한 전원을 공급해야 합니다.
- Stand-alone 방식
- Reel board에서 NOTM.2 adapter를 분리해 link board BASE의 NOTM.2 connector에 연결합니다. Shield connector wiring은 adapter 방식과 같아 shield software를 수정할 필요가 없습니다. Reel board peripheral을 쓰지 않거나 충돌할 때, reel board 전원이 부족할 때, 현장 prototype에 더 적합합니다.
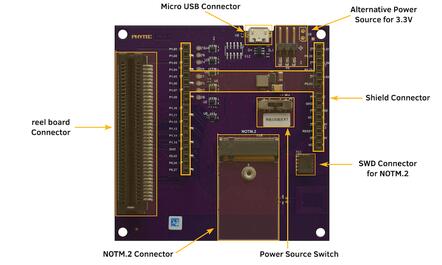
구성 요소
- reel board connector: 2×40-position edge connector
- Micro USB connector: power source로 사용할 수 있고 USB data line은 NOTM.2 connector에 배선됩니다.
- NOTM.2 connector: NOTM.2 adapter용입니다. 사용할 때는 reel board connector에서 reel board를 제거해야 합니다.
- SWD connector X11: NOTM.2 connector에 배선되어 stand-alone 구성의 MCU programming/debug probe를 연결할 수 있습니다.
- Alternative power source X5 또는 X9: + 표시와 가까운 쪽이 positive pin입니다. Nominal voltage는 3.3V이며 reverse polarity와 overvoltage 보호가 없으므로 주의해야 합니다.
- Shield connector: Arduino UNO R3 형식의 link board와 third-party shield용이며 3.3V supply shield만 지원합니다.
Power source switch
EXT: X9 또는 X5 alternative power connector에서 전원을 받습니다.USB: USB connector에서 DCDC converter를 거쳐 전원을 받습니다.RB: reel board에서 전원을 받습니다. 사용 가능한 power는 0.3W 미만이며 reel board의 power source에 따라 달라집니다.
프로그래밍과 디버깅
reel_board용 application은 일반적인 Zephyr 방식으로 build하고 flash할 수 있습니다.
Linux udev rule
Linux에서 root가 아닌 사용자로 flash할 때 permission 문제를 해결하려면 다음 udev rule을 root 권한으로 만듭니다.
# echo 'ATTR{idProduct}=="0204", ATTR{idVendor}=="0d28", MODE="0666", GROUP="plugdev"' > /etc/udev/rules.d/50-cmsis-dap.rulesRule을 다시 읽힌 뒤 device를 뽑았다 꽂습니다.
$ sudo udevadm control --reload-rulesHello World flash
먼저 terminal program으로 output을 기다립니다. <tty_device>는 reel board port로 바꾸며 Linux 예는 /dev/ttyACM0입니다.
$ minicom -D <tty_device> -b 115200GDEH0213B1 display board는 다음처럼 build하고 flash합니다.
# Zephyr 저장소 루트에서
west build -b reel_board samples/hello_world
west flash# Zephyr 저장소 루트에서
west build -b reel_board@2 samples/hello_world
west flash디버깅
hello_world를 일반적인 방식으로 debug할 수 있습니다.
# Zephyr 저장소 루트에서
west build -b reel_board samples/hello_world
west debug
LED와 button 시험
blinky와 button sample로 board의 button(switch)과 LED가 Zephyr에서 정상 동작하는지 확인할 수 있습니다. 두 example을 build하고 flash해 Zephyr 실행 상태를 검증합니다.
Source
출처
영어 원문에는 문단, 문서 지시문, 표, 코드, 코드 심벌, 경로를 그대로 보존했습니다.