Part 1
요약·해설
지원 기능 10종, 84 MHz PLL, ROM DFU와 SWD 두 programming 경로를 설명합니다.
STM32F401CCU6 · Cortex-M4
256 KB flash · 64 KB SRAM
BOOT0 DFU · dfu-util
Part 2
접을 수 있는 영어 원문 전체
영어 원문 전체 펼치기
EDBDDAB7ADBF0DAB91354733537DEBFF229E6782986FCADAD2CA4F0BE96A6B6D
.. _stm32f401_mini:

STM32 Mini F401
###############

Overview
********

The STM32 Mini F401 is an extremely low cost and bare-bones
development board featuring the STM32F401CC, see `STM32F401CC website`_.
More info about the board with schematics available `here <stm32-base-board-page_>`_

.. image:: ../../../../../../../boards/others/stm32f401_mini/doc/img/STM32_Mini_F401-1.jpg
      :align: center
      :alt: STM32 Mini F401

Hardware
********

The STM32F401CC based board provides the following
hardware components:

- STM32F401CCU6 in UFQFPN48 package
- ARM |reg| 32-bit Cortex |reg| -M4 CPU with FPU
- 84 MHz max CPU frequency
- VDD from 1.7 V to 3.6 V
- 256 KB Flash
- 64 KB SRAM
- GPIO with external interrupt capability
- 1x12-bit, 2.4 MSPS ADC with 16 channels
- DMA Controller
- Up to 11 Timers (six 16-bit, two 32-bit, two watchdog timers and a SysTick timer)
- USART/UART (3)
- I2C (3)
- SPI/I2S (4)
- SDIO
- USB 2.0 full-speed device/host/OTG controller with on-chip PHY
- CRC calculation unit
- 96-bit unique ID
- RTC

Supported Features
==================

The Zephyr stm32f401_mini board configuration supports the following
hardware features:

+------------+------------+-------------------------------------+
| Interface  | Controller | Driver/Component                    |
+============+============+=====================================+
| NVIC       | on-chip    | nested vector interrupt controller  |
+------------+------------+-------------------------------------+
| SYSTICK    | on-chip    | system clock                        |
+------------+------------+-------------------------------------+
| UART       | on-chip    | serial port                         |
+------------+------------+-------------------------------------+
| GPIO       | on-chip    | gpio                                |
+------------+------------+-------------------------------------+
| PINMUX     | on-chip    | pinmux                              |
+------------+------------+-------------------------------------+
| FLASH      | on-chip    | flash                               |
+------------+------------+-------------------------------------+
| SPI        | on-chip    | spi                                 |
+------------+------------+-------------------------------------+
| I2C        | on-chip    | i2c                                 |
+------------+------------+-------------------------------------+
| ADC        | on-chip    | ADC Controller                      |
+------------+------------+-------------------------------------+
| USB OTG FS | on-chip    | USB device                          |
+------------+------------+-------------------------------------+

The default configuration can be found in
:zephyr_file:`boards/others/stm32f401_mini/stm32f401_mini_defconfig`

Default Zephyr Peripheral Mapping:
----------------------------------

- UART_1 TX/RX : PA9/PA10
- I2C1 SCL/SDA : PB8/PB9
- SPI1 CS/SCK/MISO/MOSI : PA4/PA5/PA6/PA7
- PWM_4_CH1 : PB6
- PWM_4_CH2 : PB7
- ADC_1 : PA1
- SW0 : PB2 (routed to BOOT1 dip switch)
- LED0 : PC13

Clock Sources
-------------

The board has two external oscillators. The frequency of the slow clock (LSE) is
32.768 kHz. The frequency of the main clock (HSE) is 25 MHz.

The default configuration sources the system clock from the PLL, which is
derived from HSE, and is set at 84MHz.

Programming and Debugging
*************************

There are 2 main entry points for flashing STM32F4X SoCs, one using the ROM
bootloader, and another by using the SWD debug port (which requires additional
hardware). Flashing using the ROM bootloader requires a special activation
pattern, which can be triggered by using the BOOT0 pin, which on this board
is a dip switch.

Flashing
========

Installing dfu-util
-------------------

It is recommended to use at least v0.8 of `dfu-util`_. The package available in
debian/ubuntu can be quite old, so you might have to build dfu-util from source.

There is also a Windows version which works, but you may have to install the
right USB drivers with a tool like `Zadig`_.

Flashing an Application
-----------------------

Connect a USB-C cable and the board should power ON. Force the board into DFU mode
by setting the BOOT0 dip switch position to ON. Reset the board with the NRST button.

The dfu-util runner is supported on this board and so a sample can be built and
tested easily.

.. zephyr-app-commands::
   :zephyr-app: samples/basic/blinky
   :board: stm32f401_mini
   :goals: build flash

Debugging
=========

The board can be debugged by installing the included 100 mil (0.1 inch) header,
and attaching an SWD debugger to the 3V3 (3.3V), GND, SCK, and DIO
pins on that header.

References
**********

.. target-notes::

.. _Zadig:
   https://zadig.akeo.ie/

.. _stm32-base-board-page:
   https://stm32-base.org/boards/STM32F401CCU6-STM32-Mini-F401

.. _dfu-util:
   http://dfu-util.sourceforge.net/build.html

.. _STM32F401CC website:
   https://www.st.com/en/microcontrollers-microprocessors/stm32f401cc.html
Part 3
한국어 전문 번역
개요
STM32 Mini F401은 STM32F401CC를 탑재한 매우 저렴하고 최소 구성의 development board입니다.
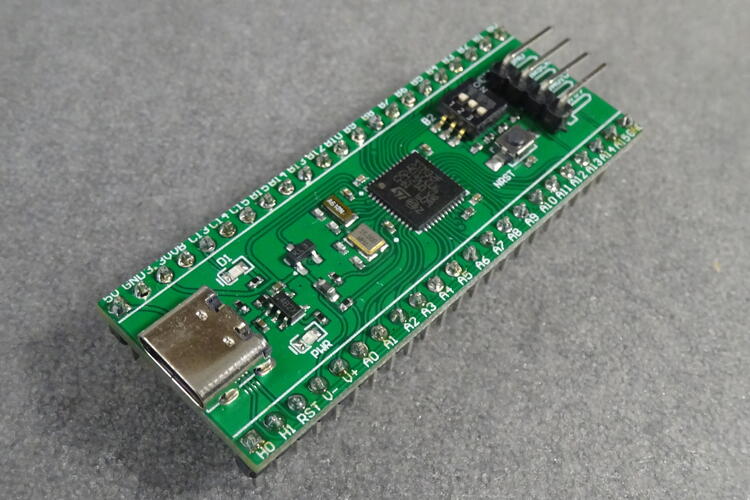
하드웨어
- UFQFPN48 STM32F401CCU6, FPU가 있는 Cortex-M4, 최대 84 MHz
- VDD 1.7~3.6 V, 256 KB flash, 64 KB SRAM
- External-interrupt GPIO, 16-channel 12-bit 2.4 MSPS ADC, DMA
- Timer 최대 11개: 16-bit 6개, 32-bit 2개, watchdog 2개, SysTick
- USART/UART 3개, I2C 3개, SPI/I2S 4개, SDIO
- On-chip PHY USB 2.0 FS device/host/OTG, CRC, 96-bit unique ID, RTC
지원 기능
| 인터페이스 | 컨트롤러 | 드라이버/컴포넌트 |
|---|---|---|
NVIC | on-chip | nested vector interrupt controller |
SYSTICK | on-chip | system clock |
UART | on-chip | serial port |
GPIO | on-chip | gpio |
PINMUX | on-chip | pinmux |
FLASH | on-chip | flash |
SPI | on-chip | spi |
I2C | on-chip | i2c |
ADC | on-chip | ADC Controller |
USB OTG FS | on-chip | USB device |
기본 구성은 boards/others/stm32f401_mini/stm32f401_mini_defconfig입니다.
기본 peripheral mapping
UART_1 TX/RX: PA9/PA10I2C1 SCL/SDA: PB8/PB9SPI1 CS/SCK/MISO/MOSI: PA4/PA5/PA6/PA7PWM_4_CH1: PB6,PWM_4_CH2: PB7ADC_1: PA1SW0: PB2(BOOT1 dip switch),LED0: PC13
Clock
LSE는 32.768 kHz, HSE는 25 MHz입니다. 기본 system clock은 HSE에서 파생한 PLL 84 MHz입니다.
프로그래밍과 디버깅
STM32F4X는 ROM bootloader 또는 추가 hardware가 필요한 SWD debug port로 flash할 수 있습니다. 이 board는 BOOT0 dip switch로 ROM bootloader activation pattern을 만듭니다.
dfu-util 설치
dfu-util v0.8 이상을 권장합니다. Debian/Ubuntu package가 오래되면 source에서 build합니다. Windows에서는 Zadig로 알맞은 USB driver를 설치해야 할 수 있습니다.
Application flash
USB-C를 연결하고 BOOT0 dip switch를 ON으로 한 뒤 NRST로 reset해 DFU mode에 진입합니다.
# Zephyr 저장소 루트에서
west build -b stm32f401_mini samples/basic/blinky
west flash
Debug
포함된 100 mil header를 장착하고 SWD debugger를 3V3, GND, SCK, DIO에 연결합니다.
참고 자료
Source
출처
영어 원문에는 문단, 문서 지시문, 표, 코드, 코드 심벌, 경로를 그대로 보존했습니다.