Part 1
요약·해설
두 core와 memory 차이, BLE 제한, expansion 83행, boot-core 일회성 설정, 3개 OS의 build·flash·debug를 보존했습니다.
RV32M1 · RI5CY + ZERO-RISCY
2.4 GHz · experimental BLE LL
J-Link · vendor OpenOCD · GDB
Part 2
접을 수 있는 영어 원문 전체
영어 원문 전체 펼치기
9CAC4A31DCE3FCDCCF64DE173B5AB48C99B2156595BEA4311BBD55EA11E3D059
.. highlight:: sh

.. _rv32m1_vega:

OpenISA VEGAboard
#################

Overview
********

The VEGAboard contains the RV32M1 SoC, featuring two RISC-V CPUs,
on-die XIP flash, and a full complement of peripherals, including a
2.4 GHz multi-protocol radio. It also has built-in sensors and
Arduino-style expansion connectors.

.. figure:: ../../../../../../../boards/openisa/rv32m1_vega/doc/rv32m1_vega.jpg
   :align: center
   :alt: RV32M1-VEGA

   OpenISA VEGAboard (image copyright: www.open-isa.org)

The two RISC-V CPUs are named RI5CY and ZERO-RISCY, and are
respectively based on the `PULP platform`_ designs by the same names:
`RI5CY`_ and `ZERO-RISCY`_. RI5CY is the "main" core; it has more
flash and RAM as well as a more powerful CPU design. ZERO-RISCY is a
"secondary" core. The main ZERO-RISCY use-case is as a wireless
coprocessor for applications running on RI5CY. The two cores can
communicate via shared memory and messaging peripherals.

Currently, Zephyr supports RI5CY with the ``rv32m1_vega/openisa_rv32m1/ri5cy`` board
configuration name, and ZERO_RISCY with the ``rv32m1_vega/openisa_rv32m1/zero_riscy`` board
configuration name.

Hardware
********

The VEGAboard includes the following features.

RV32M1 multi-core SoC:

- 1 MiB flash and 192 KiB SRAM (RI5CY core)
- 256 KiB flash and 128 KiB SRAM (ZERO-RISCY core)
- Low power modes
- DMA support
- Watchdog, CRC, cryptographic acceleration, ADC, DAC, comparator,
  timers, PWM, RTC, I2C, UART, SPI, external memory, I2S, smart
  card, USB full-speed, uSDHC, and 2.4 GHz multiprotocol radio
  peripherals

On-board sensors and peripherals:

- 32 Mbit SPI flash
- 6-axis accelerometer, magnetometer, and temperature sensor (FXOS8700)
- Ambient light sensor
- RGB LED
- microSD card slot
- Antenna interface

Additional features:

- Form-factor compatible with Arduino Uno Rev 3 expansion connector
  layout (not all Arduino shields may be pin-compatible)
- UART via USB using separate OpenSDA chip
- RISC-V flash and debug using external JTAG dongle (not included) via
  2x5 5 mil pitch connector (commonly called the "ARM 10-pin JTAG"
  connector)

Supported Features
==================

Zephyr's RI5CY configuration, ``rv32m1_vega/openisa_rv32m1/ri5cy``, currently supports
the following hardware features:

+-----------+------------+-------------------------------------+
| Interface | Controller | Driver/Component                    |
+===========+============+=====================================+
| EVENT     | on-chip    | event unit interrupt controller     |
+-----------+------------+-------------------------------------+
| INTMUX    | on-chip    | level 2 interrupt controller        |
+-----------+------------+-------------------------------------+
| LPTMR     | on-chip    | lptmr-based system timer            |
+-----------+------------+-------------------------------------+
| PINMUX    | on-chip    | pinmux                              |
+-----------+------------+-------------------------------------+
| GPIO      | on-chip    | gpio                                |
+-----------+------------+-------------------------------------+
| UART      | on-chip    | serial                              |
+-----------+------------+-------------------------------------+
| I2C(M)    | on-chip    | i2c                                 |
+-----------+------------+-------------------------------------+
| SPI       | on-chip    | spi                                 |
+-----------+------------+-------------------------------------+
| TPM       | on-chip    | pwm                                 |
+-----------+------------+-------------------------------------+
| SENSOR    | off-chip   | fxos8700 polling;                   |
|           |            | fxos8700 trigger;                   |
+-----------+------------+-------------------------------------+

Zephyr's ZERO-RISCY configuration, ``rv32m1_vega/openisa_rv32m1/zero_riscy``, currently
supports the following hardware features:

+-----------+------------+-------------------------------------+
| Interface | Controller | Driver/Component                    |
+===========+============+=====================================+
| EVENT     | on-chip    | event unit interrupt controller     |
+-----------+------------+-------------------------------------+
| INTMUX    | on-chip    | level 2 interrupt controller        |
+-----------+------------+-------------------------------------+
| LPTMR     | on-chip    | lptmr-based system timer            |
+-----------+------------+-------------------------------------+
| PINMUX    | on-chip    | pinmux                              |
+-----------+------------+-------------------------------------+
| GPIO      | on-chip    | gpio                                |
+-----------+------------+-------------------------------------+
| UART      | on-chip    | serial                              |
+-----------+------------+-------------------------------------+
| I2C(M)    | on-chip    | i2c                                 |
+-----------+------------+-------------------------------------+
| TPM       | on-chip    | pwm                                 |
+-----------+------------+-------------------------------------+
| SENSOR    | off-chip   | fxos8700 polling;                   |
|           |            | fxos8700 trigger;                   |
+-----------+------------+-------------------------------------+

BLE Software Link Layer experimental support
==================================================
This is an experimental feature supported on the Zephyr's RI5CY
configuration, ``rv32m1_vega/openisa_rv32m1/ri5cy``. It  uses the Software Link Layer
framework by Nordic Semi to enable the on-SoC radio and transceiver for
implementing a software defined BLE controller. By using both the controller
and the host stack available in Zephyr, the following BLE samples can be used
with this board:

- beacon
- central
- central_hr
- eddystone
- hci_uart
- ibeacon
- peripheral_csc (Cycling Speed Cadence)
- peripheral_dis (Device Information Service)
- peripheral_esp (Environmental Sensing Service)
- peripheral_hr (Heart Rate)
- peripheral_ht (Health Thermometer)
- peripheral
- scan_adv

.. note::

   BLE Software Link Layer limitations:

   - no 512/256 Kbps PHY
   - no TX power adjustment


Connections and IOs
===================

RV32M1 SoC pins are brought out to Arduino-style expansion connectors.
These are 2 pins wide each, adding an additional row of expansion pins
per header compared to the standard Arduino layout.

They are described in the tables in the following subsections. Since
pins are usually grouped by logical function in rows on these headers,
the odd- and even-numbered pins are listed in separate tables.  The
"Port/bit" columns refer to the SoC PORT and GPIO peripheral
naming scheme, e.g. "E/13" means PORTE/GPIOE pin 13.

See the schematic and chip reference manual for details.
(Documentation is available from the `OpenISA GitHub releases`_ page.)

.. note::

   Pins with peripheral functionality may also be muxed as GPIOs.

**Top right expansion header (J1)**

Odd/bottom pins:

===   ========    =================
Pin   Port/bit    Function
===   ========    =================
1     E/13        I2S_TX_BCLK
3     E/14        I2S_TX_FS
5     E/15        I2S_TXD
7     E/19        I2S_MCLK
9     E/16        I2S_RX_BCLK
11    E/21        SOF_OUT
13    E/17        I2S_RX_FS
15    E/18        I2S_RXD
===   ========    =================

Even/top pins:

===   ========   =================
Pin   Port/bit   Function
===   ========   =================
2     A/25       UART1_RX
4     A/26       UART1_TX
6     A/27       GPIO
8     B/13       PWM
10    B/14       GPIO
12    A/30       PWM
14    A/31       PWM/CMP
16    B/1        GPIO
===   ========   =================

**Top left expansion header (J2)**

Odd/bottom pins:

===   ========   =================
Pin   Port/bit   Function
===   ========   =================
1     D/5        FLEXIO_D25
3     D/4        FLEXIO_D24
5     D/3        FLEXIO_D23
7     D/2        FLEXIO_D22
9     D/1        FLEXIO_D21
11    D/0        FLEXIO_D20
13    C/30       FLEXIO_D19
15    C/29       FLEXIO_D18
17    C/28       FLEXIO_D17
19    B/29       FLEXIO_D16
===   ========   =================

Even/top pins:

===   ========   =================
Pin   Port/bit   Function
===   ========   =================
2     B/2        GPIO
4     B/3        PWM
6     B/6        SPI0_PCS2
8     B/5        SPI0_SOUT
10    B/7        SPI0_SIN
12    B/4        SPI0_SCK
14    -          GND
16    -          AREF
18    C/9        I2C0_SDA
20    C/10       I2C0_SCL
===   ========   =================

**Bottom left expansion header (J3)**

Note that the headers at the bottom of the board have odd-numbered
pins on the top, unlike the headers at the top of the board.

Odd/top pins:

===   ========   ====================
Pin   Port/bit   Function
===   ========   ====================
1     A/21       ARDUINO_EMVSIM_PD
3     A/20       ARDUINO_EMVSIM_IO
5     A/19       ARDUINO_EMVSIM_VCCEN
7     A/18       ARDUINO_EMVSIM_RST
9     A/17       ARDUINO_EMVSIM_CLK
11    B/17       FLEXIO_D7
13    B/16       FLEXIO_D6
15    B/15       FLEXIO_D5
===   ========   ====================

Even/bottom pins: note that these are mostly power-related.

===   ========   =================
Pin   Port/bit   Function
===   ========   =================
2     -          SDA_GPIO0
4     -          BRD_IO_PER
6     -          RST_SDA
8     -          BRD_IO_PER
10    -          P5V_INPUT
12    -          GND
14    -          GND
16    -          P5-9V VIN
===   ========   =================

**Bottom right expansion header (J4)**

Note that the headers at the bottom of the board have odd-numbered
pins on the top, unlike the headers at the top of the board.

Odd/top pins:

===   ========   ========================================
Pin   Port/bit   Function
===   ========   ========================================
1     -          TAMPER2
3     -          TAMPER1/RTC_CLKOUT
5     -          TAMPER0/RTC_WAKEUP_b
7     E/2        ADC0_SE19
9     E/5        LPCMP1_IN2/LPCMP1_OUT
11    -          DAC0_OUT/ADC0_SE16/LPCMP0_IN3/LPCMP1_IN3
===   ========   ========================================

Even/bottom pins:

===   ========   ===========================================
Pin   Port/bit   Function
===   ========   ===========================================
2     C/11       ADC0_SE6
4     C/12       ADC0_SE7
6     B/9        ADC0_SE3
8     E/4        ADC0_SE21
10    E/10       ADC0_SE19 (and E/10, I2C3_SDA via 0 Ohm DNP)
12    E/11       ADC0_SE20 (and E/11, I2C3_SCL via 0 Ohm DNP)
===   ========   ===========================================

Additional Pins
---------------

For an up-to-date description of additional pins (such as buttons,
LEDs, etc.) supported by Zephyr, see the board DTS files in the Zephyr
source code, i.e.
:zephyr_file:`boards/openisa/rv32m1_vega/rv32m1_vega_openisa_rv32m1_ri5cy.dts` for RI5CY and
:zephyr_file:`boards/openisa/rv32m1_vega/rv32m1_vega_openisa_rv32m1_zero_riscy.dts` for
ZERO-RISCY.

See the schematic in the documentation available from the `OpenISA
GitHub releases`_ page for additional details.

System Clocks
=============

The RI5CY and ZERO-RISCY cores are configured to use the slow internal
reference clock (SIRC) as the clock source for an LPTMR peripheral to manage
the system timer, and the fast internal reference clock (FIRC) to generate a
48MHz core clock.

Serial Port
===========

The USB connector at the top left of the board (near the RESET button) is
connected to an OpenSDA chip which provides a serial USB device. This is
connected to the LPUART0 peripheral which the RI5CY and ZERO-RISCY cores use by
default for console and logging.

.. warning::

   The OpenSDA chip cannot be used to flash or debug the RISC-V cores.

   See the next section for flash and debug instructions for the
   RISC-V cores using an external JTAG dongle.

Programming and Debugging
*************************

.. _rv32m1-programming-hw:

.. important::

   To use this board, you will need:

   - a `SEGGER J-Link`_ debug probe to debug the RISC-V cores
   - a J-Link `9-Pin Cortex-M Adapter`_ board and ribbon cable
   - the SEGGER `J-Link Software and Documentation Pack`_ software
     installed

   A JTAG dongle is not included with the board itself.

Follow these steps to:

#. Get a toolchain and OpenOCD
#. Set up the board for booting RI5CY
#. Compile a Zephyr application for the RI5CY core
#. Flash the application to your board
#. Debug the board using GDB

.. _rv32m1-toolchain-openocd:

Get the Toolchain and OpenOCD
=============================

Before programming and debugging, you first need to get a GNU
toolchain and an OpenOCD build. There are vendor-specific versions of
each for the RV32M1 SoC\ [#toolchain_openocd]_.

Option 1 (Recommended): Prebuilt Toolchain and OpenOCD
------------------------------------------------------

The following prebuilt toolchains and OpenOCD archives are available
on the `OpenISA GitHub releases`_ page:

- :file:`Toolchain_Linux.tar.gz`
- :file:`Toolchain_Mac.tar.gz`
- :file:`Toolchain_Windows.zip`

Download and extract the archive for your system, then extract the
toolchain and OpenOCD archives inside.

Linux::

  tar xvzf Toolchain_Linux.tar.gz
  tar xvzf openocd.tar.gz
  tar xvzf riscv32-unknown-elf-gcc.tar.gz
  mv openocd ~/rv32m1-openocd
  mv riscv32-unknown-elf-gcc ~

macOS (unfortunately, the OpenISA 1.0.0 release's Mac
:file:`riscv32-unknown-elf-gcc.tar.gz` file doesn't expand into a
:file:`riscv32-unknown-elf-gcc` directory, so it has to be created)::

  tar xvzf Toolchain_Mac.tar.gz
  tar xvzf openocd.tar.gz
  mkdir riscv32-unknown-elf-gcc
  mv riscv32-unknown-elf-gcc.tar.gz riscv32-unknown-elf-gcc
  cd riscv32-unknown-elf-gcc/
  tar xvzf riscv32-unknown-elf-gcc.tar.gz
  cd ..
  mv openocd ~/rv32m1-openocd
  mv riscv32-unknown-elf-gcc ~

Windows:

#. Extract :file:`Toolchain_Windows.zip` in the file manager
#. Extract the :file:`openocd.zip` and :file:`riscv32-unknown-elf-gcc.zip` files
   in the resulting :file:`Toolchain_Windows` folder
#. Move the extracted :file:`openocd` folder to :file:`C:\\rv32m1-openocd`
#. Move the extracted :file:`riscv32-unknown-elf-gcc` folder to
   :file:`C:\\riscv32-unknown-elf-gcc`

For simplicity, this guide assumes:

- You put the extracted toolchain at :file:`~/riscv32-unknown-elf-gcc`
  on macOS or Linux, and :file:`C:\\riscv32-unknown-elf-gcc` on
  Windows.
- You put the extracted OpenOCD binary at :file:`~/rv32m1-openocd` on
  macOS or Linux, and the OpenOCD folder into :file:`C:\\rv32m1-openocd`
  on Windows.

You can put them elsewhere, but be aware:

- If you put the toolchain somewhere else, you will need to change
  the ``CROSS_COMPILE`` value described below accordingly.
- If you put OpenOCD somewhere else, you will need to change the
  OpenOCD path in the flashing and debugging instructions below.
- Don't use installation directories with spaces anywhere in the path;
  this won't work with Zephyr's build system.

Option 2: Building Toolchain and OpenOCD From Source
----------------------------------------------------

See :ref:`rv32m1_vega_toolchain_build`.

.. _rv32m1-vega-jtag:

JTAG Setup
==========

This section describes how to connect to your board via the J-Link
debugger and adapter board. See the :ref:`above information
<rv32m1-programming-hw>` for details on required hardware.

#. Connect the J-Link debugger through the adapter board to the
   VEGAboard as shown in the figure.

   .. figure:: ../../../../../../../boards/openisa/rv32m1_vega/doc/rv32m1_vega_jtag.jpg
      :align: center
      :alt: RV32M1-VEGA

      VEGAboard connected properly to J-Link debugger.
      VEGAboard connector J55 should be used. Pin 1 is on the bottom left.

#. Power the VEGAboard via USB. The OpenSDA connector at the top left
   is recommended for UART access.

#. Make sure your J-Link is connected to your computer via USB.

One-Time Board Setup For Booting RI5CY or ZERO-RISCY
====================================================

Next, you'll need to make sure your board boots the RI5CY or ZERO-RISCY core.
**You only need to do this once.**

The RV32M1 SoC on the VEGAboard has multiple cores, any of which can
be selected as the boot core. Before flashing and debugging, you'll
first make sure you're booting the right core.

**Linux and macOS**:

.. note::

   Linux users: to run these commands as a normal user, you will need
   to install the `60-openocd.rules`_ udev rules file (usually by
   placing it in :file:`/etc/udev/rules.d`, then unplugging and
   plugging the J-Link in again via USB).

.. note::

   These Zephyr-specific instructions differ slightly from the
   equivalent SDK ones. The Zephyr OpenOCD configuration file does not
   run ``init``, so you have to do it yourself as explained below.

1. In one terminal, use OpenOCD to connect to the board::

     ~/rv32m1-openocd -f boards/openisa/rv32m1_vega/support/openocd_rv32m1_vega_ri5cy.cfg

   The output should look like this:

   .. code-block:: console

      $ ~/rv32m1-openocd -f boards/openisa/rv32m1_vega/support/openocd_rv32m1_vega_ri5cy.cfg
      Open On-Chip Debugger 0.10.0+dev-00431-ge1ec3c7d (2018-10-31-07:29)
      [...]
      Info : Listening on port 3333 for gdb connections
      Info : Listening on port 6666 for tcl connections
      Info : Listening on port 4444 for telnet connections

2. In another terminal, connect to OpenOCD's telnet server and execute
   the ``init`` and ``ri5cy_boot`` commands **with the reset button on
   the board (at top left) pressed down**::

     $ telnet localhost 4444
     Trying 127.0.0.1...
     Connected to localhost.
     Escape character is '^]'.
     Open On-Chip Debugger
     > init
     > ri5cy_boot

  To boot the ZERO-RISCY core instead, replace ``ri5cy_boot`` above with
  ``zero_boot``.

  The reset button is at top left, as shown in the following figure.

  .. figure:: ../../../../../../../boards/openisa/rv32m1_vega/doc/ri5cy_boot.jpg
     :align: center
     :alt: Reset button is pressed

  Now quit the telnet session in this terminal and exit OpenOCD in the
  other terminal.

3. Unplug your J-Link and VEGAboard, and plug them back in.

**Windows**:

In one cmd.exe prompt in the Zephyr directory::

 C:\rv32m1-openocd\bin\openocd.exe rv32m1-openocd -f boards\openisa\rv32m1_vega\support\openocd_rv32m1_vega_ri5cy.cfg

In a telnet program of your choice:

#. Connect to localhost port 4444 using telnet.
#. Run ``init`` and ``ri5cy_boot`` as shown above, with RESET held down.
#. Quit the OpenOCD and telnet sessions.
#. Unplug your J-Link and VEGAboard, and plug them back in.

  To boot the ZERO-RISCY core instead, replace ``ri5cy_boot`` above with
  ``zero_boot``.

Compiling a Program
===================

.. important::

   These instructions assume you've set up a development system,
   cloned the Zephyr repository, and installed Python dependencies as
   described in the :ref:`getting_started`.

   You should also have already downloaded and installed the toolchain
   and OpenOCD as described above in :ref:`rv32m1-toolchain-openocd`.

The first step is to set up environment variables to point at your
toolchain and OpenOCD::

  # Linux or macOS
  export ZEPHYR_TOOLCHAIN_VARIANT=cross-compile
  export CROSS_COMPILE=~/riscv32-unknown-elf-gcc/bin/riscv32-unknown-elf-

  # Windows
  set ZEPHYR_TOOLCHAIN_VARIANT=cross-compile
  set CROSS_COMPILE=C:\riscv32-unknown-elf-gcc\bin\riscv32-unknown-elf-

.. note::

   The above only sets these variables for your current shell session.
   You need to make sure this happens every time you use this board.

Now let's compile the :ref:`hello_world` application. (You can try
others as well; see :ref:`samples-and-demos` for more.)

.. We can't use zephyr-app-commands to provide build instructions
   due to the below mentioned linker issue.

Due to a toolchain `linker issue`_, you need to add an option setting
``CMAKE_REQUIRED_FLAGS`` when running CMake to generate a build system
(see :ref:`application` for information about Zephyr's build system).

Linux and macOS (run this in a terminal from the Zephyr directory)::

  # Set up environment and create build directory:
  source zephyr-env.sh

.. zephyr-app-commands::
   :zephyr-app: samples/hello_world
   :tool: cmake
   :cd-into:
   :board: rv32m1_vega/openisa_rv32m1/ri5cy
   :gen-args: -DCMAKE_REQUIRED_FLAGS=-Wl,-dT=/dev/null
   :goals: build

Windows (run this in a ``cmd`` prompt, from the Zephyr directory)::

  # Set up environment and create build directory
  zephyr-env.cmd
  cd samples\hello_world
  mkdir build & cd build

  # Use CMake to generate a Ninja-based build system:
  type NUL > empty.ld
  cmake -GNinja -DBOARD=rv32m1_vega/openisa_rv32m1/ri5cy -DCMAKE_REQUIRED_FLAGS=-Wl,-dT=%cd%\empty.ld ..

  # Build the sample
  ninja

Flashing
========

.. note::

   Make sure you've done the :ref:`JTAG setup <rv32m1-vega-jtag>`, and
   that the VEGAboard's top left USB connector is connected to your
   computer too (for UART access).

.. note::

   Linux users: to run these commands as a normal user, you will need
   to install the `60-openocd.rules`_ udev rules file (usually by
   placing it in :file:`/etc/udev/rules.d`, then unplugging and
   plugging the J-Link in again via USB).

Make sure you've followed the above instructions to set up your board
and build a program first.

Since you need to use a special OpenOCD, the easiest way to flash is
by using :ref:`west flash <west-build-flash-debug>` instead of ``ninja
flash`` like you might see with other Zephyr documentation.

Run these commands from the build directory where you ran ``ninja`` in
the above section.

Linux and macOS::

  # Don't use "~/rv32m1-openocd". It won't work.
  west flash --openocd=$HOME/rv32m1-openocd

Windows::

  west flash --openocd=C:\rv32m1-openocd\bin\openocd.exe

If you have problems:

- Make sure you don't have another ``openocd`` process running in the
  background.
- Unplug the boards and plug them back in.
- On Linux, make sure udev rules are installed, as described above.

As an alternative, for manual steps to run OpenOCD and GDB to flash,
see the `SDK README`_.

Debugging
=========

.. note::

   Make sure you've done the :ref:`JTAG setup <rv32m1-vega-jtag>`, and
   that the VEGAboard's top left USB connector is connected to your
   computer too (for UART access).

.. note::

   Linux users: to run these commands as a normal user, you will need
   to install the `60-openocd.rules`_ udev rules file (usually by
   placing it in :file:`/etc/udev/rules.d`, then unplugging and
   plugging the J-Link in again via USB).

Make sure you've followed the above instructions to set up your board
and build a program first.

To debug with gdb::

  # Linux, macOS
  west debug --openocd=$HOME/rv32m1-openocd

  # Windows
  west debug --openocd=C:\rv32m1-openocd\bin\openocd.exe

Then, from the ``(gdb)`` prompt, follow these steps to halt the core,
load the binary (:file:`zephyr.elf`), and re-sync with the OpenOCD
server::

  (gdb) monitor init
  (gdb) monitor reset halt
  (gdb) load
  (gdb) monitor gdb_sync
  (gdb) stepi

You can then set breakpoints and debug using normal GDB commands.

.. note::

   GDB can get out of sync with the target if you execute commands
   that reset it. To reset RI5CY and get GDB back in sync with it
   without reloading the binary::

     (gdb) monitor reset halt
     (gdb) monitor gdb_sync
     (gdb) stepi

If you have problems:

- Make sure you don't have another ``openocd`` process running in the
  background.
- Unplug the boards and plug them back in.
- On Linux, make sure udev rules are installed, as described above.

References
**********

- OpenISA developer portal: http://open-isa.org
- `OpenISA GitHub releases`_: includes toolchain and OpenOCD
  prebuilts, as well as documentation, such as the SoC datasheet and
  reference manual, board schematic and user guides, etc.
- Base toolchain: `pulp-riscv-gnu-toolchain`_; extra toolchain patches:
  `rv32m1_gnu_toolchain_patch`_ (only needed if building from source).
- OpenOCD repository: `rv32m1-openocd`_ (only needed if building from
  source).
- Vendor SDK: `rv32m1_sdk_riscv`_. Contains HALs, non-Zephyr sample
  applications, and information on using the board with Eclipse which
  may be interesting when combined with the Eclipse Debugging
  information in the :ref:`application`.

.. _rv32m1_vega_toolchain_build:

Appendix: Building Toolchain and OpenOCD from Source
****************************************************

.. note::

   Toolchain and OpenOCD build instructions are provided for Linux and
   macOS only.

   Instructions for building OpenOCD have only been verified on Linux.

.. warning::

   Don't use installation directories with spaces anywhere in
   the path; this won't work with Zephyr's build system.

Ubuntu 18.04 users need to install these additional dependencies::

  sudo apt-get install autoconf automake autotools-dev curl libmpc-dev \
                       libmpfr-dev libgmp-dev gawk build-essential bison \
                       flex texinfo gperf libtool patchutils bc zlib1g-dev \
                       libusb-1.0-0-dev libudev1 libudev-dev g++

Users of other Linux distributions need to install the above packages
with their system package manager.

macOS users need to install dependencies with Homebrew::

  brew install gawk gnu-sed gmp mpfr libmpc isl zlib

The build toolchain is based on the `pulp-riscv-gnu-toolchain`_, with
some additional patches hosted in a separate repository,
`rv32m1_gnu_toolchain_patch`_. To build the toolchain, follow the
instructions in the ``rv32m1_gnu_toolchain_patch`` repository's
`readme.md`_ file to apply the patches, then run::

  ./configure --prefix=<toolchain-installation-dir> --with-arch=rv32imc --with-cmodel=medlow --enable-multilib
  make

If you set ``<toolchain-installation-dir>`` to
:file:`~/riscv32-unknown-elf-gcc`, you can use the above instructions
for setting ``CROSS_COMPILE`` when building Zephyr
applications. If you set it to something else, you will need to update
your ``CROSS_COMPILE`` setting accordingly.

.. note::

   Strangely, there is no separate ``make install`` step for the
   toolchain. That is, the ``make`` invocation both builds and
   installs the toolchain. This means ``make`` has to be run as root
   if you want to set ``--prefix`` to a system directory such as
   :file:`/usr/local` or :file:`/opt` on Linux.

To build OpenOCD, clone the `rv32m1-openocd`_ repository, then run
these from the repository top level::

  ./bootstrap
  ./configure --prefix=<openocd-installation-dir>
  make
  make install

If ``<openocd-installation-dir>`` is :file:`~/rv32m1-openocd`, you
should set your OpenOCD path to :file:`~/rv32m1-openocd/bin/openocd`
in the above flash and debug instructions.

.. _RI5CY:
   https://github.com/pulp-platform/riscv
.. _ZERO-RISCY:
   https://github.com/pulp-platform/zero-riscy
.. _PULP platform:
   http://iis-projects.ee.ethz.ch/index.php/PULP

.. _pulp-riscv-gnu-toolchain:
   https://github.com/pulp-platform/pulp-riscv-gnu-toolchain
.. _rv32m1_gnu_toolchain_patch:
   https://github.com/open-isa-rv32m1/rv32m1_gnu_toolchain_patch
.. _rv32m1-openocd:
   https://github.com/open-isa-rv32m1/rv32m1-openocd
.. _readme.md:
   https://github.com/open-isa-rv32m1/rv32m1_gnu_toolchain_patch/blob/master/readme.md
.. _OpenISA GitHub releases:
   https://github.com/open-isa-org/open-isa.org/releases
.. _rv32m1_sdk_riscv:
   https://github.com/open-isa-rv32m1/rv32m1_sdk_riscv
.. _linker issue:
   https://github.com/pulp-platform/pulpino/issues/240
.. _60-openocd.rules:
   https://github.com/open-isa-rv32m1/rv32m1-openocd/blob/master/contrib/60-openocd.rules
.. _SEGGER J-Link:
   https://www.segger.com/products/debug-probes/j-link/
.. _9-Pin Cortex-M Adapter:
   https://www.segger.com/products/debug-probes/j-link/accessories/adapters/9-pin-cortex-m-adapter/
.. _J-Link Software and Documentation Pack:
   https://www.segger.com/downloads/jlink/#J-LinkSoftwareAndDocumentationPack
.. _SDK README:
   https://github.com/open-isa-rv32m1/rv32m1_sdk_riscv/blob/master/readme.md

.. rubric:: Footnotes

.. [#toolchain_openocd]

   For Linux users, the RISC-V toolchain in the :ref:`Zephyr SDK
   <toolchain_zephyr_sdk>` may work, but it hasn't been thoroughly tested with this
   SoC, and will not allow use of any available RISC-V ISA extensions.

   Support for the RV32M1 SoC is not currently available in the OpenOCD
   upstream repository or the OpenOCD build in the Zephyr SDK.
Part 3
한국어 전문 번역
개요
VEGAboard에는 RISC-V CPU 두 개, die 내부 XIP flash, 2.4 GHz multi-protocol radio를 포함한 다양한 peripheral을 갖춘 RV32M1 SoC가 탑재됩니다. Board에는 sensor와 Arduino-style expansion connector도 있습니다.
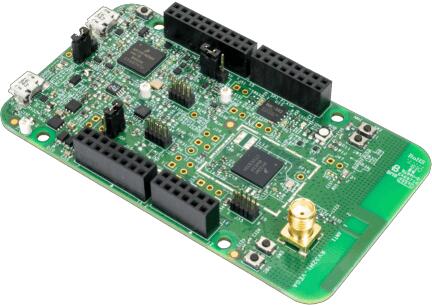
두 RISC-V CPU는 PULP platform의 동명 설계를 기반으로 한 RI5CY와 ZERO-RISCY입니다. Main core인 RI5CY는 더 많은 flash와 RAM, 더 강력한 CPU 설계를 갖습니다. Secondary core인 ZERO-RISCY의 주 용도는 RI5CY application의 wireless coprocessor입니다. 두 core는 shared memory와 messaging peripheral로 통신할 수 있습니다.
Zephyr board configuration은 RI5CY가 rv32m1_vega/openisa_rv32m1/ri5cy, ZERO-RISCY가 rv32m1_vega/openisa_rv32m1/zero_riscy입니다.
하드웨어
RV32M1 multi-core SoC
- RI5CY: 1 MiB flash, 192 KiB SRAM
- ZERO-RISCY: 256 KiB flash, 128 KiB SRAM
- Low-power mode와 DMA
- Watchdog, CRC, cryptographic acceleration, ADC, DAC, comparator, timer, PWM, RTC, I2C, UART, SPI, external memory, I2S, smart card, USB full-speed, uSDHC, 2.4 GHz multiprotocol radio peripheral
On-board sensor와 peripheral
- 32 Mbit SPI flash
- FXOS8700 6-axis accelerometer, magnetometer, temperature sensor
- Ambient light sensor, RGB LED, microSD slot, antenna interface
추가 기능
- Arduino Uno Rev 3 expansion layout과 form-factor 호환. 모든 shield의 pin 호환을 보장하지는 않음
- 별도 OpenSDA chip을 이용한 USB UART
- Board에 포함되지 않는 외부 JTAG dongle과 2x5 50 mil pitch, 이른바 ARM 10-pin JTAG connector로 RISC-V flash/debug
지원 기능
RI5CY configuration
| 인터페이스 | 컨트롤러 | 드라이버/컴포넌트 |
|---|---|---|
EVENT | on-chip | event unit interrupt controller |
INTMUX | on-chip | level 2 interrupt controller |
LPTMR | on-chip | lptmr-based system timer |
PINMUX | on-chip | pinmux |
GPIO | on-chip | gpio |
UART | on-chip | serial |
I2C(M) | on-chip | i2c |
SPI | on-chip | spi |
TPM | on-chip | pwm |
SENSOR | off-chip | fxos8700 polling; fxos8700 trigger; |
ZERO-RISCY configuration
| 인터페이스 | 컨트롤러 | 드라이버/컴포넌트 |
|---|---|---|
EVENT | on-chip | event unit interrupt controller |
INTMUX | on-chip | level 2 interrupt controller |
LPTMR | on-chip | lptmr-based system timer |
PINMUX | on-chip | pinmux |
GPIO | on-chip | gpio |
UART | on-chip | serial |
I2C(M) | on-chip | i2c |
TPM | on-chip | pwm |
SENSOR | off-chip | fxos8700 polling; fxos8700 trigger; |
BLE Software Link Layer 실험 지원
RI5CY configuration에서 제공하는 실험 기능입니다. Nordic Semiconductor의 Software Link Layer framework로 on-SoC radio와 transceiver를 구동해 software-defined BLE controller를 구현합니다. Zephyr controller와 host stack을 함께 사용하면 다음 sample을 실행할 수 있습니다.
beacon, central, central_hr, eddystone, hci_uart, ibeacon, peripheral_csc, peripheral_dis, peripheral_esp, peripheral_hr, peripheral_ht, peripheral, scan_adv
연결과 I/O
RV32M1 pin은 Arduino-style expansion connector로 나옵니다. 각 header는 standard Arduino보다 한 행 많은 2-pin 폭입니다. 아래 표는 logical function별 행을 따라 odd/even pin을 분리합니다. Port/bit의 E/13은 PORTE/GPIOE pin 13을 뜻합니다. Peripheral function pin도 GPIO로 mux할 수 있습니다.
J1 top-right, odd/bottom
| Pin | Port/bit | Function |
|---|---|---|
1 | E/13 | I2S_TX_BCLK |
3 | E/14 | I2S_TX_FS |
5 | E/15 | I2S_TXD |
7 | E/19 | I2S_MCLK |
9 | E/16 | I2S_RX_BCLK |
11 | E/21 | SOF_OUT |
13 | E/17 | I2S_RX_FS |
15 | E/18 | I2S_RXD |
J1 top-right, even/top
| Pin | Port/bit | Function |
|---|---|---|
2 | A/25 | UART1_RX |
4 | A/26 | UART1_TX |
6 | A/27 | GPIO |
8 | B/13 | PWM |
10 | B/14 | GPIO |
12 | A/30 | PWM |
14 | A/31 | PWM/CMP |
16 | B/1 | GPIO |
J2 top-left, odd/bottom
| Pin | Port/bit | Function |
|---|---|---|
1 | D/5 | FLEXIO_D25 |
3 | D/4 | FLEXIO_D24 |
5 | D/3 | FLEXIO_D23 |
7 | D/2 | FLEXIO_D22 |
9 | D/1 | FLEXIO_D21 |
11 | D/0 | FLEXIO_D20 |
13 | C/30 | FLEXIO_D19 |
15 | C/29 | FLEXIO_D18 |
17 | C/28 | FLEXIO_D17 |
19 | B/29 | FLEXIO_D16 |
J2 top-left, even/top
| Pin | Port/bit | Function |
|---|---|---|
2 | B/2 | GPIO |
4 | B/3 | PWM |
6 | B/6 | SPI0_PCS2 |
8 | B/5 | SPI0_SOUT |
10 | B/7 | SPI0_SIN |
12 | B/4 | SPI0_SCK |
14 | - | GND |
16 | - | AREF |
18 | C/9 | I2C0_SDA |
20 | C/10 | I2C0_SCL |
J3 bottom-left, odd/top
Board 아래쪽 header는 위쪽 header와 달리 odd pin이 top에 있습니다.
| Pin | Port/bit | Function |
|---|---|---|
1 | A/21 | ARDUINO_EMVSIM_PD |
3 | A/20 | ARDUINO_EMVSIM_IO |
5 | A/19 | ARDUINO_EMVSIM_VCCEN |
7 | A/18 | ARDUINO_EMVSIM_RST |
9 | A/17 | ARDUINO_EMVSIM_CLK |
11 | B/17 | FLEXIO_D7 |
13 | B/16 | FLEXIO_D6 |
15 | B/15 | FLEXIO_D5 |
J3 bottom-left, even/bottom
대부분 power 관련 pin입니다.
| Pin | Port/bit | Function |
|---|---|---|
2 | - | SDA_GPIO0 |
4 | - | BRD_IO_PER |
6 | - | RST_SDA |
8 | - | BRD_IO_PER |
10 | - | P5V_INPUT |
12 | - | GND |
14 | - | GND |
16 | - | P5-9V VIN |
J4 bottom-right, odd/top
이 header도 odd pin이 top입니다.
| Pin | Port/bit | Function |
|---|---|---|
1 | - | TAMPER2 |
3 | - | TAMPER1/RTC_CLKOUT |
5 | - | TAMPER0/RTC_WAKEUP_b |
7 | E/2 | ADC0_SE19 |
9 | E/5 | LPCMP1_IN2/LPCMP1_OUT |
11 | - | DAC0_OUT/ADC0_SE16/LPCMP0_IN3/LPCMP1_IN3 |
J4 bottom-right, even/bottom
| Pin | Port/bit | Function |
|---|---|---|
2 | C/11 | ADC0_SE6 |
4 | C/12 | ADC0_SE7 |
6 | B/9 | ADC0_SE3 |
8 | E/4 | ADC0_SE21 |
10 | E/10 | ADC0_SE19 (and E/10, I2C3_SDA via 0 Ohm DNP) |
12 | E/11 | ADC0_SE20 (and E/11, I2C3_SCL via 0 Ohm DNP) |
추가 pin
Button과 LED 등 Zephyr가 지원하는 추가 pin의 최신 정보는 RI5CY용 boards/openisa/rv32m1_vega/rv32m1_vega_openisa_rv32m1_ri5cy.dts와 ZERO-RISCY용 boards/openisa/rv32m1_vega/rv32m1_vega_openisa_rv32m1_zero_riscy.dts를 확인하십시오. Schematic과 상세 문서는 OpenISA GitHub releases에 있습니다.
System clock와 serial port
두 core는 LPTMR system timer의 source로 SIRC(slow internal reference clock), 48 MHz core clock 생성에는 FIRC(fast internal reference clock)를 사용합니다.
RESET button 가까이의 board top-left USB connector는 serial USB device를 제공하는 OpenSDA chip과 연결됩니다. 두 core의 기본 console/logging peripheral인 LPUART0에 연결됩니다.
프로그래밍과 디버깅 준비
SEGGER J-Link debug probe, J-Link 9-Pin Cortex-M Adapter와 ribbon cable, 설치된 J-Link Software and Documentation Pack이 필요합니다. JTAG dongle은 board에 포함되지 않습니다. 절차는 toolchain/OpenOCD 확보, RI5CY boot 설정, application compile, flash, GDB debug 순서입니다.
Toolchain과 OpenOCD
RV32M1 전용 GNU toolchain과 OpenOCD build가 필요합니다.
선택 1: prebuilt toolchain과 OpenOCD 권장
OpenISA GitHub releases의 Toolchain_Linux.tar.gz, Toolchain_Mac.tar.gz, Toolchain_Windows.zip 중 OS에 맞는 archive를 내려받습니다.
Linux
tar xvzf Toolchain_Linux.tar.gz
tar xvzf openocd.tar.gz
tar xvzf riscv32-unknown-elf-gcc.tar.gz
mv openocd ~/rv32m1-openocd
mv riscv32-unknown-elf-gcc ~
macOS
OpenISA 1.0.0 Mac archive는 compiler archive를 동일 이름 directory로 풀지 않으므로 directory를 직접 만듭니다.
tar xvzf Toolchain_Mac.tar.gz
tar xvzf openocd.tar.gz
mkdir riscv32-unknown-elf-gcc
mv riscv32-unknown-elf-gcc.tar.gz riscv32-unknown-elf-gcc
cd riscv32-unknown-elf-gcc/
tar xvzf riscv32-unknown-elf-gcc.tar.gz
cd ..
mv openocd ~/rv32m1-openocd
mv riscv32-unknown-elf-gcc ~
Windows
Toolchain_Windows.zip을 풉니다.- 그 안의
openocd.zip과riscv32-unknown-elf-gcc.zip을 풉니다. openocd를C:\rv32m1-openocd로 옮깁니다.riscv32-unknown-elf-gcc를C:\riscv32-unknown-elf-gcc로 옮깁니다.
이 가이드는 Linux/macOS에서 toolchain ~/riscv32-unknown-elf-gcc, OpenOCD ~/rv32m1-openocd, Windows에서 각각 C:\riscv32-unknown-elf-gcc, C:\rv32m1-openocd를 가정합니다. 다른 위치를 쓰면 CROSS_COMPILE과 OpenOCD path도 바꿔야 합니다. Zephyr build system과 호환되지 않으므로 space가 있는 설치 경로를 쓰지 마십시오.
선택 2: source에서 build
아래 부록을 따릅니다.
JTAG 설정
- J-Link debugger와 adapter board를 다음처럼 VEGAboard의
J55에 연결합니다. Pin 1은 bottom-left입니다.
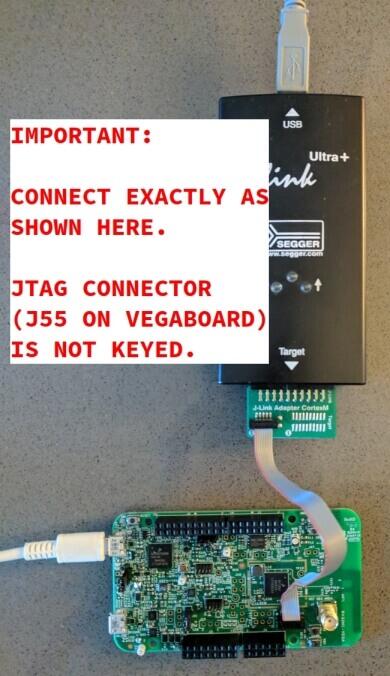
- USB로 VEGAboard에 전원을 공급합니다. UART access에는 top-left OpenSDA connector가 권장됩니다.
- J-Link가 USB로 computer에 연결됐는지 확인합니다.
RI5CY 또는 ZERO-RISCY boot 일회성 설정
RV32M1의 여러 core 중 boot core를 선택해야 하며 이 작업은 한 번만 하면 됩니다.
Linux와 macOS
- 첫 terminal에서 OpenOCD로 board에 연결합니다.
~/rv32m1-openocd -f boards/openisa/rv32m1_vega/support/openocd_rv32m1_vega_ri5cy.cfg출력 예:
$ ~/rv32m1-openocd -f boards/openisa/rv32m1_vega/support/openocd_rv32m1_vega_ri5cy.cfg
Open On-Chip Debugger 0.10.0+dev-00431-ge1ec3c7d (2018-10-31-07:29)
[...]
Info : Listening on port 3333 for gdb connections
Info : Listening on port 6666 for tcl connections
Info : Listening on port 4444 for telnet connections- 두 번째 terminal에서 telnet port 4444에 연결합니다. Board top-left RESET을 누른 채
init과ri5cy_boot를 실행합니다.
$ telnet localhost 4444
Trying 127.0.0.1...
Connected to localhost.
Escape character is '^]'.
Open On-Chip Debugger
> init
> ri5cy_boot
ZERO-RISCY를 boot하려면 ri5cy_boot 대신 zero_boot를 실행합니다.
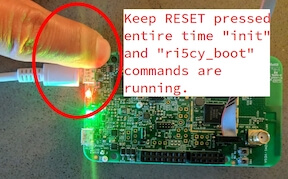
- Telnet과 OpenOCD를 종료하고 J-Link와 VEGAboard를 뽑았다 다시 연결합니다.
Windows
Zephyr directory의 cmd.exe에서 실행합니다.
C:\rv32m1-openocd\bin\openocd.exe rv32m1-openocd -f boards\openisa\rv32m1_vega\support\openocd_rv32m1_vega_ri5cy.cfg- Telnet으로 localhost port 4444에 연결합니다.
- RESET을 누른 채
init과ri5cy_boot를 실행합니다. - OpenOCD와 telnet을 종료합니다.
- J-Link와 VEGAboard를 다시 연결합니다.
ZERO-RISCY는 zero_boot를 사용합니다.
Program compile
Zephyr repository와 Python dependency를 준비하고 위 toolchain/OpenOCD를 설치한 상태여야 합니다. 현재 shell session에 environment variable을 설정합니다.
# Linux or macOS
export ZEPHYR_TOOLCHAIN_VARIANT=cross-compile
export CROSS_COMPILE=~/riscv32-unknown-elf-gcc/bin/riscv32-unknown-elf-

# Windows
set ZEPHYR_TOOLCHAIN_VARIANT=cross-compile
set CROSS_COMPILE=C:\riscv32-unknown-elf-gcc\bin\riscv32-unknown-elf-Toolchain linker issue 때문에 CMake build system 생성 시 CMAKE_REQUIRED_FLAGS를 추가해야 합니다.
Linux와 macOS
# Zephyr 저장소 루트에서
source zephyr-env.sh
west build -b rv32m1_vega/openisa_rv32m1/ri5cy samples/hello_world -- -DCMAKE_REQUIRED_FLAGS=-Wl,-dT=/dev/null
Windows
zephyr-env.cmd
cd samples\hello_world
mkdir build & cd build

type NUL > empty.ld
cmake -GNinja -DBOARD=rv32m1_vega/openisa_rv32m1/ri5cy -DCMAKE_REQUIRED_FLAGS=-Wl,-dT=%cd%\empty.ld ..

ninja
Flash
JTAG 설정과 build를 마치고 UART용 top-left USB도 연결해야 합니다. Linux 일반 사용자는 udev rule이 필요합니다. 특수 OpenOCD가 필요하므로 ninja flash 대신 build directory에서 west flash를 사용합니다.
Linux와 macOS
# ~/rv32m1-openocd 는 동작하지 않으므로 쓰지 않습니다.
west flash --openocd=$HOME/rv32m1-openocd
Windows
west flash --openocd=C:\rv32m1-openocd\bin\openocd.exe문제가 있으면 background의 다른 openocd process를 종료하고 board를 다시 연결하며 Linux udev rule을 확인합니다. Manual OpenOCD/GDB flash 절차는 SDK README를 참고하십시오.
GDB debug
JTAG와 UART USB 연결, build, Linux udev rule을 확인한 뒤 실행합니다.
# Linux, macOS
west debug --openocd=$HOME/rv32m1-openocd

# Windows
west debug --openocd=C:\rv32m1-openocd\bin\openocd.exe
(gdb) prompt에서 core를 halt하고 zephyr.elf를 load한 뒤 OpenOCD와 다시 동기화합니다.
(gdb) monitor init
(gdb) monitor reset halt
(gdb) load
(gdb) monitor gdb_sync
(gdb) stepi
Target reset 명령으로 GDB 동기화가 깨졌을 때 binary를 다시 load하지 않고 RI5CY를 reset·재동기화하려면 다음을 실행합니다.
(gdb) monitor reset halt
(gdb) monitor gdb_sync
(gdb) stepi
문제가 있으면 중복 OpenOCD process, cable 재연결, udev rule을 점검합니다.
참고 자료
- OpenISA developer portal: open-isa.org
- OpenISA GitHub releases: toolchain, OpenOCD, SoC datasheet/reference manual, schematic, user guide
- pulp-riscv-gnu-toolchain과 추가 patch
- RV32M1 OpenOCD repository
- Vendor SDK: HAL, non-Zephyr sample, Eclipse 정보
부록: source에서 toolchain과 OpenOCD build
Dependency
Ubuntu 18.04:
sudo apt-get install autoconf automake autotools-dev curl libmpc-dev \
                     libmpfr-dev libgmp-dev gawk build-essential bison \
                     flex texinfo gperf libtool patchutils bc zlib1g-dev \
                     libusb-1.0-0-dev libudev1 libudev-dev g++
다른 Linux distribution은 같은 package를 해당 package manager로 설치합니다. macOS:
brew install gawk gnu-sed gmp mpfr libmpc isl zlibToolchain build
pulp-riscv-gnu-toolchain에 rv32m1_gnu_toolchain_patch repository의 readme.md 절차로 patch를 적용한 뒤 실행합니다.
./configure --prefix=<toolchain-installation-dir> --with-arch=rv32imc --with-cmodel=medlow --enable-multilib
make--prefix를 ~/riscv32-unknown-elf-gcc로 설정하면 앞의 CROSS_COMPILE 값을 그대로 쓸 수 있습니다. 별도 make install 단계가 없고 make가 build와 install을 모두 수행하므로 system directory에 설치할 때는 root 권한이 필요합니다.
OpenOCD build
rv32m1-openocd repository top level에서 실행합니다.
./bootstrap
./configure --prefix=<openocd-installation-dir>
make
make install~/rv32m1-openocd에 설치했다면 실제 binary는 ~/rv32m1-openocd/bin/openocd입니다.
각주
Linux에서는 Zephyr SDK의 RISC-V toolchain이 동작할 수도 있지만 이 SoC에서 충분히 검증되지 않았고 사용 가능한 RISC-V ISA extension도 이용할 수 없습니다. RV32M1 SoC 지원은 upstream OpenOCD와 Zephyr SDK의 OpenOCD build에 없습니다.
Source
출처
영어 원문에는 문단, 문서 지시문, 표, 코드, 코드 심벌, 경로를 그대로 보존했습니다.