Part 1
요약·해설
기능 17종, 160 MHz clock 구성, UART label과 overlay, USB 지원 범위, 기본 J-Link programming·console 흐름을 설명합니다.
K66F · 2 MB flash · 256 KB RAM
IMU · gyro · magnetometer · barometer
J-Link EDU Mini · USB-UART
Part 2
접을 수 있는 영어 원문 전체
영어 원문 전체 펼치기
01536ACD040DB13CB11C831BD11EC41E3BE6AFA53F16C168B589500B2CF0F309
.. _rddrone_fmuk66:

NXP RDDRONE-FMUK66
##################

Overview
********

The RDDRONE FMUK66 is an drone control board with commonly used peripheral
connectors and a Kinetis K66 on board.

- Comes with a J-Link Edu Mini for programming and UART console.

.. image:: ../../../../../../../boards/nxp/rddrone_fmuk66/doc/rddrone_fmuk66.jpg
   :align: center
   :alt: RDDRONE-FMUK66

Hardware
********

- MK66FN2MOVLQ18 MCU (180 MHz, 2 MB flash memory, 256 KB RAM, low-power,
  crystal-less USB, and 144 Low profile Quad Flat Package (LQFP))
- Dual role USB interface with micro-B USB connector
- RGB LED
- FXOS8700CQ accelerometer and magnetometer
- FXAS21002CQ gyro
- BMM150 magnetometer
- ML3114A2 barometer
- BMP280 barometer
- Connector for PWM servo/motor controls
- Connector for UART GPS/GLONASS
- SDHC

For more information about the K64F SoC and FRDM-K64F board:

- `K66F Website`_
- `K66F Datasheet`_
- `K66F Reference Manual`_
- `RDDRONE-FMUK66 Website`_
- `RDDRONE-FMUK66 User Guide`_
- `RDDRONE-FMUK66 Schematics`_

Supported Features
==================

The rddrone-fmuk66 board configuration supports the following hardware features:

+-----------+------------+-------------------------------------+
| Interface | Controller | Driver/Component                    |
+===========+============+=====================================+
| NVIC      | on-chip    | nested vector interrupt controller  |
+-----------+------------+-------------------------------------+
| SYSTICK   | on-chip    | systick                             |
+-----------+------------+-------------------------------------+
| PINMUX    | on-chip    | pinmux                              |
+-----------+------------+-------------------------------------+
| GPIO      | on-chip    | gpio                                |
+-----------+------------+-------------------------------------+
| I2C       | on-chip    | i2c                                 |
+-----------+------------+-------------------------------------+
| SPI       | on-chip    | spi                                 |
+-----------+------------+-------------------------------------+
| WATCHDOG  | on-chip    | watchdog                            |
+-----------+------------+-------------------------------------+
| ADC       | on-chip    | adc                                 |
+-----------+------------+-------------------------------------+
| DAC       | on-chip    | dac                                 |
+-----------+------------+-------------------------------------+
| PWM       | on-chip    | pwm                                 |
+-----------+------------+-------------------------------------+
| ETHERNET  | on-chip    | ethernet                            |
+-----------+------------+-------------------------------------+
| UART      | on-chip    | serial port-polling;                |
|           |            | serial port-interrupt               |
+-----------+------------+-------------------------------------+
| FLASH     | on-chip    | soc flash                           |
+-----------+------------+-------------------------------------+
| USB       | on-chip    | USB device                          |
+-----------+------------+-------------------------------------+
| CAN       | on-chip    | can                                 |
+-----------+------------+-------------------------------------+
| RTC       | on-chip    | rtc                                 |
+-----------+------------+-------------------------------------+
| DMA       | on-chip    | dma                                 |
+-----------+------------+-------------------------------------+

The default configuration can be found in
:zephyr_file:`boards/nxp/rddrone_fmuk66/rddrone_fmuk66_defconfig`

Other hardware features are not currently supported by the port.

System Clock
============

The K66F SoC is configured to use the 16 MHz external oscillator on the board
with the on-chip PLL to generate a 160 MHz system clock.

Serial Port
===========

The K66F SoC has six UARTs. LPUART0 is configured for the console, UART0 is labeled Serial 2,
UART2 is labeled GPS, UART4 is labeled Serial 1. Any of these UARTs may be used as the console by
overlaying the board device tree.

USB
===

The K66F SoC has a USB OTG (USBOTG) controller that supports both
device and host functions through its micro USB connector (K66F USB).
Only USB device function is supported in Zephyr at the moment.

Programming and Debugging
*************************

Build and flash applications as usual (see :ref:`build_an_application` and
:ref:`application_run` for more details).

Configuring a Debug Probe
=========================

A debug probe is used for both flashing and debugging the board. This board is
configured by default to use jlink. The board package
with accessories comes with a jlink mini edu and cable specifically for this board
along with a usb to uart that connects directly to the jlink mini edu. This is the expected
default configuration for programming and getting a console.

.. zephyr-app-commands::
   :zephyr-app: samples/hello_world
   :board: rddrone-fmuk66
   :gen-args:
   :goals: build

Configuring a Console
=====================

Use the following settings with your serial terminal of choice (minicom, putty,
etc.):

- Speed: 115200
- Data: 8 bits
- Parity: None
- Stop bits: 1

Flashing
========

Here is an example for the :ref:`hello_world` application.

.. zephyr-app-commands::
   :zephyr-app: samples/hello_world
   :board: rddrone-fmuk66
   :goals: flash

Open a serial terminal, reset the board (press the SW1 button), and you should
see the following message in the terminal:

.. code-block:: console

   ***** Booting Zephyr OS v2.7.0 *****
   Hello World! rddrone-fmuk66

Debugging
=========

Here is an example for the :ref:`hello_world` application.

.. zephyr-app-commands::
   :zephyr-app: samples/hello_world
   :board: rddrone-fmuk66
   :goals: debug

Open a serial terminal, step through the application in your debugger, and you
should see the following message in the terminal:

.. code-block:: console

   ***** Booting Zephyr OS v2.7.0 *****
   Hello World! rddrone-fmuk66

.. _RDDRONE-FMUK66 Website:

https://www.nxp.com/design/designs/px4-robotic-drone-vehicle-flight-management-unit-vmu-fmu-rddrone-fmuk66:RDDRONE-FMUK66

.. _RDDRONE-FMUK66 User Guide:

https://nxp.gitbook.io/hovergames/userguide/getting-started

.. _RDDRONE-FMUK66 Schematics:

https://www.nxp.com/webapp/Download?colCode=SPF-39053

.. _K66F Website:

https://www.nxp.com/products/processors-and-microcontrollers/arm-microcontrollers/general-purpose-mcus/k-series-cortex-m4/k6x-ethernet/kinetis-k66-180-mhz-dual-high-speed-full-speed-usbs-2mb-flash-microcontrollers-mcus-based-on-arm-cortex-m4-core:K66_180

.. _K66F Datasheet:

https://www.nxp.com/docs/en/data-sheet/K66P144M180SF5V2.pdf

.. _K66F Reference Manual:

https://www.nxp.com/webapp/Download?colCode=K66P144M180SF5RMV2
Part 3
한국어 전문 번역
개요
RDDRONE FMUK66은 Kinetis K66와 일반적으로 쓰이는 주변장치 connector를 갖춘 drone control board입니다. Programming과 UART console용 J-Link EDU Mini가 함께 제공됩니다.
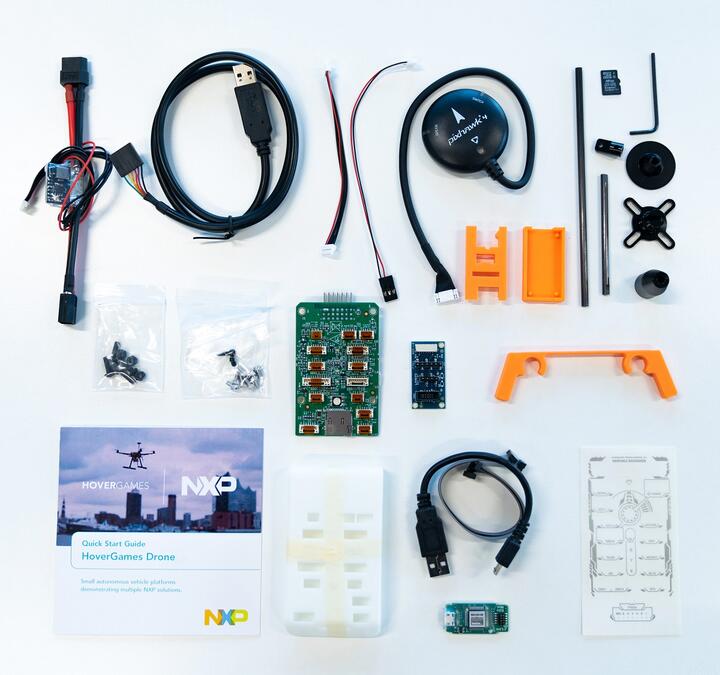
하드웨어
MK66FN2MOVLQ18MCU: 180 MHz, 2 MB flash, 256 KB RAM, low-power, crystal-less USB, 144-pin LQFP- Micro-B USB connector의 dual-role USB interface
- RGB LED
- FXOS8700CQ accelerometer·magnetometer
- FXAS21002CQ gyro
- BMM150 magnetometer
- ML3114A2 barometer와 BMP280 barometer
- PWM servo/motor control connector
- UART GPS/GLONASS connector
- SDHC
지원 기능
| 인터페이스 | 컨트롤러 | 드라이버/컴포넌트 |
|---|---|---|
NVIC | on-chip | nested vector interrupt controller |
SYSTICK | on-chip | systick |
PINMUX | on-chip | pinmux |
GPIO | on-chip | gpio |
I2C | on-chip | i2c |
SPI | on-chip | spi |
WATCHDOG | on-chip | watchdog |
ADC | on-chip | adc |
DAC | on-chip | dac |
PWM | on-chip | pwm |
ETHERNET | on-chip | ethernet |
UART | on-chip | serial port-polling; serial port-interrupt |
FLASH | on-chip | soc flash |
USB | on-chip | USB device |
CAN | on-chip | can |
RTC | on-chip | rtc |
DMA | on-chip | dma |
기본 구성은 boards/nxp/rddrone_fmuk66/rddrone_fmuk66_defconfig에 있습니다. 표 밖의 하드웨어 기능은 현재 port에서 지원하지 않습니다.
시스템 클록
K66F SoC는 보드의 16 MHz external oscillator와 on-chip PLL을 사용해 160 MHz system clock을 생성하도록 구성됩니다.
직렬 포트
K66F SoC에는 UART가 6개 있습니다. LPUART0은 console, UART0은 Serial 2, UART2는 GPS, UART4는 Serial 1로 표시됩니다. Board devicetree overlay를 사용하면 이들 UART 가운데 하나를 console로 선택할 수 있습니다.
USB
K66F SoC의 USB OTG controller는 K66F micro USB connector를 통해 device와 host 역할을 모두 지원합니다. 그러나 현재 Zephyr에서는 USB device 기능만 지원합니다.
프로그래밍과 디버깅
일반 application과 같은 방식으로 build하고 flash합니다. 기본 runner는 J-Link입니다. Accessory가 포함된 board package에는 이 보드 전용 J-Link Mini EDU와 cable, J-Link Mini EDU에 직접 연결되는 USB-to-UART adapter가 들어 있으며, 이것이 programming과 console의 기본 구성입니다.
먼저 hello_world를 build할 수 있습니다.
# Zephyr 저장소 루트에서
west build -b rddrone-fmuk66 samples/hello_world
콘솔
Terminal은 115200 baud, data 8 bits, parity None, stop bit 1로 설정합니다.
플래시
# Zephyr 저장소 루트에서
west build -b rddrone-fmuk66 samples/hello_world
west flash
Serial terminal을 열고 SW1 button을 눌러 reset하면 다음 메시지가 표시됩니다.
***** Booting Zephyr OS v2.7.0 *****
Hello World! rddrone-fmuk66
디버깅
# Zephyr 저장소 루트에서
west build -b rddrone-fmuk66 samples/hello_world
west debug
Debugger에서 application을 단계 실행하면 terminal에 다음 메시지가 표시됩니다.
***** Booting Zephyr OS v2.7.0 *****
Hello World! rddrone-fmuk66
참고 자료
Source
출처
영어 원문에는 문단, 문서 지시문, 표, 코드, 코드 심벌, 경로를 그대로 보존했습니다.