Part 1
요약·해설
지원 기능 21종과 핀 16행, Cortex-M33/F1 target 차이, LPC-Link2·J-Link·LinkServer 연결, flash boot 방해 복구를 설명합니다.
Cortex-M33 275 MHz · Fusion F1 DSP
5 MB SRAM · Octal/Quad SPI
DIP switch · flash reprogramming
Part 2
접을 수 있는 영어 원문 전체
영어 원문 전체 펼치기
030D246CCE3159D988C1B9FEAC5DA760E8759C65CE97C31E0304006EF5D58214
.. _mimxrt595_evk:

NXP MIMXRT595-EVK
##################

Overview
********

i.MX RT500 crossover MCUs are part of the edge computing family and are optimized
for low-power HMI applications by combining a graphics engine and a streamlined
Cadence Tensilica Fusion F1 DSP core with a next-generation Arm Cortex-M33
core. These devices are designed to unlock the potential of display-based applications
with a secure, power-optimized embedded processor.

i.MX RT500 MCUs provides up to 5MB of on-chip SRAM and several high-bandwidth interfaces
to access off-chip flash, including an Octal/Quad SPI interface with an on-the-fly
decryption engine.

.. image:: ../../../../../../../boards/nxp/mimxrt595_evk/doc/mimxrt595_evk.jpg
   :align: center
   :alt: MIMXRT595-EVK

Hardware
********

- MIMXRT595SFFOC Cortex-M33 (275 MHz) core processor with Cadence Tensilica Fusion F1 DSP
- Onboard, high-speed USB, Link2 debug probe with CMSIS-DAP protocol (supporting Cortex M33 debug only)
- USB2.0 high-speed host and device with micro USB connector and external crystal
- Octal/Quad/pSRAM external memories via FlexSPI
- 5 MB system SRAM
- Full size SD card slot (SDIO)
- On-board eMMC chip
- On-board 5 V inputs NXP PCA9420UK PMIC providing 1.2 V, 1.8 V, 3.3 V
- User LEDs
- Reset and User buttons
- MIPI-DSI connector
- Single row headers for ARDUINO signals and MikroBus connector
- FlexIO connector for MikroElektronica TFT Proto 5 inch capacitive touch display
- One motion sensor combo accelero-/magneto-meter NXP FXOS8700CQ
- Stereo audio codec with line-In/ line-Out/ and Microphone
- Pmod/host expansion connector
- NXP TFA9896 audio digital amplifier
- Support for up to eight off-board digital microphones via 12-pin header
- Two on-board digital microphones

For more information about the MIMXRT595 SoC and MIMXRT595-EVK board, see
these references:

- `i.MX RT595 Website`_
- `i.MX RT595 Datasheet`_
- `i.MX RT595 Reference Manual`_
- `MIMXRT595-EVK Website`_
- `MIMXRT595-EVK User Guide`_
- `MIMXRT595-EVK Schematics`_
- `MIMXRT595-EVK Debug Firmware`_

Supported Features
==================

NXP considers the MIMXRT595-EVK as a superset board for the i.MX RT5xx
family of MCUs.  This board is a focus for NXP's Full Platform Support for
Zephyr, to better enable the entire RT5xx family.  NXP prioritizes enabling
this board with new support for Zephyr features.  The mimxrt595_evk board
configuration supports the hardware features below.  Another very similar
board is the :ref:`mimxrt685_evk`, and that board may have additional features
already supported, which can also be re-used on this mimxrt595_evk board:

+-----------+------------+-------------------------------------+
| Interface | Controller | Driver/Component                    |
+===========+============+=====================================+
| NVIC      | on-chip    | nested vector interrupt controller  |
+-----------+------------+-------------------------------------+
| SYSTICK   | on-chip    | systick                             |
+-----------+------------+-------------------------------------+
| OS_TIMER  | on-chip    | os timer                            |
+-----------+------------+-------------------------------------+
| IOCON     | on-chip    | pinmux                              |
+-----------+------------+-------------------------------------+
| GPIO      | on-chip    | gpio                                |
+-----------+------------+-------------------------------------+
| USART     | on-chip    | serial port-polling;                |
|           |            | serial port-interrupt               |
+-----------+------------+-------------------------------------+
| CLOCK     | on-chip    | clock_control                       |
+-----------+------------+-------------------------------------+
| I2C       | on-chip    | i2c                                 |
+-----------+------------+-------------------------------------+
| SPI       | on-chip    | spi                                 |
+-----------+------------+-------------------------------------+
| CTIMER    | on-chip    | counter                             |
+-----------+------------+-------------------------------------+
| WDT       | on-chip    | watchdog                            |
+-----------+------------+-------------------------------------+
| FLASH     | on-chip    | OctalSPI Flash                      |
+-----------+------------+-------------------------------------+
| TRNG      | on-chip    | entropy                             |
+-----------+------------+-------------------------------------+
| USB       | on-chip    | USB device                          |
+-----------+------------+-------------------------------------+
| FLEXSPI   | on-chip    | flash programming                   |
+-----------+------------+-------------------------------------+
| RTC       | on-chip    | counter                             |
+-----------+------------+-------------------------------------+
| PM        | on-chip    | power management; uses SoC sleep,   |
|           |            | deep sleep and deep-powerdown modes |
+-----------+------------+-------------------------------------+
| SDHC      | on-chip    | disk access (works with eMMC & SD)  |
+-----------+------------+-------------------------------------+
| I2S       | on-chip    | i2s                                 |
+-----------+------------+-------------------------------------+
| DISPLAY   | on-chip    | LCDIF; MIPI-DSI. Tested with        |
|           |            | :ref:`rk055hdmipi4m`,               |
|           |            | :ref:`rk055hdmipi4ma0`, and         |
|           |            | :ref:`g1120b0mipi` display shields  |
+-----------+------------+-------------------------------------+
| DMIC      | on-chip    | dmic                                |
+-----------+------------+-------------------------------------+

The default configuration can be found in the defconfig file:

   :zephyr_file:`boards/nxp/mimxrt595_evk/mimxrt595_evk_mimxrt595s_cm33_defconfig`

Other hardware features are not currently supported by the port.

Connections and IOs
===================

The MIMXRT595 SoC has IOCON registers, which can be used to configure the
functionality of a pin.

+---------+-----------------+----------------------------+
| Name    | Function        | Usage                      |
+=========+=================+============================+
| PIO0_2  | USART0          | USART RX                   |
+---------+-----------------+----------------------------+
| PIO0_1  | USART0          | USART TX                   |
+---------+-----------------+----------------------------+
| PIO0_14 | GPIO            | GREEN LED                  |
+---------+-----------------+----------------------------+
| PIO0_25 | GPIO            | SW0                        |
+---------+-----------------+----------------------------+
| PIO0_10 | GPIO            | SW1                        |
+---------+-----------------+----------------------------+
| PIO4_30 | USART12         | USART TX                   |
+---------+-----------------+----------------------------+
| PIO4_31 | USART12         | USART RX                   |
+---------+-----------------+----------------------------+
| PIO0_29 | I2C             | I2C SCL                    |
+---------+-----------------+----------------------------+
| PIO0_30 | I2C             | I2C SDA                    |
+---------+-----------------+----------------------------+
| PIO0_22 | GPIO            | FXOS8700 TRIGGER           |
+---------+-----------------+----------------------------+
| PIO1_5  | SPI             | SPI MOSI                   |
+---------+-----------------+----------------------------+
| PIO1_4  | SPI             | SPI MISO                   |
+---------+-----------------+----------------------------+
| PIO1_3  | SPI             | SPI SCK                    |
+---------+-----------------+----------------------------+
| PIO1_6  | SPI             | SPI SSEL                   |
+---------+-----------------+----------------------------+
| PIO0_5  | SCT0            | SCT0 GPI0                  |
+---------+-----------------+----------------------------+
| PIO0_6  | SCT0            | SCT0 GPI1                  |
+---------+-----------------+----------------------------+

System Clock
============

The MIMXRT595 EVK is configured to use the OS Event timer
as a source for the system clock.

Serial Port
===========

The MIMXRT595 SoC has 13 FLEXCOMM interfaces for serial communication. One is
configured as USART for the console and the remaining are not used.

Fusion F1 DSP Core
==================

You can build a Zephyr application for the RT500 DSP core by targeting the F1
SOC. Xtensa toolchain supporting RT500 DSP core is included in Zephyr SDK.
To build the hello_world sample for the RT500 DSP core:

.. code-block:: shell

   $ west build -b mimxrt595_evk/mimxrt595s/f1 samples/hello_world

For detailed instructions on how to debug DSP firmware, please refer to
this document: `Getting Started with Xplorer for EVK-MIMXRT595`_

Programming and Debugging
*************************

Build and flash applications as usual (see :ref:`build_an_application` and
:ref:`application_run` for more details).

Configuring a Debug Probe
=========================

A debug probe is used for both flashing and debugging the board. This board is
configured by default to use the LPC-Link2.

.. tabs::

    .. group-tab:: LPCLink2 JLink Onboard


        1. Install the :ref:`jlink-debug-host-tools` and make sure they are in your search path.
        2. To connect the SWD signals to onboard debug circuit, install jumpers JP17, JP18 and JP19,
           if not already done (these jumpers are installed by default).
        3. Follow the instructions in :ref:`lpclink2-jlink-onboard-debug-probe` to program the
           J-Link firmware. Please make sure you have the latest firmware for this board.

    .. group-tab:: JLink External


        1. Install the :ref:`jlink-debug-host-tools` and make sure they are in your search path.

        2. To disconnect the SWD signals from onboard debug circuit, **remove** jumpers J17, J18,
           and J19 (these are installed by default).

        3. Connect the J-Link probe to J2 10-pin header.

        See :ref:`jlink-external-debug-probe` for more information.

    .. group-tab:: Linkserver

        1. Install the :ref:`linkserver-debug-host-tools` and make sure they are in your search path.
        2. To update the debug firmware, please follow the instructions on `MIMXRT595-EVK Debug Firmware`

Configuring a Console
=====================

Connect a USB cable from your PC to J40, and use the serial terminal of your choice
(minicom, putty, etc.) with the following settings:

- Speed: 115200
- Data: 8 bits
- Parity: None
- Stop bits: 1

Flashing
========

Here is an example for the :ref:`hello_world` application. This example uses the
:ref:`jlink-debug-host-tools` as default.

.. zephyr-app-commands::
   :zephyr-app: samples/hello_world
   :board: mimxrt595_evk/mimxrt595s/cm33
   :goals: flash

Open a serial terminal, reset the board (press the RESET button), and you should
see the following message in the terminal:

.. code-block:: console

   *** Booting Zephyr OS v2.7 ***
   Hello World! mimxrt595_evk

Debugging
=========

Here is an example for the :ref:`hello_world` application. This example uses the
:ref:`jlink-debug-host-tools` as default.

.. zephyr-app-commands::
   :zephyr-app: samples/hello_world
   :board: mimxrt595_evk/mimxrt595s/cm33
   :goals: debug

Open a serial terminal, step through the application in your debugger, and you
should see the following message in the terminal:

.. code-block:: console

   *** Booting Zephyr OS v2.7 ***
   Hello World! mimxrt595_evk

Troubleshooting
===============

If the debug probe fails to connect with the following error, it's possible
that the image in flash is interfering and causing this issue.

.. code-block:: console

   Remote debugging using :2331
   Remote communication error.  Target disconnected.: Connection reset by peer.
   "monitor" command not supported by this target.
   "monitor" command not supported by this target.
   You can't do that when your target is `exec'
   (gdb) Could not connect to target.
   Please check power, connection and settings.

You can fix it by erasing and reprogramming the flash with the following
steps:

#. Set the SW7 DIP switches to ON-ON-ON to prevent booting from flash.

#. Reset by pressing SW3

#. Run ``west debug`` or ``west flash`` again with a known working Zephyr
   application (example "Hello World").

#. Set the SW5 DIP switches to OFF-OFF-ON to boot from flash.

#. Reset by pressing SW3

.. _MIMXRT595-EVK Website:
   https://www.nxp.com/design/development-boards/i-mx-evaluation-and-development-boards/i-mx-rt595-evaluation-kit:MIMXRT595-EVK

.. _MIMXRT595-EVK User Guide:
   https://www.nxp.com/webapp/Download?colCode=MIMXRT595EVKHUG

.. _MIMXRT595-EVK Debug Firmware:
   https://www.nxp.com/docs/en/application-note/AN13206.pdf

.. _MIMXRT595-EVK Schematics:
   https://www.nxp.com/downloads/en/schematics/MIMXRT595-EVK-DESIGN-FILES.zip

.. _i.MX RT595 Website:
   https://www.nxp.com/products/processors-and-microcontrollers/arm-microcontrollers/i-mx-rt-crossover-mcus/i-mx-rt500-crossover-mcu-with-arm-cortex-m33-dsp-and-gpu-cores:i.MX-RT500

.. _i.MX RT595 Datasheet:
   https://www.nxp.com/docs/en/data-sheet/IMXRT500EC.pdf

.. _i.MX RT595 Reference Manual:
   https://www.nxp.com/webapp/Download?colCode=IMXRT500RM

.. _Getting Started with Xplorer for EVK-MIMXRT595:
   https://www.nxp.com/docs/en/supporting-information/GSXEVKMIMXRT595.pdf
Part 3
한국어 전문 번역
개요
i.MX RT500 crossover MCU는 edge computing 계열의 일부로서 저전력 HMI application에 맞춰져 있습니다. Graphics engine, 간결한 Cadence Tensilica Fusion F1 DSP core, 차세대 Arm Cortex-M33 core를 결합해 display 중심 application을 안전하고 전력 효율적으로 실행하도록 설계됐습니다.
i.MX RT500 MCU는 최대 5 MB on-chip SRAM을 제공하며, on-the-fly decryption engine이 포함된 Octal/Quad SPI를 비롯한 고대역폭 interface로 off-chip flash에 접근합니다.
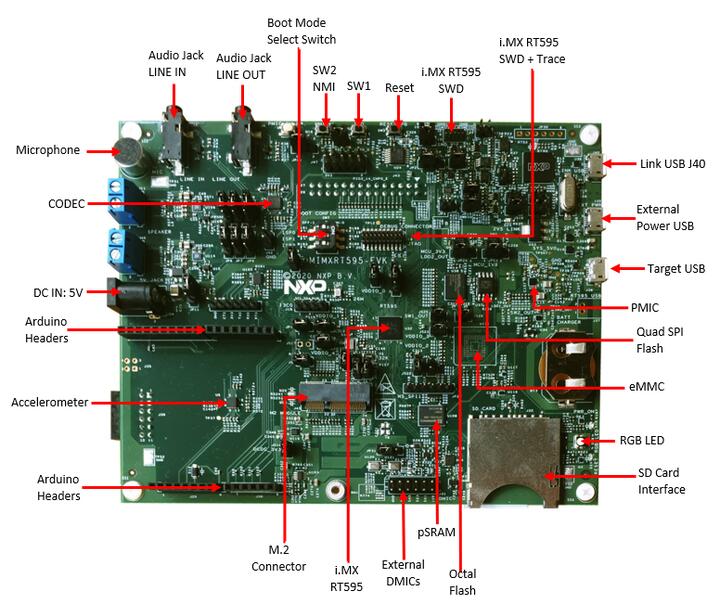
하드웨어
MIMXRT595SFFOC275 MHz Cortex-M33와 Cadence Tensilica Fusion F1 DSP- CMSIS-DAP protocol을 사용하는 high-speed USB Link2 debug probe. Cortex-M33 debug만 지원
- Micro USB connector와 외부 crystal을 갖춘 USB 2.0 high-speed host/device
- FlexSPI를 통한 Octal/Quad/pSRAM 외부 메모리, 5 MB system SRAM
- Full-size SD card slot(SDIO), on-board eMMC
- 5 V 입력과 NXP PCA9420UK PMIC의 1.2 V, 1.8 V, 3.3 V 출력
- User LED, Reset·User button, MIPI-DSI connector
- Arduino signal header, MikroBus connector, MikroElektronica TFT Proto 5 inch capacitive touch display용 FlexIO connector
- NXP FXOS8700CQ accelero-/magneto-meter motion sensor
- Stereo audio codec의 line-in, line-out, microphone
- Pmod/host expansion connector와 NXP TFA9896 digital audio amplifier
- 12-pin header를 통한 off-board digital microphone 최대 8개와 on-board digital microphone 2개
지원 기능
NXP는 MIMXRT595-EVK를 i.MX RT5xx MCU 계열의 상위 집합 보드로 보고 Zephyr Full Platform Support의 우선 대상으로 삼습니다. 매우 비슷한 MIMXRT685-EVK에 먼저 활성화된 기능도 이 보드에서 재사용할 수 있습니다.
| 인터페이스 | 컨트롤러 | 드라이버/컴포넌트 |
|---|---|---|
NVIC | on-chip | nested vector interrupt controller |
SYSTICK | on-chip | systick |
OS_TIMER | on-chip | os timer |
IOCON | on-chip | pinmux |
GPIO | on-chip | gpio |
USART | on-chip | serial port-polling; serial port-interrupt |
CLOCK | on-chip | clock_control |
I2C | on-chip | i2c |
SPI | on-chip | spi |
CTIMER | on-chip | counter |
WDT | on-chip | watchdog |
FLASH | on-chip | OctalSPI Flash |
TRNG | on-chip | entropy |
USB | on-chip | USB device |
FLEXSPI | on-chip | flash programming |
RTC | on-chip | counter |
PM | on-chip | power management; SoC sleep, deep sleep, deep-powerdown mode 사용 |
SDHC | on-chip | disk access (eMMC와 SD 지원) |
I2S | on-chip | i2s |
DISPLAY | on-chip | LCDIF; MIPI-DSI; rk055hdmipi4m, rk055hdmipi4ma0, g1120b0mipi shield로 시험 |
DMIC | on-chip | dmic |
기본 구성은 boards/nxp/mimxrt595_evk/mimxrt595_evk_mimxrt595s_cm33_defconfig에 있습니다. 표 밖의 하드웨어 기능은 현재 port에서 지원하지 않습니다.
연결과 I/O
MIMXRT595 SoC는 IOCON register로 pin 기능을 설정합니다.
| 이름 | 기능 | 용도 |
|---|---|---|
PIO0_2 | USART0 | USART RX |
PIO0_1 | USART0 | USART TX |
PIO0_14 | GPIO | GREEN LED |
PIO0_25 | GPIO | SW0 |
PIO0_10 | GPIO | SW1 |
PIO4_30 | USART12 | USART TX |
PIO4_31 | USART12 | USART RX |
PIO0_29 | I2C | I2C SCL |
PIO0_30 | I2C | I2C SDA |
PIO0_22 | GPIO | FXOS8700 TRIGGER |
PIO1_5 | SPI | SPI MOSI |
PIO1_4 | SPI | SPI MISO |
PIO1_3 | SPI | SPI SCK |
PIO1_6 | SPI | SPI SSEL |
PIO0_5 | SCT0 | SCT0 GPI0 |
PIO0_6 | SCT0 | SCT0 GPI1 |
시스템 클록
MIMXRT595-EVK는 OS Event timer를 system clock source로 사용합니다.
직렬 포트
SoC에는 serial communication용 FLEXCOMM interface가 13개 있습니다. 하나를 console USART로 구성하고 나머지는 사용하지 않습니다.
Fusion F1 DSP core
F1 SoC를 target으로 지정하면 RT500 DSP core용 Zephyr application을 build할 수 있습니다. RT500 DSP를 지원하는 Xtensa toolchain은 Zephyr SDK에 포함됩니다. DSP용 hello_world는 다음과 같이 build합니다.
$ west build -b mimxrt595_evk/mimxrt595s/f1 samples/hello_worldDSP firmware debug의 상세 절차는 아래 Getting Started with Xplorer for EVK-MIMXRT595 문서를 참고하십시오.
프로그래밍과 디버깅
일반 application과 같은 방식으로 build하고 flash합니다. 이 보드는 기본적으로 LPC-Link2를 사용하도록 구성되어 있습니다.
LPCLink2 J-Link on-board
- J-Link host tool을 설치하고 검색 경로에 넣습니다.
- SWD signal을 on-board debug circuit에 연결하려면 기본 장착된
JP17,JP18,JP19jumper를 설치합니다. - LPCLink2 J-Link on-board probe 절차에 따라 최신 J-Link firmware를 programming합니다.
외부 J-Link
- J-Link host tool을 설치하고 검색 경로에 넣습니다.
- SWD signal을 on-board debug circuit에서 분리하려면 기본 장착된
J17,J18,J19jumper를 제거합니다. - 외부 J-Link probe를
J210-pin header에 연결합니다.
LinkServer
- LinkServer host tool을 설치하고 검색 경로에 넣습니다.
- MIMXRT595-EVK Debug Firmware 문서의 절차에 따라 debug firmware를 갱신합니다.
콘솔
PC의 USB cable을 J40에 연결합니다. Terminal은 115200 baud, data 8 bits, parity None, stop bit 1로 설정합니다.
플래시
다음 hello_world 예제는 기본 J-Link host tool을 사용합니다.
# Zephyr 저장소 루트에서
west build -b mimxrt595_evk/mimxrt595s/cm33 samples/hello_world
west flash
Serial terminal을 열고 RESET button을 누르면 다음 메시지가 표시됩니다.
*** Booting Zephyr OS v2.7 ***
Hello World! mimxrt595_evk
디버깅
# Zephyr 저장소 루트에서
west build -b mimxrt595_evk/mimxrt595s/cm33 samples/hello_world
west debug
Debugger에서 application을 단계 실행하면 terminal에 다음 메시지가 표시됩니다.
*** Booting Zephyr OS v2.7 ***
Hello World! mimxrt595_evk
문제 해결
다음 오류로 debug probe 연결이 실패하면 flash의 image가 실행되어 연결을 방해하는 상황일 수 있습니다.
Remote debugging using :2331
Remote communication error.  Target disconnected.: Connection reset by peer.
"monitor" command not supported by this target.
"monitor" command not supported by this target.
You can't do that when your target is `exec'
(gdb) Could not connect to target.
Please check power, connection and settings.
Flash를 지우고 정상 image를 다시 programming하려면 다음 순서를 따릅니다.
SW7DIP switch를ON-ON-ON으로 설정해 flash boot를 막습니다.SW3를 눌러 reset합니다.- 동작이 확인된 Zephyr application, 예를 들면 Hello World로
west debug또는west flash를 다시 실행합니다. SW5DIP switch를OFF-OFF-ON으로 설정해 flash에서 boot하도록 합니다.SW3를 눌러 다시 reset합니다.
참고 자료
Source
출처
영어 원문에는 문단, 문서 지시문, 표, 코드, 코드 심벌, 경로를 그대로 보존했습니다.