Part 1
요약·해설
M4/M0 defconfig, UART·I2C·SPI 핀, 48 MHz FRO와 FLEXCOMM, LPC-Link2 J-Link 재구성, J5 콘솔과 M4 target flash/debug 절차를 설명합니다.
LPC54114 · dual core · 100 MHz
48 MHz internal FRO
LPC-Link2 · J-Link · J5 console
Part 2
접을 수 있는 영어 원문 전체
영어 원문 전체 펼치기
302AA2E80A015DE3C7BD6FFBFF919F4A7A55A8A048132525EE61C42C7B840A6A
.. _lpcxpresso54114:

NXP LPCXPRESSO54114
###################

Overview
********

The LPCXpresso54114 board has been developed by NXP to enable evaluation of and
prototyping with the low-power LPC54110 family of MCUs. LPCXpresso* is a
low-cost development platform available from NXP supporting NXP's ARM-based
microcontrollers. LPCXpresso is an end-to-end solution enabling embedded
engineers to develop their applications from initial evaluation to final
production.

.. image:: ../../../../../../../boards/nxp/lpcxpresso54114/doc/lpcxpresso54114_m4.jpg
   :align: center
   :alt: LPCXPRESSO54114

Hardware
********

- LPC54114 dual-core (M4F and dual M0) MCU running at up to 100 MHz
- On-board high-speed USB based debug probe with CMSIS-DAP and J-Link protocol
  support, can debug the on-board LPC54114 or an external target
- External debug probe option
- Tri-color LED, target Reset, ISP & interrupt/user buttons for easy testing of
  software functionality
- Expansion options based on Arduino UNO and Pmod™, plus additional expansion
  port pins
- On-board 1.8 V and 3.3 V regulators plus external power supply option
- 8 Mb Macronix MX25R SPI flash
- Built-in MCU power consumption and supply voltage measurement
- UART, I²C and SPI port bridging from LPC54114 target to USB via the on-board
  debug probe
- FTDI UART connector

For more information about the LPC54114 SoC and LPCXPRESSO54114 board:

- `LPC54114 SoC Website`_
- `LPC54114 Datasheet`_
- `LPC54114 Reference Manual`_
- `LPCXPRESSO54114 Website`_
- `LPCXPRESSO54114 User Guide`_
- `LPCXPRESSO54114 Schematics`_

Supported Features
==================

The lpcxpresso54114 board configuration supports the following hardware
features:

+-----------+------------+-------------------------------------+
| Interface | Controller | Driver/Component                    |
+===========+============+=====================================+
| NVIC      | on-chip    | nested vector interrupt controller  |
+-----------+------------+-------------------------------------+
| SYSTICK   | on-chip    | systick                             |
+-----------+------------+-------------------------------------+
| IOCON     | on-chip    | pinmux                              |
+-----------+------------+-------------------------------------+
| GPIO      | on-chip    | gpio                                |
+-----------+------------+-------------------------------------+
| I2C       | on-chip    | i2c                                 |
+-----------+------------+-------------------------------------+
| SPI       | on-chip    | spi                                 |
+-----------+------------+-------------------------------------+
| USART     | on-chip    | serial port-polling                 |
+-----------+------------+-------------------------------------+
| CLOCK     | on-chip    | clock_control                       |
+-----------+------------+-------------------------------------+
| IAP       | on-chip    | flash programming                   |
+-----------+------------+-------------------------------------+

The default configuration for each core can be found in the defconfig files:

	`boards/nxp/lpcxpresso54114/lpcxpresso54114_lpc54114_m4_defconfig`
	`boards/nxp/lpcxpresso54114/lpcxpresso54114_lpc54114_m0_defconfig`

Other hardware features are not currently supported by the port.

Connections and IOs
===================

The LPC54114 SoC has IOCON registers, which can be used to configure the
functionality of a pin.

+---------+-----------------+----------------------------+
| Name    | Function        | Usage                      |
+=========+=================+============================+
| PIO0_0  | USART           | USART RX                   |
+---------+-----------------+----------------------------+
| PIO0_1  | USART           | USART TX                   |
+---------+-----------------+----------------------------+
| PIO0_18 | SPI             | SPI MISO                   |
+---------+-----------------+----------------------------+
| PIO0_19 | SPI             | SPI SCK                    |
+---------+-----------------+----------------------------+
| PIO0_20 | SPI             | SPI MOSI                   |
+---------+-----------------+----------------------------+
| PIO0_25 | I2C             | I2C SCL                    |
+---------+-----------------+----------------------------+
| PIO0_26 | I2C             | I2C SDA                    |
+---------+-----------------+----------------------------+
| PIO0_29 | GPIO            | RED LED                    |
+---------+-----------------+----------------------------+
| PIO1_1  | SPI             | SPI SSEL2                  |
+---------+-----------------+----------------------------+
| PIO1_9  | GPIO            | BLUE_LED                   |
+---------+-----------------+----------------------------+
| PIO1_10 | GPIO            | GREEN LED                  |
+---------+-----------------+----------------------------+

System Clock
============

The LPC54114 SoC is configured to use the internal FRO at 48MHz as a source for
the system clock. Other sources for the system clock are provided in the SOC,
depending on your system requirements.

Serial Port
===========

The LPC54114 SoC has 8 FLEXCOMM interfaces for serial communication.  One is
configured as USART for the console and the remaining are not used.

Programming and Debugging
*************************

Build and flash applications as usual (see :ref:`build_an_application` and
:ref:`application_run` for more details).

Configuring a Debug Probe
=========================

A debug probe is used for both flashing and debugging the board. This board is
configured by default to use the LPC-Link2 CMSIS-DAP Onboard Debug Probe,
however the :ref:`pyocd-debug-host-tools` do not support this probe so you must
reconfigure the board for one of the following debug probes instead.

:ref:`lpclink2-jlink-onboard-debug-probe`
-----------------------------------------

Install the :ref:`jlink-debug-host-tools` and make sure they are in your search
path.

Follow the instructions in :ref:`lpclink2-jlink-onboard-debug-probe` to program
the J-Link firmware.

Configuring a Console
=====================

Regardless of your choice in debug probe, we will use the LPC-Link2
microcontroller as a usb-to-serial adapter for the serial console.

Connect a USB cable from your PC to J5

Use the following settings with your serial terminal of choice (minicom, putty,
etc.):

- Speed: 115200
- Data: 8 bits
- Parity: None
- Stop bits: 1

Flashing
========

Here is an example for the :ref:`hello_world` application.

.. zephyr-app-commands::
   :zephyr-app: samples/hello_world
   :board: lpcxpresso54114/lpc54114/m4
   :goals: flash

Open a serial terminal, reset the board (press the SW4 button), and you should
see the following message in the terminal:

.. code-block:: console

   ***** Booting Zephyr OS v1.14.0-rc1 *****
   Hello World! lpcxpresso54114_m4

Debugging
=========

Here is an example for the :ref:`hello_world` application.

.. zephyr-app-commands::
   :zephyr-app: samples/hello_world
   :board: lpcxpresso54114/lpc54114/m4
   :goals: debug

Open a serial terminal, step through the application in your debugger, and you
should see the following message in the terminal:

.. code-block:: console

   ***** Booting Zephyr OS v1.14.0-rc1 *****
   Hello World! lpcxpresso54114_m4

.. _LPC54114 SoC Website:
   https://www.nxp.com/products/processors-and-microcontrollers/arm-based-processors-and-mcus/lpc-cortex-m-mcus/lpc54000-series-cortex-m4-mcus/low-power-microcontrollers-mcus-based-on-arm-cortex-m4-cores-with-optional-cortex-m0-plus-co-processor:LPC541XX

.. _LPC54114 Datasheet:
   https://www.nxp.com/docs/en/data-sheet/LPC5411X.pdf

.. _LPC54114 Reference Manual:
   https://www.nxp.com/webapp/Download?colCode=UM10914

.. _LPCXPRESSO54114 Website:
   https://www.nxp.com/support/developer-resources/evaluation-and-development-boards/lpcxpresso-boards/lpcxpresso54114-board:OM13089

.. _LPCXPRESSO54114 User Guide:
   https://www.nxp.com/webapp/Download?colCode=UM10973

.. _LPCXPRESSO54114 Schematics:
   https://www.nxp.com/downloads/en/design-support/LPCX5411x_Schematic_Rev_A1.pdf
Part 3
한국어 전문 번역
개요
LPCXpresso54114 보드는 저전력 LPC54110 MCU 제품군의 평가와 시제품 제작을 지원하도록 NXP가 개발했습니다. LPCXpresso는 NXP의 Arm 기반 마이크로컨트롤러를 지원하는 저비용 개발 플랫폼입니다. 임베디드 엔지니어가 초기 평가부터 최종 생산까지 애플리케이션을 개발할 수 있는 end-to-end 솔루션입니다.
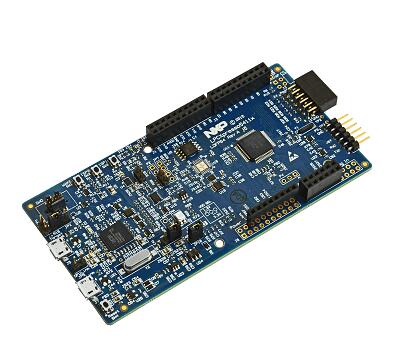
하드웨어
- 최대 100 MHz로 동작하는 LPC54114 듀얼 코어 MCU. 공식 원문은 코어 구성을
M4F and dual M0
로 표기합니다. - CMSIS-DAP와 J-Link 프로토콜을 지원하는 온보드 고속 USB 디버그 프로브. 온보드 LPC54114 또는 외부 target 디버깅 가능
- 외부 디버그 프로브 선택 가능
- 3색 LED, target Reset 버튼, ISP 버튼, interrupt/user 버튼
- Arduino UNO와 Pmod 호환 확장 인터페이스 및 추가 확장 포트 핀
- 온보드 1.8 V·3.3 V regulator 및 외부 전원 공급 선택
- 8 Mb Macronix MX25R SPI flash
- MCU 소비 전력과 공급 전압 측정 기능 내장
- 온보드 디버그 프로브를 통해 LPC54114 target의 UART, I2C, SPI 포트를 USB로 bridge
- FTDI UART 커넥터
자세한 자료는 아래 참고 자료의 LPC54114 SoC 웹사이트, 데이터시트와 Reference Manual, 보드 웹사이트, User Guide와 회로도를 참고하십시오.
지원 기능
lpcxpresso54114 보드 구성은 다음 하드웨어 기능을 지원합니다.
| 인터페이스 | 컨트롤러 | 드라이버/컴포넌트 |
|---|---|---|
NVIC | on-chip | nested vector interrupt controller |
SYSTICK | on-chip | systick |
IOCON | on-chip | pinmux |
GPIO | on-chip | gpio |
I2C | on-chip | i2c |
SPI | on-chip | spi |
USART | on-chip | serial port-polling |
CLOCK | on-chip | clock_control |
IAP | on-chip | flash programming |
각 코어의 기본 구성은 다음 defconfig 파일에 있습니다.
boards/nxp/lpcxpresso54114/lpcxpresso54114_lpc54114_m4_defconfigboards/nxp/lpcxpresso54114/lpcxpresso54114_lpc54114_m0_defconfig
이 포트는 현재 그 밖의 하드웨어 기능을 지원하지 않습니다.
연결과 I/O
LPC54114 SoC의 IOCON 레지스터로 각 핀의 기능을 구성할 수 있습니다.
| 이름 | 기능 | 용도 |
|---|---|---|
PIO0_0 | USART | USART RX |
PIO0_1 | USART | USART TX |
PIO0_18 | SPI | SPI MISO |
PIO0_19 | SPI | SPI SCK |
PIO0_20 | SPI | SPI MOSI |
PIO0_25 | I2C | I2C SCL |
PIO0_26 | I2C | I2C SDA |
PIO0_29 | GPIO | RED LED |
PIO1_1 | SPI | SPI SSEL2 |
PIO1_9 | GPIO | BLUE_LED |
PIO1_10 | GPIO | GREEN LED |
시스템 클록
LPC54114 SoC는 내부 48 MHz FRO를 시스템 클록 소스로 사용하도록 구성됩니다. 시스템 요구 사항에 따라 SoC가 제공하는 다른 시스템 클록 소스를 선택할 수도 있습니다.
직렬 포트
LPC54114 SoC에는 직렬 통신용 FLEXCOMM 인터페이스가 8개 있습니다. 그중 하나는 콘솔용 USART로 구성되고 나머지는 사용하지 않습니다.
프로그래밍과 디버깅
애플리케이션은 일반적인 Zephyr 절차로 빌드하고 플래시합니다.
디버그 프로브 구성
디버그 프로브는 보드 플래시와 디버깅에 모두 사용됩니다. 이 보드는 기본적으로 LPC-Link2 CMSIS-DAP 온보드 디버그 프로브를 사용하도록 구성되어 있습니다. 그러나 pyOCD 디버그 호스트 도구가 이 프로브를 지원하지 않으므로 다른 프로브로 재구성해야 합니다.
LPC-Link2 J-Link 온보드 디버그 프로브
J-Link 디버그 호스트 도구를 설치하고 실행 파일이 검색 경로에 있는지 확인합니다. LPC-Link2 J-Link 온보드 디버그 프로브 안내에 따라 J-Link 펌웨어를 프로그래밍합니다.
콘솔 구성
선택한 디버그 프로브와 관계없이 직렬 콘솔의 USB-to-serial 어댑터로 LPC-Link2 마이크로컨트롤러를 사용합니다. PC와 J5 사이를 USB 케이블로 연결합니다.
minicom, PuTTY 등 원하는 직렬 터미널에서 다음 설정을 사용합니다.
- 속도:
115200 - 데이터:
8 bits - 패리티:
None - 정지 비트:
1
플래시
hello_world 애플리케이션을 M4 target용으로 빌드하고 플래시하는 예는 다음과 같습니다.
west build -b lpcxpresso54114/lpc54114/m4 samples/hello_world
west flash
직렬 터미널을 열고 SW4 버튼을 눌러 보드를 reset하면 다음 메시지가 나타납니다.
***** Booting Zephyr OS v1.14.0-rc1 *****
Hello World! lpcxpresso54114_m4
디버깅
hello_world 애플리케이션을 M4 target용으로 빌드하고 디버깅하는 예는 다음과 같습니다.
west build -b lpcxpresso54114/lpc54114/m4 samples/hello_world
west debug
직렬 터미널을 열고 디버거에서 애플리케이션을 단계 실행하면 터미널에 다음 메시지가 나타납니다.
***** Booting Zephyr OS v1.14.0-rc1 *****
Hello World! lpcxpresso54114_m4
참고 자료
Source
출처
영어 원문에는 문단, 문서 지시문, 표, 코드, 코드 심벌, 경로를 그대로 보존했습니다.