Part 1
요약·해설
보드 메모리와 주변장치, IOCON 핀 배치, LPC-Link2의 CMSIS-DAP/J-Link 전환과 LPCScrypt·Mbed 펌웨어 갱신, west 플래시·디버깅 절차를 설명합니다.
LPC11U68 · Cortex-M0+
256 KB flash · 32 KB SRAM
LPC-Link2 · CMSIS-DAP/J-Link
Part 2
접을 수 있는 영어 원문 전체
영어 원문 전체 펼치기
BD2B07A0D3B3D9E9D9EB9E57F7FA845E2734C5CAC44386239EDEBDE517D42967
.. _lpcxpresso11u68:

NXP LPCXpresso11U68
###################

Overview
********

The LPCXpresso11u68 development board uses an NXP LPC11U68 MCU based
on an ARM Cortex-M0+ core.

.. figure:: ../../../../../../../boards/nxp/lpcxpresso11u68/doc/lpcxpresso11u68.jpg
   :align: center
   :alt: LPCXpresso11U68

Hardware
********

The LPCxpresso 11U68 board provides the following hardware components:

- LPC11U68 microcontroller in LQFP100 package
- ARM Cortex-M0+
- Memory:

  - 256KB of flash memory
  - 32KB of SRAM
  - 2x2KB of additional SRAM
  - 4 KB EEPROM
- USB:

  - USB 2.0 Full-Speed device controller
- DMA controller
- 5x USART
- 2x I2C
- 2x SSP with DMA support
- Board power supply: through USB bus or external power supply (3V and 5V)
- Arduino connectors compatible with the 'Arduino UNO' platform
- Tri-color user LED, Power On Led, Reset LED
- Three push buttons: target reset, ISP and user

More information can be found here:

- `LPC11UXX SoC Website`_
- `LPC11U6X Datasheet`_
- `LPC11U6X Reference Manual`_
- `LPCXPRESSO11U68 Website`_
- `LPCXPRESSO11U68 Schematics`_

Supported Features
==================

The lpcxpresso11U68 supports the following features:

+-----------+------------+-------------------------------------+
| Interface | Controller | Driver/Component                    |
+===========+============+=====================================+
| NVIC      | on-chip    | nested vector interrupt controller  |
+-----------+------------+-------------------------------------+
| SYSTICK   | on-chip    | systick                             |
+-----------+------------+-------------------------------------+
| IOCON     | on-chip    | pinmux                              |
+-----------+------------+-------------------------------------+
| CLOCK     | on-chip    | clock and reset control             |
+-----------+------------+-------------------------------------+
| GPIO      | on-chip    | gpio                                |
+-----------+------------+-------------------------------------+
| I2C       | on-chip    | i2c master/slave controller         |
+-----------+------------+-------------------------------------+
| UART      | on-chip    | serial port-polling;                |
|           |            | serial port interrupt               |
+-----------+------------+-------------------------------------+
| EEPROM    | on-chip    | eeprom                              |
+-----------+------------+-------------------------------------+

Other hardware is not yet supported on Zephyr.

Connections and IOs
===================

The IOCON controller can be used to configure the LPC11U68 pins.

+---------+-----------------+----------------------------+
| Name    | Function        | Usage                      |
+=========+=================+============================+
| PIO2_11 | UART            | USART RX                   |
+---------+-----------------+----------------------------+
| PIO2_12 | UART            | USART TX                   |
+---------+-----------------+----------------------------+
| PIO2_16 | GPIO            | GREEN LED                  |
+---------+-----------------+----------------------------+
| PIO2_17 | GPIO            | RED LED                    |
+---------+-----------------+----------------------------+
| PIO2_18 | GPIO            | BLUE_LED                   |
+---------+-----------------+----------------------------+
| PIO0_4  | I2C             | I2C SCL                    |
+---------+-----------------+----------------------------+
| PIO0_5  | I2C             | I2C SDA                    |
+---------+-----------------+----------------------------+


Programming and Debugging
*************************

Flashing
========

The LPCXpresso11U68 board can be flashed by using the on-board LPC-Link2 debug
probe (based on a NXP LPC43xx MCU). This MCU provides either a CMSIS-DAP or
a J-Link interface. It depends on the embedded firmware image. The default
OpenOCD configuration supports the CMSIS-DAP interface. If you want to
switch to J-Link, then you need to edit the
:zephyr_file:`boards/nxp/lpcxpresso11u68/support/openocd.cfg` file and to replace::

   source [find interface/cmsis-dap.cfg]

with::

   source [find interface/jlink.cfg]

.. note::
   The firmware image of the LPC-Link2 can be updated using the
   `LPCScrypt tool <https://www.nxp.com/design/microcontrollers-developer-resources/lpc-microcontroller-utilities/lpcscrypt-v2-1-1:LPCSCRYPT>`_.

.. note::
   The `Mbed project <https://os.mbed.com>`_ also provides some firmware images
   `here <https://os.mbed.com/teams/NXP/wiki/Updating-LPCXpresso-firmware>`_.
   In addition to a CMSIS-DAP interface, they also provide a convenient update
   mechanism through a pseudo USB disk.

Here are the steps to flash a firmware you built into a LPCXpresso11U68 board:

#. Connect the "Link" micro-B USB port to your host computer.
#. Next, simply run the ``west flash`` command

Debugging
=========

Please refer to the `Flashing`_ section and run the ``west debug`` command
instead of ``west flash``.

References
**********

- `LPC11UXX SoC Website`_
- `LPC11U6X Datasheet`_
- `LPC11U6X Reference Manual`_
- `LPCXPRESSO11U68 Website`_
- `LPCXPRESSO11U68 Schematics`_

.. _LPC11UXX SoC Website:
   https://www.nxp.com/products/processors-and-microcontrollers/arm-microcontrollers/general-purpose-mcus/lpc1100-cortex-m0-plus-m0/scalable-entry-level-32-bit-microcontroller-mcu-based-on-arm-cortex-m0-plus-and-cortex-m0-cores:LPC11U00

.. _LPC11U6X Datasheet:
   https://www.nxp.com/docs/en/data-sheet/LPC11U6X.pdf

.. _LPC11U6x Reference Manual:
   https://www.nxp.com/webapp/Download?colCode=UM10732

.. _LPCXPRESSO11U68 Website:
   https://www.nxp.com/design/microcontrollers-developer-resources/lpc-microcontroller-utilities/lpcxpresso-board-for-lpc11u68:OM13058

.. _LPCXPRESSO11U68 Schematics:
   https://www.nxp.com/downloads/en/schematics/LPC11U68_Xpresso_v2_Schematic_RevC_1.pdf
Part 3
한국어 전문 번역
개요
LPCXpresso11U68 개발 보드는 Arm Cortex-M0+ 코어 기반 NXP LPC11U68 MCU를 사용합니다.
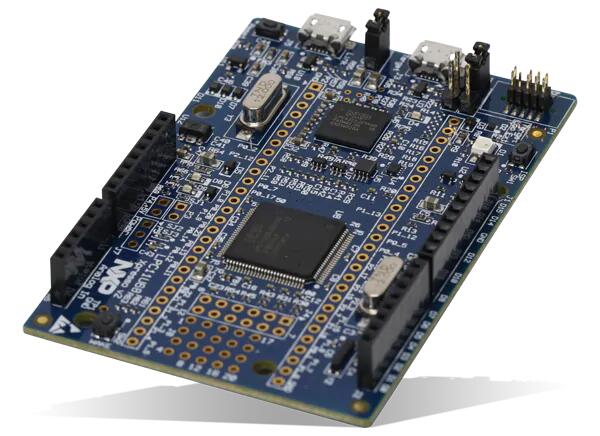
하드웨어
LPCXpresso11U68 보드는 다음 하드웨어 컴포넌트를 제공합니다.
- LQFP100 패키지의 LPC11U68 마이크로컨트롤러, Arm Cortex-M0+
- 메모리: flash 256 KB, SRAM 32 KB, 추가 SRAM 2 KB 2개, EEPROM 4 KB
- USB 2.0 Full-Speed device controller
- DMA controller
- USART 5개, I2C 2개, DMA를 지원하는 SSP 2개
- USB 버스 또는 외부 3 V/5 V 전원 공급
- Arduino UNO 플랫폼 호환 커넥터
- 3색 사용자 LED, 전원 LED, Reset LED
- target reset, ISP, user 푸시 버튼 3개
자세한 자료는 아래 참고 자료의 LPC11UXX SoC 웹사이트, LPC11U6X 데이터시트와 Reference Manual, 보드 웹사이트와 회로도를 참고하십시오.
지원 기능
lpcxpresso11U68은 다음 기능을 지원합니다.
| 인터페이스 | 컨트롤러 | 드라이버/컴포넌트 |
|---|---|---|
NVIC | on-chip | nested vector interrupt controller |
SYSTICK | on-chip | systick |
IOCON | on-chip | pinmux |
CLOCK | on-chip | clock and reset control |
GPIO | on-chip | gpio |
I2C | on-chip | i2c master/slave controller |
UART | on-chip | serial port-polling; serial port interrupt |
EEPROM | on-chip | eeprom |
그 밖의 하드웨어는 아직 Zephyr에서 지원하지 않습니다.
연결과 I/O
IOCON 컨트롤러로 LPC11U68 핀을 구성할 수 있습니다.
| 이름 | 기능 | 용도 |
|---|---|---|
PIO2_11 | UART | USART RX |
PIO2_12 | UART | USART TX |
PIO2_16 | GPIO | GREEN LED |
PIO2_17 | GPIO | RED LED |
PIO2_18 | GPIO | BLUE_LED |
PIO0_4 | I2C | I2C SCL |
PIO0_5 | I2C | I2C SDA |
프로그래밍과 디버깅
플래시
LPCXpresso11U68 보드는 NXP LPC43xx MCU 기반의 온보드 LPC-Link2 디버그 프로브로 플래시할 수 있습니다. LPC-Link2가 제공하는 인터페이스는 내장 펌웨어 이미지에 따라 CMSIS-DAP 또는 J-Link가 됩니다. 기본 OpenOCD 구성은 CMSIS-DAP 인터페이스를 지원합니다.
J-Link로 전환하려면 boards/nxp/lpcxpresso11u68/support/openocd.cfg 파일에서 다음 줄을
source [find interface/cmsis-dap.cfg]다음 줄로 바꿉니다.
source [find interface/jlink.cfg]빌드한 펌웨어를 LPCXpresso11U68 보드에 플래시하는 순서는 다음과 같습니다.
- Link micro-B USB 포트를 호스트 컴퓨터에 연결합니다.
- 다음 명령을 실행합니다.
west flash디버깅
플래시 절의 연결과 설정을 그대로 사용하되 west flash 대신 다음 명령을 실행합니다.
west debug참고 자료
Source
출처
영어 원문에는 문단, 문서 지시문, 표, 코드, 코드 심벌, 경로를 그대로 보존했습니다.