Part 1
요약·해설
Cortex-M4 Zephyr 포트의 지원 기능과 UART2 pinmux, A53/M4 RAM 주소 관계, SD 카드 또는 직렬 전송을 통한 U-Boot 기동, J-Link 디버깅을 설명합니다.
Cortex-M4 · 266 MHz
TCML · TCMU · OCRAM
SD card · screen/lrzsz
Part 2
접을 수 있는 영어 원문 전체
영어 원문 전체 펼치기
630D94533E66077FE6018C7E24F632BFC910F7A7F26BF9FF114A91E818A5D8D7
.. _mimx8mq_evk:

NXP MIMX8MQ EVK
###############

Overview
********

i.MX8MQ EVK board is based on NXP i.MX8MQ applications
processor, composed of a quad Cortex®-A53 cluster and a single Cortex®-M4 core.
Zephyr OS is ported to run on the Cortex®-M4 core.

- Board features:

  - RAM: 3GB LPDDR4
  - Storage:

    - 16GB eMMC5.0
    - 32MB QSPI NOR
    - microSD Socket
  - Wireless:

    - WiFi: 2.4/5GHz IEEE 802.11 a/b/g/n/ac
    - Bluetooth: v4.1
  - USB:

    - OTG - 1x type C
    - HOST - 1x type A
  - Ethernet
  - PCI-E M.2
  - LEDs:

    - 1x Power status LED
    - 1x UART LED
  - Debug

    - JTAG 10-pin connector
    - MicroUSB for UART debug, two COM ports for A53 and M4

.. image:: ../../../../../../../boards/nxp/imx8mq_evk/doc/img/mimx8mq_evk.jpg
   :align: center
   :alt: MIMX8MQ EVK

More information about the board can be found at the
`NXP website`_.

Supported Features
==================

The Zephyr mimx8mq_evk board configuration supports the following hardware
features:

+-----------+------------+-------------------------------------+
| Interface | Controller | Driver/Component                    |
+===========+============+=====================================+
| NVIC      | on-chip    | nested vector interrupt controller  |
+-----------+------------+-------------------------------------+
| SYSTICK   | on-chip    | systick                             |
+-----------+------------+-------------------------------------+
| CLOCK     | on-chip    | clock_control                       |
+-----------+------------+-------------------------------------+
| PINMUX    | on-chip    | pinmux                              |
+-----------+------------+-------------------------------------+
| UART      | on-chip    | serial port-polling;                |
|           |            | serial port-interrupt               |
+-----------+------------+-------------------------------------+

The default configuration can be found in the defconfig file:
:zephyr_file:`boards/nxp/imx8mq_evk/imx8mq_evk_mimx8mq6_m4_defconfig`.

Other hardware features are not currently supported by the port.

Connections and IOs
===================

MIMX8MQ EVK board was tested with the following pinmux controller
configuration.

+---------------+-----------------+---------------------------+
| Board Name    | SoC Name        | Usage                     |
+===============+=================+===========================+
| UART2 RXD     | UART2_TXD       | UART Console              |
+---------------+-----------------+---------------------------+
| UART2 TXD     | UART2_RXD       | UART Console              |
+---------------+-----------------+---------------------------+

System Clock
============

The M4 Core is configured to run at a 266 MHz clock speed.

Serial Port
===========

The i.MX8MQ SoC has four UARTs. UART_2 is configured for the console and
the remaining are not used/tested.

Programming and Debugging
*************************

The MIMX8MQ EVK board doesn't have QSPI flash for the M4 and it needs
to be started by the A53 core. The A53 core is responsible to load the M4 binary
application into the RAM, put the M4 in reset, set the M4 Program Counter and
Stack Pointer, and get the M4 out of reset. The A53 can perform these steps at
bootloader level or after the Linux system has booted.

The M4 can use up to 3 different RAMs. These are the memory mapping for A53 and M4:

+------------+-------------------------+------------------------+-----------------------+----------------------+
| Region     | Cortex-A53              | Cortex-M4 (System Bus) | Cortex-M4 (Code Bus)  | Size                 |
+============+=========================+========================+=======================+======================+
| OCRAM      | 0x00900000-0x0091FFFF   | 0x20200000-0x2021FFFF  | 0x00900000-0x0091FFFF | 128KB                |
+------------+-------------------------+------------------------+-----------------------+----------------------+
| TCMU       | 0x00800000-0x0081FFFF   | 0x20000000-0x2001FFFF  |                       | 128KB                |
+------------+-------------------------+------------------------+-----------------------+----------------------+
| TCML       | 0x007E0000-0x007FFFFF   |                        | 0x1FFE0000-0x1FFFFFFF | 128KB                |
+------------+-------------------------+------------------------+-----------------------+----------------------+
| OCRAM_S    | 0x00180000-0x00187FFF   | 0x20180000-0x20187FFF  | 0x00180000-0x00187FFF | 32KB                 |
+------------+-------------------------+------------------------+-----------------------+----------------------+

For more information about memory mapping see the
`i.MX 8M Applications Processor Reference Manual`_  (section 2.1.2 and 2.1.3)

At compilation time you have to choose which RAM will be used. This
configuration is done in the file :zephyr_file:`boards/nxp/imx8mq_evk/imx8mq_evk_mimx8mq6_m4.dts`
with "zephyr,flash" (when CONFIG_XIP=y) and "zephyr,sram" properties.
The available configurations are:

.. code-block:: none

   "zephyr,flash"
   - &tcml_code
   - &ocram_code
   - &ocram_s_code

   "zephyr,sram"
   - &tcmu_sys
   - &ocram_sys
   - &ocram_s_sys

Load and run Zephyr on M4 from A53 using u-boot.

.. tabs::

   .. group-tab:: From an SD card
      Copy the compiled ``zephyr.bin`` to the first FAT partition of the
      SD card and plug the SD card into the board. Power it up and stop the u-boot
      execution at prompt.

      Load the M4 binary onto the desired memory and start its execution using:

      .. code-block:: console

         fatload mmc 0:1 0x40480000 zephyr.bin
         cp.b 0x40480000 0x7e0000 0x8000
         bootaux 0x7e0000

   .. group-tab:: From serial
      This procedure requires ``screen`` and ``lrzsz`` to be installed.

      Start ``screen``, power up the board, and stop the u-boot execution at prompt:

      .. code-block:: console

         screen <tty-device> 115200

      Start ``loadx`` with offset ``7e0000``:

      .. code-block:: console

         loadx 7e0000 115200

      Send the compiled ``zephyr.bin`` with ``sx`` by pressing :kbd:`Ctrl-a` followed by :kbd:`:`
      and write:

      .. code-block:: console

         exec !! sx </full/path/to/zephyr.bin>

      Start execution:

      .. code-block:: console

         bootaux 0x7e0000

Debugging
=========

MIMX8MQ EVK board can be debugged by connecting an external JLink
JTAG debugger to the J401 debug connector and to the PC. Then
the application can be debugged using the usual way.

Here is an example for the :ref:`hello_world` application.

.. zephyr-app-commands::
   :zephyr-app: samples/hello_world
   :board: imx8mq_evk/mimx8mq6/m4
   :goals: debug

Open a serial terminal, step through the application in your debugger, and you
should see the following message in the terminal:

.. code-block:: console

   ***** Booting Zephyr OS build zephyr-v2.6.99-30942-g6ee70bd22058 *****
   Hello World! imx8mq_evk

References
==========

.. _NXP website:
   https://www.nxp.com/design/development-boards/i-mx-evaluation-and-development-boards/evaluation-kit-for-the-i-mx-8m-applications-processor:MCIMX8M-EVK

.. _i.MX 8M Applications Processor Reference Manual:
   https://www.nxp.com/webapp/Download?colCode=IMX8MDQLQRM
Part 3
한국어 전문 번역
개요
i.MX8MQ EVK 보드는 NXP i.MX8MQ 애플리케이션 프로세서를 기반으로 합니다. 프로세서는 쿼드 Cortex-A53 클러스터와 단일 Cortex-M4 코어로 구성되며, Zephyr OS는 Cortex-M4 코어에서 실행되도록 포팅되어 있습니다.
보드 기능
- RAM: 3 GB LPDDR4
- 저장 장치: 16 GB eMMC 5.0, 32 MB QSPI NOR, microSD 소켓
- 무선: 2.4/5 GHz IEEE 802.11 a/b/g/n/ac Wi-Fi, Bluetooth v4.1
- USB: OTG Type-C 1개, Host Type-A 1개
- Ethernet, PCI-E M.2
- LED: 전원 상태 LED 1개, UART LED 1개
- 디버그: 10핀 JTAG 커넥터, A53와 M4용 COM 포트 두 개를 제공하는 UART 디버그용 MicroUSB
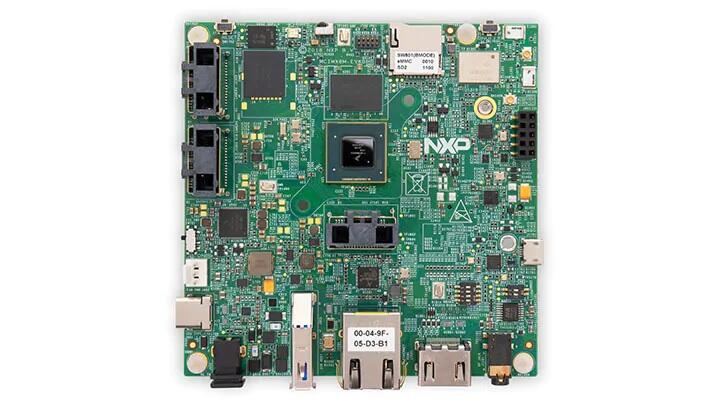
보드에 관한 자세한 내용은 아래의 NXP 웹사이트에서 확인할 수 있습니다.
지원 기능
Zephyr mimx8mq_evk 보드 구성은 다음 하드웨어 기능을 지원합니다.
| 인터페이스 | 컨트롤러 | 드라이버/컴포넌트 |
|---|---|---|
NVIC | on-chip | nested vector interrupt controller |
SYSTICK | on-chip | systick |
CLOCK | on-chip | clock_control |
PINMUX | on-chip | pinmux |
UART | on-chip | serial port-polling; serial port-interrupt |
기본 구성은 boards/nxp/imx8mq_evk/imx8mq_evk_mimx8mq6_m4_defconfig 파일에 있습니다. 이 포트는 현재 그 밖의 하드웨어 기능을 지원하지 않습니다.
연결과 I/O
MIMX8MQ EVK 보드는 다음 pinmux 컨트롤러 구성으로 시험되었습니다.
| 보드 이름 | SoC 이름 | 용도 |
|---|---|---|
UART2 RXD | UART2_TXD | UART Console |
UART2 TXD | UART2_RXD | UART Console |
시스템 클록
M4 코어는 266 MHz 클록 속도로 동작하도록 구성됩니다.
직렬 포트
i.MX8MQ SoC에는 UART가 네 개 있습니다. UART_2는 콘솔로 구성되며 나머지 UART는 사용하거나 시험하지 않았습니다.
프로그래밍과 디버깅
MIMX8MQ EVK 보드에는 M4용 QSPI 플래시가 없으므로 M4는 A53 코어가 시작해야 합니다. A53 코어는 M4 바이너리 애플리케이션을 RAM에 로드하고, M4를 리셋 상태로 둔 채 Program Counter와 Stack Pointer를 설정한 다음, M4를 리셋에서 해제합니다. A53은 부트로더 단계 또는 Linux 시스템이 부팅된 뒤 이 절차를 수행할 수 있습니다.
M4는 최대 세 종류의 RAM을 사용할 수 있습니다. A53와 M4에서 보이는 메모리 주소는 다음과 같습니다.
| 영역 | Cortex-A53 | Cortex-M4 시스템 버스 | Cortex-M4 코드 버스 | 크기 |
|---|---|---|---|---|
OCRAM | 0x00900000-0x0091FFFF | 0x20200000-0x2021FFFF | 0x00900000-0x0091FFFF | 128 KB |
TCMU | 0x00800000-0x0081FFFF | 0x20000000-0x2001FFFF | - | 128 KB |
TCML | 0x007E0000-0x007FFFFF | - | 0x1FFE0000-0x1FFFFFFF | 128 KB |
OCRAM_S | 0x00180000-0x00187FFF | 0x20180000-0x20187FFF | 0x00180000-0x00187FFF | 32 KB |
메모리 매핑의 자세한 설명은 i.MX 8M Applications Processor Reference Manual 2.1.2절과 2.1.3절을 참고하십시오.
컴파일할 때 사용할 RAM을 선택해야 합니다. boards/nxp/imx8mq_evk/imx8mq_evk_mimx8mq6_m4.dts 파일의 zephyr,flash(CONFIG_XIP=y일 때)와 zephyr,sram 속성으로 구성합니다. 선택할 수 있는 구성은 다음과 같습니다.
"zephyr,flash"
- &tcml_code
- &ocram_code
- &ocram_s_code

"zephyr,sram"
- &tcmu_sys
- &ocram_sys
- &ocram_s_sys
A53에서 U-Boot를 사용해 M4의 Zephyr를 로드하고 실행할 수 있습니다.
SD 카드에서 로드
컴파일된 zephyr.bin을 SD 카드의 첫 번째 FAT 파티션에 복사하고 카드를 보드에 꽂습니다. 전원을 켠 뒤 U-Boot 프롬프트에서 실행을 중지합니다. M4 바이너리를 원하는 메모리에 로드하고 다음 명령으로 실행합니다.
fatload mmc 0:1 0x40480000 zephyr.bin
cp.b 0x40480000 0x7e0000 0x8000
bootaux 0x7e0000
직렬 포트에서 로드
이 절차를 사용하려면 screen과 lrzsz가 설치되어 있어야 합니다. screen을 시작하고 보드 전원을 켠 뒤 U-Boot 프롬프트에서 실행을 중지합니다.
screen <tty-device> 115200오프셋 7e0000으로 loadx를 시작합니다.
loadx 7e0000 115200Ctrl-a를 누른 다음 :를 눌러 명령 모드로 들어가고, sx로 컴파일된 zephyr.bin을 전송합니다.
exec !! sx </full/path/to/zephyr.bin>전송이 끝나면 다음 명령으로 실행을 시작합니다.
bootaux 0x7e0000디버깅
MIMX8MQ EVK 보드는 외부 J-Link JTAG 디버거를 J401 디버그 커넥터와 PC에 연결해 일반적인 방식으로 디버깅할 수 있습니다. hello_world 애플리케이션의 예는 다음과 같습니다.
west build -b imx8mq_evk/mimx8mq6/m4 samples/hello_world
west debug
직렬 터미널을 열고 디버거에서 애플리케이션을 단계 실행하면 터미널에 다음 메시지가 나타납니다.
***** Booting Zephyr OS build zephyr-v2.6.99-30942-g6ee70bd22058 *****
Hello World! imx8mq_evk
참고 자료
Source
출처
영어 원문에는 문단, 문서 지시문, 표, 코드, 코드 심벌, 경로를 그대로 보존했습니다.