Part 1
요약·해설
12개 지원 interface와 120 MHz oscillator/15 MHz EC clock 구성을 정리하고, SDK OpenOCD의 npcx4 미지원 상황에서 source build 후 J-Link로 flash하는 절차를 설명합니다.
NPCX498F · Cortex-M4F
512 KB RAM · 64 KB ROM
ETM · JTAG/SWD · Servo
Part 2
접을 수 있는 영어 원문 전체
영어 원문 전체 펼치기
799D5EE92CD240372F0D1E840332F7CCE7B5A3B7138C78F9FC62075C99F4D3B3
.. _npcx4m8f_evb:

Nuvoton NPCX4M8F_EVB
####################

Overview
********

The NPCX4M8F_EVB kit is a development platform to evaluate the
Nuvoton NPCX4 series microcontrollers. This board needs to be mated with
part number NPCX498F.

.. image:: ../../../../../../../boards/nuvoton/npcx4m8f_evb/doc/npcx4m8f_evb.jpg
     :align: center
     :alt: NPCX4M8F Evaluation Board

Hardware
********

- ARM Cortex-M4F Processor
- 512 KB RAM and 64 KB boot ROM
- ADC & GPIO headers
- UART0 and UART1
- FAN PWM interface
- Jtag interface
- Intel Modular Embedded Controller Card (MECC) headers

Supported Features
==================

The following features are supported:

+-----------+------------+-------------------------------------+
| Interface | Controller | Driver/Component                    |
+===========+============+=====================================+
| NVIC      | on-chip    | nested vector interrupt controller  |
+-----------+------------+-------------------------------------+
| ADC       | on-chip    | adc controller                      |
+-----------+------------+-------------------------------------+
| CLOCK     | on-chip    | reset and clock control             |
+-----------+------------+-------------------------------------+
| GPIO      | on-chip    | gpio                                |
+-----------+------------+-------------------------------------+
| I2C       | on-chip    | i2c port/controller                 |
+-----------+------------+-------------------------------------+
| PINMUX    | on-chip    | pinmux                              |
+-----------+------------+-------------------------------------+
| PM        | on-chip    | power management                    |
+-----------+------------+-------------------------------------+
| PSL       | on-chip    | power switch logic                  |
+-----------+------------+-------------------------------------+
| PWM       | on-chip    | pulse width modulator               |
+-----------+------------+-------------------------------------+
| TACH      | on-chip    | tachometer sensor                   |
+-----------+------------+-------------------------------------+
| UART      | on-chip    | serial port-polling;                |
|           |            | serial port-interrupt               |
+-----------+------------+-------------------------------------+
| WDT       | on-chip    | watchdog                            |
+-----------+------------+-------------------------------------+

Other hardware features are not currently supported by Zephyr (at the moment)

The default configuration can be found in the defconfig file:
:zephyr_file:`boards/nuvoton/npcx4m8f_evb/npcx4m8f_evb_defconfig`


Connections and IOs
===================

Nuvoton to provide the schematic for this board.

System Clock
============

The NPCX4M8F MCU is configured to use the 120Mhz internal oscillator with the
on-chip PLL to generate a resulting EC clock rate of 15 MHz. See Processor clock
control register (chapter 4 in user manual)

Serial Port
===========

UART1 is configured for serial logs.

Programming and Debugging
*************************

This board comes with a Cortex ETM port which facilitates tracing and debugging
using a single physical connection. In addition, it comes with sockets for
JTAG-only sessions.

Flashing
========

If the correct headers are installed, this board supports both J-TAG and also
the ChromiumOS servo.

To flash using Servo V2, μServo, or Servo V4 (CCD), see the
`Chromium EC Flashing Documentation`_ for more information.

To flash with J-TAG, install the drivers for your programmer, for example:
SEGGER J-link's drivers are at https://www.segger.com/downloads/jlink/

The openocd from Zephyr SDK 0.16.1 doesn't include npcx4 support, so build openocd from source.::

  sudo apt-get install libftdi-dev libusb-1.0.0-dev
  git clone https://git.code.sf.net/p/openocd/code ~/openocd
  cd ~/openocd
  ./bootstrap
  ./configure --enable-jlink --enable-ftdi
  make clean
  make
  sudo make install

Build and flash the blinky sample.::

  west build -t clean && \
    west build -c -p auto -b npcx4m8f_evb samples/basic/blinky && \
    west flash --openocd /usr/local/bin/openocd

Debugging
=========

Use JTAG/SWD with a J-Link

References
**********
.. target-notes::

.. _Chromium EC Flashing Documentation:
   https://chromium.googlesource.com/chromiumos/platform/ec#Flashing-via-the-servo-debug-board
Part 3
한국어 전문 번역
개요
NPCX4M8F_EVB kit는 Nuvoton NPCX4 series microcontroller를 평가하기 위한 development platform입니다. 이 보드는 part number NPCX498F와 결합해야 합니다.
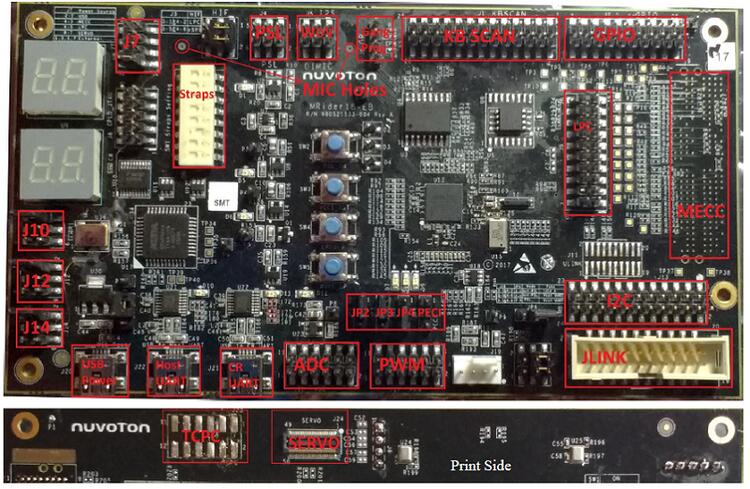
하드웨어
- ARM Cortex-M4F processor
512 KB RAM과64 KB boot ROM- ADC 및 GPIO header
- UART0과 UART1
- FAN PWM interface
- JTAG interface
- Intel Modular Embedded Controller Card(MECC) header
지원 기능
| 인터페이스 | 컨트롤러 | 드라이버/컴포넌트 |
|---|---|---|
NVIC | on-chip | nested vector interrupt controller |
ADC | on-chip | adc controller |
CLOCK | on-chip | reset and clock control |
GPIO | on-chip | gpio |
I2C | on-chip | i2c port/controller |
PINMUX | on-chip | pinmux |
PM | on-chip | power management |
PSL | on-chip | power switch logic |
PWM | on-chip | pulse width modulator |
TACH | on-chip | tachometer sensor |
UART | on-chip | serial port-polling; serial port-interrupt |
WDT | on-chip | watchdog |
다른 하드웨어 기능은 현재 Zephyr에서 지원되지 않습니다.
기본 구성은 boards/nuvoton/npcx4m8f_evb/npcx4m8f_evb_defconfig에서 확인할 수 있습니다.
연결과 입출력
이 보드의 schematic은 Nuvoton이 제공할 예정입니다.
System clock
NPCX4M8F MCU는 120 MHz internal oscillator와 on-chip PLL을 사용하여 최종 15 MHz EC clock을 생성하도록 구성됩니다. 자세한 내용은 user manual 4장의 Processor clock control register를 참고하십시오.
Serial port
UART1이 serial log용으로 구성됩니다.
프로그래밍과 디버깅
보드에는 하나의 physical connection으로 tracing과 debugging을 수행할 수 있게 하는 Cortex ETM port가 있습니다. JTAG-only session을 위한 socket도 제공합니다.
Flash
올바른 header가 설치되어 있으면 이 보드는 J-TAG과 ChromiumOS servo를 모두 지원합니다.
Servo V2, μServo 또는 Servo V4(CCD)로 flash하는 방법은 Chromium EC Flashing Documentation을 참고하십시오.
J-TAG으로 flash하려면 programmer driver를 설치해야 합니다. 예를 들어 SEGGER J-Link driver는 SEGGER 다운로드 페이지에서 받을 수 있습니다.
sudo apt-get install libftdi-dev libusb-1.0.0-dev
git clone https://git.code.sf.net/p/openocd/code ~/openocd
cd ~/openocd
./bootstrap
./configure --enable-jlink --enable-ftdi
make clean
make
sudo make install
다음 명령으로 blinky sample을 빌드하고 flash합니다.
west build -t clean && \
  west build -c -p auto -b npcx4m8f_evb samples/basic/blinky && \
  west flash --openocd /usr/local/bin/openocd
Debug
J-Link와 함께 JTAG/SWD를 사용하십시오.
Source
출처
영어 원문에는 문단, 문서 지시문, 표, 코드, 코드 심벌, 경로를 그대로 보존했습니다.