Part 1
요약·해설
nRF9160 Secure/Non-Secure firmware와 nRF52840 target을 구분하고, v0.14.0 이후 외부 flash·I/O expander 및 29개 analog-switch routing 항목을 실제 overlay 예제와 연결합니다.
PCA10090
LTE-M · NB-IoT
nRF9160 · nRF52840
Part 2
접을 수 있는 영어 원문 전체
영어 원문 전체 펼치기
204B8775EAE19A4F4113306D9B359AAFE8154396F00A5B71B99CD94A33DA7795
.. _nrf9160dk_nrf9160:

nRF9160 DK
##########

Overview
********

The nRF9160 DK (PCA10090) is a single-board development kit for evaluation and
development on the nRF9160 SiP for LTE-M and NB-IoT. The nrf9160dk/nrf9160
board configuration provides support for the Nordic Semiconductor nRF9160 ARM
Cortex-M33F CPU with ARMv8-M Security Extension and the following devices:

* :abbr:`ADC (Analog to Digital Converter)`
* CLOCK
* FLASH
* :abbr:`GPIO (General Purpose Input Output)`
* :abbr:`I2C (Inter-Integrated Circuit)`
* :abbr:`MPU (Memory Protection Unit)`
* :abbr:`NVIC (Nested Vectored Interrupt Controller)`
* :abbr:`PWM (Pulse Width Modulation)`
* :abbr:`RTC (nRF RTC System Clock)`
* Segger RTT (RTT Console)
* :abbr:`SPI (Serial Peripheral Interface)`
* :abbr:`UARTE (Universal asynchronous receiver-transmitter with EasyDMA)`
* :abbr:`WDT (Watchdog Timer)`
* :abbr:`IDAU (Implementation Defined Attribution Unit)`

.. figure:: ../../../../../../../boards/nordic/nrf9160dk/doc/img/nrf9160dk_nrf9160.jpg
     :align: center
     :alt: nRF9160 DK

     nRF9160 DK (Credit: Nordic Semiconductor)

More information about the board can be found at the
`nRF9160 DK website`_. `nRF9160 Product Specification`_
contains the processor's information and the datasheet.


Hardware
********

nRF9160 DK has two external oscillators. The frequency of
the slow clock is 32.768 kHz. The frequency of the main clock
is 32 MHz.

Supported Features
==================

The nrf9160dk/nrf9160 board configuration supports the following
hardware features:

+-----------+------------+----------------------+
| Interface | Controller | Driver/Component     |
+===========+============+======================+
| ADC       | on-chip    | adc                  |
+-----------+------------+----------------------+
| CLOCK     | on-chip    | clock_control        |
+-----------+------------+----------------------+
| FLASH     | on-chip    | flash                |
+-----------+------------+----------------------+
| GPIO      | on-chip    | gpio                 |
+-----------+------------+----------------------+
| I2C(M)    | on-chip    | i2c                  |
+-----------+------------+----------------------+
| MPU       | on-chip    | arch/arm             |
+-----------+------------+----------------------+
| NVIC      | on-chip    | arch/arm             |
+-----------+------------+----------------------+
| PWM       | on-chip    | pwm                  |
+-----------+------------+----------------------+
| RTC       | on-chip    | system clock         |
+-----------+------------+----------------------+
| RTT       | Segger     | console              |
+-----------+------------+----------------------+
| SPI(M/S)  | on-chip    | spi                  |
+-----------+------------+----------------------+
| SPU       | on-chip    | system protection    |
+-----------+------------+----------------------+
| UARTE     | on-chip    | serial               |
+-----------+------------+----------------------+
| WDT       | on-chip    | watchdog             |
+-----------+------------+----------------------+

.. _nrf9160dk_additional_hardware:

Additional hardware in v0.14.0+
-------------------------------

Starting from v0.14.0, additional hardware is available on the DK:

* External flash memory (MX25R6435F, 64 Mb)
* I/O expander (PCAL6408A) that can be used to interface LEDs, slide switches,
  and buttons

To use this additional hardware, specify the revision of the board that
should be used when building your application (for more information, see
:ref:`application_board_version`). For example, to build for nRF9160 DK v1.0.0:

.. zephyr-app-commands::
   :tool: all
   :cd-into:
   :board: nrf9160dk/[email protected]
   :goals: build
   :compact:

Remember to also enable routing for this additional hardware in the firmware for
:ref:`nrf9160dk_nrf52840` (see :ref:`nrf9160dk_board_controller_firmware`).

Other hardware features have not been enabled yet for this board.
See `nRF9160 DK website`_ and `nRF9160 Product Specification`_
for a complete list of nRF9160 DK board hardware features.

Connections and IOs
===================

LED
---

* LED1 (green) = P0.2
* LED2 (green) = P0.3
* LED3 (green) = P0.4
* LED4 (green) = P0.5

Push buttons and Switches
-------------------------

* BUTTON1 = P0.6
* BUTTON2 = P0.7
* SWITCH1 = P0.8
* SWITCH2 = P0.9
* BOOT = SW5 = boot/reset

Security components
===================

- Implementation Defined Attribution Unit (`IDAU`_).  The IDAU is implemented
  with the System Protection Unit and is used to define secure and non-secure
  memory maps.  By default, all of the memory space  (Flash, SRAM, and
  peripheral address space) is defined to be secure accessible only.
- Secure boot.


Programming and Debugging
*************************

nrf9160dk/nrf9160 supports the Armv8m Security Extension, and by default boots
in the Secure state.

Building Secure/Non-Secure Zephyr applications with Arm |reg| TrustZone |reg|
=============================================================================

Applications on the nRF9160 may contain a Secure and a Non-Secure firmware
image. The Secure image can be built using either Zephyr or
`Trusted Firmware M`_ (TF-M). Non-Secure firmware images are always built
using Zephyr. The two alternatives are described below.

.. note::

   By default the Secure image for nRF9160 is built using TF-M.

Building the Secure firmware using Zephyr
-----------------------------------------

The process requires the following steps:

1. Build the Secure Zephyr application using ``-DBOARD=nrf9160dk/nrf9160`` and
   ``CONFIG_TRUSTED_EXECUTION_SECURE=y`` in the application project configuration file.
2. Build the Non-Secure Zephyr application using ``-DBOARD=nrf9160dk/nrf9160/ns``.
3. Merge the two binaries together.

Building the Secure firmware with TF-M
--------------------------------------

The process to build the Secure firmware image using TF-M and the Non-Secure
firmware image using Zephyr requires the following action:

1. Build the Non-Secure Zephyr application
   using ``-DBOARD=nrf9160dk_nrf9160_ns``.
   To invoke the building of TF-M the Zephyr build system requires the
   Kconfig option ``BUILD_WITH_TFM`` to be enabled, which is done by
   default when building Zephyr as a Non-Secure application.
   The Zephyr build system will perform the following steps automatically:

      * Build the Non-Secure firmware image as a regular Zephyr application
      * Build a TF-M (secure) firmware image
      * Merge the output binaries together
      * Optionally build a bootloader image (MCUboot)

.. note::

   Depending on the TF-M configuration, an application DTS overlay may be
   required, to adjust the Non-Secure image Flash and SRAM starting address
   and sizes.

When building a Secure/Non-Secure application, the Secure application will
have to set the IDAU (SPU) configuration to allow Non-Secure access to all
CPU resources utilized by the Non-Secure application firmware. SPU
configuration shall take place before jumping to the Non-Secure application.

Building a Secure only application
==================================

Build the Zephyr app in the usual way (see :ref:`build_an_application`
and :ref:`application_run`), using ``-DBOARD=nrf9160dk/nrf9160``.


Flashing
========

Follow the instructions in the :ref:`nordic_segger` page to install
and configure all the necessary software. Further information can be
found in :ref:`nordic_segger_flashing`. Then build and flash
applications as usual (see :ref:`build_an_application` and
:ref:`application_run` for more details).

Here is an example for the :ref:`hello_world` application.

First, run your favorite terminal program to listen for output.

.. code-block:: console

   $ minicom -D <tty_device> -b 115200

Replace :code:`<tty_device>` with the port where the nRF9160 DK
can be found. For example, under Linux, :code:`/dev/ttyACM0`.

Then build and flash the application in the usual way.

.. zephyr-app-commands::
   :zephyr-app: samples/hello_world
   :board: nrf9160dk/nrf9160
   :goals: build flash

Debugging
=========

Refer to the :ref:`nordic_segger` page to learn about debugging Nordic boards with a
Segger IC.


Testing the LEDs and buttons in the nRF9160 DK
**********************************************

There are 2 samples that allow you to test that the buttons (switches) and LEDs on
the board are working properly with Zephyr:

* :zephyr:code-sample:`blinky`
* :zephyr:code-sample:`button`

You can build and flash the examples to make sure Zephyr is running correctly on
your board. The button and LED definitions can be found in
:zephyr_file:`boards/nordic/nrf9160dk/nrf9160dk_nrf9160_common.dtsi`.

.. _nrf9160dk_nrf52840:

nRF9160 DK - nRF52840
#####################

Overview
********

The nRF52840 SoC on the nRF9160 DK (PCA10090) hardware provides support for the
Nordic Semiconductor nRF52840 ARM Cortex-M4F CPU and the following devices:

* CLOCK
* FLASH
* :abbr:`GPIO (General Purpose Input Output)`
* :abbr:`MPU (Memory Protection Unit)`
* :abbr:`NVIC (Nested Vectored Interrupt Controller)`
* :abbr:`PWM (Pulse Width Modulation)`
* RADIO (Bluetooth Low Energy and 802.15.4)
* :abbr:`RTC (nRF RTC System Clock)`
* Segger RTT (RTT Console)
* :abbr:`UART (Universal asynchronous receiver-transmitter)`
* :abbr:`WDT (Watchdog Timer)`

The nRF52840 SoC does not have any connection to the any of the LEDs,
buttons, switches, and Arduino pin headers on the nRF9160 DK board. It is,
however, possible to route some of the pins of the nRF52840 SoC to the nRF9160
SiP.

More information about the board can be found at
the `Nordic Low power cellular IoT`_ website.
`nRF52840 Product Specification`_
contains the processor's information and the datasheet.


Hardware
********

The nRF9160 DK has two external oscillators. The frequency of
the slow clock is 32.768 kHz. The frequency of the main clock
is 32 MHz.

Supported Features
==================

The nrf9160dk/nrf52840 board configuration supports the following
hardware features:

+-----------+------------+----------------------+
| Interface | Controller | Driver/Component     |
+===========+============+======================+
| CLOCK     | on-chip    | clock_control        |
+-----------+------------+----------------------+
| FLASH     | on-chip    | flash                |
+-----------+------------+----------------------+
| GPIO      | on-chip    | gpio                 |
+-----------+------------+----------------------+
| MPU       | on-chip    | arch/arm             |
+-----------+------------+----------------------+
| NVIC      | on-chip    | arch/arm             |
+-----------+------------+----------------------+
| PWM       | on-chip    | pwm                  |
+-----------+------------+----------------------+
| RADIO     | on-chip    | Bluetooth,           |
|           |            | ieee802154           |
+-----------+------------+----------------------+
| RTC       | on-chip    | system clock         |
+-----------+------------+----------------------+
| RTT       | Segger     | console              |
+-----------+------------+----------------------+
| UART      | on-chip    | serial               |
+-----------+------------+----------------------+
| WDT       | on-chip    | watchdog             |
+-----------+------------+----------------------+

Programming and Debugging
*************************

Applications for the ``nrf9160dk/nrf52840`` board configuration can be
built and flashed in the usual way (see :ref:`build_an_application`
and :ref:`application_run` for more details).

Make sure that the PROG/DEBUG switch on the DK is set to nRF52.

Flashing
========

Follow the instructions in the :ref:`nordic_segger` page to install
and configure all the necessary software. Further information can be
found in :ref:`nordic_segger_flashing`. Then build and flash
applications as usual (see :ref:`build_an_application` and
:ref:`application_run` for more details).

Remember to set the PROG/DEBUG switch on the DK to nRF52.

See the following example for the :ref:`hello_world` application.

First, run your favorite terminal program to listen for output.

.. code-block:: console

   $ minicom -D <tty_device> -b 115200

Replace :code:`<tty_device>` with the port where the nRF52840 SoC is connected
to. Usually, under Linux it will be ``/dev/ttyACM1``. The ``/dev/ttyACM0``
port is connected to the nRF9160 SiP on the board.

Then build and flash the application in the usual way.

.. zephyr-app-commands::
   :zephyr-app: samples/hello_world
   :board: nrf9160dk/nrf52840
   :goals: build flash

Debugging
=========

Refer to the :ref:`nordic_segger` page to learn about debugging Nordic boards
with a Segger IC.

Remember to set the PROG/DEBUG switch on the DK to nRF52.

.. _nrf9160dk_board_controller_firmware:

Board controller firmware
*************************

The board controller firmware is a small snippet of code that takes care of
routing specific pins of the nRF9160 SiP to different components on the DK,
such as LEDs and buttons, UART interfaces (VCOMx) of the interface MCU, and
specific nRF52840 SoC pins.

.. note::
   In nRF9160 DK revisions earlier than v0.14.0, nRF9160 signals routed to
   other components on the DK are not simultaneously available on the DK
   connectors.

When compiling a project for nrf9160dk/nrf52840, the board controller firmware
will be compiled and run automatically after the Kernel has been initialized.

By default, the board controller firmware will route the following:

+--------------------------------+----------------------------------+
| nRF9160 pins                   | Routed to                        |
+================================+==================================+
| P0.26, P0.27, P0.28, and P0.29 | VCOM0                            |
+--------------------------------+----------------------------------+
| P0.01, P0.00, P0.15, and P0.14 | VCOM2                            |
+--------------------------------+----------------------------------+
| P0.02                          | LED1                             |
+--------------------------------+----------------------------------+
| P0.03                          | LED2                             |
+--------------------------------+----------------------------------+
| P0.04                          | LED3                             |
+--------------------------------+----------------------------------+
| P0.05                          | LED4                             |
+--------------------------------+----------------------------------+
| P0.08                          | Switch 1                         |
+--------------------------------+----------------------------------+
| P0.09                          | Switch 2                         |
+--------------------------------+----------------------------------+
| P0.06                          | Button 1                         |
+--------------------------------+----------------------------------+
| P0.07                          | Button 2                         |
+--------------------------------+----------------------------------+
| P0.17, P0.18, and P0.19        | Arduino pin headers              |
+--------------------------------+----------------------------------+
| P0.21, P0.22, and P0.23        | Trace interface                  |
+--------------------------------+----------------------------------+
| COEX0, COEX1, and COEX2        | COEX interface                   |
+--------------------------------+----------------------------------+

For a complete list of all the routing options available,
see the `nRF9160 DK board control section in the nRF9160 DK User Guide`_.

If you want to route some of the above pins differently or enable any of the
other available routing options, enable or disable the devicetree node that
represents the analog switch that provides the given routing.

The following devicetree nodes are defined for the analog switches present
on the nRF9160 DK:

+------------------------------------+------------------------------+
| Devicetree node label              | Analog switch name           |
+====================================+==============================+
| ``vcom0_pins_routing``             | nRF91_UART1 (nRF91_APP1)     |
+------------------------------------+------------------------------+
| ``vcom2_pins_routing``             | nRF91_UART2 (nRF91_APP2)     |
+------------------------------------+------------------------------+
| ``led1_pin_routing``               | nRF91_LED1                   |
+------------------------------------+------------------------------+
| ``led2_pin_routing``               | nRF91_LED2                   |
+------------------------------------+------------------------------+
| ``led3_pin_routing``               | nRF91_LED3                   |
+------------------------------------+------------------------------+
| ``led4_pin_routing``               | nRF91_LED4                   |
+------------------------------------+------------------------------+
| ``switch1_pin_routing``            | nRF91_SWITCH1                |
+------------------------------------+------------------------------+
| ``switch2_pin_routing``            | nRF91_SWITCH2                |
+------------------------------------+------------------------------+
| ``button1_pin_routing``            | nRF91_BUTTON1                |
+------------------------------------+------------------------------+
| ``button2_pin_routing``            | nRF91_BUTTON2                |
+------------------------------------+------------------------------+
| ``nrf_interface_pins_0_2_routing`` | nRF_IF0-2_CTRL (nRF91_GPIO)  |
+------------------------------------+------------------------------+
| ``nrf_interface_pins_3_5_routing`` | nRF_IF3-5_CTRL (nRF91_TRACE) |
+------------------------------------+------------------------------+
| ``nrf_interface_pins_6_8_routing`` | nRF_IF6-8_CTRL (nRF91_COEX)  |
+------------------------------------+------------------------------+

When building for the DK revision 0.14.0 or later, you can use the following
additional nodes (see :ref:`application_board_version` for information how to
build for specific revisions of the board):

+------------------------------------+------------------------------+
| Devicetree node label              | Analog switch name           |
+====================================+==============================+
| ``nrf_interface_pin_9_routing``    | nRF_IF9_CTRL                 |
+------------------------------------+------------------------------+
| ``io_expander_pins_routing``       | IO_EXP_EN                    |
+------------------------------------+------------------------------+
| ``external_flash_pins_routing``    | EXT_MEM_CTRL                 |
+------------------------------------+------------------------------+

For example, if you want to enable the optional routing for the nRF9160 pins
P0.17, P0.18, and P0.19 so that they are routed to nRF52840 pins P0.17, P0.20,
and P0.15, respectively, add the following in the devicetree overlay in your
application:

.. code-block:: devicetree

   &nrf_interface_pins_0_2_routing {
           status = "okay";
   };

And if you want to, for example, disable routing for the VCOM2 pins, add the
following:

.. code-block:: devicetree

   &vcom2_pins_routing {
           status = "disabled";
   };

A few helper .dtsi files are provided in the directories
:zephyr_file:`boards/nordic/nrf9160dk/dts/nrf52840` and
:zephyr_file:`boards/nordic/nrf9160dk/dts/nrf9160`. They can serve as examples of
how to configure and use the above routings. You can also include them from
respective devicetree overlay files in your applications to conveniently
configure the signal routing between nRF9160 and nRF52840 on the nRF9160 DK.
For example, to use ``uart1`` on both these chips for communication between
them, add the following line in the overlays for applications on both sides, nRF52840:

.. code-block:: devicetree

   #include <nrf52840/nrf9160dk_uart1_on_if0_3.dtsi>

nRF9160:

.. code-block:: devicetree

   #include <nrf9160/nrf9160dk_uart1_on_if0_3.dtsi>

References
**********

.. target-notes::

.. _IDAU:
   https://developer.arm.com/docs/100690/latest/attribution-units-sau-and-idau
.. _nRF9160 DK website: https://www.nordicsemi.com/Software-and-Tools/Development-Kits/nRF9160-DK
.. _Trusted Firmware M: https://www.trustedfirmware.org/projects/tf-m/
.. _Nordic Low power cellular IoT: https://www.nordicsemi.com/Products/Low-power-cellular-IoT
.. _nRF9160 Product Specification: https://docs.nordicsemi.com/bundle/ps_nrf9160/page/nRF9160_html5_keyfeatures.html
.. _nRF52840 Product Specification: https://docs.nordicsemi.com/bundle/ps_nrf52840/page/keyfeatures_html5.html
.. _J-Link Software and documentation pack: https://www.segger.com/jlink-software.html
.. _nRF9160 DK board control section in the nRF9160 DK User Guide: https://docs.nordicsemi.com/bundle/ug_nrf9160_dk/page/UG/nrf91_DK/hw_description/nrf9160_board_controller.html
Part 3
한국어 전문 번역
nRF9160 DK 개요
nRF9160 DK(PCA10090)는 LTE-M과 NB-IoT용 nRF9160 SiP를 평가하고 그 위에서 개발하기 위한 single-board development kit입니다. nrf9160dk/nrf9160 보드 구성은 ARMv8-M Security Extension을 갖춘 Nordic Semiconductor nRF9160 ARM Cortex-M33F CPU와 다음 장치를 지원합니다.
- ADC(Analog to Digital Converter)
- CLOCK
- FLASH
- GPIO(General Purpose Input Output)
- I2C(Inter-Integrated Circuit)
- MPU(Memory Protection Unit)
- NVIC(Nested Vectored Interrupt Controller)
- PWM(Pulse Width Modulation)
- RTC(nRF RTC System Clock)
- Segger RTT(RTT Console)
- SPI(Serial Peripheral Interface)
- UARTE(Universal asynchronous receiver-transmitter with EasyDMA)
- WDT(Watchdog Timer)
- IDAU(Implementation Defined Attribution Unit)
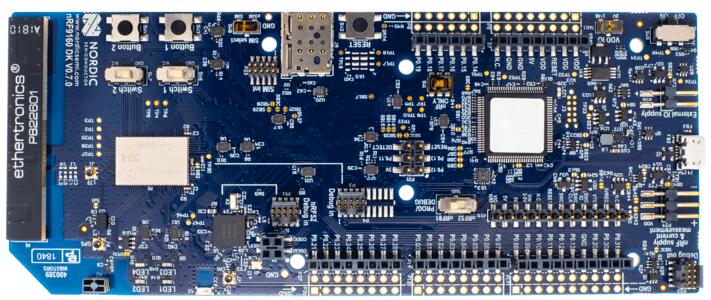
보드 정보는 nRF9160 DK 웹사이트에서 확인할 수 있습니다. nRF9160 Product Specification에는 프로세서 정보와 데이터시트가 들어 있습니다.
nRF9160 하드웨어
nRF9160 DK에는 외부 oscillator가 두 개 있습니다. 저속 clock은 32.768 kHz, main clock은 32 MHz입니다.
지원 기능
nrf9160dk/nrf9160 보드 구성이 지원하는 하드웨어 기능은 다음과 같습니다.
| 인터페이스 | 컨트롤러 | 드라이버/컴포넌트 |
|---|---|---|
ADC | on-chip | adc |
CLOCK | on-chip | clock_control |
FLASH | on-chip | flash |
GPIO | on-chip | gpio |
I2C(M) | on-chip | i2c |
MPU | on-chip | arch/arm |
NVIC | on-chip | arch/arm |
PWM | on-chip | pwm |
RTC | on-chip | system clock |
RTT | Segger | console |
SPI(M/S) | on-chip | spi |
SPU | on-chip | system protection |
UARTE | on-chip | serial |
WDT | on-chip | watchdog |
v0.14.0 이상에서 추가된 하드웨어
DK v0.14.0부터 다음 하드웨어를 추가로 사용할 수 있습니다.
- External flash memory:
MX25R6435F,64 Mb - LED, slide switch, button을 연결하는 데 사용할 수 있는 I/O expander:
PCAL6408A
추가 하드웨어를 사용하려면 애플리케이션을 빌드할 때 사용할 보드 revision을 지정해야 합니다. 예를 들어 nRF9160 DK v1.0.0용으로 빌드할 때 west는 다음과 같이 실행합니다.
west build -b nrf9160dk/[email protected]CMake와 ninja를 직접 사용할 때는 다음과 같습니다.
mkdir build && cd build
cmake -GNinja -DBOARD=nrf9160dk/[email protected] ..
ninja
이 추가 하드웨어를 사용하려면 nrf9160dk/nrf52840 firmware에서도 해당 routing을 활성화해야 합니다. 자세한 내용은 아래의 board controller firmware 절을 참고하십시오.
그 밖의 기능은 아직 이 보드에서 활성화되지 않았습니다. 전체 기능은 nRF9160 DK 웹사이트와 Product Specification을 참고하십시오.
nRF9160 연결과 입출력
LED
- LED1(녹색) =
P0.2 - LED2(녹색) =
P0.3 - LED3(녹색) =
P0.4 - LED4(녹색) =
P0.5
Push button과 switch
- BUTTON1 =
P0.6 - BUTTON2 =
P0.7 - SWITCH1 =
P0.8 - SWITCH2 =
P0.9 - BOOT = SW5 = boot/reset
보안 컴포넌트
- IDAU: Implementation Defined Attribution Unit은 System Protection Unit(SPU)으로 구현되며 Secure memory map과 Non-Secure memory map을 정의합니다. 기본 상태에서는 Flash, SRAM, peripheral address space를 포함한 모든 memory space가 Secure 상태에서만 접근할 수 있습니다.
- Secure boot
nRF9160 프로그래밍과 디버깅
nrf9160dk/nrf9160은 Armv8-M Security Extension을 지원하며 기본적으로 Secure state에서 부팅합니다.
Arm TrustZone으로 Secure/Non-Secure Zephyr 애플리케이션 빌드
nRF9160 애플리케이션에는 Secure firmware image와 Non-Secure firmware image가 함께 들어갈 수 있습니다. Secure image는 Zephyr 또는 Trusted Firmware-M(TF-M)으로 빌드할 수 있지만 Non-Secure image는 항상 Zephyr로 빌드합니다.
Zephyr로 Secure firmware 빌드
-DBOARD=nrf9160dk/nrf9160을 사용하고 project configuration에CONFIG_TRUSTED_EXECUTION_SECURE=y를 설정해 Secure Zephyr 애플리케이션을 빌드합니다.-DBOARD=nrf9160dk/nrf9160/ns를 사용해 Non-Secure Zephyr 애플리케이션을 빌드합니다.- 두 binary를 병합합니다.
TF-M으로 Secure firmware 빌드
원문에 명시된
-DBOARD=nrf9160dk_nrf9160_ns를 사용해 Non-Secure Zephyr 애플리케이션을 빌드합니다.Zephyr build system이 TF-M을 호출하려면 Kconfig 옵션
BUILD_WITH_TFM이 활성화되어야 하며, Non-Secure 애플리케이션 빌드에서는 기본으로 활성화됩니다. build system은 다음을 자동 수행합니다.- 일반 Zephyr 방식으로 Non-Secure firmware image 빌드
- TF-M Secure firmware image 빌드
- 출력 binary 병합
- 선택적으로 MCUboot bootloader image 빌드
Secure 애플리케이션은 Non-Secure firmware가 사용하는 모든 CPU resource에 Non-Secure access를 허용하도록 IDAU(SPU)를 구성해야 합니다. 이 구성은 Non-Secure 애플리케이션으로 제어를 넘기기 전에 완료해야 합니다.
Secure-only 애플리케이션
-DBOARD=nrf9160dk/nrf9160을 사용해 일반적인 Zephyr 방식으로 빌드합니다.
Flash
Nordic Segger 안내에 따라 필요한 소프트웨어를 설치·구성한 뒤 애플리케이션을 빌드하고 flash합니다. hello_world의 출력을 받으려면 먼저 terminal을 실행합니다.
$ minicom -D <tty_device> -b 115200<tty_device>를 nRF9160 DK port로 바꾸십시오. Linux에서는 예를 들어 /dev/ttyACM0입니다.
# From the root of the zephyr repository
west build -b nrf9160dk/nrf9160 samples/hello_world
west flash
Debug
Segger IC를 이용한 Nordic 보드 디버깅 방법은 Nordic Segger 문서를 참고하십시오.
nRF9160 LED와 버튼 시험
samples/basic/blinky와 samples/basic/button sample로 button(switch)과 LED를 시험할 수 있습니다. 정의는 boards/nordic/nrf9160dk/nrf9160dk_nrf9160_common.dtsi에 있습니다.
nRF9160 DK의 nRF52840
개요
nRF9160 DK(PCA10090)에 탑재된 nRF52840 SoC는 Nordic Semiconductor nRF52840 ARM Cortex-M4F CPU와 다음 장치를 지원합니다.
- CLOCK
- FLASH
- GPIO
- MPU
- NVIC
- PWM
- RADIO(Bluetooth Low Energy 및 802.15.4)
- RTC
- Segger RTT
- UART
- WDT
nRF52840 SoC는 nRF9160 DK의 LED, button, switch, Arduino pin header에 직접 연결되어 있지 않습니다. 그러나 일부 nRF52840 pin을 nRF9160 SiP로 route할 수 있습니다.
추가 정보는 Nordic Low power cellular IoT 웹사이트와 nRF52840 Product Specification을 참고하십시오.
하드웨어와 지원 기능
보드의 저속 외부 oscillator는 32.768 kHz, main oscillator는 32 MHz입니다. nrf9160dk/nrf52840 보드 구성은 다음 기능을 지원합니다.
| 인터페이스 | 컨트롤러 | 드라이버/컴포넌트 |
|---|---|---|
CLOCK | on-chip | clock_control |
FLASH | on-chip | flash |
GPIO | on-chip | gpio |
MPU | on-chip | arch/arm |
NVIC | on-chip | arch/arm |
PWM | on-chip | pwm |
RADIO | on-chip | Bluetooth, ieee802154 |
RTC | on-chip | system clock |
RTT | Segger | console |
UART | on-chip | serial |
WDT | on-chip | watchdog |
프로그래밍과 디버깅
nrf9160dk/nrf52840 애플리케이션은 일반적인 방식으로 빌드하고 flash할 수 있습니다. DK의 PROG/DEBUG switch를 nRF52로 설정해야 합니다.
Nordic Segger 소프트웨어를 설치·구성한 뒤 hello_world 출력을 받기 위해 terminal을 실행합니다.
$ minicom -D <tty_device> -b 115200<tty_device>는 nRF52840이 연결된 port로 바꾸십시오. Linux에서는 보통 /dev/ttyACM1입니다. /dev/ttyACM0은 보드의 nRF9160 SiP에 연결됩니다.
# From the root of the zephyr repository
west build -b nrf9160dk/nrf52840 samples/hello_world
west flash
디버깅 역시 Nordic Segger 안내를 따르며 PROG/DEBUG switch가 nRF52인지 다시 확인하십시오.
Board controller firmware
Board controller firmware는 nRF9160 SiP의 특정 pin을 DK의 LED·button, interface MCU의 UART interface(VCOMx), 특정 nRF52840 SoC pin 등 서로 다른 component로 route하는 작은 코드입니다.
nrf9160dk/nrf52840용 project를 compile하면 board controller firmware가 자동으로 compile되고 Kernel 초기화가 끝난 뒤 실행됩니다.
기본 routing은 다음과 같습니다.
| nRF9160 pin | 연결 대상 |
|---|---|
P0.26, P0.27, P0.28, P0.29 | VCOM0 |
P0.01, P0.00, P0.15, P0.14 | VCOM2 |
P0.02 | LED1 |
P0.03 | LED2 |
P0.04 | LED3 |
P0.05 | LED4 |
P0.08 | Switch 1 |
P0.09 | Switch 2 |
P0.06 | Button 1 |
P0.07 | Button 2 |
P0.17, P0.18, P0.19 | Arduino pin headers |
P0.21, P0.22, P0.23 | Trace interface |
COEX0, COEX1, COEX2 | COEX interface |
사용 가능한 모든 routing option은 nRF9160 DK User Guide의 board control 절을 참고하십시오. 위 pin을 다르게 route하거나 다른 option을 활성화하려면 해당 routing을 제공하는 analog switch를 나타내는 devicetree node를 활성화 또는 비활성화합니다.
nRF9160 DK의 analog switch에 정의된 devicetree node는 다음과 같습니다.
| Devicetree node label | Analog switch name |
|---|---|
vcom0_pins_routing | nRF91_UART1 (nRF91_APP1) |
vcom2_pins_routing | nRF91_UART2 (nRF91_APP2) |
led1_pin_routing | nRF91_LED1 |
led2_pin_routing | nRF91_LED2 |
led3_pin_routing | nRF91_LED3 |
led4_pin_routing | nRF91_LED4 |
switch1_pin_routing | nRF91_SWITCH1 |
switch2_pin_routing | nRF91_SWITCH2 |
button1_pin_routing | nRF91_BUTTON1 |
button2_pin_routing | nRF91_BUTTON2 |
nrf_interface_pins_0_2_routing | nRF_IF0-2_CTRL (nRF91_GPIO) |
nrf_interface_pins_3_5_routing | nRF_IF3-5_CTRL (nRF91_TRACE) |
nrf_interface_pins_6_8_routing | nRF_IF6-8_CTRL (nRF91_COEX) |
DK revision 0.14.0 이상에서는 다음 node도 사용할 수 있습니다. 특정 revision을 지정하는 방법은 보드 revision 빌드 안내를 참고하십시오.
| Devicetree node label | Analog switch name |
|---|---|
nrf_interface_pin_9_routing | nRF_IF9_CTRL |
io_expander_pins_routing | IO_EXP_EN |
external_flash_pins_routing | EXT_MEM_CTRL |
Routing overlay 예제
nRF9160의 P0.17, P0.18, P0.19를 각각 nRF52840의 P0.17, P0.20, P0.15로 route하려면 애플리케이션 devicetree overlay에 다음을 추가합니다.
&nrf_interface_pins_0_2_routing {
        status = "okay";
};
VCOM2 pin routing을 비활성화하려면 다음을 추가합니다.
&vcom2_pins_routing {
        status = "disabled";
};boards/nordic/nrf9160dk/dts/nrf52840과 boards/nordic/nrf9160dk/dts/nrf9160에는 routing 구성 예제로 사용할 수 있는 helper .dtsi 파일이 있습니다. 각 application의 devicetree overlay에서 이 파일을 include해 nRF9160과 nRF52840 사이의 signal routing을 편리하게 구성할 수 있습니다.
두 chip 사이의 통신에 양쪽 uart1을 사용하려면 nRF52840 application overlay에 다음을 추가합니다.
#include <nrf52840/nrf9160dk_uart1_on_if0_3.dtsi>nRF9160 application overlay에는 다음을 추가합니다.
#include <nrf9160/nrf9160dk_uart1_on_if0_3.dtsi>Source
출처
영어 원문에는 문단, 문서 지시문, 표, 코드, 코드 심벌, 경로를 그대로 보존했습니다.