Part 1
요약·해설
센서가 풍부하지만 Zephyr 3.7.0에서는 EMW3166 Wi-Fi 모듈이 아직 지원되지 않는 점이 핵심 제약입니다.
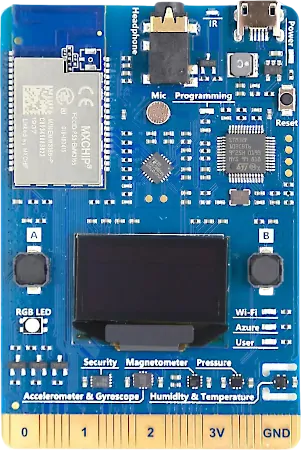
MCU
STM32F412 · Cortex-M4F · 96MHz
Display
OLED · 128×64
Connectivity
EMW3166 탑재 · Zephyr Wi-Fi 미지원
Part 2
접을 수 있는 영어 원문 전체
영어 원문 전체 펼치기
원문 SHA-256
CACFFE059E60FFEC70C55C05C942728A496AFDB68149C316EA3DF977DC838333
.. _az3166_iotdevkit:

AZ3166 MXChip IoT DevKit
########################

Overview
********

The AZ3166 IoT DevKit from MXChip is a development board designed for IoT (Internet of Things)
projects. It's an all-in-one board powered by an Arm Cortex-M4 processor. On-board peripherals
include an OLED screen, headphone output, stereo microphone and abundant sensors like humidity &
temperature, pressure, motion (accelerometer & gyroscope) and magnetometer.

.. figure:: ../../../../../../../boards/mxchip/az3166_iotdevkit/doc/img/az3166-iotdevkit.webp
     :align: center
     :alt: AZ3166 MXChip IoT DevKit

     AZ3166 MXChip IoT DevKit (Credit: MXChip)

More information about the board can be found at the `MXChip AZ3166 website`_.

Hardware
********

The MXChip AZ3166 IoT DevKit has the following physical features:

* STM32F412 Arm Cortex M4F processor at 96 MHz
* Working voltage: 3.3v or USB power supply
* Supports 3.3V DC-DC, maximum current 1.5A
* OLED display, 128x64 pixels
* 2 programmable buttons
* 1 RGB LED
* 3 LED for status indicators ("Wi-Fi", "Azure", "User")
* Security encryption chip
* Infrared emitter for IR remote control or interaction
* Motion sensor (LSM6DSL)
* Magnetometer sensor (LIS3MDL)
* Atmospheric pressure sensor (LPS22HB)
* Temperature and humidity sensor (HTS221)
* EMW3166 Wi-Fi module with 256K SRAM,1M+2M Byte SPI Flash


Supported Features
==================

The az3166_iotdevkit board configuration supports the following
hardware features:

+-----------+------------+----------------------+
| Interface | Controller | Driver/Component     |
+===========+============+======================+
| NVIC      | on-chip    | nested vector        |
|           |            | interrupt controller |
+-----------+------------+----------------------+
| SYSTICK   | on-chip    | system clock         |
+-----------+------------+----------------------+
| UART      | on-chip    | serial port          |
+-----------+------------+----------------------+
| GPIO      | on-chip    | gpio                 |
+-----------+------------+----------------------+
| I2C       | on-chip    | i2c                  |
+-----------+------------+----------------------+
| SPI       | on-chip    | spi                  |
+-----------+------------+----------------------+

.. note::

   The EMW3166 Wi-Fi module is currently not supported.

Programming and Debugging
*************************

Flashing
========

Build and flash applications as usual (see :ref:`build_an_application` and
:ref:`application_run` for more details).

Here is an example for the :ref:`hello_world` application.

First, run your favorite terminal program to listen for output.

.. code-block:: console

   $ minicom -D <tty_device> -b 115200

Replace :code:`<tty_device>` with the port where the micro:bit board
can be found. For example, under Linux, :code:`/dev/ttyACM0`.

Then build and flash the application in the usual way.

.. zephyr-app-commands::
   :zephyr-app: samples/hello_world
   :board: az3166_iotdevkit
   :goals: build flash


References
**********

.. target-notes::

.. _MXChip AZ3166 website: https://www.mxchip.com/en/az3166
Part 3
한국어 전문 번역
개요
MXChip의 AZ3166 IoT DevKit은 사물 인터넷(IoT) 프로젝트를 위해 설계된 개발 보드입니다. Arm Cortex-M4 프로세서를 중심으로 필요한 기능을 한 보드에 통합했습니다.
온보드 주변장치로 OLED 화면, 헤드폰 출력과 스테레오 마이크가 있습니다. 습도·온도, 기압, 움직임(가속도계·자이로스코프), 자기장을 측정하는 센서도 갖추고 있습니다.
보드에 관한 추가 정보는 MXChip AZ3166 제품 페이지에서 확인할 수 있습니다.
하드웨어
MXChip AZ3166 IoT DevKit의 물리적 사양은 다음과 같습니다.
- 96MHz로 동작하는 STM32F412 Arm Cortex-M4F 프로세서
- 동작 전압 3.3V 또는 USB 전원
- 최대 전류 1.5A의 3.3V DC-DC 지원
- 128×64 픽셀 OLED 디스플레이
- 프로그래밍 가능한 버튼 2개
- RGB LED 1개
- 상태 표시 LED 3개: Wi-Fi, Azure, User
- 보안 암호화 칩
- IR 리모컨 또는 상호작용용 적외선 송신기
- LSM6DSL 움직임 센서
- LIS3MDL 자기장 센서
- LPS22HB 대기압 센서
- HTS221 온도·습도 센서
- 256KB SRAM과 1MB+2MB SPI Flash를 갖춘 EMW3166 Wi-Fi 모듈
지원 기능
az3166_iotdevkit 보드 구성은 다음 하드웨어 기능을 지원합니다.
| 인터페이스 | 컨트롤러 | 드라이버/컴포넌트 |
|---|---|---|
| NVIC | 온칩 | 중첩 벡터 인터럽트 컨트롤러 |
| SYSTICK | 온칩 | 시스템 클록 |
| UART | 온칩 | 직렬 포트 |
| GPIO | 온칩 | GPIO |
| I2C | 온칩 | I2C |
| SPI | 온칩 | SPI |
프로그래밍과 디버깅
플래시
애플리케이션은 일반적인 Zephyr 빌드·실행 절차로 빌드하고 플래시할 수 있습니다. hello_world 예제를 실행하려면 먼저 선호하는 터미널 프로그램으로 출력을 기다립니다.
$ minicom -D <tty_device> -b 115200<tty_device>를 보드가 연결된 직렬 포트로 바꿉니다. Linux에서는 예를 들어 /dev/ttyACM0일 수 있습니다.
그런 다음 애플리케이션을 빌드하고 플래시합니다.
# Zephyr 저장소 루트에서 실행
west build -b az3166_iotdevkit samples/hello_world
west flash
참고 자료
Source
출처
영어 원문에는 문단, 문서 지시문, 표, 코드, 코드 심벌, 경로를 그대로 보존했습니다.