Part 1
요약·해설
48MHz RA4M1, 256KB Flash와 32KB SRAM을 사용하며 온보드 J-Link로 바로 개발할 수 있습니다.
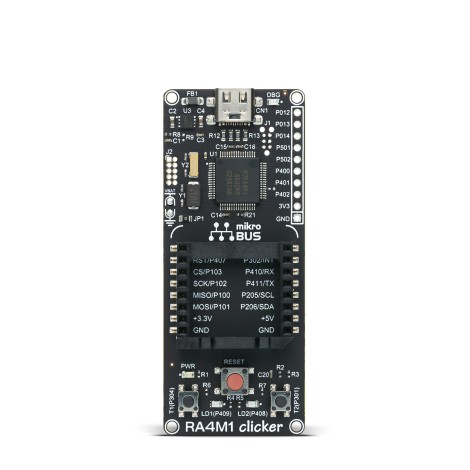
R7FA4M1AB3CFM · 48MHz
256KB Flash · 32KB SRAM
On-board J-Link
Part 2
접을 수 있는 영어 원문 전체
영어 원문 전체 펼치기
D57ACC8405D3CA517F8C78C4BC7A82AC470A02B58C229BDF593F838BFDA0B094
.. _mikroe_clicker_ra4m1:

Mikroe Clicker RA4M1
####################

Overview
********

The Mikroe Clicker RA4M1 development board contains a Renesas Cortex-M4 based
R7FA4M1AB3CFM Microcontroller operating at up to 48 MHz with 256 KB of Flash
memory and 32 KB of SRAM.

.. figure:: ../../../../../../../boards/mikroe/clicker_ra4m1/doc/img/mikroe_clicker_ra4m1.jpg
   :align: center
   :alt: Clicker RA4M1

   Clicker RA4M1 (Credit: MikroElektronika d.o.o.)

Hardware
********

The Clicker RA4M1 board contains a USB Type-C connector, two LEDs, two push
buttons, and a reset button. It has J-Link onboard and mikroBUS socket for
interfacing with external electronics. For more information about the
development board see the `Clicker RA4M1 website`_.

Supported Features
==================

The Zephyr Mikroe Clicker RA4M1 configuration supports the following hardware
features:

+-----------+------------+-------------------------------------+
| Interface | Controller | Driver/Component                    |
+===========+============+=====================================+
| NVIC      | on-chip    | nested vector interrupt controller  |
+-----------+------------+-------------------------------------+
| UART      | on-chip    | serial port-polling                 |
+-----------+------------+-------------------------------------+
| PINMUX    | on-chip    | pinmux                              |
+-----------+------------+-------------------------------------+
| GPIO      | on-chip    | GPIO output                         |
|           |            | GPIO input                          |
+-----------+------------+-------------------------------------+

Other hardware features have not been enabled yet for this board.

The default configuration can be found in the defconfig file:
:zephyr_file:`boards/mikroe/clicker_ra4m1/mikroe_clicker_ra4m1_defconfig`.

Programming and debugging
*************************

Building & Flashing
===================

You can build and flash an application in the usual way (See
:ref:`build_an_application` and
:ref:`application_run` for more details).

Here is an example for building and flashing the :zephyr:code-sample:`blinky` application.

.. zephyr-app-commands::
   :zephyr-app: samples/basic/blinky
   :board: mikroe_clicker_ra4m1
   :goals: build flash

Debugging
=========

Debugging also can be done in the usual way.
The following command is debugging the :zephyr:code-sample:`blinky` application.
Also, see the instructions specific to the debug server that you use.

.. zephyr-app-commands::
   :zephyr-app: samples/basic/blinky
   :board: mikroe_clicker_ra4m1
   :maybe-skip-config:
   :goals: debug

References
**********

.. target-notes::

.. _Clicker RA4M1 website:
	https://www.mikroe.com/ra4m1-clicker
Part 3
한국어 전문 번역
개요
Mikroe Clicker RA4M1 개발 보드는 최대 48MHz로 동작하는 Renesas Cortex-M4 기반 R7FA4M1AB3CFM 마이크로컨트롤러를 탑재합니다. 플래시 메모리는 256KB, SRAM은 32KB입니다.
하드웨어
Clicker RA4M1에는 USB Type-C 커넥터, LED 두 개, 푸시 버튼 두 개와 리셋 버튼이 있습니다. 온보드 J-Link와 외부 전자 회로 연결용 mikroBUS 소켓도 제공합니다. 자세한 하드웨어 정보는 Clicker RA4M1 제품 페이지에서 확인할 수 있습니다.
지원 기능
Zephyr의 Mikroe Clicker RA4M1 보드 구성은 다음 기능을 지원합니다.
| 인터페이스 | 컨트롤러 | 드라이버/컴포넌트 |
|---|---|---|
| NVIC | 온칩 | 중첩 벡터 인터럽트 컨트롤러 |
| UART | 온칩 | 폴링 방식 직렬 포트 |
| PINMUX | 온칩 | 핀 멀티플렉싱 |
| GPIO | 온칩 | GPIO 출력, GPIO 입력 |
나머지 하드웨어 기능은 이 보드에서 아직 활성화되지 않았습니다. 기본 구성은 boards/mikroe/clicker_ra4m1/mikroe_clicker_ra4m1_defconfig에 있습니다.
프로그래밍과 디버깅
빌드와 플래시
애플리케이션은 일반적인 Zephyr 빌드·실행 절차로 빌드하고 플래시할 수 있습니다. blinky 예제의 명령은 다음과 같습니다.
# Zephyr 저장소 루트에서 실행
west build -b mikroe_clicker_ra4m1 samples/basic/blinky
west flash
디버깅
디버깅도 일반적인 방식으로 수행합니다. 다음 명령은 blinky 애플리케이션을 디버깅합니다. 사용하는 디버그 서버에 맞는 별도 지침도 함께 확인해야 합니다.
# Zephyr 저장소 루트에서 실행
west build -b mikroe_clicker_ra4m1 samples/basic/blinky
west debug
참고 자료
Source
출처
영어 원문에는 문단, 문서 지시문, 표, 코드, 코드 심벌, 경로를 그대로 보존했습니다.