Part 1
요약·해설
UART1 P12, SHD SPI·SWD routing과 MEC172x image generation·flash를 다룹니다.
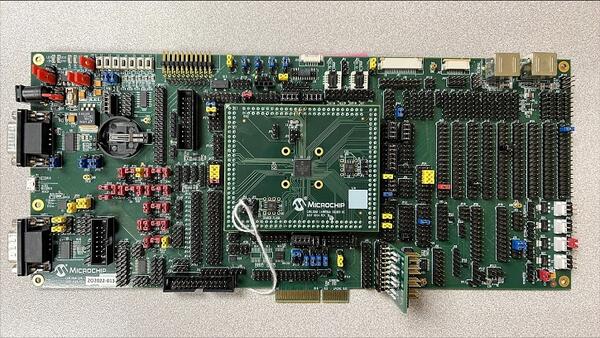
MEC172x · Cortex-M4
416KB RAM · 128KB boot ROM
ASSY6906 · ASSY6914 · ASSY6791
Part 2
접을 수 있는 영어 원문 전체
영어 원문 전체 펼치기
B69FC70AF4F031CA6DED53C45696334302F62F499783554B7678A16A5A4271B8
.. _mec172xevb_assy6906:

Microchip MEC172xEVB ASSY6906
#############################

Overview
********

The MEC172xEVB_ASSY6906 kit is a future development platform to evaluate the
Microchip MEC172X series microcontrollers. This board needs to be mated with
part number MEC172x 144WFBGA SOLDER DC ASSY 6914 (cpu board) in order to operate.
MEC172x and MEC152x SPI image formats are not compatible with each other.

.. image:: ../../../../../../../boards/microchip/mec172xevb_assy6906/doc/mec172xevb_assy6906.jpg
     :align: center
     :alt: MEC172X EVB ASSY 6906

Hardware
********

- MEC172x ARM Cortex-M4 Processor
- 416 KB RAM and 128 KB boot ROM
- Keyboard interface
- ADC & GPIO headers
- UART0 and UART1
- FAN0, FAN1, FAN2 headers
- FAN PWM interface
- JTAG/SWD, ETM and MCHP Trace ports
- PECI interface 3.0
- I2C voltage translator
- 10 SMBUS headers
- VCI interface
- 1 Hardware Driven PS/2 Port
- eSPI header
- 2 Sockets for SPI NOR chips
- One reset and VCC_PWRDGD pushbuttons
- One external PCA9555 I/O port with jumper selectable I2C address.
- One external LTC2489 delta-sigma ADC with jumper selectable I2C address.
- Board power jumper selectable from +5V 2.1mm/5.5mm barrel connector or USB Micro A connector.

For more information about the SOC's please see `MEC172x Reference Manual`_

Supported Features
==================

The mec172xevb_assy6906 board configuration supports the following hardware
features:

+-----------+------------+-------------------------------------+
| Interface | Controller | Driver/Component                    |
+===========+============+=====================================+
| NVIC      | on-chip    | nested vector interrupt controller  |
+-----------+------------+-------------------------------------+
| SYSTICK   | on-chip    | systick                             |
+-----------+------------+-------------------------------------+
| UART      | on-chip    | serial port                         |
+-----------+------------+-------------------------------------+
| GPIO      | on-chip    | gpio                                |
+-----------+------------+-------------------------------------+
| I2C       | on-chip    | i2c                                 |
+-----------+------------+-------------------------------------+
| PINMUX    | on-chip    | pinmux                              |
+-----------+------------+-------------------------------------+
| PS/2      | on-chip    | ps2                                 |
+-----------+------------+-------------------------------------+
| KSCAN     | on-chip    | kscan                               |
+-----------+------------+-------------------------------------+
| TACH      | on-chip    | tachometer                          |
+-----------+------------+-------------------------------------+
| RPMFAN    | on-chip    | Fan speed controller                |
+-----------+------------+-------------------------------------+

Other hardware features are not currently supported by Zephyr.

The default configuration can be found in the
:zephyr_file:`boards/microchip/mec172xevb_assy6906/mec172xevb_assy6906_defconfig` Kconfig file.

Connections and IOs
===================

This evaluation board kit is comprised of the following HW blocks:

- MEC172x EVB ASSY 6906 Rev A `MEC172x EVB Schematic`_
- MEC172x 144WFBGA SOLDER DC ASSY 6914 with MEC172x silicon `MEC172x Daughter Card Schematic`_
- SPI DONGLE ASSY 6791 `SPI Dongle Schematic`_

System Clock
============

The MEC1723 MCU is configured to use the 96Mhz internal oscillator with the
on-chip PLL to generate a resulting EC clock rate of 12 MHz. See Processor clock
control register in chapter 4 "4.0 POWER, CLOCKS, and RESETS" of the data sheet in
the references at the end of this document.

Serial Port
===========

UART1 is configured for serial logs.

Jumper settings
***************

Please follow the jumper settings below to properly demo this
board. Advanced users may deviate from this recommendation.

Jumper setting for MEC172x EVB Assy 6906 Rev A1p0
=================================================

Power-related jumpers
---------------------

If you wish to power from +5V power brick, then connect to barrel connector ``P1``
(5.5mm OD, 2.1mm ID) and move the jumper to ``JP30 5-6``.

If you wish to power from micro-USB type A/B connector ``P2``, move the
jumper to ``JP30 7-8``.


.. note:: A single jumper is required in ``JP30``.

+------+-------+-------+------+------+
| JP31 | JP158 | JP159 | JP40 | JP42 |
+======+=======+=======+======+======+
| 2-3  |  2-3  |  2-3  | 1-2  | 1-2  |
+------+-------+-------+------+------+

+------+------+------+------+------+------+------+
| JP36 | JP37 | JP38 | JP39 | JP41 | JP43 | JP44 |
+======+======+======+======+======+======+======+
| 1-2  | 1-2  | 1-2  | 1-2  | 1-2  | 1-2  | 1-2  |
+------+------+------+------+------+------+------+

+------+------+------+------+------+------+------+------+------+
| JP45 | JP46 | JP47 | JP50 | JP51 | JP52 | JP55 | JP56 | JP57 |
+======+======+======+======+======+======+======+======+======+
| 1-2  | 1-2  | 1-2  | 1-2  | 1-2  | 1-2  | 1-2  | 1-2  | 1-2  |
+------+------+------+------+------+------+------+------+------+

+------+------+------+------+------+------+------+
| JP59 | JP60 | JP61 | JP62 | JP63 | JP65 | JP66 |
+======+======+======+======+======+======+======+
| 1-2  | 1-2  | 1-2  | 1-2  | 1-2  | 1-2  | 1-2  |
+------+------+------+------+------+------+------+

These jumpers configure VCC Power good and nRESET_IN.

+------------------+-------------+
| JP32             | JP33        |
| (VCC Power good) | (nRESET_IN) |
+==================+=============+
| 1-2              | 1-2         |
+------------------+-------------+

Boot-ROM Straps
---------------

These jumpers configure MEC172x Boot-ROM straps.

+------------+--------------+-------------+-------------+---------------+
| JP1        | JP2          | JP3         | JP7         | JP160         |
| (CR_STRAP) | (JTAG_STRAP) | (CMP_STRAP) | (BSS_STRAP) | (UART_BSTRAP) |
+============+==============+=============+=============+===============+
| 1-2        | 2-3          | 2-3         | 1-2         | 1-2           |
+------------+--------------+-------------+-------------+---------------+

``JP7 1-2`` pulls SHD SPI CS0# up to VTR2. MEC172x Boot-ROM samples
SHD SPI CS0# and if high, it loads code from SHD SPI.

Peripheral Routing Jumpers
--------------------------

Each column of the following table illustrates how to enable UART0, UART1, SHD SPI
and SWD, respectively.

+-------+-------+------+------+------+------+------+
|                   UART0 (P11)                    |
+-------+-------+------+------+------+------+------+
| JP13  | JP17  | JP19 | JP22 | JP88 | JP89 | JP93 |
+=======+=======+======+======+======+======+======+
| 2-3   | 2-3   | 1-2  | 1-2  | 2-3  | 2-3  | 1-3  |
+-------+-------+------+------+------+------+------+
| 5-6   | 5-6   | 4-5  | 4-5  |      |      | 2-4  |
+-------+-------+------+------+------+------+------+
| 8-9   | 8-9   |      |      |      |      |      |
+-------+-------+------+------+------+------+------+
| 11-12 | 11-12 |      |      |      |      |      |
+-------+-------+------+------+------+------+------+
| 14-15 | 14-15 |      |      |      |      |      |
+-------+-------+------+------+------+------+------+
| 17-18 | 17-18 |      |      |      |      |      |
+-------+-------+------+------+------+------+------+
|       | 20-21 |      |      |      |      |      |
+-------+-------+------+------+------+------+------+
|       | 23-24 |      |      |      |      |      |
+-------+-------+------+------+------+------+------+

+------+------+-------+-------+------+------+-------+-----+--------+------+------+------+-------+
|                                             UART1                                             |
+---------------------------------------------------+-------------------------------------------+
|                      (P12)                        |                    (P2)                   |
+------+------+-------+-------+------+------+-------+------+-------+------+------+------+-------+
| JP11 | JP14 | JP19  | JP24  | JP90 | JP94 | JP157 | JP11 | JP19  | JP24 | JP90 | JP94 | JP157 |
+======+======+=======+=======+======+======+=======+======+=======+======+======+======+=======+
| 1-2  | 1-2  | 20-21 |  2-3  | 2-3  | 1-3  |  1-2  | 1-2  | 11-12 | 5-6  | 2-3  | 1-3  |  1-3  |
+------+------+-------+-------+------+------+-------+------+-------+------+------+------+-------+
| 4-5  |      |       |  5-6  |      | 2-4  |  4-5  | 4-5  |       | 8-9  |      | 2-4  |  4-6  |
+------+------+-------+-------+------+------+-------+------+-------+------+------+------+-------+
| 8-9  |      |       |  8-9  |      |      |  7-8  |      |       |17-18 |      |      |  7-9  |
+------+------+-------+-------+------+------+-------+------+-------+------+------+------+-------+
|      |      |       | 11-12 |      |      | 10-11 |      |       |23-24 |      |      | 10-12 |
+------+------+-------+-------+------+------+-------+------+-------+------+------+------+-------+
|      |      |       | 14-15 |      |      |       |      |       |      |      |      |       |
+------+------+-------+-------+------+------+-------+------+-------+------+------+------+-------+
|      |      |       | 17-18 |      |      |       |      |       |      |      |      |       |
+------+------+-------+-------+------+------+-------+------+-------+------+------+------+-------+

NOTE: The "Hello World" example outputs at ``UART1 P12`` .

+----------------------+-------+--------+
|        SHD_SPI       |  SWD  | LED4-5 |
+-------+------+-------+-------+--------+
| JP23  | JP25 | JP156 |  J18  |  JP21  |
+=======+======+=======+=======+========+
|  2-3  | 1-2  |  1-2  |  8-9  |  4-5   |
+-------+------+-------+-------+--------+
|  8-9  |      |       | 11-12 | 16-17  |
+-------+------+-------+-------+--------+
| 14-15 |      |       |       |        |
+-------+------+-------+-------+--------+
| 17-18 |      |       |       |        |
+-------+------+-------+-------+--------+

Jumper settings for MEC172x 144WFBGA Socket DC Assy 6914 Rev A0p1
=================================================================

The jumper configuration explained above covers the base board. The ASSY
6914 MEC172x CPU board provides capability for an optional, external 32KHz
clock source. The card includes a 32KHz crystal oscillator. The card can
also be configured to use an external 50% duty cycle 32KHz source on the
XTAL2/32KHZ_IN pin. Note, firmware must set the MEC172x clock enable
register to select the external source matching the jumper settings. If
using the MEC172x internal silicon oscillator then the 32K jumper settings
are don't cares. ``JP1`` on DC is for scoping test clock outputs. Please
refer to the schematic in reference section below.

Parallel 32KHz crystal configuration
------------------------------------

+-------+-------+
| JP1   | JP2   |
+=======+=======+
| 1-2   | 2-3   |
+-------+-------+

External 32KHz 50% duty cycle configuration
-------------------------------------------

+-------+-------+
| JP2   | JP3   |
+=======+=======+
| NC    | 1-2   |
+-------+-------+

NOTE: ``JP121 3-4`` on base board also needs to be loaded.


Programming and Debugging
*************************

Setup
=====

#. If you use Dediprog SF100 programmer, then setup it.

   Windows version can be found at the `SF100 Product page`_.

   Linux version source code can be found at `SF100 Linux GitHub`_.
   Follow the `SF100 Linux manual`_ to complete setup of the SF100 programmer.
   For Linux please make sure that you copied ``60-dediprog.rules``
   from the ``SF100Linux`` folder to the :code:`/etc/udev/rules.s` (or rules.d)
   then restart service using:

   .. code-block:: console

      $ udevadm control --reload

   Add directory with program ``dpcmd`` (on Linux)
   or ``dpcmd.exe`` (on Windows) to your ``PATH``.

#. Clone the `MEC172x SPI Image Gen`_ repository or download the files within
   that directory.

#. Make the image generation available for Zephyr, by making the tool
   searchable by path, or by setting an environment variable
   ``MEC172X_SPI_GEN``, for example:

   .. code-block:: console

      export MEC172X_SPI_GEN=<path to tool>/mec172x_spi_gen_lin_x86_64

   Note that the tools for Linux and Windows have different file names.

#. The default MEC172X_SPI_CFG file is spi_cfg.txt located in ${BOARD_DIR}/support.
   If needed, a custom SPI image configuration file can be specified to override the
   default one.

   .. code-block:: console

      export MEC172X_SPI_CFG=custom_spi_cfg.txt

Wiring
========

#. Connect the SPI Dongle ASSY 6791 to ``J34`` in the EVB.

   .. image:: ../../../../../../../boards/microchip/mec172xevb_assy6906/doc/spidongle_assy6791.jpg
        :align: center
        :alt: SPI DONGLE ASSY 6791 Connected

#. Connect programmer to the header J6 on the Assy6791 board, it will flash the SPI NOR chip
   ``U3``. Make sure that your programmer's offset is 0x0.
   For programming you can use Dediprog SF100 or a similar tool for flashing SPI chips.

   .. image:: ../../../../../../../boards/microchip/mec172xevb_assy6906/doc/dediprog_connector.jpg
        :align: center
        :alt: SF100 Connected


   .. note:: Remember that SPI MISO/MOSI are swapped on Dediprog headers!
    Use separate wires to connect Dediprog pins with pins on the Assy6791 SPI board.
    Wiring connection is described in the table below.

    +------------+---------------+
    |  Dediprog  |  Assy6791     |
    |  Connector |  J6 Connector |
    +============+===============+
    |    VCC     |       1       |
    +------------+---------------+
    |    GND     |       2       |
    +------------+---------------+
    |    CS      |       3       |
    +------------+---------------+
    |    CLK     |       4       |
    +------------+---------------+
    |    MISO    |       6       |
    +------------+---------------+
    |    MOSI    |       5       |
    +------------+---------------+

#. Connect UART1 port of the MEC17xxEVB_ASSY_6906 board
   to your host computer using the RS232 cable.

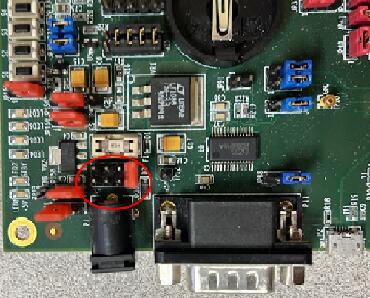
#. Apply power to the board via a micro-USB cable.
   Configure this option by using a jumper between ``JP30 7-8``.

   .. image:: ../../../../../../../boards/microchip/mec172xevb_assy6906/doc/jp30_power_options.jpg
        :align: center
        :alt: Power Connection

Building
========

#. Build :ref:`hello_world` application as you would normally do.

#. The file :file:`spi_image.bin` will be created if the build system
   can find the image generation tool. This binary image can be used
   to flash the SPI chip.

Flashing
========

#. Run your favorite terminal program to listen for output.
   Under Linux the terminal should be :code:`/dev/ttyUSB0`. Do not close it.

   For example:

   .. code-block:: console

      $ minicom -D /dev/ttyUSB0 -o

   The -o option tells minicom not to send the modem initialization
   string. Connection should be configured as follows:

   - Speed: 115200
   - Data: 8 bits
   - Parity: None
   - Stop bits: 1

#. Flash your board using ``west`` from the second terminal window.
   Split first and second terminal windows to view both of them.

   .. code-block:: console

      $ west flash

   .. note:: When west process started press Reset button ``S2`` and do not release it
    till the whole west process will not be finished successfully.

   .. image:: ../../../../../../../boards/microchip/mec172xevb_assy6906/doc/Reset_Button.jpg
        :align: center
        :alt: Reset Button

   .. note:: If you don't want to press Reset button every time, you can disconnect
    SPI Dongle ASSY 6791 from the EVB during the west flash programming.
    Then connect it back to the ``J34`` header and apply power to the EVB.
    Result will be the same.


#. You should see ``"Hello World! mec172xevb_assy6906"`` in the first terminal window.
   If you don't see this message, press the Reset button and the message should appear.

Debugging
=========

This board comes with a Cortex ETM port which facilitates tracing and debugging
using a single physical connection.  In addition, it comes with sockets for
JTAG only sessions.

Troubleshooting
===============

#. In case you don't see your application running, please make sure ``LED1`` and ``LED2``
   are lit. If one of these is off, then check the power-related jumpers again.

#. If you can't program the board using Dediprog, disconnect the Assy6791
   from the main board Assy6906 and try again.

#. If Dediprog can't detect the onboard flash, press the board's Reset button and try again.

PCA9555 Enabling
================
#. To enable PCA9555PW and test the I2C on mec172xevb_assy6906, additional works are needed:

   As the I2C slave device NXP pca95xx on mec172xevb_assy6906 is connected to I2C00 port,
   however, I2C00 port is shared with UART2 RS232 to TTL converter used to catch serial log,
   so it's not possible to use UART2 and I2C00 port simultaneously. We need to change to use
   I2C01 port by making some jumpers setting as below:

    +---------+---------+------------------------------------------+
    |  Pin 1  | Pin 2   |                Comment                   |
    +=========+=========+==========================================+
    | JP49.1  | JP49.2  | Connect PCA9555 VCC to +3.3V_STBY        |
    +---------+---------+------------------------------------------+
    | JP53.1  | JP53.2  | Select address 0100b, which means 0x26   |
    +---------+---------+------------------------------------------+
    | JP12.13 | JP12.14 | Connect I2C01_SDA from CPU to header J20 |
    +---------+---------+------------------------------------------+
    | JP12.4  | JP12.5  | Connect I2C01_SCL from CPU to header J20 |
    +---------+---------+------------------------------------------+
    | JP77.7  | JP77.8  | External pull-up for I2C01_SDA           |
    +---------+---------+------------------------------------------+
    | JP77.9  | JP77.10 | External pull-up for I2C01_SCL           |
    +---------+---------+------------------------------------------+
    | JP58.1  | JP20.1  | Connect NXP PCA9555 SCL to I2C01         |
    +---------+---------+------------------------------------------+
    | JP58.3  | JP20.3  | Connect NXP PCA9555 SDA to I2C01         |
    +---------+---------+------------------------------------------+

References
**********

.. target-notes::

.. _MEC172x Reference Manual:
    https://github.com/MicrochipTech/CPGZephyrDocs/blob/master/MEC172x/MEC172x-Data-Sheet.pdf
.. _MEC172x EVB Schematic:
    https://github.com/MicrochipTech/CPGZephyrDocs/blob/master/MEC172x/MEC172X-EVB-Assy_6906-A1p0-SCH.pdf
.. _MEC172x Daughter Card Schematic:
    https://github.com/MicrochipTech/CPGZephyrDocs/blob/master/MEC172x/MEC172X-144WFBGA-Socket-DC-Assy6914-Rev-A-SCH.pdf
.. _SPI Dongle Schematic:
    https://github.com/MicrochipTech/CPGZephyrDocs/blob/master/MEC1501/SPI%20Dongles%20and%20Aardvark%20Interposer%20Assy%206791%20Rev%20A1p1%20-%20SCH.pdf
.. _MEC172x SPI Image Gen:
    https://github.com/MicrochipTech/CPGZephyrDocs/tree/master/MEC172x/SPI_image_gen
.. _SF100 Linux GitHub:
    https://github.com/DediProgSW/SF100Linux
.. _SF100 Product page:
    https://www.dediprog.com/product/SF100
.. _SF100 Linux manual:
    https://www.dediprog.com/download/save/727.pdf
Part 3
한국어 전문 번역
개요
MEC172xEVB ASSY6906 kit는 Microchip MEC172X series 평가용 platform이며 동작하려면 MEC172x 144WFBGA SOLDER DC ASSY6914 CPU board와 결합해야 합니다. MEC172x와 MEC152x SPI image format은 호환되지 않습니다.
Hardware
- MEC172x Arm Cortex-M4, 416KB RAM, 128KB boot ROM
- Keyboard, ADC·GPIO, UART0·UART1
- FAN0·1·2, FAN PWM, JTAG/SWD·ETM·MCHP Trace
- PECI 3.0, I2C translator, SMBUS 10개, VCI
- Hardware-driven PS/2 1개, eSPI, SPI NOR socket 2개
- Reset·VCC_PWRDGD button, PCA9555 I/O, LTC2489 ADC
- Barrel 또는 USB Micro-A power 선택
지원 기능
| Interface | Controller | Driver/Component |
|---|---|---|
| NVIC | on-chip | nested vector interrupt controller |
| SYSTICK | on-chip | systick |
| UART | on-chip | serial port |
| GPIO | on-chip | gpio |
| I2C | on-chip | i2c |
| PINMUX | on-chip | pinmux |
| PS/2 | on-chip | ps2 |
| KSCAN | on-chip | kscan |
| TACH | on-chip | tachometer |
| RPMFAN | on-chip | Fan speed controller |
Default configuration은 boards/microchip/mec172xevb_assy6906/mec172xevb_assy6906_defconfig입니다.
연결과 I/O
Kit는 EVB ASSY6906, MEC172x ASSY6914 daughter card와 SPI Dongle ASSY6791로 구성됩니다. MEC1723은 96MHz oscillator와 PLL로 EC clock 12MHz를 만들며 UART1이 serial log를 담당합니다.
Jumper 설정
Power
+5V barrel P1은 JP30 5-6, micro-USB P2는 JP30 7-8입니다. JP30에는 jumper 하나만 둡니다.
| JP31 | JP158 | JP159 | JP40 | JP42 |
|---|---|---|---|---|
| 2-3 | 2-3 | 2-3 | 1-2 | 1-2 |
| JP36 | JP37 | JP38 | JP39 | JP41 | JP43 | JP44 |
|---|---|---|---|---|---|---|
| 1-2 | 1-2 | 1-2 | 1-2 | 1-2 | 1-2 | 1-2 |
| JP45 | JP46 | JP47 | JP50 | JP51 | JP52 | JP55 | JP56 | JP57 |
|---|---|---|---|---|---|---|---|---|
| 1-2 | 1-2 | 1-2 | 1-2 | 1-2 | 1-2 | 1-2 | 1-2 | 1-2 |
| JP59 | JP60 | JP61 | JP62 | JP63 | JP65 | JP66 |
|---|---|---|---|---|---|---|
| 1-2 | 1-2 | 1-2 | 1-2 | 1-2 | 1-2 | 1-2 |
VCC power-good와 nRESET_IN setting입니다.
| JP32 VCC Power good | JP33 nRESET_IN |
|---|---|
| 1-2 | 1-2 |
Boot-ROM straps
| JP1 CR_STRAP | JP2 JTAG_STRAP | JP3 CMP_STRAP | JP7 BSS_STRAP | JP160 UART_BSTRAP |
|---|---|---|---|---|
| 1-2 | 2-3 | 2-3 | 1-2 | 1-2 |
JP7 1-2는 SHD SPI CS0#을 VTR2로 pull-up하며 high이면 SHD SPI에서 code를 load합니다.
Peripheral routing
UART0(P11) routing입니다.
| Row | JP13 | JP17 | JP19 | JP22 | JP88 | JP89 | JP93 |
|---|---|---|---|---|---|---|---|
| 1 | 2-3 | 2-3 | 1-2 | 1-2 | 2-3 | 2-3 | 1-3 |
| 2 | 5-6 | 5-6 | 4-5 | 4-5 | 2-4 | ||
| 3 | 8-9 | 8-9 | |||||
| 4 | 11-12 | 11-12 | |||||
| 5 | 14-15 | 14-15 | |||||
| 6 | 17-18 | 17-18 | |||||
| 7 | 20-21 | ||||||
| 8 | 23-24 |
UART1의 P12와 P2 routing입니다. Hello World output은 UART1 P12로 나옵니다.
| Route | JP11 | JP14/JP19 | JP19/JP24 | JP24/JP90 | JP90/JP94 | JP94/JP157 | JP157 |
|---|---|---|---|---|---|---|---|
| P12 row1 | 1-2 | 1-2 | 20-21 | 2-3 | 2-3 | 1-3 | 1-2 |
| P12 row2 | 4-5 | 5-6 | 2-4 | 4-5 | |||
| P12 row3 | 8-9 | 8-9 | 7-8 | ||||
| P12 row4 | 11-12 | 10-11 | |||||
| P12 row5 | 14-15 | ||||||
| P12 row6 | 17-18 | ||||||
| P2 row1 | 1-2 | 11-12 | 5-6 | 2-3 | 1-3 | 1-3 | |
| P2 row2 | 4-5 | 8-9 | 2-4 | 4-6 | |||
| P2 row3 | 17-18 | 7-9 | |||||
| P2 row4 | 23-24 | 10-12 |
SHD SPI, SWD와 LED4-5 setting입니다.
| Row | JP23 SHD_SPI | JP25 SHD_SPI | JP156 SHD_SPI | J18 SWD | JP21 LED4-5 |
|---|---|---|---|---|---|
| 1 | 2-3 | 1-2 | 1-2 | 8-9 | 4-5 |
| 2 | 8-9 | 11-12 | 16-17 | ||
| 3 | 14-15 | ||||
| 4 | 17-18 |
ASSY6914 32KHz source
Parallel crystal 또는 external 50% duty-cycle source를 선택할 수 있으며 firmware clock register와 jumper를 일치시켜야 합니다. Internal oscillator를 쓰면 jumper는 don't-care입니다.
| JP1 | JP2 |
|---|---|
| 1-2 | 2-3 |
| JP2 | JP3 |
|---|---|
| NC | 1-2 |
External source를 사용할 때 base board의 JP121 3-4도 연결해야 합니다.
Programming과 Debugging
Setup
Dediprog SF100 programmer를 사용한다면 먼저 설정합니다. Windows version은 SF100 Product page에서, Linux source는 SF100 Linux GitHub에서 구할 수 있습니다. Linux에서는 manual에 따라 60-dediprog.rules를 /etc/udev/rules.s 또는 rules.d로 복사하고 다음 명령으로 service를 reload합니다.
$ udevadm control --reloadLinux의 dpcmd 또는 Windows의 dpcmd.exe가 있는 directory를 PATH에 추가합니다.
MEC172x SPI Image Gen을 clone하고 PATH에 두거나 환경 변수를 설정합니다.
export MEC172X_SPI_GEN=<path to tool>/mec172x_spi_gen_lin_x86_64Default MEC172X_SPI_CFG는 ${BOARD_DIR}/support/spi_cfg.txt이며 필요하면 override합니다.
export MEC172X_SPI_CFG=custom_spi_cfg.txtWiring
- SPI Dongle ASSY6791을 EVB의
J34에 연결합니다. - Programmer를 Assy6791
J6에 연결해 SPI NORU3offset 0x0을 flash합니다.
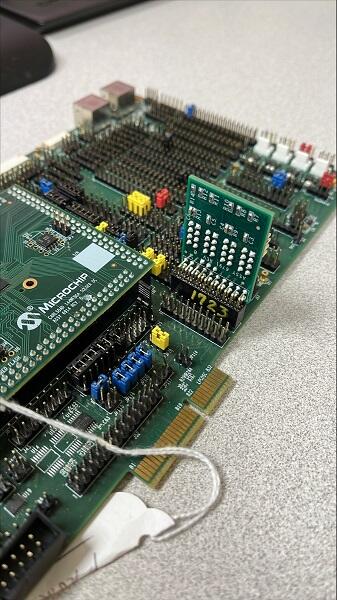
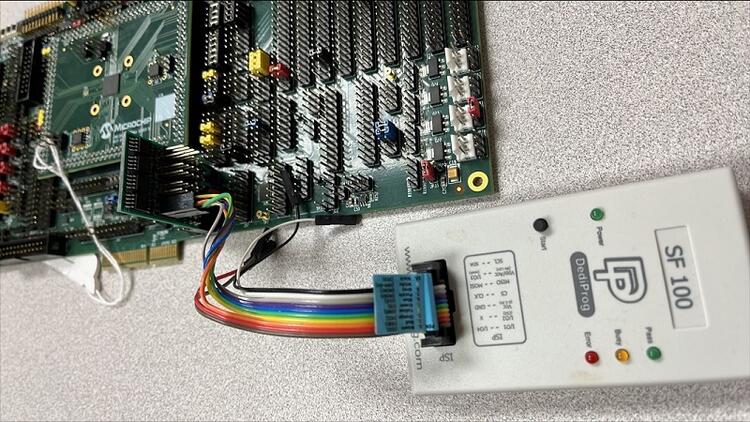
Dediprog header의 MISO/MOSI가 바뀌므로 다음 배선을 사용합니다.
| Dediprog Connector | Board connector pin |
|---|---|
| VCC | 1 |
| GND | 2 |
| CS | 3 |
| CLK | 4 |
| MISO | 6 |
| MOSI | 5 |
UART1을 RS232로 host에 연결하고 JP30 7-8에서 micro-USB 전원을 인가합니다.
Building
hello_world를 build하면 tool을 찾을 경우 spi_image.bin이 생성됩니다.
Flashing
$ minicom -D /dev/ttyUSB0 -o- Speed: 115200
- Data: 8 bits
- Parity: None
- Stop bits: 1
$ west flashWest 실행 중 Reset S2를 누르고 성공할 때까지 놓지 않습니다.
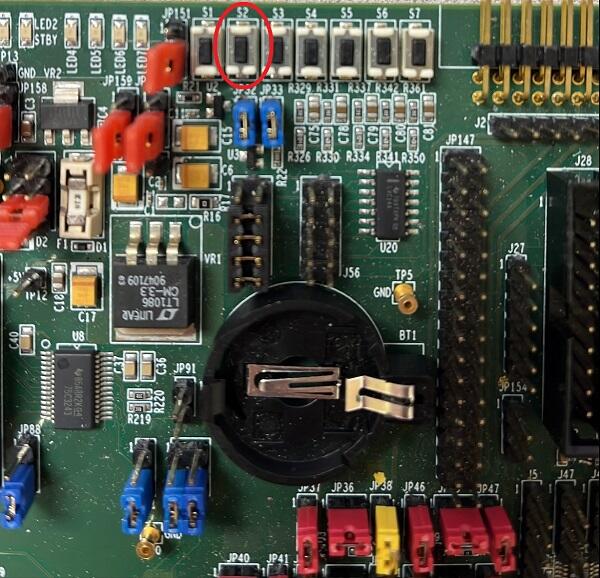
대신 flash 중 dongle을 분리하고 완료 후 J34에 다시 연결할 수 있습니다. Hello World! mec172xevb_assy6906가 표시되어야 합니다.
Debugging
Cortex ETM port와 JTAG-only socket을 제공합니다.
Troubleshooting
LED1과LED2전원을 확인합니다.- Programming 실패 시 Assy6791을 Assy6906에서 분리합니다.
- Flash 감지 실패 시 Reset을 누릅니다.
PCA9555 활성화
I2C00은 serial log용 UART2 converter와 공유되어 동시에 사용할 수 없으므로 PCA9555를 I2C01로 route합니다.
| Pin 1 | Pin 2 | Comment |
|---|---|---|
| JP49.1 | JP49.2 | PCA9555 VCC를 +3.3V_STBY에 연결 |
| JP53.1 | JP53.2 | Address 0100b, 즉 0x26 선택 |
| JP12.13 | JP12.14 | CPU I2C01_SDA를 J20에 연결 |
| JP12.4 | JP12.5 | CPU I2C01_SCL을 J20에 연결 |
| JP77.7 | JP77.8 | I2C01_SDA external pull-up |
| JP77.9 | JP77.10 | I2C01_SCL external pull-up |
| JP58.1 | JP20.1 | PCA9555 SCL을 I2C01에 연결 |
| JP58.3 | JP20.3 | PCA9555 SDA를 I2C01에 연결 |
참고 자료
Source
출처
영어 원문에는 문단, 문서 지시문, 표, 코드, 코드 심벌, 경로를 그대로 보존했습니다.