Part 1
요약·해설
Power·boot strap, 1.8V VTR3와 SHD SPI image 생성·flash 절차를 다룹니다.
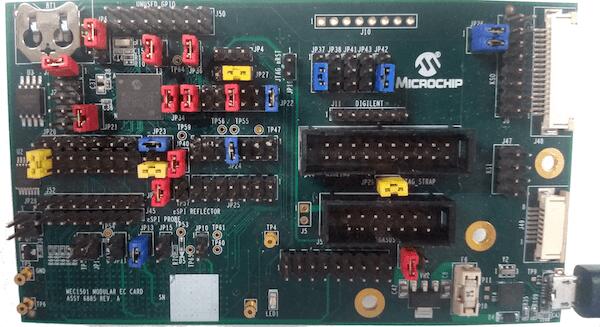
MEC1521 · Cortex-M4
256KB RAM · 64KB boot ROM
Standalone · MECC mated
Part 2
접을 수 있는 영어 원문 전체
영어 원문 전체 펼치기
1B569353E52CF107976079B88167BA4EB8CAAE1E895060C927904B5106D6160F
.. _mec1501modular_assy6885:

Microchip MEC1501 Modular card ASSY6885
#######################################

Overview
********

The MEC1501 Modular card ASSY6885 is a development board to evaluate the Microchip
MEC152X series microcontrollers. This board can work standalone or be mated with
any platform that complies with MECC specification.

.. image:: ../../../../../../../boards/microchip/mec1501modular_assy6885/doc/mec1501modular_assy6885.jpg
     :align: center
     :alt: MEC1501 Modular ASSY 6885

Hardware
********

- MEC1521HA0SZ ARM Cortex-M4 Processor
- 256 KB RAM and 64 KB boot ROM
- GPIO headers
- UART1 using microUSB
- PECI interface 3.0
- 10 SMBUS instances
- FAN, PMW and TACHO pins
- VCI interface
- Independent Hardware Driven PS/2 Ports

At difference from MEC15xx evaluation board, modular MEC1521 exposes the pins
in 2 different ways:

1) Standalone mode via headers

   - GPIOs
   - PWM5
   - JTAG/SWD, ETM and MCHP Trace ports
   - eSPI bus
   - SMB0

2) Mated mode with another platform that has a high density MECC connector.

   - FAN0, PWM0, SMB0, SMB1, SMB4 and SMB5
   - eSPI bus
   - Breathing/Blinking LEDs

The board is powered through the +5V USB Micro A connector or from the MECC connector.


For more information about the SOC please see the `MEC152x Reference Manual`_

Supported Features
==================

The mec1501modular_assy6885 board configuration supports the following hardware
features:

+-----------+------------+-------------------------------------+
| Interface | Controller | Driver/Component                    |
+===========+============+=====================================+
| NVIC      | on-chip    | nested vector interrupt controller  |
+-----------+------------+-------------------------------------+
| SYSTICK   | on-chip    | systick                             |
+-----------+------------+-------------------------------------+
| UART      | on-chip    | serial port                         |
+-----------+------------+-------------------------------------+
| GPIO      | on-chip    | gpio                                |
+-----------+------------+-------------------------------------+
| ESPI      | on-chip    | espi                                |
+-----------+------------+-------------------------------------+
| I2C       | on-chip    | i2c                                 |
+-----------+------------+-------------------------------------+
| PINMUX    | on-chip    | pinmux                              |
+-----------+------------+-------------------------------------+
| RTOS      | on-chip    | timer                               |
+-----------+------------+-------------------------------------+
| TIMER     | on-chip    | counter                             |
+-----------+------------+-------------------------------------+
| PWM       | on-chip    | pwm                                 |
+-----------+------------+-------------------------------------+
| ADC       | on-chip    | adc                                 |
+-----------+------------+-------------------------------------+
| WATCHDOG  | on-chip    | watchdog                            |
+-----------+------------+-------------------------------------+
| PS2       | on-chip    | ps2                                 |
+-----------+------------+-------------------------------------+

Other hardware features are not currently supported by Zephyr (at the moment)

The default configuration can be found in the
:zephyr_file:`boards/microchip/mec1501modular_assy6885/mec1501modular_assy6885_defconfig`
Kconfig file.

Connections and IOs
===================

This evaluation board kit is comprised of the following HW blocks:

- MEC1501 Modular Card ASSY 6885 Rev A0 `MEC1501 Modular EC Card - Assy_6885 Rev A0p1`_

System Clock
============

The MEC1501 MCU is configured to use the 48Mhz internal oscillator with the
on-chip PLL to generate a resulting EC clock rate of 12 MHz. See Processor clock
control register in chapter 4 "4.0 POWER, CLOCKS, and RESETS" of the data sheet in
the references at the end of this document.

Serial Port
===========
UART1 is configured for serial logs.

Jumper settings
***************

Please follow the jumper settings below to properly demo this
board. Advanced users may deviate from this recommendation.

Jumper setting for MEC1501 Modular Assy 6885 Rev A1p0
=====================================================

Power-related jumpers
---------------------

If you wish to power from type A/B connector ``P10`` set the jumper ``JP35 1-2``.

If you wish to power through MECC connector ``P1`` and mate to external platform,
set the jumper to ``JP35 3-4``.

.. note:: A single jumper is required in JP35.

+------+---------+---------+------+------+------+----------+
| JP30 | JP31    | JP32    | JP33 | JP34 | JP40 | JP21     |
| VTR3 | VTR_PLL | VTR_REG | VTR1 | VTR2 | 3.3V | VREF_ADC |
+======+=========+=========+======+======+======+==========+
| 1-2  |   1-2   |   1-2   | 1-2  |  1-2 | 1-2  |   1-2    |
+------+---------+---------+------+------+------+----------+


+------+------------+------+----------+
| JP6  | JP36       | JP27 | JP4      |
| VBAT | VTR_ANALOG | PECI | VREF_VTT |
+======+============+======+==========+
| 2-3  |    1-2     | 2-3  |   open   |
+------+------------+------+----------+

These jumpers configure nRESETI and JTAG_STRAP respectively.

+-----------+---------------+
| JP22      | JP29          |
| (nRESETI) | (JTAG_STRAP)  |
+===========+===============+
| 11-12     | 1-2           |
+-----------+---------------+

Boot-ROM Straps
---------------

These jumpers configure MEC1501 Boot-ROM straps.

+-------------+------------+--------------+-------------+
| JP37        | J6         | JP41         | JP23        |
| (CMP_STRAP) | (CR_STRAP) | (VTR2_STRAP) | (BSS_STRAP) |
+=============+============+==============+=============+
| 1-2         | 1-2        | 1-2          | 3-4         |
+-------------+------------+--------------+-------------+


``JP23 3-4`` pulls SHD SPI CS0# up to VTR2. MEC1501 Boot-ROM samples
SHD SPI CS0# and if high, it loads code from SHD SPI.
This is the recommended setup.

+-------------+------------+----------------------------+
|  CR_STRAP   | BSS_STRAP  |         SOURCE             |
+-------------+------------+----------------------------+
|      0      |     X      |   Use 3.3V Private SPI     |
+-------------+------------+----------------------------+
|      1      |     0      |  Use eSPI Flash channel    |
+-------------+------------+----------------------------+
|             |     1      |  Use 3.3V Shared channel(R)|
+-------------+------------+----------------------------+

Power management
----------------
``JP20 2-3`` is required so all GPIOs powered by VTR3 rail worked at 1.8V.

.. note:: External 1.8V needs to be connected to JP13.1

+-------------------+-----------------+
| JP20              | JP13            |
| (VTR3 selection)  | (1.8V source)   |
+===================+=================+
|   2-3             | 1.8V to pin 1   |
+-------------------+-----------------+


Jumper location map
-------------------

.. code-block:: none

   +--------------------------------------------------------------------------------------+
   |                  |------------|                     +----------+ J10              || |
   |  [BT1]       +   +------------+ J50                                      ++   ++  || |
   |              |                                           JP38 JP43       ++   ||  || |
   |              +         +      +       +-+ JP4              +    +       JP26  ||  || |
   |             JP6        +      +                  +      +  + +  + +           ||  || |
   |    JP31 ++            JP32   JP36     +-+ JP27   +      +    +    +           J6  || |
   |                                                 JP18  JP37 JP41 JP42              ++ |
   |         ++                  +   +    +--------+                                  J48 |
   |         ||  JP21            +   +    +--------+ JP22    +----------+                 |
   |      J2 ||   +            JP34 JP30                         J11              ++      |
   |         ++   +                                                  J44          ||      |
   |                            ++                         +----------------+     ||      |
   |       +---------------+    ||  +        JP24          |----------------|     ++      |
   |       |---------------|    ++  +    +----------+      +----------------+    J47      |
   | JP20  +---------------+  JP23  JP40 +----------+                                  ++ |
   |                                                     +           ++ JP29           || |
   |                             +  +    +----------+    +                             || |
   |    J52+---------------+     +  +    +----------+   J5   +-------------+           ++ |
   |    J45+---------------+  JP33 TP57      JP25            +-------------+ J4       J49 |
   |                                                                                      |
   | ++                                           TP4   +----------+   ++                 |
   | ++     +    +      +    +    +       +  TP61         +----------+   ++               |
   | JP28   +    +      +    +    +  TP65 +  TP60            J51        JP35              |
   |      TP58 JP16   JP11 JP13 JP15     JP10                                             |
   | TP5                                                                                  |
   | TP6                                        TP1                                       |
   +--------------------------------------------------------------------------------------+


Programming and Debugging
*************************

Setup
=====

#. Clone the `MEC152x SPI Image Gen`_ repository or download the files within
   that directory. For the pre-production MEC150x use the `MEC150x SPI Image Gen`_
   repository.

#. Make the image generation available for Zephyr, by making the tool
   searchable by path, or by setting an environment variable
   ``EVERGLADES_SPI_GEN``, for example:

   .. code-block:: console

      export EVERGLADES_SPI_GEN=<path to tool>/everglades_spi_gen_RomE

   Note that the tools for Linux and Windows have different file names.
   For the pre-production MEC1501 SOC use everglades_spi_gen_lin64.

#. If needed, a custom SPI image configuration file can be specified
   to override the default one.

   .. code-block:: console

      export EVERGLADES_SPI_CFG=custom_spi_cfg.txt


Building
==========
#. Build :ref:`hello_world` application as you would normally do.

#. Once you have ``zephyr.bin``, use the `MEC152x SPI Image Gen`_ microchip tool
   to create the final binary. You need the output from this tool to flash
   in the SHD SPI memory.

Flashing
========

#. Connect Dediprog into header ``J2``.

#. Flash the SPI NOR ``U3`` at offset 0x0 using Dediprog SF100
   or a similar tool for flashing SPI chips.

#. Run your favorite terminal program to listen for output. Under Linux the
   terminal should be :code:`/dev/ttyACM0`. For example:

   .. code-block:: console

      $ minicom -D /dev/ttyACM0 -o

   The -o option tells minicom not to send the modem initialization
   string. Connection should be configured as follows:

   - Speed: 115200
   - Data: 8 bits
   - Parity: None
   - Stop bits: 1

#. Connect the MEC1501MODULAR_ASSY6885 board to your host computer using the
   UART1 port and apply power.

   You should see ``"Hello World! mec1501modular_assy6885"`` in your terminal.

Debugging
=========
This board comes with a Cortex ETM port which facilitates tracing and debugging
using a single physical connection.  In addition, it comes with sockets for
JTAG only sessions.

HW Issues
=========
In case you don't see your application running, please make sure ``LED1`` is lit.
If is off, then check the power related jumpers again.

References
**********
.. target-notes::

.. _MEC152x Preliminary Data Sheet:
    https://github.com/MicrochipTech/CPGZephyrDocs/blob/master/MEC152x/MEC152x_Datasheet.pdf
.. _MEC152x Reference Manual:
    https://github.com/MicrochipTech/CPGZephyrDocs/blob/master/MEC152x/MEC152x_Datasheet.pdf
.. _MEC1501 Modular EC Card - Assy_6885 Rev A0p1:
    https://github.com/MicrochipTech/CPGZephyrDocs/blob/master/MEC1501/MEC1501%20Modular%20EC%20Card%20-%20Assy_6885%20Rev%20A0p1%20-%20SCH.pdf
.. _MEC152x SPI Image Gen:
    https://github.com/MicrochipTech/CPGZephyrDocs/tree/master/MEC152x/SPI_image_gen
.. _MEC150x SPI Image Gen:
    https://github.com/MicrochipTech/CPGZephyrDocs/tree/master/MEC1501/SPI_image_gen
Part 3
한국어 전문 번역
개요
MEC1501 Modular Card ASSY6885는 Microchip MEC152X series microcontroller 평가용 development board입니다. Standalone으로 동작하거나 MECC specification을 준수하는 platform에 결합할 수 있습니다.
Hardware
- MEC1521HA0SZ Arm Cortex-M4 processor
- 256KB RAM, 64KB boot ROM
- GPIO header와 microUSB UART1
- PECI 3.0, SMBUS 10개
- FAN, PWM, TACHO pin과 VCI
- Independent hardware-driven PS/2 port
MEC15xx evaluation board와 달리 MEC1521 modular card는 두 방식으로 pin을 노출합니다.
- Standalone header: GPIO, PWM5, JTAG/SWD·ETM·MCHP Trace, eSPI, SMB0
- MECC mated mode: FAN0, PWM0, SMB0·1·4·5, eSPI, breathing/blinking LED
전원은 +5V USB Micro-A connector 또는 MECC connector에서 공급합니다.
지원 기능
| Interface | Controller | Driver/Component |
|---|---|---|
| NVIC | on-chip | nested vector interrupt controller |
| SYSTICK | on-chip | systick |
| UART | on-chip | serial port |
| GPIO | on-chip | gpio |
| ESPI | on-chip | espi |
| I2C | on-chip | i2c |
| PINMUX | on-chip | pinmux |
| RTOS | on-chip | timer |
| TIMER | on-chip | counter |
| PWM | on-chip | pwm |
| ADC | on-chip | adc |
| WATCHDOG | on-chip | watchdog |
| PS2 | on-chip | ps2 |
나머지 hardware 기능은 현재 Zephyr에서 지원하지 않습니다. Default configuration은 boards/microchip/mec1501modular_assy6885/mec1501modular_assy6885_defconfig입니다.
연결과 I/O
Kit의 hardware block은 MEC1501 Modular Card ASSY6885 Rev A0입니다. MEC1501 MCU는 48MHz internal oscillator와 on-chip PLL을 사용해 EC clock 12MHz를 생성합니다. UART1은 serial log용입니다.
Jumper 설정
권장 설정은 MEC1501 Modular Assy 6885 Rev A1p0 기준이며 고급 사용자는 목적에 따라 변경할 수 있습니다.
Power-related jumpers
Type A/B connector P10에서 전원을 공급하려면 JP35 1-2, MECC P1에서 공급하려면 JP35 3-4로 둡니다. JP35에는 jumper 하나만 필요합니다.
| JP30 VTR3 | JP31 VTR_PLL | JP32 VTR_REG | JP33 VTR1 | JP34 VTR2 | JP40 3.3V | JP21 VREF_ADC |
|---|---|---|---|---|---|---|
| 1-2 | 1-2 | 1-2 | 1-2 | 1-2 | 1-2 | 1-2 |
| JP6 VBAT | JP36 VTR_ANALOG | JP27 PECI | JP4 VREF_VTT |
|---|---|---|---|
| 2-3 | 1-2 | 2-3 | open |
JP22와 JP29는 각각 nRESETI와 JTAG_STRAP을 설정합니다.
| JP22 (nRESETI) | JP29 (JTAG_STRAP) |
|---|---|
| 11-12 | 1-2 |
Boot-ROM straps
| JP37 CMP_STRAP | J6 CR_STRAP | JP41 VTR2_STRAP | JP23 BSS_STRAP |
|---|---|---|---|
| 1-2 | 1-2 | 1-2 | 3-4 |
JP23 3-4는 SHD SPI CS0#을 VTR2로 pull-up합니다. Boot-ROM은 이 신호가 high이면 SHD SPI에서 code를 load합니다. 이것이 권장 설정입니다.
| CR_STRAP | BSS_STRAP | SOURCE |
|---|---|---|
| 0 | X | Use 3.3V Private SPI |
| 1 | 0 | Use eSPI Flash channel |
| 1 | 1 | Use 3.3V Shared channel(R) |
Power management
VTR3 rail의 모든 GPIO를 1.8V에서 동작시키려면 JP20 2-3과 외부 1.8V를 JP13.1에 연결해야 합니다.
| JP20 VTR3 selection | JP13 1.8V source |
|---|---|
| 2-3 | 1.8V to pin 1 |
Jumper location map
+--------------------------------------------------------------------------------------+
|                  |------------|                     +----------+ J10              || |
|  [BT1]       +   +------------+ J50                                      ++   ++  || |
|              |                                           JP38 JP43       ++   ||  || |
|              +         +      +       +-+ JP4              +    +       JP26  ||  || |
|             JP6        +      +                  +      +  + +  + +           ||  || |
|    JP31 ++            JP32   JP36     +-+ JP27   +      +    +    +           J6  || |
|                                                 JP18  JP37 JP41 JP42              ++ |
|         ++                  +   +    +--------+                                  J48 |
|         ||  JP21            +   +    +--------+ JP22    +----------+                 |
|      J2 ||   +            JP34 JP30                         J11              ++      |
|         ++   +                                                  J44          ||      |
|                            ++                         +----------------+     ||      |
|       +---------------+    ||  +        JP24          |----------------|     ++      |
|       |---------------|    ++  +    +----------+      +----------------+    J47      |
| JP20  +---------------+  JP23  JP40 +----------+                                  ++ |
|                                                     +           ++ JP29           || |
|                             +  +    +----------+    +                             || |
|    J52+---------------+     +  +    +----------+   J5   +-------------+           ++ |
|    J45+---------------+  JP33 TP57      JP25            +-------------+ J4       J49 |
|                                                                                      |
| ++                                           TP4   +----------+   ++                 |
| ++     +    +      +    +    +       +  TP61         +----------+   ++               |
| JP28   +    +      +    +    +  TP65 +  TP60            J51        JP35              |
|      TP58 JP16   JP11 JP13 JP15     JP10                                             |
| TP5                                                                                  |
| TP6                                        TP1                                       |
+--------------------------------------------------------------------------------------+
Programming과 Debugging
Setup
- MEC152x SPI Image Gen repository를 clone하거나 파일을 내려받습니다. Pre-production MEC150x는 MEC150x SPI Image Gen을 사용합니다.
- Tool을 PATH에서 찾을 수 있게 하거나 다음 환경 변수를 설정합니다.
export EVERGLADES_SPI_GEN=<path to tool>/everglades_spi_gen_RomELinux와 Windows tool filename은 다릅니다. Pre-production MEC1501 SoC에는 everglades_spi_gen_lin64를 사용합니다.
필요하면 custom SPI image configuration으로 default를 override합니다.
export EVERGLADES_SPI_CFG=custom_spi_cfg.txtBuilding
hello_world를 평소처럼 build한 뒤 zephyr.bin을 MEC152x SPI Image Gen에 넣어 SHD SPI memory에 flash할 최종 binary를 만듭니다.
Flashing
- Dediprog를 header
J2에 연결합니다. - Dediprog SF100 또는 유사 tool로 SPI NOR
U3offset0x0에 flash합니다. - Linux에서는 다음처럼 terminal을 엽니다.
$ minicom -D /dev/ttyACM0 -o-o는 modem initialization string 전송을 막습니다.
- Speed: 115200
- Data: 8 bits
- Parity: None
- Stop bits: 1
UART1 port로 host에 연결하고 전원을 인가하면 Hello World! mec1501modular_assy6885가 표시되어야 합니다.
Debugging
Cortex ETM port는 단일 physical connection으로 tracing과 debugging을 지원하며 JTAG-only session용 socket도 있습니다.
HW Issues
Application이 보이지 않으면 LED1이 켜졌는지 확인하고 꺼져 있으면 power jumper를 다시 점검합니다.
참고 자료
Source
출처
영어 원문에는 문단, 문서 지시문, 표, 코드, 코드 심벌, 경로를 그대로 보존했습니다.