Part 1
요약·해설
i.MX RT1052, Swift/Zephyr pin ID, OpenSDA console과 USB disk copy flashing을 다룹니다.
i.MX RT1052 · Cortex-M7 · 600MHz
8MB QSPI · 32MB SDRAM
DAPLink disk · SWIFTIODBGR
Part 2
접을 수 있는 영어 원문 전체
영어 원문 전체 펼치기
FBC52FF57A57C3212EE2BD7B20B0D746BCC30C17BE8437DAAC9904CAEE4DA821
.. _mm_swiftio:

MadMachine SwiftIO
##################

Overview
********

The SwiftIO board, designed by MadMachine is the world's first board
designed with support for the modern `Swift language
<https://docs.swift.org/swift-book/>`_.  Zephyr provides basic
low-level capabilities for the SwiftIO board. Swift application would
run on top of Zephyr. More information about the board can be found
at:

- `MadMachine Homepage`_
- `SwiftIO API Reference`_


.. image:: ../../../../../../../boards/madmachine/mm_swiftio/doc/mm_swiftio.jpg
   :align: center
   :alt: SwiftIO Board

Hardware
********

- i.MX RT1052 Cortex-M7 processor at 600MHz
- 8MB QSPI Flash, 32MB SDRAM
- On-board DAPLink debugger with serial port
- User RGB LED, USB 2.0 Connector, microSD slot


Supported Features
==================

The mm_swiftio board configuration supports the following hardware
features:

+-----------+------------+-------------------------------------+
| Interface | Controller | Driver/Component                    |
+===========+============+=====================================+
| NVIC      | on-chip    | nested vector interrupt controller  |
+-----------+------------+-------------------------------------+
| SYSTICK   | on-chip    | systick                             |
+-----------+------------+-------------------------------------+
| DISPLAY   | on-chip    | display                             |
+-----------+------------+-------------------------------------+
| GPIO      | on-chip    | gpio                                |
+-----------+------------+-------------------------------------+
| I2C       | on-chip    | i2c                                 |
+-----------+------------+-------------------------------------+
| SPI       | on-chip    | spi                                 |
+-----------+------------+-------------------------------------+
| UART      | on-chip    | serial port-polling;                |
|           |            | serial port-interrupt               |
+-----------+------------+-------------------------------------+
| USB       | on-chip    | USB device                          |
+-----------+------------+-------------------------------------+


Connections and IOs
===================

Note:
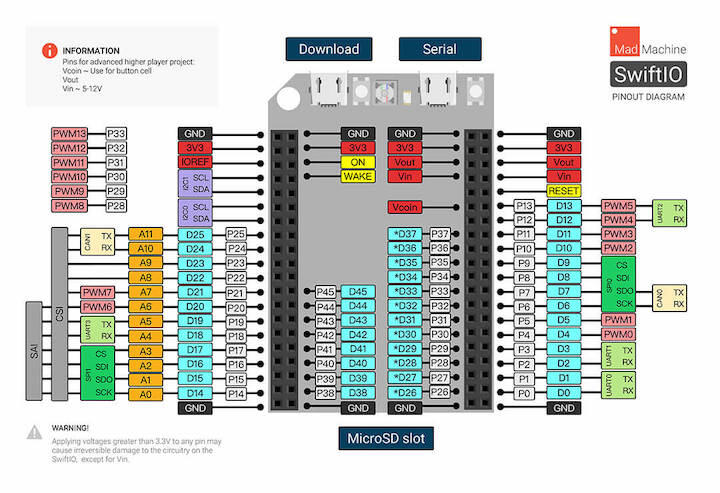
The following SwiftIO pinout diagram is used for Swift programming.
The Swift ID is not the same as the Zephyr driver ID.

+-----------+---------------+----------+---------------+--------------------------+
| Name                      | GPIO                     | Other peripherals        |
+===========+===============+==========+===============+==========+===============+
| Swift ID  | Pin name      | Swift ID | Zephyr driver | Swift ID | Zephyr driver |
+-----------+---------------+----------+---------------+----------+---------------+
| P0        | GPIO_AD_B1_03 | D0       | GPIO1_IO19    |          |               |
+-----------+---------------+----------+---------------+ UART0    | UART_2        |
| P1        | GPIO_AD_B1_02 | D1       | GPIO1_IO18    |          |               |
+-----------+---------------+----------+---------------+----------+---------------+
| P2        | GPIO_AD_B0_03 | D2       | GPIO1_IO03    |          |               |
+-----------+---------------+----------+---------------+ UART1    | UART_6        |
| P3        | GPIO_AD_B0_02 | D3       | GPIO1_IO02    |          |               |
+-----------+---------------+----------+---------------+----------+---------------+
| P4        | GPIO_B1_14    | D4       | GPIO2_IO30    |          |               |
+-----------+---------------+----------+---------------+----------+---------------+
| P5        | GPIO_B1_15    | D5       | GPIO2_IO31    |          |               |
+-----------+---------------+----------+---------------+----------+---------------+
| P6        | GPIO_B0_03    | D6       | GPIO2_IO03    |          |               |
+-----------+---------------+----------+---------------+          |               |
| P7        | GPIO_B0_02    | D7       | GPIO2_IO02    |          |               |
+-----------+---------------+----------+---------------+ SPI0     | SPI_4         |
| P8        | GPIO_B0_01    | D8       | GPIO2_IO01    |          |               |
+-----------+---------------+----------+---------------+          |               |
| P9        | GPIO_B0_00    | D9       | GPIO2_IO00    |          |               |
+-----------+---------------+----------+---------------+----------+---------------+
| P10       | GPIO_B1_03    | D10      | GPIO2_IO19    |          |               |
+-----------+---------------+----------+---------------+----------+---------------+
| P11       | GPIO_B1_02    | D11      | GPIO2_IO18    |          |               |
+-----------+---------------+----------+---------------+----------+---------------+
| P12       | GPIO_B1_01    | D12      | GPIO2_IO17    |          |               |
+-----------+---------------+----------+---------------+ UART2    | UART_4        |
| P13       | GPIO_B1_00    | D13      | GPIO2_IO16    |          |               |
+-----------+---------------+----------+---------------+----------+---------------+
| P14       | GPIO_AD_B1_15 | D14      | GPIO1_IO31    |          |               |
+-----------+---------------+----------+---------------+          |               |
| P15       | GPIO_AD_B1_14 | D15      | GPIO1_IO30    |          |               |
+-----------+---------------+----------+---------------+ SPI1     | SPI_3         |
| P16       | GPIO_AD_B1_13 | D16      | GPIO1_IO29    |          |               |
+-----------+---------------+----------+---------------+          |               |
| P17       | GPIO_AD_B1_12 | D17      | GPIO1_IO28    |          |               |
+-----------+---------------+----------+---------------+----------+---------------+
| P18       | GPIO_AD_B1_11 | D18      | GPIO1_IO27    |          |               |
+-----------+---------------+----------+---------------+ UART3    | UART_8        |
| P19       | GPIO_AD_B1_10 | D19      | GPIO1_IO26    |          |               |
+-----------+---------------+----------+---------------+----------+---------------+
| P20       | GPIO_AD_B1_09 | D20      | GPIO1_IO25    |          |               |
+-----------+---------------+----------+---------------+----------+---------------+
| P21       | GPIO_AD_B1_08 | D21      | GPIO1_IO24    |          |               |
+-----------+---------------+----------+---------------+----------+---------------+
| P22       | GPIO_AD_B1_05 | D22      | GPIO1_IO21    |          |               |
+-----------+---------------+----------+---------------+----------+---------------+
| P23       | GPIO_AD_B1_04 | D23      | GPIO1_IO20    |          |               |
+-----------+---------------+----------+---------------+----------+---------------+
| P24       | GPIO_AD_B0_15 | D24      | GPIO1_IO15    |          |               |
+-----------+---------------+----------+---------------+----------+---------------+
| P25       | GPIO_AD_B0_14 | D25      | GPIO1_IO14    |          |               |
+-----------+---------------+----------+---------------+----------+---------------+
| P26       | GPIO_B0_04    | D26      | GPIO2_IO04    |          |               |
+-----------+---------------+----------+---------------+----------+---------------+
| P27       | GPIO_B0_05    | D27      | GPIO2_IO05    |          |               |
+-----------+---------------+----------+---------------+----------+---------------+
| P28       | GPIO_B0_06    | D28      | GPIO2_IO06    |          |               |
+-----------+---------------+----------+---------------+----------+---------------+
| P29       | GPIO_B0_07    | D29      | GPIO2_IO07    |          |               |
+-----------+---------------+----------+---------------+----------+---------------+
| P30       | GPIO_B0_08    | D30      | GPIO2_IO08    |          |               |
+-----------+---------------+----------+---------------+----------+---------------+
| P31       | GPIO_B0_09    | D31      | GPIO2_IO09    |          |               |
+-----------+---------------+----------+---------------+----------+---------------+
| P32       | GPIO_B0_10    | D32      | GPIO2_IO10    |          |               |
+-----------+---------------+----------+---------------+----------+---------------+
| P33       | GPIO_B0_11    | D33      | GPIO2_IO11    |          |               |
+-----------+---------------+----------+---------------+----------+---------------+
| P34       | GPIO_B0_12    | D34      | GPIO2_IO12    |          |               |
+-----------+---------------+----------+---------------+----------+---------------+
| P35       | GPIO_B0_13    | D35      | GPIO2_IO13    |          |               |
+-----------+---------------+----------+---------------+----------+---------------+
| P36       | GPIO_B0_14    | D36      | GPIO2_IO14    |          |               |
+-----------+---------------+----------+---------------+----------+---------------+
| P37       | GPIO_B0_15    | D37      | GPIO2_IO15    |          |               |
+-----------+---------------+----------+---------------+----------+---------------+
| P38       | GPIO_B1_11    | D38      | GPIO2_IO27    |          |               |
+-----------+---------------+----------+---------------+----------+---------------+
| P39       | GPIO_B1_10    | D39      | GPIO2_IO26    |          |               |
+-----------+---------------+----------+---------------+----------+---------------+
| P40       | GPIO_B1_9     | D40      | GPIO2_IO25    |          |               |
+-----------+---------------+----------+---------------+----------+---------------+
| P41       | GPIO_B1_8     | D41      | GPIO2_IO24    |          |               |
+-----------+---------------+----------+---------------+----------+---------------+
| P42       | GPIO_B1_7     | D42      | GPIO2_IO23    |          |               |
+-----------+---------------+----------+---------------+----------+---------------+
| P43       | GPIO_B1_6     | D43      | GPIO2_IO22    |          |               |
+-----------+---------------+----------+---------------+----------+---------------+
| P44       | GPIO_B1_5     | D44      | GPIO2_IO21    |          |               |
+-----------+---------------+----------+---------------+----------+---------------+
| P45       | GPIO_B1_4     | D45      | GPIO2_IO20    |          |               |
+-----------+---------------+----------+---------------+----------+---------------+
|           | GPIO_AD_B1_07 |          |               |          |               |
+-----------+---------------+----------+---------------+ I2C0     | I2C_3         |
|           | GPIO_AD_B1_06 |          |               |          |               |
+-----------+---------------+----------+---------------+----------+---------------+
|           | GPIO_AD_B1_00 |          |               |          |               |
+-----------+---------------+----------+---------------+ I2C1     | I2C_1         |
|           | GPIO_AD_B1_01 |          |               |          |               |
+-----------+---------------+----------+---------------+----------+---------------+


Programming and Flash
*************************

Build  applications as usual (see :ref:`build_an_application` for more details).

Configuring a Debug Probe
=========================

This board is configured by default to use the :ref:`opensda-daplink-onboard-debug-probe`,
however the :ref:`pyocd-debug-host-tools` do not yet support programming the
external flashes on this board so you must flash the device by copying files

Configuring a Console
=====================

Regardless of your choice in debug probe, we will use the OpenSDA
microcontroller as a USB-to-serial adapter for the serial console.

Connect a USB cable from your PC to Serial of SwiftIO.

Use the following settings with your serial terminal of choice (minicom, putty,
etc.):

- Speed: 115200
- Data: 8 bits
- Parity: None
- Stop bits: 1

Flashing
========

Here is an example for the :ref:`hello_world` application.

Connect a USB cable from your PC to "Serial" port of SwiftIO.
On Ubuntu, DAPLink debug probes appear on the host
computer as a USB disk mounted to ``/media/<user>/SWIFTIODBGR/``,
where ``<user>`` is your login name.

.. code-block:: console

    west build -b mm_swiftio samples/hello_world
    cp build/zephyr/zephyr.bin /media/<user>/SWIFTIODBGR/


Open a serial terminal, reset the board (press the "reset" button), and you should
see the following message in the terminal:

.. code-block:: console

   ***** Booting Zephyr OS v2.1.0-rc1 *****
   Hello World! mm_swiftio


.. _MadMachine Homepage:
   https://madmachine.io

.. _SwiftIO API Reference:
   https://madmachineio.github.io/SwiftIO/documentation/swiftio/
Part 3
한국어 전문 번역
개요
MadMachine이 설계한 SwiftIO board는 현대적인 Swift language 지원을 목적으로 설계된 세계 최초의 board라고 원문은 설명합니다. Zephyr는 SwiftIO board용 기본 low-level capability를 제공하며 Swift application은 Zephyr 위에서 실행됩니다. 자세한 내용은 MadMachine Homepage와 SwiftIO API Reference에서 확인할 수 있습니다.
Hardware
- 600MHz i.MX RT1052 Cortex-M7 processor
- 8MB QSPI Flash와 32MB SDRAM
- Serial port를 갖춘 on-board DAPLink debugger
- User RGB LED, USB 2.0 Connector, microSD slot
지원 기능
mm_swiftio board configuration은 다음 hardware 기능을 지원합니다.
| Interface | Controller | Driver/Component |
|---|---|---|
| NVIC | on-chip | nested vector interrupt controller |
| SYSTICK | on-chip | systick |
| DISPLAY | on-chip | display |
| GPIO | on-chip | gpio |
| I2C | on-chip | i2c |
| SPI | on-chip | spi |
| UART | on-chip | serial port-polling; serial port-interrupt |
| USB | on-chip | USB device |
연결과 I/O
| Swift ID | Pin name | GPIO Swift ID | Zephyr driver | Peripheral Swift ID | Zephyr driver |
|---|---|---|---|---|---|
| P0 | GPIO_AD_B1_03 | D0 | GPIO1_IO19 | UART0 (P0-P1) | UART_2 |
| P1 | GPIO_AD_B1_02 | D1 | GPIO1_IO18 | ||
| P2 | GPIO_AD_B0_03 | D2 | GPIO1_IO03 | UART1 (P2-P3) | UART_6 |
| P3 | GPIO_AD_B0_02 | D3 | GPIO1_IO02 | ||
| P4 | GPIO_B1_14 | D4 | GPIO2_IO30 | ||
| P5 | GPIO_B1_15 | D5 | GPIO2_IO31 | ||
| P6 | GPIO_B0_03 | D6 | GPIO2_IO03 | SPI0 (P6-P9) | SPI_4 |
| P7 | GPIO_B0_02 | D7 | GPIO2_IO02 | ||
| P8 | GPIO_B0_01 | D8 | GPIO2_IO01 | ||
| P9 | GPIO_B0_00 | D9 | GPIO2_IO00 | ||
| P10 | GPIO_B1_03 | D10 | GPIO2_IO19 | ||
| P11 | GPIO_B1_02 | D11 | GPIO2_IO18 | ||
| P12 | GPIO_B1_01 | D12 | GPIO2_IO17 | UART2 (P12-P13) | UART_4 |
| P13 | GPIO_B1_00 | D13 | GPIO2_IO16 | ||
| P14 | GPIO_AD_B1_15 | D14 | GPIO1_IO31 | SPI1 (P14-P17) | SPI_3 |
| P15 | GPIO_AD_B1_14 | D15 | GPIO1_IO30 | ||
| P16 | GPIO_AD_B1_13 | D16 | GPIO1_IO29 | ||
| P17 | GPIO_AD_B1_12 | D17 | GPIO1_IO28 | ||
| P18 | GPIO_AD_B1_11 | D18 | GPIO1_IO27 | UART3 (P18-P19) | UART_8 |
| P19 | GPIO_AD_B1_10 | D19 | GPIO1_IO26 | ||
| P20 | GPIO_AD_B1_09 | D20 | GPIO1_IO25 | ||
| P21 | GPIO_AD_B1_08 | D21 | GPIO1_IO24 | ||
| P22 | GPIO_AD_B1_05 | D22 | GPIO1_IO21 | ||
| P23 | GPIO_AD_B1_04 | D23 | GPIO1_IO20 | ||
| P24 | GPIO_AD_B0_15 | D24 | GPIO1_IO15 | ||
| P25 | GPIO_AD_B0_14 | D25 | GPIO1_IO14 | ||
| P26 | GPIO_B0_04 | D26 | GPIO2_IO04 | ||
| P27 | GPIO_B0_05 | D27 | GPIO2_IO05 | ||
| P28 | GPIO_B0_06 | D28 | GPIO2_IO06 | ||
| P29 | GPIO_B0_07 | D29 | GPIO2_IO07 | ||
| P30 | GPIO_B0_08 | D30 | GPIO2_IO08 | ||
| P31 | GPIO_B0_09 | D31 | GPIO2_IO09 | ||
| P32 | GPIO_B0_10 | D32 | GPIO2_IO10 | ||
| P33 | GPIO_B0_11 | D33 | GPIO2_IO11 | ||
| P34 | GPIO_B0_12 | D34 | GPIO2_IO12 | ||
| P35 | GPIO_B0_13 | D35 | GPIO2_IO13 | ||
| P36 | GPIO_B0_14 | D36 | GPIO2_IO14 | ||
| P37 | GPIO_B0_15 | D37 | GPIO2_IO15 | ||
| P38 | GPIO_B1_11 | D38 | GPIO2_IO27 | ||
| P39 | GPIO_B1_10 | D39 | GPIO2_IO26 | ||
| P40 | GPIO_B1_9 | D40 | GPIO2_IO25 | ||
| P41 | GPIO_B1_8 | D41 | GPIO2_IO24 | ||
| P42 | GPIO_B1_7 | D42 | GPIO2_IO23 | ||
| P43 | GPIO_B1_6 | D43 | GPIO2_IO22 | ||
| P44 | GPIO_B1_5 | D44 | GPIO2_IO21 | ||
| P45 | GPIO_B1_4 | D45 | GPIO2_IO20 | ||
| GPIO_AD_B1_07 | I2C0 (2-pin pair) | I2C_3 | |||
| GPIO_AD_B1_06 | |||||
| GPIO_AD_B1_00 | I2C1 (2-pin pair) | I2C_1 | |||
| GPIO_AD_B1_01 |
Programming과 Flash
일반적인 Zephyr application처럼 application을 build합니다.
Debug probe 설정
이 board는 기본적으로 on-board OpenSDA DAPLink debug probe를 사용합니다. 그러나 pyOCD host tool은 아직 이 board의 external flash programming을 지원하지 않으므로 파일을 복사해 device를 flash해야 합니다.
Console 설정
선택한 debug probe와 관계없이 OpenSDA microcontroller를 serial console용 USB-to-serial adapter로 사용합니다. PC에서 SwiftIO의 Serial
port로 USB cable을 연결하고 Minicom, PuTTY 등에서 다음 값을 사용합니다.
- Speed: 115200
- Data: 8 bits
- Parity: None
- Stop bits: 1
Flashing
hello_world application 예입니다. PC에서 SwiftIO의 Serial
port로 USB cable을 연결합니다. Ubuntu에서는 DAPLink debug probe가 host computer의 /media/<user>/SWIFTIODBGR/에 mount된 USB disk로 나타나며 <user>는 login name입니다.
west build -b mm_swiftio samples/hello_world
cp build/zephyr/zephyr.bin /media/<user>/SWIFTIODBGR/
Serial terminal을 열고 board의 reset button을 누르면 다음 message가 표시되어야 합니다.
***** Booting Zephyr OS v2.1.0-rc1 *****
Hello World! mm_swiftio
관련 자료
Source
출처
영어 원문에는 문단, 문서 지시문, 표, 코드, 코드 심벌, 경로를 그대로 보존했습니다.