Part 1
요약·해설
BL654 Sensor Board는 BME280 환경 sensor와 coin-cell 전원을 사용하며 external UART와 SWD programmer가 필요합니다.
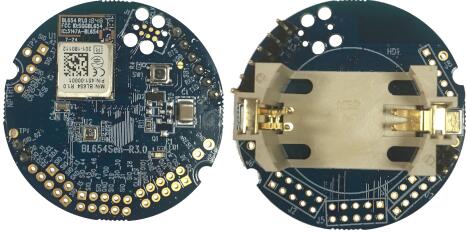
nRF52840 Cortex-M4F
BME280 · I2C
Tag-Connect · JLink · pyOCD
Part 2
접을 수 있는 영어 원문 전체
영어 원문 전체 펼치기
6DED982516BACBB6D4E6B39879FF0C4227C65D6E3FAD8C7CF87C642610A7222F
.. _bl654_sensor_board:

Ezurio BL654 Sensor Board
#########################

Overview
********

The BL654 Sensor Board hardware provides support for the Ezurio
BL654 module which is powered by a Nordic Semiconductor nRF52840 ARM
Cortex-M4F CPU.

This sensor board has the following features:

* :abbr:`ADC (Analog to Digital Converter)`
* CLOCK
* FLASH
* :abbr:`GPIO (General Purpose Input Output)`
* :abbr:`I2C (Inter-Integrated Circuit)`
* :abbr:`MPU (Memory Protection Unit)`
* :abbr:`NVIC (Nested Vectored Interrupt Controller)`
* :abbr:`PWM (Pulse Width Modulation)`
* RADIO (Bluetooth Low Energy and 802.15.4)
* :abbr:`RTC (nRF RTC System Clock)`
* Segger RTT (RTT Console)
* :abbr:`SPI (Serial Peripheral Interface)`
* :abbr:`UART (Universal asynchronous receiver-transmitter)`
* :abbr:`WDT (Watchdog Timer)`

.. figure:: ../../../../../../../boards/ezurio/bl654_sensor_board/doc/img/bl654_sensor_board.jpg
     :align: center
     :alt: BL654 Sensor Board front and back

     BL654 Sensor Board front and back

.. figure:: ../../../../../../../boards/ezurio/bl654_sensor_board/doc/img/bl654_sensor_board_usb_swd_programmer.jpg
     :align: center
     :alt: BL654 Sensor Board connected to USB-SWD Programmer (UART and SWD access)

     BL654 Sensor Board connected to USB-SWD Programmer (UART and SWD access)

More information about the BL654 module can be found on the `BL654 website`_,
more information about the USB-SWD Programmer can be found on the
`USB-SWD Programmer website`_.

Hardware
********

Supported Features
==================

The BL654 Sensor Board configuration supports the following hardware features:

+-----------+------------+----------------------+
| Interface | Controller | Driver/Component     |
+===========+============+======================+
| ADC       | on-chip    | adc                  |
+-----------+------------+----------------------+
| CLOCK     | on-chip    | clock_control        |
+-----------+------------+----------------------+
| FLASH     | on-chip    | flash                |
+-----------+------------+----------------------+
| GPIO      | on-chip    | gpio                 |
+-----------+------------+----------------------+
| I2C(M)    | on-chip    | i2c                  |
+-----------+------------+----------------------+
| MPU       | on-chip    | arch/arm             |
+-----------+------------+----------------------+
| NVIC      | on-chip    | arch/arm             |
+-----------+------------+----------------------+
| PWM       | on-chip    | pwm                  |
+-----------+------------+----------------------+
| RADIO     | on-chip    | Bluetooth,           |
|           |            | ieee802154           |
+-----------+------------+----------------------+
| RTC       | on-chip    | system clock         |
+-----------+------------+----------------------+
| RTT       | Segger     | console              |
+-----------+------------+----------------------+
| SPI(M/S)  | on-chip    | spi                  |
+-----------+------------+----------------------+
| UART      | on-chip    | serial               |
+-----------+------------+----------------------+
| WDT       | on-chip    | watchdog             |
+-----------+------------+----------------------+

Other hardware features have not been enabled yet for this board.
See the `BL654 website`_ for a complete list of BL654 module hardware features.

Connections and IOs
===================

LED
---

* LED1 (blue) = P0.16 (active low)

Push button
-----------

* BUTTON1 (SW1) = P1.03 (active high)

Sensor
------

The BL654 Sensor Board has an on-board Bosch BME280
temperature/humidity/pressure sensor which is connected to the BL654 via I2C.

* SCL = P0.27
* SDA = P0.26

More information about the Bosch BME280 sensor can be found on the
`Bosch BME280 sensor website`_.

Powering the sensor
*******************

The sensor can be powered directly from a coin cell or from a voltage supplied
on the UART pins, the board accepts voltage from 1.8v-3.3v. Note that if using a
battery with a UART/debugger connected, the voltage of the UART/debugger (if it
does not automatically sense/adjust) must be within 0.3v of the voltage of the
coin cell to prevent suppression diodes in the nRF52840 silicon being activated
or possible back-powering of the battery.

To power the board from an external source via UART, the solder bridge SB1 must
be blobbed.

Programming and Debugging
*************************

Applications for the ``bl654_sensor_board`` board configuration can be built,
flashed, and debugged in the usual way. See :ref:`build_an_application` and
:ref:`application_run` for more details on building and running. An external
debugger/programmer is required which can be connected to using a Tag-Connect
TC2030-CTX cable, a Ezurio USB-SWD Programmer board or Segger JLink
programmer can be used to program and debug the BL654 sensor board.

Flashing
========

If using an external JLink, follow the instructions in the :ref:`nordic_segger`
page to install and configure all the necessary software. Further information
can be found in :ref:`nordic_segger_flashing`. Then build and flash applications
as usual (see :ref:`build_an_application` and :ref:`application_run` for more
details). If using a Ezurio USB-SWD Programmer Board, see the
`pyOCD website`_ to find details about the software and how to install it.

Here is an example for the :ref:`hello_world` application.

First, run your favorite terminal program to listen for output - note that an
external UART is required to be connected to the BL654 sensor board's UART, if
using the Ezurio USB-SWD Programmer Board, the BL654 sensor board
can be plugged in to the UART header. An FTDI cable can also be used - the
voltage of the I/O lines and power line must be between 1.8v and 3.3v, do not
connect an FTDI cable with a 5v power line to the BL654 sensor board.

J3 UART connector pinout (all pins referenced to operating voltage Vdd):

+---------+------+---------------------------------------------+-----------+
| Pin No. | Name | Description                                 | Direction |
+=========+======+=============================================+===========+
| 1       | GND  | GND                                         | (N/A)     |
+---------+------+---------------------------------------------+-----------+
| 2       | RTS  | UART Ready-to-send pin                      | OUT       |
+---------+------+---------------------------------------------+-----------+
| 3       | VDD  | Supply voltage (requires SB1 to be blobbed) | (N/A)     |
+---------+------+---------------------------------------------+-----------+
| 4       | RXD  | UART Receive pin                            | IN        |
+---------+------+---------------------------------------------+-----------+
| 5       | TXD  | UART Transmit pin                           | (N/A)     |
+---------+------+---------------------------------------------+-----------+
| 6       | CTS  | UART Clear-to-send pin                      | IN        |
+---------+------+---------------------------------------------+-----------+

.. code-block:: console

   $ minicom -D <tty_device> -b 115200

Replace :code:`<tty_device>` with the port where the BL654 sensor board
can be found. For example, under Linux, :code:`/dev/ttyACM0`.

The BL654 sensor board needs an external programmer to program it, any SWD
programmer which has a 9-pin ARM debug port can be used with a Tag-Connect
TC2030-CTX cable. If using the Ezurio USB-SWD Programmer Board,
connect the cable to P1 and ensure the board is set to supply power to the
target at 3.3v.

J1 Tag-Connect SWD Pinout:

+---------+--------+-----------------------------------+-----------+
| Pin No. | Name   | Description                       | Direction |
+=========+========+===================================+===========+
| 1       | VDD    | Operating voltage                 | (N/A)     |
+---------+--------+-----------------------------------+-----------+
| 2       | SWDIO  | Serial wire data input/output pin | IN/OUT    |
+---------+--------+-----------------------------------+-----------+
| 3       | nRESET | Module reset pin                  | IN        |
+---------+--------+-----------------------------------+-----------+
| 4       | SWCLK  | Serial wire clock input pin       | IN        |
+---------+--------+-----------------------------------+-----------+
| 5       | GND    | GND                               | (N/A)     |
+---------+--------+-----------------------------------+-----------+
| 6       | SWO    | Serial wire output pin            | OUT       |
+---------+--------+-----------------------------------+-----------+

Then build and flash the application in the usual way.

.. zephyr-app-commands::
   :zephyr-app: samples/hello_world
   :board: bl654_sensor_board
   :goals: build flash

Debugging
=========

Refer to the :ref:`nordic_segger` page to learn about debugging Nordic based
boards if using an external JLink debugger. If using a Ezurio
USB-SWD Programmer Board, pyOCD can be used for debugging.

Testing Bluetooth on the BL654 Sensor Board
*******************************************
Many of the Bluetooth examples will work on the BL654 Sensor Board.
Try them out:

* :ref:`ble_peripheral`
* :ref:`bluetooth-eddystone-sample`
* :ref:`bluetooth-ibeacon-sample`


Testing the LED and button on the BL654 Sensor Board
****************************************************

There are 2 samples that allow you to test that the button (switch) and LED on
the board are working properly with Zephyr:

* :zephyr:code-sample:`blinky`
* :zephyr:code-sample:`button`

You can build and flash the examples to make sure Zephyr is running correctly on
your board. The button and LED definitions can be found in
:zephyr_file:`boards/ezurio/bl654_sensor_board/bl654_sensor_board.dts`.


References
**********

.. target-notes::

.. _Bosch BME280 sensor website: https://www.bosch-sensortec.com/products/environmental-sensors/humidity-sensors-bme280/
.. _BL654 website: https://ezurio.com/wireless-modules/bluetooth-modules/bluetooth-5-modules/bl654-series
.. _pyOCD website: https://github.com/pyocd/pyOCD
.. _USB-SWD Programmer website: https://www.ezurio.com/usb-swd-programmer
Part 3
한국어 전문 번역
개요
BL654 Sensor Board hardware는 Nordic Semiconductor nRF52840 ARM Cortex-M4F CPU 기반 Ezurio BL654 module을 지원합니다.
이 sensor board에는 다음 기능이 있습니다.
- ADC(Analog-to-Digital Converter)
- CLOCK
- FLASH
- GPIO(General Purpose Input/Output)
- I2C(Inter-Integrated Circuit)
- MPU(Memory Protection Unit)
- NVIC(Nested Vectored Interrupt Controller)
- PWM(Pulse Width Modulation)
- RADIO(Bluetooth Low Energy와 802.15.4)
- RTC(nRF RTC System Clock)
- Segger RTT(RTT Console)
- SPI(Serial Peripheral Interface)
- UART(Universal asynchronous receiver-transmitter)
- WDT(Watchdog Timer)
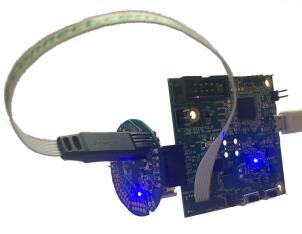
BL654 module 정보는 BL654 website, USB-SWD Programmer 정보는 USB-SWD Programmer website에서 확인할 수 있습니다.
Hardware
지원 기능
BL654 Sensor Board configuration은 다음 hardware 기능을 지원합니다.
| Interface | Controller | Driver/Component |
|---|---|---|
| ADC | on-chip | adc |
| CLOCK | on-chip | clock_control |
| FLASH | on-chip | flash |
| GPIO | on-chip | gpio |
| I2C(M) | on-chip | i2c |
| MPU | on-chip | arch/arm |
| NVIC | on-chip | arch/arm |
| PWM | on-chip | pwm |
| RADIO | on-chip | Bluetooth, ieee802154 |
| RTC | on-chip | system clock |
| RTT | Segger | console |
| SPI(M/S) | on-chip | spi |
| UART | on-chip | serial |
| WDT | on-chip | watchdog |
그 밖의 hardware 기능은 아직 이 board에서 활성화되지 않았습니다. BL654 module hardware 기능 전체 목록은 BL654 website를 참조하십시오.
연결과 I/O
LED
- LED1(blue) = P0.16(active low)
Push button
- BUTTON1(SW1) = P1.03(active high)
Sensor
BL654 Sensor Board에는 I2C로 BL654에 연결되는 Bosch BME280 temperature/humidity/pressure sensor가 탑재됩니다.
- SCL = P0.27
- SDA = P0.26
Bosch BME280 sensor 정보는 Bosch BME280 sensor website에서 확인할 수 있습니다.
Sensor에 전원 공급
Sensor는 coin cell에서 직접 또는 UART pin에 공급되는 voltage로 구동할 수 있으며 board 허용 범위는 1.8V~3.3V입니다. Battery와 UART/debugger를 함께 사용하고 UART/debugger가 voltage를 자동 감지·조정하지 않는다면, UART/debugger voltage는 coin-cell voltage와 0.3V 이내여야 합니다. 그렇지 않으면 nRF52840 silicon의 suppression diode가 활성화되거나 battery가 역으로 전원을 공급받을 수 있습니다.
UART를 통해 external source로 board에 전원을 공급하려면 solder bridge SB1을 blobbed 상태로 만들어야 합니다.
Programming과 Debugging
bl654_sensor_board board configuration용 application은 일반적인 방법으로 build, flash, debug할 수 있습니다. External debugger/programmer가 필요하며 Tag-Connect TC2030-CTX cable로 연결합니다. Ezurio USB-SWD Programmer board 또는 Segger JLink programmer로 BL654 Sensor Board를 program하고 debug할 수 있습니다.
Flashing
External JLink를 사용한다면 Nordic Segger 안내에 따라 필요한 software를 설치·구성하고 일반적인 방법으로 application을 build하고 flash합니다. Ezurio USB-SWD Programmer Board를 사용한다면 pyOCD website에서 software와 설치 방법을 확인하십시오.
다음은 hello_world application 예입니다.
먼저 선호하는 terminal program을 실행해 output을 수신합니다. BL654 Sensor Board UART에는 external UART가 연결되어야 합니다. Ezurio USB-SWD Programmer Board를 사용한다면 Sensor Board를 UART header에 꽂을 수 있습니다. FTDI cable도 사용할 수 있지만 I/O line과 power line voltage는 1.8V~3.3V여야 하며, 5V power line을 사용하는 FTDI cable을 연결하면 안 됩니다.
J3 UART connector pinout
모든 pin은 operating voltage Vdd를 기준으로 합니다.
| Pin No. | Name | Description | Direction |
|---|---|---|---|
| 1 | GND | GND | (N/A) |
| 2 | RTS | UART Ready-to-send pin | OUT |
| 3 | VDD | Supply voltage (requires SB1 to be blobbed) | (N/A) |
| 4 | RXD | UART Receive pin | IN |
| 5 | TXD | UART Transmit pin | (N/A) |
| 6 | CTS | UART Clear-to-send pin | IN |
$ minicom -D <tty_device> -b 115200<tty_device>를 BL654 Sensor Board가 연결된 port로 바꿉니다. Linux 예시는 /dev/ttyACM0입니다.
BL654 Sensor Board programming에는 external programmer가 필요합니다. 9-pin ARM debug port가 있는 SWD programmer는 Tag-Connect TC2030-CTX cable과 함께 사용할 수 있습니다. Ezurio USB-SWD Programmer Board를 사용한다면 cable을 P1에 연결하고 board가 target에 3.3V를 공급하도록 설정하십시오.
J1 Tag-Connect SWD pinout
| Pin No. | Name | Description | Direction |
|---|---|---|---|
| 1 | VDD | Operating voltage | (N/A) |
| 2 | SWDIO | Serial wire data input/output pin | IN/OUT |
| 3 | nRESET | Module reset pin | IN |
| 4 | SWCLK | Serial wire clock input pin | IN |
| 5 | GND | GND | (N/A) |
| 6 | SWO | Serial wire output pin | OUT |
그다음 일반적인 방법으로 application을 build하고 flash합니다.
west build -b bl654_sensor_board samples/hello_world
west flash
Debugging
External JLink debugger를 사용한다면 Nordic 기반 board의 Nordic Segger debugging 안내를 참조하십시오. Ezurio USB-SWD Programmer Board를 사용한다면 pyOCD로 debug할 수 있습니다.
BL654 Sensor Board에서 Bluetooth 시험
많은 Bluetooth example이 BL654 Sensor Board에서 동작합니다. 다음 sample을 시험해 보십시오.
- Bluetooth LE peripheral
- Bluetooth Eddystone
- Bluetooth iBeacon
BL654 Sensor Board LED와 button 시험
Board의 button(switch)과 LED가 Zephyr에서 올바르게 동작하는지 시험할 수 있는 sample은 두 개입니다.
blinkybutton
Example을 build·flash하여 board에서 Zephyr가 올바르게 실행되는지 확인할 수 있습니다. Button과 LED 정의는 boards/ezurio/bl654_sensor_board/bl654_sensor_board.dts에 있습니다.
참고 자료
Source
출처
영어 원문에는 문단, 문서 지시문, 표, 코드, 코드 심벌, 경로를 그대로 보존했습니다.