Part 1
요약·해설
LiteX VexRiscv는 M/C/A extension을 지원하는 32-bit RISC-V soft CPU와 peripheral로 구성한 FPGA SoC입니다. Arty A7-35T/A7-100T와 SDI-MIPI converter가 Zephyr target입니다.
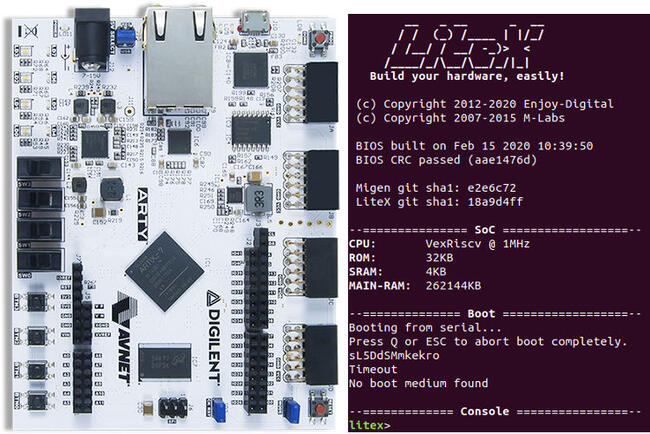
VexRiscv · RV32 · M/C/A
Arty A7-35T/100T · SDI-MIPI
F4PGA · oxide · LiteX builder
Part 2
접을 수 있는 영어 원문 전체
영어 원문 전체 펼치기
0B02E84807116F887CEA4F411F0E40C9C485D51DC4D959265AB484AA622E1F53
.. _litex-vexriscv:

LiteX VexRiscv
##############

LiteX VexRiscv is an example of a system on a chip (SoC) that consists of
a `VexRiscv processor <https://github.com/SpinalHDL/VexRiscv>`_
and additional peripherals. This setup can be generated using
`Zephyr on LiteX VexRiscv (reference platform)
<https://github.com/litex-hub/zephyr-on-litex-vexriscv>`_
or `LiteX SoC Builder <https://github.com/enjoy-digital/litex>`_
and can be used on various FPGA chips.
The bitstream (FPGA configuration file) can be obtained using both
vendor-specific and open-source tools, including the
`F4PGA toolchain <https://f4pga.org/>`_.

The ``litex_vexriscv`` board configuration in Zephyr is meant for the
LiteX VexRiscv SoC implementation generated for the
`Digilent Arty A7-35T or A7-100T Development Boards
<https://store.digilentinc.com/arty-a7-artix-7-fpga-development-board-for-makers-and-hobbyists>`_
or `SDI-MIPI Video Converter <https://github.com/antmicro/sdi-mipi-video-converter>`_.

.. image:: ../../../../../../../boards/enjoydigital/litex_vexriscv/doc/img/litex_vexriscv.jpg
   :align: center
   :alt: LiteX VexRiscv on Digilent Arty 35T Board

LiteX is based on
`Migen <https://m-labs.hk/gateware/migen/>`_/`MiSoC SoC builder <https://github.com/m-labs/misoc>`_
and provides ready-made system components such as buses, streams, interconnects,
common cores, and CPU wrappers to create SoCs easily. The tool contains
mechanisms for integrating, simulating, and building various designs
that target multiple chips of different vendors.
More information about the LiteX project can be found on
`LiteX's website <https://github.com/enjoy-digital/litex>`_.

VexRiscv is a 32-bit implementation of the RISC-V CPU architecture
written in the `SpinalHDL <https://spinalhdl.github.io/SpinalDoc-RTD/>`_.
The processor supports M, C, and A RISC-V instruction
set extensions, with numerous optimizations that include multistage
pipelines and data caching. The project provides many optional extensions
that can be used to customize the design (JTAG, MMU, MUL/DIV extensions).
The implementation is optimized for FPGA chips.
More information about the project can be found on
`VexRiscv's website <https://github.com/SpinalHDL/VexRiscv>`_.

To run the ZephyrOS on the VexRiscv CPU, it is necessary to prepare the
bitstream for the FPGA on a Digilent Arty A7-35 Board or SDI-MIPI Video Converter. This can be achieved
using the
`Zephyr on LiteX VexRiscv <https://github.com/litex-hub/zephyr-on-litex-vexriscv>`_
reference platform. You can also use the official LiteX SoC Builder.

Bitstream generation
********************

Zephyr on LiteX VexRiscv
========================
Using this platform ensures that all registers addresses are in the proper place.
All drivers were tested using this platform.
In order to generate the bitstream,
proceed with the following instruction:

1. Clone the repository and update all submodules:

   .. code-block:: bash

      git clone https://github.com/litex-hub/zephyr-on-litex-vexriscv.git
      cd zephyr-on-litex-vexriscv
      git submodule update --init --recursive

   Generating the bitstream for the Digilent Arty A7-35 Board requires F4PGA toolchain installation. It can be done by following instructions in
   `this tutorial <https://f4pga-examples.readthedocs.io/en/latest/getting.html>`_.

   In order to generate the bitstream for the SDI-MIPI Video Converter, install
   oxide (yosys+nextpnr) toolchain by following
   `these instructions <https://github.com/gatecat/prjoxide#getting-started---complete-flow>`_.

#. Next, get all required packages and run the install script:

   .. code-block:: bash

      apt-get install build-essential bzip2 python3 python3-dev python3-pip
      ./install.sh

#. Add LiteX to path:

   .. code-block:: bash

      source ./init

#. Set up the F4PGA environment (for the Digilent Arty A7-35 Board):

   .. code-block:: bash

      export F4PGA_INSTALL_DIR=~/opt/f4pga
      export FPGA_FAM="xc7"
      export PATH="$F4PGA_INSTALL_DIR/$FPGA_FAM/install/bin:$PATH";
      source "$F4PGA_INSTALL_DIR/$FPGA_FAM/conda/etc/profile.d/conda.sh"
      conda activate $FPGA_FAM

#. Generate the bitstream for the Arty 35T:

   .. code-block:: bash

      ./make.py --board=arty --variant=a7-35 --build --toolchain=symbiflow

#. Generate the bitstream for the Arty 100T:

   .. code-block:: bash

      ./make.py --board=arty --variant=a7-100 --build --toolchain=symbiflow

#. Generate the bitstream for the SDI-MIPI Video Converter:

   .. code-block:: bash

      ./make.py --board=sdi_mipi_bridge --build --toolchain=oxide

Official LiteX SoC builder
==========================
You can also generate the bitstream using the `official LiteX repository <https://github.com/enjoy-digital/litex>`_.
In that case you must also generate a dts overlay.

1. Install Migen/LiteX and the LiteX's cores:

   .. code-block:: bash

      wget https://raw.githubusercontent.com/enjoy-digital/litex/master/litex_setup.py
      chmod +x litex_setup.py
      ./litex_setup.py --init --install --user (--user to install to user directory) --config=(minimal, standard, full)

#. Install the RISC-V toolchain:

   .. code-block:: bash

      pip3 install meson ninja
      ./litex_setup.py --gcc=riscv

#. Build the target:

   .. code-block:: bash

      ./litex-boards/litex_boards/targets/digilent_arty.py --build --timer-uptime --csr-json csr.json

#. Generate the dts and config overlay:

   .. code-block:: bash

      ./litex/litex/tools/litex_json2dts_zephyr.py --dts overlay.dts --config overlay.config csr.json

Programming and booting
*************************

Building
========

Applications for the ``litex_vexriscv`` board configuration can be built as usual
(see :ref:`build_an_application`).
In order to build the application for ``litex_vexriscv``, set the ``BOARD`` variable
to ``litex_vexriscv``.

If you were generating bitstream with the official LiteX SoC builder you need to pass an additional argument:

.. code-block:: bash

   west build -b litex_vexriscv path/to/app -DDTC_OVERLAY_FILE=path/to/overlay.dts

Booting
=======

To upload the bitstream to Digilent Arty A7-35 you can use `xc3sprog <https://github.com/matrix-io/xc3sprog>`_ or
`openFPGALoader <https://github.com/trabucayre/openFPGALoader>`_:

.. code-block:: bash

   xc3sprog -c nexys4 digilent_arty.bit

.. code-block:: bash

   openFPGALoader -b arty_a7_100t digilent_arty.bit

Use `ecpprog <https://github.com/gregdavill/ecpprog>`_ to upload the bitstream to SDI-MIPI Video Converter:

.. code-block:: bash

   ecpprog -S antmicro_sdi_mipi_video_converter.bit

You can boot from a serial port using litex_term (replace `ttyUSBX` with your device) , e.g.:

.. code-block:: bash

   litex_term /dev/ttyUSBX --speed 115200 --kernel zephyr.bin
Part 3
한국어 전문 번역
개요
LiteX VexRiscv는 VexRiscv processor와 추가 peripheral로 구성된 SoC 예입니다. Zephyr on LiteX VexRiscv reference platform 또는 LiteX SoC Builder로 생성할 수 있고 여러 FPGA chip에서 사용할 수 있습니다. FPGA configuration file인 bitstream은 vendor-specific tool과 F4PGA toolchain 같은 open-source tool 모두로 만들 수 있습니다.
Zephyr의 litex_vexriscv board configuration은 Digilent Arty A7-35T/A7-100T development board 또는 SDI-MIPI Video Converter용으로 생성된 LiteX VexRiscv SoC implementation을 대상으로 합니다.
LiteX는 Migen/MiSoC SoC builder를 기반으로 하며 bus, stream, interconnect, common core, CPU wrapper 같은 ready-made system component를 제공해 SoC를 쉽게 만들 수 있게 합니다. 여러 vendor의 chip을 대상으로 design을 integrate, simulate, build하는 mechanism도 포함합니다.
VexRiscv는 SpinalHDL로 작성된 32-bit RISC-V CPU architecture implementation입니다. M, C, A instruction-set extension과 multi-stage pipeline·data cache 같은 최적화를 지원합니다. JTAG, MMU, MUL/DIV 등 optional extension으로 design을 customize할 수 있으며 FPGA chip에 최적화되어 있습니다.
VexRiscv CPU에서 Zephyr OS를 실행하려면 Digilent Arty A7-35 또는 SDI-MIPI Video Converter용 FPGA bitstream을 준비해야 합니다. Zephyr on LiteX VexRiscv reference platform이나 official LiteX SoC Builder를 사용할 수 있습니다.
Bitstream 생성
Zephyr on LiteX VexRiscv
이 platform을 사용하면 모든 register address가 올바른 위치에 놓입니다. 모든 driver는 이 platform으로 시험됐습니다. bitstream 생성 절차는 다음과 같습니다.
- repository를 clone하고 submodule을 모두 update합니다.
git clone https://github.com/litex-hub/zephyr-on-litex-vexriscv.git
cd zephyr-on-litex-vexriscv
git submodule update --init --recursive
Digilent Arty A7-35 bitstream 생성에는 F4PGA toolchain이 필요합니다. SDI-MIPI Video Converter에는 oxide(yosys+nextpnr) toolchain을 설치합니다.
- 필요한 package를 설치하고 install script를 실행합니다.
apt-get install build-essential bzip2 python3 python3-dev python3-pip ./install.sh - LiteX를 path에 추가합니다.
source ./init - Digilent Arty A7-35용 F4PGA environment를 설정합니다.
export F4PGA_INSTALL_DIR=~/opt/f4pga export FPGA_FAM="xc7" export PATH="$F4PGA_INSTALL_DIR/$FPGA_FAM/install/bin:$PATH"; source "$F4PGA_INSTALL_DIR/$FPGA_FAM/conda/etc/profile.d/conda.sh" conda activate $FPGA_FAM - Arty 35T bitstream을 생성합니다.
./make.py --board=arty --variant=a7-35 --build --toolchain=symbiflow - Arty 100T bitstream을 생성합니다.
./make.py --board=arty --variant=a7-100 --build --toolchain=symbiflow - SDI-MIPI Video Converter bitstream을 생성합니다.
./make.py --board=sdi_mipi_bridge --build --toolchain=oxide
Official LiteX SoC builder
official LiteX repository로 bitstream을 생성할 수도 있습니다. 이 경우 DTS overlay도 생성해야 합니다.
- Migen/LiteX와 LiteX core를 설치합니다.
wget https://raw.githubusercontent.com/enjoy-digital/litex/master/litex_setup.py chmod +x litex_setup.py ./litex_setup.py --init --install --user --config=(minimal,standard,full) - RISC-V toolchain을 설치합니다.
pip3 install meson ninja ./litex_setup.py --gcc=riscv - target을 build합니다.
./litex-boards/litex_boards/targets/digilent_arty.py --build --timer-uptime --csr-json csr.json - DTS와 config overlay를 생성합니다.
./litex/litex/tools/litex_json2dts_zephyr.py --dts overlay.dts --config overlay.config csr.json
Programming과 boot
Building
litex_vexriscv board configuration용 application은 일반적인 방법으로 build할 수 있습니다. board variable을 litex_vexriscv로 설정합니다. official LiteX SoC builder로 bitstream을 생성했다면 추가 argument로 overlay를 전달합니다.
west build -b litex_vexriscv path/to/app -DDTC_OVERLAY_FILE=path/to/overlay.dtsBooting
Digilent Arty A7-35에 bitstream을 upload하려면 xc3sprog 또는 openFPGALoader를 사용할 수 있습니다.
xc3sprog -c nexys4 digilent_arty.bit
openFPGALoader -b arty_a7_100t digilent_arty.bit
SDI-MIPI Video Converter에는 ecpprog를 사용합니다.
ecpprog -S antmicro_sdi_mipi_video_converter.bitlitex_term으로 serial port에서 boot할 수 있습니다. ttyUSBX를 실제 device로 바꿉니다.
litex_term /dev/ttyUSBX --speed 115200 --kernel zephyr.bin참고 자료
Source
출처
영어 원문에는 문단, 문서 지시문, 표, 코드, 코드 심벌, 경로를 그대로 보존했습니다.