Part 1
요약·해설
WaRP7은 single Cortex-A7 800 MHz와 Cortex-M4 200 MHz를 결합한 i.MX7S board입니다. Zephyr는 M4에서 실행되며 A7 bootloader/Linux가 binary 적재, reset, PC·SP 설정과 시작을 담당합니다.
Cortex-A7 800 MHz · Cortex-M4 200 MHz
TCML · TCMU · OCRAM · OCRAM_S · DDR
A7 U-Boot 또는 Linux · J-Link
Part 2
접을 수 있는 영어 원문 전체
영어 원문 전체 펼치기
7743E22272198DF5122E11F05772C6FCA847602F5BF9DF37ABD46AA3BB676017
.. _warp7:

WaRP7 - Next Generation IoT and Wearable Development Platform
#############################################################

Overview
********

The i.MX7S SoC is a Hybrid multi-core processor composed of Single Cortex A7
core and Single Cortex M4 core.
Zephyr was ported to run on the M4 core. In a later release, it will also
communicate with the A7 core (running Linux) via RPmsg.


.. image:: ../../../../../../../boards/element14/warp7/doc/warp7.jpg
   :align: center
   :alt: WaRP7-iMX7S

Hardware
********

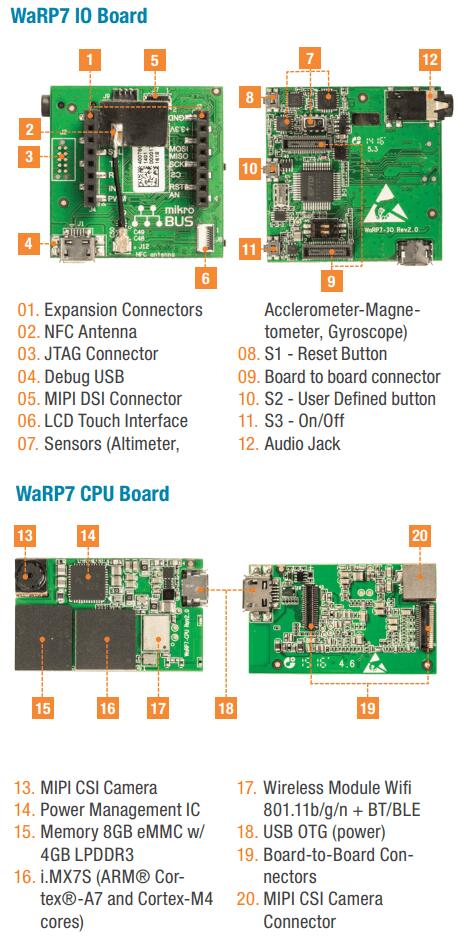
The WaRP7 Platform is composed of a CPU and IO board.

WaRP7 IO Board
==============

- 6-axis Accelerometer Magnetometer: NXP FXOS8700CQ (I2C4 interface)
- 3-axis Gyroscope: NXP FXAS21002C (I2C4 interface)
- Altimeter: NXP MPL3115A2 (I2C4 interface)
- NXP NTAG NT3H1101 (I2C2 interface)
- Audio Codec: NXP SGTL5000 (I2C4 and SAI1 interfaces)
- S1 - Reset Button (POR_B signal)
- S2 - User Defined button (ENET1_RD1/GPIO7_IO1 signal)
- S3 - On/Off (MX7_ONOFF signal)
- Board to board connector (34 configurable pins)
- mikroBUS expansion connector
- 10-pin needle JTAG Connector
- Debug USB exposing two UARTs (UART1 for A7 and UART2 for M4)
- MIPI DSI 1 lane Connector
- LCD Touch Connector (I2C2 interface)
- Audio Jack: Mic and Stereo Headphone

WaRP7 CPU Board
===============

- CPU i.MX7 Solo with a Single Cortex A7 (800MHz) core and
  Single Cortex M4 (200MHz) core
- Memory

  - RAM -> A7: 4GB (Kingston 08EMCP04)
  - RAM -> M4: 3x32KB (TCML, TCMU, OCRAM_S), 1x128KB (OCRAM) and 1x256MB (DDR)
  - Flash -> A7: 8GB eMMC (Kingston 08EMCP04)
- Multimedia

  - MIPI CSI 1 lane connector with 5MP OV5640 camera module (I2C2 interface)
- Connectivity

  - Board to board connector (34 configurable pins)
  - Micro USB 2.0 OTG connector (USB_OTG1 interface)
  - Murata Type 1DX Wi-Fi IEEE 802.11b/g/n and Bluetooth 4.1 plus EDR
    (SD1, UART3 SAI2 interfaces)
- Li-ion/Li-polymer Battery Charger: NXP BC3770 (I2C1 interface)
- Power management integrated circuit (PMIC): NXP PF3000 (I2C1 interface)


For more information about the i.MX7 SoC and WaRP7, see these references:

- `i.MX 7 Series Website`_
- `i.MX 7 Solo Datasheet`_
- `i.MX 7 Solo Reference Manual`_
- `WaRP7 Site`_
- `WaRP7 Quick Start Guide`_
- `WaRP7 User Guide`_
- `WaRP7 GitHub repository`_

Supported Features
==================

The WaRP7 configuration supports the following hardware features on the
Cortex M4 Core:

+-----------+------------+-------------------------------------+
| Interface | Controller | Driver/Component                    |
+===========+============+=====================================+
| NVIC      | on-chip    | nested vector interrupt controller  |
+-----------+------------+-------------------------------------+
| SYSTICK   | on-chip    | systick                             |
+-----------+------------+-------------------------------------+
| GPIO      | on-chip    | gpio                                |
+-----------+------------+-------------------------------------+
| I2C       | on-chip    | i2c                                 |
+-----------+------------+-------------------------------------+
| UART      | on-chip    | serial port-polling;                |
|           |            | serial port-interrupt               |
+-----------+------------+-------------------------------------+
| SENSOR    | off-chip   | fxos8700 polling;                   |
|           |            | fxos8700 trigger;                   |
|           |            | fxas21002 polling;                  |
|           |            | fxas21002 trigger;                  |
+-----------+------------+-------------------------------------+

The default configuration can be found in the defconfig file:
:zephyr_file:`boards/element14/warp7/warp7_mcimx7d_m4_defconfig`

Other hardware features are not currently supported by the port.

Connections and IOs
===================

The WaRP7 board Board was tested with the following pinmux controller
configuration.

+---------------+---------------------+--------------------------------+
| Board Name    | SoC Name            | Usage                          |
+===============+=====================+================================+
| FT_TX2        | UART2_TXD           | UART Console                   |
+---------------+---------------------+--------------------------------+
| FT_RX2        | UART2_RXD           | UART Console                   |
+---------------+---------------------+--------------------------------+
| MKBUS_TX      | UART6_TXD           | UART                           |
+---------------+---------------------+--------------------------------+
| MKBUS_RX      | UART6_RXD           | UART                           |
+---------------+---------------------+--------------------------------+
| S2            | ENET1_RD1/GPIO7_IO1 | SW0                            |
+---------------+---------------------+--------------------------------+
| I2C4_SDA      | I2C4_SDA            | I2C / FXOS8700 / FXAS21002     |
+---------------+---------------------+--------------------------------+
| I2C4_SCL      | I2C4_SCL            | I2C / FXOS8700 / FXAS21002     |
+---------------+---------------------+--------------------------------+
| SENSOR_INT_B  | ENET1_RD0/GPIO7_IO0 | FXOS8700 INT1 / FXAS21002 INT1 |
+---------------+---------------------+--------------------------------+

System Clock
============

The M4 Core is configured to run at a 200 MHz clock speed.

Serial Port
===========

The iMX7S SoC has seven UARTs. The number 2 is configured for the console and
the number 6 is used in the mikroBUS connector.

Programming and Debugging
*************************

The WaRP7 doesn't have QSPI flash for the M4 and it needs to be started by
the A7 core. The A7 core is responsible to load the M4 binary application into
the RAM, put the M4 in reset, set the M4 Program Counter and Stack Pointer, and
get the M4 out of reset.
The A7 can perform these steps at bootloader level or after the Linux system
has booted.

The M4 can use up to 5 different RAMs. These are the memory mapping for A7 and
M4:

+------------+-----------------------+------------------------+-----------------------+----------------------+
| Region     | Cortex-A7             | Cortex-M4 (System Bus) | Cortex-M4 (Code Bus)  | Size                 |
+============+=======================+========================+=======================+======================+
| DDR        | 0x80000000-0xFFFFFFFF | 0x80000000-0xDFFFFFFF  | 0x10000000-0x1FFEFFFF | 2048MB (less for M4) |
+------------+-----------------------+------------------------+-----------------------+----------------------+
| OCRAM      | 0x00900000-0x0091FFFF | 0x20200000-0x2021FFFF  | 0x00900000-0x0091FFFF | 128KB                |
+------------+-----------------------+------------------------+-----------------------+----------------------+
| TCMU       | 0x00800000-0x00807FFF | 0x20000000-0x20007FFF  |                       | 32KB                 |
+------------+-----------------------+------------------------+-----------------------+----------------------+
| TCML       | 0x007F8000-0x007FFFFF |                        | 0x1FFF8000-0x1FFFFFFF | 32KB                 |
+------------+-----------------------+------------------------+-----------------------+----------------------+
| OCRAM_S    | 0x00180000-0x00187FFF | 0x20180000-0x20187FFF  | 0x00000000-0x00007FFF | 32KB                 |
+------------+-----------------------+------------------------+-----------------------+----------------------+
| QSPI Flash |                       |                        | 0x08000000-0x0BFFFFFF | 64MB                 |
+------------+-----------------------+------------------------+-----------------------+----------------------+


References
==========

- `i.MX 7 Solo Reference Manual`_ from page 182 (section 2.1.2 and 2.1.3)
- `Toradex Wiki`_


At compilation time you have to choose which RAM will be used. This
configuration is done in the file :zephyr_file:`boards/element14/warp7/warp7_mcimx7d_m4.dts` with
"zephyr,flash" (when CONFIG_XIP=y) and "zephyr,sram" properties. The available
configurations are:

.. code-block:: none

   "zephyr,flash"
   - &ddr_code
   - &tcml_code
   - &ocram_code
   - &ocram_s_code
   - &ocram_pxp_code
   - &ocram_epdc_code

   "zephyr,sram"
   - &ddr_sys
   - &tcmu_sys
   - &ocram_sys
   - &ocram_s_sys
   - &ocram_pxp_sys
   - &ocram_epdc_sys


Below you will find the instructions to load and run Zephyr on M4 from A7 using
u-boot.

Connect both micro USB interfaces into the PC. In one USB interface you will
have 2 USB serial ports, the first one is the A7 console and the second is the
M4 console for Zephyr with both configured to work at 115200 8N1.
The other USB interface is used to power the CPU and IO boards and is connected
to the USB OTG interface of the i.MX7S.

After powering up the platform stop the u-boot execution on the A7 core and
expose the eMMC as mass storage with the following command in the u-boot
prompt: ``ums 0 mmc 0``. Copy the compiled zephyr.bin to the first FAT
partition and remove the mounted device on the PC by issuing a "Ctrl+C" in the
u-boot prompt.
Set the u-boot environment variables and run the zephyr.bin from the
appropriated memory configured in the Zephyr compilation:

.. code-block:: console

   setenv bootm4 'fatload mmc 0:1 $m4addr $m4fw && dcache flush && bootaux $m4addr'
   # TCML
   setenv m4tcml 'setenv m4fw zephyr.bin; setenv m4addr 0x007F8000'
   setenv bootm4tcml 'run m4tcml && run bootm4'
   run bootm4tcml
   # TCMU
   setenv m4tcmu 'setenv m4fw zephyr.bin; setenv m4addr 0x00800000'
   setenv bootm4tcmu 'run m4tcmu && run bootm4'
   run bootm4tcmu
   # OCRAM
   setenv m4ocram 'setenv m4fw zephyr.bin; setenv m4addr 0x00900000'
   setenv bootm4ocram 'run m4ocram && run bootm4'
   run bootm4ocram
   # OCRAM_S
   setenv m4ocrams 'setenv m4fw zephyr.bin; setenv m4addr 0x00180000'
   setenv bootm4ocrams 'run m4ocrams && run bootm4'
   run bootm4ocrams
   # DDR
   setenv m4ddr 'setenv m4fw zephyr.bin; setenv m4addr 0x80000000'
   setenv bootm4ddr 'run m4ddr && run bootm4'
   run bootm4ddr


Debugging
=========

Download and install `J-Link Tools`_ and `NXP iMX7D Connect CortexM4.JLinkScript`_.

To run Zephyr Binary using J-Link, create the following script to get the
Program Counter and Stack Pointer from ``zephyr.bin``.

get-pc-sp.sh:
.. code-block:: console

   #!/bin/sh

   firmware=$1

   pc=$(od -An -N 8 -t x4 $firmware | awk '{print $2;}')
   sp=$(od -An -N 8 -t x4 $firmware | awk '{print $1;}')

   echo pc=$pc
   echo sp=$sp


Get the SP and PC from firmware binary: ``./get-pc-sp.sh zephyr.bin``
.. code-block:: console

   pc=00900f01
   sp=00905020

Plug in the J-Link into the board and PC and run the J-Link command line tool:

.. code-block:: console

   /usr/bin/JLinkExe -device Cortex-M4 -if JTAG \
      -speed 4000 -autoconnect 1 -jtagconf -1,-1 \
      -jlinkscriptfile iMX7D_Connect_CortexM4.JLinkScript

The following steps are necessary to run the zephyr.bin:

1. Put the M4 core in reset
2. Load the binary in the appropriate addr (TMCL, TCMU, OCRAM, OCRAM_S or DDR)
3. Set PC (Program Counter)
4. Set SP (Stack Pointer)
5. Get the M4 core out of reset

Issue the following commands inside J-Link commander:

.. code-block:: console

   w4 0x3039000C 0xAC
   loadfile zephyr.bin,0x00900000
   w4 0x00180000 00900f01
   w4 0x00180004 00905020
   w4 0x3039000C 0xAA

With these mechanisms, applications for the ``warp7`` board
configuration can be built and debugged in the usual way (see
:ref:`build_an_application` and :ref:`application_run` for more details).

References
==========

- `Loading Code on Cortex-M4 from Linux for the i.MX 6SoloX and i.MX 7Dual/7Solo Application Processors`_
- `J-Link iMX7D Instructions`_

.. _WaRP7 Site:
   https://www.element14.com/warp7

.. _WaRP7 User Guide:
   https://github.com/WaRP7/WaRP7-User-Guide/releases/download/v1.3/User_Guide_Manual_v1-3.pdf

.. _WaRP7 Quick Start Guide:
   https://www.nxp.com/docs/en/supporting-information/WARP7-LEAFLET-QSG.pdf

.. _WaRP7 GitHub repository:
   https://github.com/WaRP7

.. _i.MX 7 Series Website:
   https://www.nxp.com/products/processors-and-microcontrollers/applications-processors/i.mx-applications-processors/i.mx-7-processors:IMX7-SERIES?fsrch=1&sr=1&pageNum=1

.. _i.MX 7 Solo Datasheet:
   https://www.nxp.com/docs/en/data-sheet/IMX7SCEC.pdf

.. _i.MX 7 Solo Reference Manual:
   https://www.nxp.com/webapp/Download?colCode=IMX7SRM

.. _J-Link Tools:
   https://www.segger.com/downloads/jlink/#J-LinkSoftwareAndDocumentationPack

.. _NXP iMX7D Connect CortexM4.JLinkScript:
   https://wiki.segger.com/images/8/86/NXP_iMX7D_Connect_CortexM4.JLinkScript

.. _Loading Code on Cortex-M4 from Linux for the i.MX 6SoloX and i.MX 7Dual/7Solo Application Processors:
   https://www.nxp.com/docs/en/application-note/AN5317.pdf

.. _J-Link iMX7D Instructions:
   https://wiki.segger.com/IMX7D

.. _Toradex Wiki:
   https://developer.toradex.com/knowledge-base/freertos-on-the-cortex-m4-of-a-colibri-imx7#Memory_areas
Part 3
한국어 전문 번역
개요
i.MX7S SoC는 single Cortex-A7 core와 single Cortex-M4 core로 구성된 hybrid multi-core processor입니다. Zephyr는 M4 core에서 실행되도록 port됐습니다. 이후 release에서는 Linux를 실행하는 A7 core와 RPMsg로 통신할 예정입니다.
하드웨어
WaRP7 platform은 CPU board와 I/O board로 구성됩니다.
WaRP7 I/O board
- NXP FXOS8700CQ 6-axis accelerometer/magnetometer(I2C4)
- NXP FXAS21002C 3-axis gyroscope(I2C4)
- NXP MPL3115A2 altimeter(I2C4)
- NXP NTAG NT3H1101(I2C2)
- NXP SGTL5000 audio codec(I2C4·SAI1)
- S1 reset button(POR_B)
- S2 user-defined button(ENET1_RD1/GPIO7_IO1)
- S3 On/Off(MX7_ONOFF)
- board-to-board connector(configurable pin 34개)
- mikroBUS expansion connector
- 10-pin needle JTAG connector
- UART 두 개를 노출하는 debug USB(UART1=A7, UART2=M4)
- MIPI DSI 1-lane connector
- LCD touch connector(I2C2)
- mic·stereo headphone audio jack
WaRP7 CPU board
- single Cortex-A7 800 MHz와 single Cortex-M4 200 MHz를 갖춘 i.MX7 Solo CPU
- memory
- A7 RAM: 4 GB(Kingston 08EMCP04)
- M4 RAM: 32 KB 3개(TCML, TCMU, OCRAM_S), OCRAM 128 KB 1개, DDR 256 MB 1개
- A7 flash: eMMC 8 GB(Kingston 08EMCP04)
- multimedia: I2C2의 5 MP OV5640 camera module을 갖춘 MIPI CSI 1-lane connector
- connectivity
- configurable pin 34개의 board-to-board connector
- USB_OTG1의 Micro USB 2.0 OTG connector
- Murata Type 1DX Wi-Fi IEEE 802.11b/g/n 및 Bluetooth 4.1+EDR(SD1, UART3, SAI2)
- NXP BC3770 Li-ion/Li-polymer battery charger(I2C1)
- NXP PF3000 PMIC(I2C1)
자세한 내용은 i.MX 7 Series Website, i.MX 7 Solo datasheet/reference manual, WaRP7 site·quick start·user guide·GitHub repository를 참고하십시오.
지원 기능
WaRP7 configuration은 Cortex-M4 core에서 다음 hardware 기능을 지원합니다.
| Interface | Controller | Driver/Component |
|---|---|---|
| NVIC | on-chip | nested vector interrupt controller |
| SYSTICK | on-chip | systick |
| GPIO | on-chip | gpio |
| I2C | on-chip | i2c |
| UART | on-chip | serial port-polling; serial port-interrupt |
| SENSOR | off-chip | fxos8700 polling/trigger; fxas21002 polling/trigger |
기본 configuration은 boards/element14/warp7/warp7_mcimx7d_m4_defconfig에 있습니다. 다른 hardware 기능은 현재 이 port에서 지원하지 않습니다.
연결과 I/O
WaRP7 board는 다음 pinmux controller configuration으로 시험됐습니다.
| Board Name | SoC Name | Usage |
|---|---|---|
| FT_TX2 | UART2_TXD | UART Console |
| FT_RX2 | UART2_RXD | UART Console |
| MKBUS_TX | UART6_TXD | UART |
| MKBUS_RX | UART6_RXD | UART |
| S2 | ENET1_RD1/GPIO7_IO1 | SW0 |
| I2C4_SDA | I2C4_SDA | I2C / FXOS8700 / FXAS21002 |
| I2C4_SCL | I2C4_SCL | I2C / FXOS8700 / FXAS21002 |
| SENSOR_INT_B | ENET1_RD0/GPIO7_IO0 | FXOS8700 INT1 / FXAS21002 INT1 |
System clock
M4 core는 200 MHz clock으로 실행되도록 구성됩니다.
Serial port
i.MX7S SoC에는 UART가 7개 있습니다. UART2는 console로 구성되고 UART6은 mikroBUS connector에 사용됩니다.
프로그래밍과 디버깅
WaRP7에는 M4용 QSPI flash가 없으므로 M4는 A7 core가 시작해야 합니다. A7은 M4 binary application을 RAM에 load하고, M4를 reset 상태에 둔 뒤 M4 Program Counter와 Stack Pointer를 설정하고 reset에서 해제합니다. A7은 bootloader 단계 또는 Linux boot 뒤에 이 단계를 수행할 수 있습니다.
M4는 최대 5종류 RAM을 사용할 수 있습니다. A7·M4 memory mapping은 다음과 같습니다.
| Region | Cortex-A7 | Cortex-M4(System Bus) | Cortex-M4(Code Bus) | Size |
|---|---|---|---|---|
| DDR | 0x80000000-0xFFFFFFFF | 0x80000000-0xDFFFFFFF | 0x10000000-0x1FFEFFFF | 2048 MB(M4는 더 적음) |
| OCRAM | 0x00900000-0x0091FFFF | 0x20200000-0x2021FFFF | 0x00900000-0x0091FFFF | 128 KB |
| TCMU | 0x00800000-0x00807FFF | 0x20000000-0x20007FFF | 32 KB | |
| TCML | 0x007F8000-0x007FFFFF | 0x1FFF8000-0x1FFFFFFF | 32 KB | |
| OCRAM_S | 0x00180000-0x00187FFF | 0x20180000-0x20187FFF | 0x00000000-0x00007FFF | 32 KB |
| QSPI Flash | 0x08000000-0x0BFFFFFF | 64 MB |
근거는 i.MX 7 Solo Reference Manual 182쪽 section 2.1.2·2.1.3과 Toradex Wiki입니다.
compile할 때 사용할 RAM을 선택해야 합니다. boards/element14/warp7/warp7_mcimx7d_m4.dts의 zephyr,flash(CONFIG_XIP=y일 때)와 zephyr,sram property로 구성합니다.
"zephyr,flash"
- &ddr_code
- &tcml_code
- &ocram_code
- &ocram_s_code
- &ocram_pxp_code
- &ocram_epdc_code

"zephyr,sram"
- &ddr_sys
- &tcmu_sys
- &ocram_sys
- &ocram_s_sys
- &ocram_pxp_sys
- &ocram_epdc_sys
다음은 A7의 U-Boot으로 M4에 Zephyr를 load하고 실행하는 절차입니다. micro USB interface 두 개를 PC에 연결합니다. 한 interface에는 USB serial port 두 개가 나타나며 첫 번째는 A7 console, 두 번째는 Zephyr M4 console입니다. 둘 다 115200 8N1입니다. 다른 USB interface는 CPU·I/O board 전원과 i.MX7S USB OTG 연결에 사용됩니다.
platform을 켠 뒤 A7의 U-Boot 실행을 중단하고 U-Boot prompt에서 ums 0 mmc 0을 실행해 eMMC를 mass storage로 노출합니다. compile한 zephyr.bin을 첫 FAT partition에 복사하고 U-Boot prompt에서 Ctrl+C를 눌러 PC에 mount된 device를 제거합니다. Zephyr compile에서 선택한 memory에 맞게 U-Boot environment variable을 설정하고 zephyr.bin을 실행합니다.
setenv bootm4 'fatload mmc 0:1 $m4addr $m4fw && dcache flush && bootaux $m4addr'
# TCML
setenv m4tcml 'setenv m4fw zephyr.bin; setenv m4addr 0x007F8000'
setenv bootm4tcml 'run m4tcml && run bootm4'
run bootm4tcml
# TCMU
setenv m4tcmu 'setenv m4fw zephyr.bin; setenv m4addr 0x00800000'
setenv bootm4tcmu 'run m4tcmu && run bootm4'
run bootm4tcmu
# OCRAM
setenv m4ocram 'setenv m4fw zephyr.bin; setenv m4addr 0x00900000'
setenv bootm4ocram 'run m4ocram && run bootm4'
run bootm4ocram
# OCRAM_S
setenv m4ocrams 'setenv m4fw zephyr.bin; setenv m4addr 0x00180000'
setenv bootm4ocrams 'run m4ocrams && run bootm4'
run bootm4ocrams
# DDR
setenv m4ddr 'setenv m4fw zephyr.bin; setenv m4addr 0x80000000'
setenv bootm4ddr 'run m4ddr && run bootm4'
run bootm4ddr
Debugging
SEGGER J-Link Tools와 NXP iMX7D_Connect_CortexM4.JLinkScript를 내려받아 설치합니다. zephyr.bin에서 Program Counter와 Stack Pointer를 얻으려면 다음 script를 만듭니다.
#!/bin/sh

firmware=$1

pc=$(od -An -N 8 -t x4 $firmware | awk '{print $2;}')
sp=$(od -An -N 8 -t x4 $firmware | awk '{print $1;}')

echo pc=$pc
echo sp=$sp
./get-pc-sp.sh zephyr.bin으로 firmware binary의 SP와 PC를 얻습니다.
pc=00900f01
sp=00905020
J-Link를 board와 PC에 연결하고 command-line tool을 실행합니다.
/usr/bin/JLinkExe -device Cortex-M4 -if JTAG \
  -speed 4000 -autoconnect 1 -jtagconf -1,-1 \
  -jlinkscriptfile iMX7D_Connect_CortexM4.JLinkScript
zephyr.bin 실행에는 다음 단계가 필요합니다.
- M4 core를 reset 상태로 둡니다.
- binary를 알맞은 주소(TCML, TCMU, OCRAM, OCRAM_S 또는 DDR)에 load합니다.
- PC(Program Counter)를 설정합니다.
- SP(Stack Pointer)를 설정합니다.
- M4 core를 reset에서 해제합니다.
J-Link commander에서 다음 command를 실행합니다.
w4 0x3039000C 0xAC
loadfile zephyr.bin,0x00900000
w4 0x00180000 00900f01
w4 0x00180004 00905020
w4 0x3039000C 0xAA
이 방식을 사용하면 warp7 board configuration용 application을 일반적인 방법으로 build하고 debug할 수 있습니다.
참고 자료
Source
출처
영어 원문에는 문단, 문서 지시문, 표, 코드, 코드 심벌, 경로를 그대로 보존했습니다.