Part 1
요약·해설
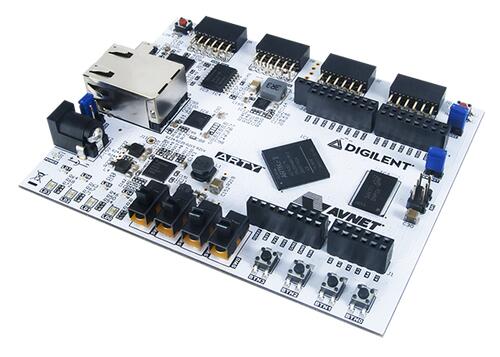
Arty는 Spartan-7·Artix-7·Zynq-7000 variant가 있는 FPGA board 계열입니다. Zephyr는 현재 Artix-7 대상 DesignStart Cortex-M1/M3 reference design을 지원합니다.
DesignStart Cortex-M1 · Cortex-M3
On-board JTAG + external SWD
Xilinx UART Lite · J10 · 115200 8N1
Part 2
접을 수 있는 영어 원문 전체
영어 원문 전체 펼치기
7702D1F5D41F3F0C105DBEAE57E866697B648F642CB738F986F1ADE243507520
.. _arty:

Digilent Arty
#############

Overview
********

The `Digilent Arty`_ is a line of FPGA-based development boards aimed for makers
and hobbyists. The Arty is available in several configurations, each with a
different Xilinx FPGA (Spartan-7, Artix-7, or Zynq-7000 series).

Each board is equipped with on-board JTAG for FPGA programming and debugging,
LEDs, switches, buttons, DDR3 RAM, and QSPI flash for storing the FPGA
bitstream.

.. figure:: ../../../../../../../boards/digilent/arty_a7/doc/arty_a7-35.jpg
   :align: center
   :alt: Digilent Arty A7-35

   Digilent Arty A7-35 (Credit: Digilent Inc)

The Spartan-7 and Artix-7 based Arty board do not contain a CPU, but require a
so-called soft processor to be instantiated within the FPGA in order to run
Zephyr. The Zynq-7000 based Arty boards are not yet supported by Zephyr.

ARM Cortex-M1/M3 DesignStart FPGA
*********************************

One way of instantiating soft processors on the Arty is using the `ARM
DesignStart FPGA`_ Xilinx edition reference designs from ARM. Zephyr supports
both the Cortex-M1 and the Cortex-M3 reference designs. The Cortex-M1 design
targets either the Spartan-7 or Artix-7 based Arty boards, whereas the Cortex-M3
design only targets the Artix-7 based boards. Zephyr only supports the Artix-7
targeted designs for now.

For more information about the ARM Cortex-M1/M3 DesignStart FPGA, see the
following websites:

- `Technical Resources for DesignStart FPGA`_
- `Technical Resources for DesignStart FPGA on Xilinx`_
- `ARM DesignStart FPGA Xilinx FAQs`_

Supported Features
==================

The ``arty_a7/designstart_fpga_cortex_m1`` board configuration supports the following
hardware features of the Cortex-M1 reference design:

+-----------+------------+-------------------------------------+
| Interface | Controller | Driver/Component                    |
+===========+============+=====================================+
| NVIC      | on-chip    | nested vector interrupt controller  |
+-----------+------------+-------------------------------------+
| SYSTICK   | on-chip    | systick                             |
+-----------+------------+-------------------------------------+
| GPIO      | on-chip    | gpio, non-interrupt                 |
+-----------+------------+-------------------------------------+
| UART      | on-chip    | serial port-polling;                |
|           |            | serial port-interrupt               |
+-----------+------------+-------------------------------------+
| QSPI      | on-chip    | QSPI flash                          |
+-----------+------------+-------------------------------------+

The default configuration for the Cortex-M1 can be found in the defconfig file:
:file:`boards/digilent/arty_a7/arty_a7_designstart_fpga_cortex_m1_defconfig`.

In addition to the above, the ``arty_a7/designstart_fpga_cortex_m3`` board configuration
supports the following hardware features of the Cortex-M3 reference design:

+-----------+------------+-------------------------------------+
| Interface | Controller | Driver/Component                    |
+===========+============+=====================================+
| MPU       | on-chip    | Memory Protection Unit              |
+-----------+------------+-------------------------------------+

The default configuration for the Cortex-M3 can be found in the defconfig file:
:file:`boards/digilent/arty_a7/arty_a7_designstart_fpga_cortex_m3_defconfig`.

Other hardware features are not currently supported by the port.

System Clock
============

The Cortex-M1 reference design is configured to use the 100 MHz external
oscillator on the board as CPU system clock whereas the Cortex-M3 reference
design is configured for 50MHz CPU system clock.

Serial Port
===========

The reference design contains one Xilinx UART Lite. This UART is configured as
console and is accessible through the on-board JTAG adapter via USB connector
``J10``.

Connecting the Debug Probes
===========================

Two different debug probes are needed in order to program the board; the
on-board Digilent JTAG connected to the FPGA, and an external Serial Wire Debug
(SWD) capable debug probe connected to the ARM Cortex-M1 CPU.

The on-board JTAG is used for configuring and debugging the Xilinx FPGA
itself. It is available on USB connector ``J10``.

The external SWD debug probe can be connected to connector ``J4`` (``nSRST`` on
``IO39``, ``SWDIO`` on ``IO40``, and ``SWCLK`` on ``IO41``). Another option is
to use the dedicated :ref:`v2c_daplink_shield`.

Programming and Debugging
*************************

First, configure the FPGA with the selected reference design FPGA bitstream
using Xilinx Vivado as described in the ARM Cortex-M1/Cortex-M3 DesignStart FPGA
Xilinx edition user guide (available as part of the reference design download
from `Technical Resources for DesignStart FPGA on Xilinx`_).

Another option for configuring the FPGA with the reference design bitstream is
to use the :ref:`openocd-debug-host-tools`:

.. code-block:: console

   openocd -f board/arty_s7.cfg -c "init;\
        pld load 0 m1_for_arty_a7_reference.bit;\
        shutdown"

or:

.. code-block:: console

   openocd -f board/arty_s7.cfg -c "init;\
        pld load 0 m3_for_arty_a7_reference.bit;\
        shutdown"

.. note::

   The pre-built FPGA bitstream only works for Arty boards equipped with an
   Artix-35T FPGA. For other Arty variants (e.g. the Arty A7-100) the bitstream
   must be rebuilt.

Next, build and flash applications as usual (see :ref:`build_an_application` and
:ref:`application_run` for more details).

Configuring a Console
=====================

The UART console is available via the on-board JTAG on USB connector
``J10``. The on-board JTAG will enumerate as two USB serial ports. The UART is
typically available on the second serial port.

Use the following settings with your serial terminal of choice (minicom, putty,
etc.):

- Speed: 115200
- Data: 8 bits
- Parity: None
- Stop bits: 1

Flashing
========

Here is an example for building and flashing the :ref:`hello_world` application
for the Cortex-M1 reference design:

.. zephyr-app-commands::
   :zephyr-app: samples/hello_world
   :board: arty_a7/designstart_fpga_cortex_m1
   :goals: flash

After flashing, you should see message similar to the following in the terminal:

.. code-block:: console

   *** Booting Zephyr OS build zephyr-v2.3.99  ***
   Hello World! arty_a7

The same procedure can be used for the Cortex-M3 reference design.

Note, however, that the application was not persisted in flash memory by the
above steps. It was merely written to internal block RAM in the FPGA. It will
revert to the application stored in the block RAM within the FPGA bitstream
the next time the FPGA is configured.

The steps to persist the application within the FPGA bitstream are covered by
the ARM Cortex-M1/M3 DesignStart FPGA Xilinx edition user guide. If the
:kconfig:option:`CONFIG_BUILD_OUTPUT_BIN` is enabled and the `SiFive elf2hex`_ package
is available, the build system will automatically generate a Verilog memory hex
dump :file:`zephyr.mem` file suitable for initialising the block RAM using
`Xilinx Vivado`_.

Debugging
=========

Here is an example for the :ref:`hello_world` application.

.. zephyr-app-commands::
   :zephyr-app: samples/hello_world
   :board: arty_a7/designstart_fpga_cortex_m1
   :goals: debug

Step through the application in your debugger, and you should see a message
similar to the following in the terminal:

.. code-block:: console

   *** Booting Zephyr OS build zephyr-v2.3.99  ***
   Hello World! arty_a7

.. _Digilent Arty:
   https://store.digilentinc.com/arty

.. _ARM DesignStart FPGA:
   https://www.arm.com/resources/designstart/designstart-fpga

.. _Technical Resources for DesignStart FPGA:
   https://developer.arm.com/ip-products/designstart/fpga

.. _Technical Resources for DesignStart FPGA on Xilinx:
   https://developer.arm.com/ip-products/designstart/fpga/fpga-xilinx

.. _ARM DesignStart FPGA Xilinx FAQs:
   https://developer.arm.com/ip-products/designstart/fpga/fpga-xilinx-faqs

.. _SiFive elf2hex:
   https://github.com/sifive/elf2hex

.. _Xilinx Vivado:
   https://www.xilinx.com/products/design-tools/vivado.html
Part 3
한국어 전문 번역
개요
Digilent Arty는 maker와 hobbyist를 위한 FPGA 기반 development board 계열입니다. 서로 다른 Xilinx FPGA(Spartan-7, Artix-7, Zynq-7000 series)를 사용하는 여러 configuration으로 제공됩니다.
각 board에는 FPGA programming/debugging용 on-board JTAG, LED, switch, button, DDR3 RAM과 FPGA bitstream 저장용 QSPI flash가 있습니다.
Spartan-7·Artix-7 기반 Arty에는 CPU가 없습니다. Zephyr를 실행하려면 FPGA 안에 이른바 soft processor를 instantiate해야 합니다. Zynq-7000 기반 Arty board는 아직 Zephyr가 지원하지 않습니다.
Arm Cortex-M1/M3 DesignStart FPGA
Arty에 soft processor를 instantiate하는 한 방법은 Arm의 Arm DesignStart FPGA Xilinx edition reference design을 사용하는 것입니다. Zephyr는 Cortex-M1과 Cortex-M3 reference design을 모두 지원합니다. Cortex-M1 design은 Spartan-7 또는 Artix-7 기반 Arty를 대상으로 하고 Cortex-M3 design은 Artix-7 기반 board만 대상으로 합니다. 현재 Zephyr는 Artix-7 target design만 지원합니다.
자세한 내용은 Technical Resources for DesignStart FPGA, Technical Resources for DesignStart FPGA on Xilinx, Arm DesignStart FPGA Xilinx FAQs를 참고하십시오.
지원 기능
arty_a7/designstart_fpga_cortex_m1 board configuration은 Cortex-M1 reference design의 다음 hardware 기능을 지원합니다.
| Interface | Controller | Driver/Component |
|---|---|---|
| NVIC | on-chip | nested vector interrupt controller |
| SYSTICK | on-chip | systick |
| GPIO | on-chip | gpio, non-interrupt |
| UART | on-chip | serial port-polling; serial port-interrupt |
| QSPI | on-chip | QSPI flash |
Cortex-M1 기본 configuration은 boards/digilent/arty_a7/arty_a7_designstart_fpga_cortex_m1_defconfig에 있습니다.
이에 더해 arty_a7/designstart_fpga_cortex_m3 board configuration은 Cortex-M3 reference design의 MPU(on-chip Memory Protection Unit)를 지원합니다.
| Interface | Controller | Driver/Component |
|---|---|---|
| MPU | on-chip | Memory Protection Unit |
Cortex-M3 기본 configuration은 boards/digilent/arty_a7/arty_a7_designstart_fpga_cortex_m3_defconfig에 있습니다. 다른 hardware 기능은 현재 이 port에서 지원하지 않습니다.
System clock
Cortex-M1 reference design은 board의 100 MHz external oscillator를 CPU system clock으로 사용하도록 구성됩니다. Cortex-M3 reference design의 CPU system clock은 50 MHz입니다.
Serial port
reference design에는 Xilinx UART Lite 하나가 있습니다. 이 UART는 console로 구성되며 USB connector J10을 통해 on-board JTAG adapter에서 접근할 수 있습니다.
Debug probe 연결
board programming에는 서로 다른 debug probe 두 개가 필요합니다. 하나는 FPGA에 연결된 on-board Digilent JTAG이고 다른 하나는 Arm Cortex-M1 CPU에 연결하는 external SWD(Serial Wire Debug) capable probe입니다.
on-board JTAG는 Xilinx FPGA 자체의 configuration과 debugging에 사용하며 USB connector J10에서 사용할 수 있습니다.
external SWD debug probe는 connector J4에 연결할 수 있습니다. nSRST는 IO39, SWDIO는 IO40, SWCLK는 IO41입니다. 전용 V2C-DAPLink shield를 사용하는 방법도 있습니다.
프로그래밍과 디버깅
먼저 Arm Cortex-M1/M3 DesignStart FPGA Xilinx edition user guide의 설명에 따라 Xilinx Vivado로 선택한 reference design FPGA bitstream을 FPGA에 구성합니다. user guide는 Technical Resources for DesignStart FPGA on Xilinx에서 reference design과 함께 내려받을 수 있습니다.
또 다른 방법은 OpenOCD host tool로 reference design bitstream을 구성하는 것입니다.
openocd -f board/arty_s7.cfg -c "init;\
     pld load 0 m1_for_arty_a7_reference.bit;\
     shutdown"
또는 Cortex-M3 bitstream을 사용합니다.
openocd -f board/arty_s7.cfg -c "init;\
     pld load 0 m3_for_arty_a7_reference.bit;\
shutdown"그 다음 일반적인 방법으로 application을 build하고 flash합니다.
Console 구성
UART console은 USB connector J10의 on-board JTAG를 통해 제공됩니다. on-board JTAG는 USB serial port 두 개로 enumerate되며 UART는 일반적으로 두 번째 serial port입니다.
원하는 serial terminal에 다음 설정을 사용합니다.
- Speed: 115200
- Data: 8 bits
- Parity: None
- Stop bits: 1
Flashing
다음은 Cortex-M1 reference design용 hello_world application을 build하고 flash하는 예입니다.
west build -b arty_a7/designstart_fpga_cortex_m1 samples/hello_world
west flash
flash 뒤 terminal에 다음과 비슷한 message가 보여야 합니다.
*** Booting Zephyr OS build zephyr-v2.3.99  ***
Hello World! arty_a7
Cortex-M3 reference design에도 같은 절차를 사용할 수 있습니다.
하지만 위 단계는 application을 flash memory에 영구 저장하지 않습니다. FPGA internal block RAM에만 기록합니다. 다음에 FPGA를 구성하면 FPGA bitstream의 block RAM에 저장된 application으로 되돌아갑니다.
application을 FPGA bitstream 안에 영구 보존하는 단계는 Arm Cortex-M1/M3 DesignStart FPGA Xilinx edition user guide에 설명되어 있습니다. CONFIG_BUILD_OUTPUT_BIN이 enable되고 SiFive elf2hex package를 사용할 수 있으면 build system이 Xilinx Vivado에서 block RAM을 initialize하기 적합한 Verilog memory hex dump zephyr.mem을 자동 생성합니다.
Debugging
다음은 Cortex-M1 reference design의 hello_world 예입니다.
west build -b arty_a7/designstart_fpga_cortex_m1 samples/hello_world
west debug
debugger에서 application을 한 단계씩 실행하면 terminal에 다음과 비슷한 message가 보여야 합니다.
*** Booting Zephyr OS build zephyr-v2.3.99  ***
Hello World! arty_a7
참고 자료
Source
출처
영어 원문에는 문단, 문서 지시문, 표, 코드, 코드 심벌, 경로를 그대로 보존했습니다.