Part 1
요약·해설
CY8CKIT-062-WiFi-BT는 150 MHz Cortex-M4, 100 MHz Cortex-M0+, flash 1 MB, SRAM 288 KB와 Murata LBEE5KL1DX(CYW4343W)를 갖춥니다. M0+가 먼저 시작해 M4 firmware를 enable해야 합니다.
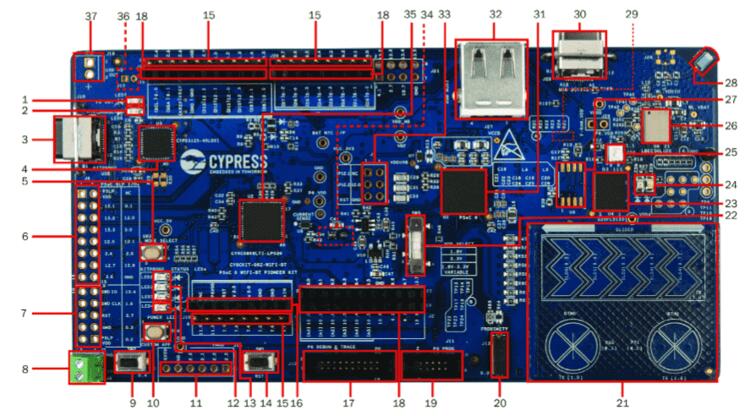
Cortex-M4 150 MHz · Cortex-M0+ 100 MHz
LBEE5KL1DX · CYW4343W Wi-Fi/Bluetooth
KitProg2 CMSIS-DAP · J-Link · OpenOCD
Part 2
접을 수 있는 영어 원문 전체
영어 원문 전체 펼치기
8E0AE960FB0303B075020FDF45EA1DB739789F7D625C74F0B7716BFC130BB68D
.. _cy8ckit_062_wifi_bt:

INFINEON PSoC6 WiFi-BT Pioneer Kit
##################################

Overview
********

The PSoC 6 WiFi-BT Pioneer Kit (CY8CKIT-062-WiFi-BT) is a low-cost hardware
platform that enables design and debug of the PSoC 62 MCU and the Murata
LBEE5KL1DX Module (CYW4343W WiFi + Bluetooth Combo Chip).

The PSoC 6 WiFi-BT Pioneer Kit features the PSoC 62 MCU: a
dual-core MCU, with a 150-MHz Arm Cortex-M4 as the primary application
processor and a 100-MHz Arm Cortex-M0+ that supports low-power operations,
1MB of Flash, 288KB of SRAM, 104 GPIO, 7 programmable analog blocks,
56 programmable digital blocks, Full-Speed USB, a serial memory interface,
a PDM-PCM digital microphone interface, and industry-leading capacitive-sensing
with CapSense.

The PSoC 6 WiFi-BT Pioneer board offers compatibility with Arduino shields.

The Cortex-M0+ is a primary core on the board's SoC. It starts first and
enables the CM4 core.

.. image:: ../../../../../../../boards/cypress/cy8ckit_062_wifi_bt/doc/img/cy8ckit_062_wifi_bt_m0.jpg
     :align: center
     :alt: CY8CKIT_062_WIFI_BT

1. USB PD output voltage availability indicator (LED7)
2. Battery charging indicator (LED6)
3. KitProg2 USB Type-C connector (J10)
4. Cypress EZ-PD™ CCG3 Type-C Port Controller with PD (CYPD3125-40LQXI, U3)
5. KitProg2 programming mode selection button (SW3)
6. KitProg2 I/O header (J6)1
7. KitProg2 programming/custom application header (J7)1
8. External power supply connector (J9)
9. PSoC 6 user button (SW2)
10. KitProg2 application selection button (SW4)
11. Digilent® Pmod™ compatible I/O header (J14)1
12. Power LED (LED4)
13. KitProg2 status LEDs (LED1, LED2, and LED3)
14. PSoC 6 reset button (SW1)
15. PSoC 6 I/O header (J18, J19 and J20)
16. Arduino™ Uno R3 compatible power header (J1)
17. PSoC 6 debug and trace header (J12)
18. Arduino Uno R3 compatible PSoC 6 I/O header (J2, J3 and J4)
19. PSoC 6 program and debug header (J11)
20. CapSense proximity header (J13)
21. CapSense slider and buttons
22. PSoC 6 VDD selection switch (SW5)
23. Cypress  512-Mbit  serial  NOR  Flash  memory  (S25-FL512S, U4)
24. PSoC 6 user LEDs (LED8 and LED9)
25. RGB LED (LED5)
26. WiFi/BT module (LBEE5KL 1DX, U6)
27. Cypress serial Ferroelectric RAM (U5)1
28. WiFi-BT Antenna
29. VBACKUP and PMIC control selection switch (SW7)2
30. PSoC 6 USB device Type-C connector (J28)
31. Cypress PSoC 6 (CY8C6247BZI-D54, U1)
32. PSoC 6 USB Host Type-A connector (J27)
33. Arduino Uno R3 compatible ICSP header (J5)1
34. PSoC 6 power monitoring jumper (J8)2
35. KitProg2  (PSoC  5LP)  programmer  and  debugger(CY8C5868LTI-LP039, U2)
36. Battery connector (J15)1,2
37. USB PD output voltage (9V/12V) connector (J16)

Hardware
********

For more information about the PSoC 62 MCU SoC and CY8CKIT-062-WiFi-BT board:

- `PSoC 62 MCU SoC Website`_
- `PSoC 62 MCU Datasheet`_
- `PSoC 62 MCU Architecture Reference Manual`_
- `PSoC 62 MCU Register Reference Manual`_
- `CY8CKIT-062-WiFi-BT Website`_
- `CY8CKIT-062-WiFi-BT User Guide`_
- `CY8CKIT-062-WiFi-BT Schematics`_

Supported Features
==================

The board configuration supports the following hardware features:

+-----------+------------+-----------------------+
| Interface | Controller | Driver/Component      |
+===========+============+=======================+
| NVIC      | on-chip    | nested vectored       |
|           |            | interrupt controller  |
+-----------+------------+-----------------------+
| SYSTICK   | on-chip    | system clock          |
+-----------+------------+-----------------------+
| PINCTRL   | on-chip    | pin control           |
+-----------+------------+-----------------------+
| UART      | on-chip    | serial port-polling;  |
|           |            | serial port-interrupt |
+-----------+------------+-----------------------+


The default configuration can be found in the Kconfig
:zephyr_file:`boards/cypress/cy8ckit_062_wifi_bt/cy8ckit_062_wifi_bt_cy8c6247_m0_defconfig`.


System Clock
============

The PSoC 62 MCU SoC is configured to use the internal IMO+FLL as a source for
the system clock. CM0+ works at 50MHz, CM4 - at 100MHz. Other sources for the
system clock are provided in the SOC, depending on your system requirements.

Serial Port
===========

The PSoC 62 MCU SoC has 9 SCB blocks 8 of each can be configured as UART
interfaces for serial communication. At the moment UART5 on SCB5 and UART6 on
SCB6 are configured. SCB5 is connected to the onboard KitProg2's USB-UART
Bridge, SCB6 to P12_0, P12_1 pins on the J3 of the Arduino Uno R3 compatible
PSoC6 I/O header.

OpenOCD Installation
====================

To get the OpenOCD package, it is required that you

1. Download the software ModusToolbox 3.1. https://softwaretools.infineon.com/tools/com.ifx.tb.tool.modustoolbox
2. Once downloaded add the path to access the Scripts folder provided by ModusToolbox
   export PATH=$PATH:/path/to/ModusToolbox/tools_3.1/openocd/scripts
3. Add the OpenOCD executable file's path to west flash/debug.
4. Flash using: west flash --openocd path/to/infineon/openocd/bin/openocd
5. Debug using: west debug --openocd path/to/infineon/openocd/bin/openocd


Programming and Debugging
*************************

The CY8CKIT-062-WiFi-BT includes an onboard programmer/debugger (KitProg2) with
mass storage programming to provide debugging, flash programming, and serial
communication over USB. There are also PSoC 6 program and debug headers J11
and J12 that can be used with Segger J-Link.
A watchdog timer is enabled by default. To disable it call Cy_WDT_Unlock() and
Cy_WDT_Disable().

Only the CM0+ core starts by default after the MCU reset.  In order to have
CM4 core working FW for both cores should be written into Flash.  CM0+ FW
should starts the CM4 core at one point using
Cy_SysEnableCM4(CM4_START_ADDRESS); call.  CM4_START_ADDRESS is 0x10060000 in
the current configuration. The CM0+/CM4 Flash/SRAM areas are defined in
:zephyr_file:`dts/arm/cypress/psoc6.dtsi`.

Build the project for CM0+

.. zephyr-app-commands::
   :board: cy8ckit_062_wifi_bt/cy8c6247/m0
   :goals: build

Switch the DevKit into CMSIS-DAP mode using SW3 (LED2 should blink) and flash
the board:

.. code-block:: console

   $<openocd_path>\bin\openocd -c "source [find interface/cmsis-dap.cfg]" \
      -c "transport select swd" -c "source [find target/psoc6.cfg]" \
      -c "if [catch {program {<zephyr_path>\samples\hello_world\build\zephyr\zephyr.elf}} ] \
         { echo {** Program operation failed **} } \
         else { echo {** Program operation completed successfully **} }" \
      -c "reset_config srst_only;reset run;psoc6.dap dpreg 0x04 0x00;shutdown"

Switch the DevKit back using SW3. Open a serial terminal (minicom, putty,
etc.) and connect to the board with the following settings:

- Speed: 115200
- Data: 8 bits
- Parity: None
- Stop bits: 1

Reset the board and the following message will appear on the corresponding
serial port:

.. code-block:: console

   ***** Booting Zephyr OS zephyr-v1.13.0-1877-g9d14874db1 *****
   Hello World! cy8ckit_062_wifi_bt


References
**********

.. _PSoC 62 MCU SoC Website:
	https://www.cypress.com/products/32-bit-arm-cortex-m4-psoc-6

.. _PSoC 62 MCU Datasheet:
	https://www.cypress.com/documentation/datasheets/psoc-6-mcu-psoc-62-datasheet-programmable-system-chip-psoc-preliminary

.. _PSoC 62 MCU Architecture Reference Manual:
	https://www.cypress.com/documentation/technical-reference-manuals/psoc-6-mcu-psoc-62-architecture-technical-reference-manual

.. _PSoC 62 MCU Register Reference Manual:
	https://www.cypress.com/documentation/technical-reference-manuals/psoc-6-mcu-psoc-62-register-technical-reference-manual-trm

.. _CY8CKIT-062-WiFi-BT Website:
   https://www.cypress.com/documentation/development-kitsboards/psoc-6-wifi-bt-pioneer-kit

.. _CY8CKIT-062-WiFi-BT User Guide:
   https://www.cypress.com/file/407731/download

.. _CY8CKIT-062-WiFi-BT Schematics:
   https://www.cypress.com/file/420846/download
Part 3
한국어 전문 번역
개요
PSoC 6 WiFi-BT Pioneer Kit(CY8CKIT-062-WiFi-BT)는 PSoC 62 MCU와 Murata LBEE5KL1DX module(CYW4343W Wi-Fi + Bluetooth combo chip)을 설계하고 debug할 수 있게 하는 저비용 hardware platform입니다.
PSoC 62는 primary application processor인 150 MHz Arm Cortex-M4와 low-power operation을 지원하는 100 MHz Arm Cortex-M0+로 구성된 dual-core MCU입니다. flash 1 MB, SRAM 288 KB, GPIO 104개, programmable analog block 7개, programmable digital block 56개, Full-Speed USB, serial memory interface, PDM-PCM digital microphone interface와 CapSense를 제공합니다.
board는 Arduino shield와 호환됩니다. SoC에서는 Cortex-M0+가 primary core이며 먼저 시작한 뒤 CM4 core를 enable합니다.
그림에 표시된 주요 구성 요소 37개는 다음과 같습니다.
- USB PD output voltage availability indicator(LED7)
- Battery charging indicator(LED6)
- KitProg2 USB Type-C connector(J10)
- PD를 지원하는 Cypress EZ-PD CCG3 Type-C Port Controller(CYPD3125-40LQXI, U3)
- KitProg2 programming mode selection button(SW3)
- KitProg2 I/O header(J6)¹
- KitProg2 programming/custom application header(J7)¹
- External power supply connector(J9)
- PSoC 6 user button(SW2)
- KitProg2 application selection button(SW4)
- Digilent Pmod compatible I/O header(J14)¹
- Power LED(LED4)
- KitProg2 status LED(LED1, LED2, LED3)
- PSoC 6 reset button(SW1)
- PSoC 6 I/O header(J18, J19, J20)
- Arduino Uno R3 compatible power header(J1)
- PSoC 6 debug and trace header(J12)
- Arduino Uno R3 compatible PSoC 6 I/O header(J2, J3, J4)
- PSoC 6 program and debug header(J11)
- CapSense proximity header(J13)
- CapSense slider와 button
- PSoC 6 VDD selection switch(SW5)
- Cypress 512-Mbit serial NOR flash memory(S25-FL512S, U4)
- PSoC 6 user LED(LED8, LED9)
- RGB LED(LED5)
- WiFi/BT module(LBEE5KL 1DX, U6)
- Cypress serial Ferroelectric RAM(U5)¹
- WiFi-BT antenna
- VBACKUP와 PMIC control selection switch(SW7)²
- PSoC 6 USB device Type-C connector(J28)
- Cypress PSoC 6(CY8C6247BZI-D54, U1)
- PSoC 6 USB Host Type-A connector(J27)
- Arduino Uno R3 compatible ICSP header(J5)¹
- PSoC 6 power monitoring jumper(J8)²
- KitProg2(PSoC 5LP) programmer/debugger(CY8C5868LTI-LP039, U2)
- Battery connector(J15)¹,²
- USB PD output voltage(9 V/12 V) connector(J16)
하드웨어
PSoC 62 MCU SoC와 CY8CKIT-062-WiFi-BT board의 자세한 정보는 다음 공식 자료를 참고하십시오.
- PSoC 62 MCU SoC Website
- PSoC 62 MCU Datasheet
- PSoC 62 MCU Architecture Reference Manual
- PSoC 62 MCU Register Reference Manual
- CY8CKIT-062-WiFi-BT Website
- CY8CKIT-062-WiFi-BT User Guide
- CY8CKIT-062-WiFi-BT Schematics
지원 기능
board configuration은 다음 hardware 기능을 지원합니다.
| Interface | Controller | Driver/Component |
|---|---|---|
| NVIC | on-chip | nested vectored interrupt controller |
| SYSTICK | on-chip | system clock |
| PINCTRL | on-chip | pin control |
| UART | on-chip | serial port-polling; serial port-interrupt |
기본 configuration은 boards/cypress/cy8ckit_062_wifi_bt/cy8ckit_062_wifi_bt_cy8c6247_m0_defconfig에서 확인할 수 있습니다.
System clock
PSoC 62 MCU SoC는 internal IMO+FLL을 system clock source로 사용하도록 구성됩니다. CM0+는 50 MHz, CM4는 100 MHz로 동작합니다. system 요구 사항에 따라 SoC가 제공하는 다른 system clock source도 사용할 수 있습니다.
Serial port
PSoC 62 MCU SoC에는 SCB block 9개가 있고 그중 8개를 serial communication용 UART interface로 구성할 수 있습니다. 현재 SCB5의 UART5와 SCB6의 UART6가 구성되어 있습니다. SCB5는 on-board KitProg2 USB-UART Bridge에 연결되고, SCB6는 Arduino Uno R3 compatible PSoC 6 I/O header J3의 P12_0·P12_1 pin에 연결됩니다.
OpenOCD 설치
OpenOCD package를 사용하려면 다음 절차를 따릅니다.
- ModusToolbox 3.1을 내려받습니다.
- 내려받은 뒤 ModusToolbox가 제공하는 Scripts folder에 접근할 수 있도록 path를 추가합니다.
export PATH=$PATH:/path/to/ModusToolbox/tools_3.1/openocd/scripts west flash/debug에 OpenOCD executable file path를 추가합니다.- 다음과 같이 flash합니다.
west flash --openocd path/to/infineon/openocd/bin/openocd - 다음과 같이 debug합니다.
west debug --openocd path/to/infineon/openocd/bin/openocd
프로그래밍과 디버깅
CY8CKIT-062-WiFi-BT에는 mass-storage programming을 지원하는 on-board KitProg2 programmer/debugger가 있어 USB로 debug, flash programming과 serial communication을 제공합니다. PSoC 6 program/debug header J11·J12에는 SEGGER J-Link를 사용할 수 있습니다.
watchdog timer는 기본으로 enable됩니다. disable하려면 Cy_WDT_Unlock()과 Cy_WDT_Disable()을 호출합니다.
MCU reset 뒤에는 CM0+ core만 기본으로 시작됩니다. CM4 core를 동작시키려면 두 core의 firmware를 모두 flash에 기록해야 합니다. CM0+ firmware는 적절한 시점에 Cy_SysEnableCM4(CM4_START_ADDRESS)를 호출해 CM4 core를 시작해야 합니다. 현재 configuration의 CM4_START_ADDRESS는 0x10060000입니다. CM0+/CM4 flash·SRAM 영역은 dts/arm/cypress/psoc6.dtsi에 정의됩니다.
CM0+용 project를 build합니다.
west build -b cy8ckit_062_wifi_bt/cy8c6247/m0SW3을 사용해 DevKit을 CMSIS-DAP mode로 전환합니다. LED2가 깜박여야 합니다. 그 다음 다음 command로 board를 flash합니다.
$<openocd_path>\bin\openocd -c "source [find interface/cmsis-dap.cfg]" \
  -c "transport select swd" -c "source [find target/psoc6.cfg]" \
  -c "if [catch {program {<zephyr_path>\samples\hello_world\build\zephyr\zephyr.elf}} ] \
     { echo {** Program operation failed **} } \
     else { echo {** Program operation completed successfully **} }" \
  -c "reset_config srst_only;reset run;psoc6.dap dpreg 0x04 0x00;shutdown"
SW3으로 DevKit을 원래 mode로 되돌립니다. serial terminal(minicom, PuTTY 등)을 열고 다음 설정으로 board에 연결합니다.
- Speed: 115200
- Data: 8 bits
- Parity: None
- Stop bits: 1
board를 reset하면 해당 serial port에 다음 message가 나타납니다.
***** Booting Zephyr OS zephyr-v1.13.0-1877-g9d14874db1 *****
Hello World! cy8ckit_062_wifi_bt
참고 자료
Source
출처
영어 원문에는 문단, 문서 지시문, 표, 코드, 코드 심벌, 경로를 그대로 보존했습니다.