Part 1
요약·해설
CY8CKIT-062-BLE는 150 MHz Cortex-M4와 100 MHz Cortex-M0+, flash 1 MB, SRAM 288 KB, BLE 4.2, CapSense와 KitProg2를 제공합니다. M0+가 먼저 시작해 M4를 enable합니다.
Cortex-M4 150 MHz · Cortex-M0+ 100 MHz
Flash 1 MB · SRAM 288 KB · NOR 512 Mb
KitProg2 · J-Link · OpenOCD
Part 2
접을 수 있는 영어 원문 전체
영어 원문 전체 펼치기
8061CE94A0F0DBA5D51BB8EBCF19DD5C63C61A2702275D5660613E74B3A9969A
.. _cy8ckit_062_ble:

INFINEON PSoC63 BLE Pioneer Kit
###############################

Overview
********

The PSoC 6 BLE Pioneer Kit (CY8CKIT-062-BLE) is a hardware platform that
enables design and debug of the Cypress PSoC 63 BLE MCU.

The PSoC 6 BLE Pioneer Kit features the PSoC 63 MCU: a dual-core MCU, with a
150-MHz Arm Cortex-M4 as the primary application processor and a 100-MHz Arm
Cortex-M0+ that supports low-power operations, 1MB of Flash, 288KB of SRAM,
an integrated BLE 4.2 radio, 78 GPIO, 7 programmable analog blocks, 12
programmable digital blocks, and capacitive-sensing with CapSense.

The PSoC 6 BLE Pioneer board offers compatibility with Arduino shields, a
512-Mb NOR flash, onboard programmer/debugger (KitProg2), USB Type-C power
delivery system (EZ-PD™ CCG3), 5-segment CapSense slider, two CapSense
buttons, one CapSense proximity sensing header, an RGB LED, two user LEDs,
and one push button.

The CY8CKIT-062-BLE package includes a CY8CKIT-028-EPD E-INK Display Shield
that contains a 2.7-inch E-INK display, a motion sensor, a thermistor, and a
PDM microphone. The kit package also contains a CY5677 CySmart BLE 4.2 USB
Dongle that is factory-programmed to emulate a BLE GAP Central device,
enabling you to emulate a BLE host on your computer.

The Cortex-M0+ is a primary core on the board's SoC. It starts first and
enables the CM4 core.

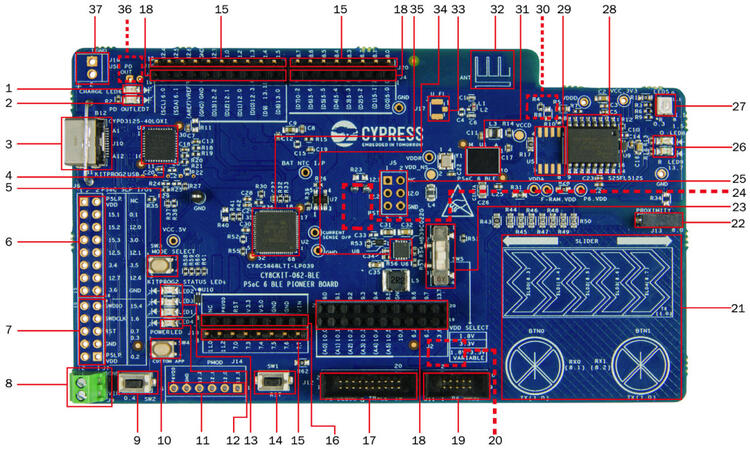
.. image:: ../../../../../../../boards/cypress/cy8ckit_062_ble/doc/img/cy8ckit-062-ble.jpg
     :align: center
     :alt: CY8CKIT_062_BLE

1. Battery charging indicator (LED6)
2. USB PD output voltage availability indicator (LED7)
3. KitProg2 USB Type-C connector (J10)
4. Cypress EZ-PD™ CCG3 Type-C Port Controller with PD (CYPD3125-40LQXI, U3)
5. KitProg2 programming mode selection button (SW3)
6. KitProg2 I/O header (J6)1
7. KitProg2 programming/custom application header (J7)1
8. External power supply connector (J9)
9. PSoC 6 BLE user button (SW2)
10. KitProg2 application selection button (SW4)
11. Digilent® Pmod™ compatible I/O header (J14)1
12. Power LED (LED4)
13. KitProg2 status LEDs (LED1, LED2, and LED3)
14. PSoC 6 reset button (SW1)
15. PSoC 6 I/O header (J18, J19 and J20)
16. Arduino™ Uno R3 compatible power header (J1)
17. PSoC 6 debug and trace header (J12)
18. Arduino Uno R3 compatible PSoC 6 I/O header (J2, J3 and J4)
19. PSoC 6 program and debug header (J11)
20. KitProg2 programming target selection switch (SW6)
21. CapSense slider and buttons
22. CapSense proximity header (J13)
23. PSoC 6 BLE VDD selection switch (SW5)
24. PSoC 6 BLE power monitoring jumper (J8)2
25. Arduino Uno R3 compatible ICSP header (J5)1
26. PSoC 6 user LEDs (LED8 and LED9)
27. RGB LED (LED5)
28. Cypress  512-Mbit  serial  NOR  Flash  memory  (S25FL512S, U4)
29. Cypress serial Ferroelectric RAM (U5)1
30. VBACKUP and PMIC control selection switch (SW7)2
31. Cypress PSoC 6 BLE (CY8C6347BZI-BLD53, U1)
32. BLE Antenna
33. U.FL connector for external antenna (J17)1
34. Cypress main voltage regulator (MB39C022G, U6)
35. KitProg2  (PSoC  5LP)  programmer  and  debugger(CY8C5868LTI-LP039, U2)
36. Battery connector (J15)1,2
37. USB PD output voltage (9V/12V) connector (J16)

Hardware
********

For more information about the PSoC 63 BLE MCU SoC and CY8CKIT-062-BLE board:

- `PSoC 63 BLE MCU SoC Website`_
- `PSoC 63 BLE MCU Datasheet`_
- `PSoC 63 BLE MCU Architecture Reference Manual`_
- `PSoC 63 BLE MCU Register Reference Manual`_
- `CY8CKIT-062-BLE Website`_
- `CY8CKIT-062-BLE User Guide`_
- `CY8CKIT-062-BLE Schematics`_

Supported Features
==================

The board configuration supports the following hardware features:

+-----------+------------+-----------------------+
| Interface | Controller | Driver/Component      |
+===========+============+=======================+
| NVIC      | on-chip    | nested vectored       |
|           |            | interrupt controller  |
+-----------+------------+-----------------------+
| SYSTICK   | on-chip    | system clock          |
+-----------+------------+-----------------------+
| GPIO      | on-chip    | gpio                  |
+-----------+------------+-----------------------+
| PINCTRL   | on-chip    | pin control           |
+-----------+------------+-----------------------+
| SPI       | on-chip    | spi                   |
+-----------+------------+-----------------------+
| UART      | on-chip    | serial port-polling;  |
|           |            | serial port-interrupt |
+-----------+------------+-----------------------+


The default configurations can be found in the Kconfig
:zephyr_file:`boards/cypress/cy8ckit_062_ble/cy8ckit_062_ble_cy8c6347_m0_defconfig` for
Cortex-M0+ and on the Kconfig
:zephyr_file:`boards/cypress/cy8ckit_062_ble/cy8ckit_062_ble_cy8c6347_m4_defconfig` for
Cortex-M4

System Clock
============

The PSoC 63 BLE MCU SoC is configured to use the internal IMO+FLL as a source for
the system clock. CM0+ works at 50MHz, CM4 - at 100MHz. Other sources for the
system clock are provided in the SOC, depending on your system requirements.

Serial Port
===========

The PSoC 63 BLE MCU SoC has 8 SCB blocks and each one can be configured as
UART/SPI/I2C interfaces for serial communication. At the moment UART5 on SCB5
and UART6 on SCB6 are configured. SCB5 is connected to the onboard KitProg2's
USB-UART Bridge working as a serial console interface. SCB6 to P13_0, P13_1
pins on the J3 of the Arduino Uno R3 compatible PSoC6 I/O header for general
purposes.

OpenOCD Installation
====================

To get the OpenOCD package, it is required that you

1. Download the software ModusToolbox 3.1. https://softwaretools.infineon.com/tools/com.ifx.tb.tool.modustoolbox
2. Once downloaded add the path to access the Scripts folder provided by ModusToolbox
   export PATH=$PATH:/path/to/ModusToolbox/tools_3.1/openocd/scripts
3. Add the OpenOCD executable file's path to west flash/debug.
4. Flash using: west flash --openocd path/to/infineon/openocd/bin/openocd
5. Debug using: west debug --openocd path/to/infineon/openocd/bin/openocd

Programming and Debugging
*************************

The CY8CKIT-062-BLE includes an onboard programmer/debugger (KitProg2) with
mass storage programming to provide debugging, flash programming, and serial
communication over USB. There are also PSoC 6 program and debug headers J11
and J12 that can be used with Segger J-Link [default].
A watchdog timer is enabled by default. To disable it call Cy_WDT_Unlock() and
Cy_WDT_Disable().

#. Build the Zephyr kernel and the :ref:`hello_world` sample application:

   .. zephyr-app-commands::
      :zephyr-app: samples/hello_world
      :board: cy8ckit_062_ble/cy8c6347/m0
      :goals: build
      :compact:

#. Run your favorite terminal program to listen for output. Under Linux the
   terminal should be :code:`/dev/ttyACM0`. For example:

   .. code-block:: console

      $ minicom -D /dev/ttyACM0 -o

   The -o option tells minicom not to send the modem initialization
   string. Connection should be configured as follows:

      - Speed: 115200
      - Data: 8 bits
      - Parity: None
      - Stop bits: 1

#. To flash an image:

   .. zephyr-app-commands::
      :zephyr-app: samples/hello_world
      :board: cy8ckit_062_ble/cy8c6347/m0
      :goals: flash
      :compact:

   You should see "Hello World! cy8ckit_062_ble" in your terminal.

Running on Dual Core
********************

#. Build the Zephyr kernel and the :zephyr:code-sample:`button` sample application:

   .. zephyr-app-commands::
      :zephyr-app: samples/basic/button
      :board: cy8ckit_062_ble/cy8c6347/m4
      :goals: build
      :compact:

#. If you have a USB-Serial adapter, you can connect SBC[UART]-6 on Arduino
   header.  Schematic should be checked for connections.   Run your favorite
   terminal program again now listen for another output.   Under Linux the
   terminal should be :code:`/dev/ttyUSB0`. For example:

   .. code-block:: console

      $ minicom -D /dev/ttyUSB0 -o

   The -o option tells minicom not to send the modem initialization
   string. Connection should be configured as follows:

      - Speed: 115200
      - Data: 8 bits
      - Parity: None
      - Stop bits: 1

#. To flash an image:

   .. zephyr-app-commands::
      :zephyr-app: samples/basic/button
      :board: cy8ckit_062_ble/cy8c6347/m4
      :goals: flash
      :compact:

#. Configure Cortex-M0+ to enable Cortex-M4:

   The last step flash the M4 image on the flash.  However, Cortex-M0 by default
   doesn't start the M4 and nothing will happen.  To enable Cortex-M4 CPU,
   repeat the steps on programming and debug and add the following parameter
   when performing the build process.

   .. zephyr-app-commands::
      :zephyr-app: samples/hello_world
      :board: cy8ckit_062_ble/cy8c6347/m0
      :goals: build flash
      :gen-args: -DCONFIG_SOC_PSOC6_M0_ENABLES_M4=y
      :compact:

   Now you can press button SW-2 and see LED-9 blink at same time you have the
   "Hello World! cy8ckit_062_ble" in the your terminal.

Board Revision
**************

The CY8CKIT-062-BLE KitProg2 shares connections with Arduino-R3 header.  This
connections may not allow the correct use of shields.  The default board
revision (0.0.0) allows use of default connections.  The use of Arduino headers
are only possible after rework the board and using the revision 1.0.0.

#. Build the Zephyr kernel and the :ref:`hello_world` sample application for
   board revision 1.0.0:

   .. zephyr-app-commands::
      :zephyr-app: samples/hello_world
      :board: [email protected]/cy8c6347/m0
      :goals: build
      :compact:

#. The differences from version 0.0.0 to 1.0.0:

+-------------+------------+------------+
| Connection  | 0.0.0      | 1.0.0      |
+=============+============+============+
| CDC-COM RX  | P5_0       | P9_0       |
+-------------+------------+------------+
| CDC-COM TX  | P5_1       | P9_1       |
+-------------+------------+------------+
| R77         |  X         |            |
+-------------+------------+------------+
| R78         |            |   X        |
+-------------+------------+------------+


The P9 pins are available at J2. Those signals should be routed to J6.

J2-2 to J6-14
J2-4 to J6-13

The most complex part is short circuit pins 14 and 15 from U13.  That connect
UART_RTS with UART_CTS from KitProg2.

References
**********

.. _PSoC 63 BLE MCU SoC Website:
	https://www.cypress.com/products/32-bit-arm-cortex-m4-cortex-m0-psoc-63-connectivity-line

.. _PSoC 63 BLE MCU Datasheet:
	https://www.cypress.com/documentation/datasheets/psoc-6-mcu-psoc-63-ble-datasheet-programmable-system-chip-psoc

.. _PSoC 63 BLE MCU Architecture Reference Manual:
	https://www.cypress.com/documentation/technical-reference-manuals/psoc-6-mcu-psoc-63-ble-architecture-technical-reference

.. _PSoC 63 BLE MCU Register Reference Manual:
	https://www.cypress.com/documentation/technical-reference-manuals/psoc-6-mcu-cy8c63x6-cy8c63x7-cy8c63x6-cy8c63x7-registers

.. _CY8CKIT-062-BLE Website:
   https://www.cypress.com/documentation/development-kitsboards/psoc-6-ble-pioneer-kit-cy8ckit-062-ble

.. _CY8CKIT-062-BLE User Guide:
   https://www.cypress.com/file/390496/download

.. _CY8CKIT-062-BLE Schematics:
   https://www.cypress.com/file/417021/download
Part 3
한국어 전문 번역
개요
PSoC 6 BLE Pioneer Kit(CY8CKIT-062-BLE)는 Cypress PSoC 63 BLE MCU를 설계하고 debug할 수 있게 하는 hardware platform입니다.
PSoC 63 MCU는 primary application processor인 150 MHz Arm Cortex-M4와 low-power operation을 지원하는 100 MHz Arm Cortex-M0+로 구성된 dual-core MCU입니다. flash 1 MB, SRAM 288 KB, 통합 BLE 4.2 radio, GPIO 78개, programmable analog block 7개, programmable digital block 12개와 CapSense capacitive sensing을 제공합니다.
board는 Arduino shield와 호환되며 NOR flash 512 Mb, on-board KitProg2 programmer/debugger, EZ-PD CCG3 USB Type-C power delivery, 5-segment CapSense slider, CapSense button 2개, CapSense proximity sensing header 1개, RGB LED, user LED 2개와 push button 1개를 제공합니다.
package에는 2.7-inch E-INK display, motion sensor, thermistor와 PDM microphone이 있는 CY8CKIT-028-EPD E-INK Display Shield가 포함됩니다. factory programming으로 BLE GAP Central device를 emulate하는 CY5677 CySmart BLE 4.2 USB Dongle도 포함되어 computer에서 BLE host를 emulate할 수 있습니다.
board SoC에서는 Cortex-M0+가 primary core입니다. M0+가 먼저 시작한 뒤 CM4 core를 enable합니다.
그림에 표시된 주요 구성 요소 37개는 다음과 같습니다.
- Battery charging indicator(LED6)
- USB PD output voltage availability indicator(LED7)
- KitProg2 USB Type-C connector(J10)
- PD를 지원하는 Cypress EZ-PD CCG3 Type-C Port Controller(CYPD3125-40LQXI, U3)
- KitProg2 programming mode selection button(SW3)
- KitProg2 I/O header(J6)¹
- KitProg2 programming/custom application header(J7)¹
- External power supply connector(J9)
- PSoC 6 BLE user button(SW2)
- KitProg2 application selection button(SW4)
- Digilent Pmod compatible I/O header(J14)¹
- Power LED(LED4)
- KitProg2 status LED(LED1, LED2, LED3)
- PSoC 6 reset button(SW1)
- PSoC 6 I/O header(J18, J19, J20)
- Arduino Uno R3 compatible power header(J1)
- PSoC 6 debug and trace header(J12)
- Arduino Uno R3 compatible PSoC 6 I/O header(J2, J3, J4)
- PSoC 6 program and debug header(J11)
- KitProg2 programming target selection switch(SW6)
- CapSense slider와 button
- CapSense proximity header(J13)
- PSoC 6 BLE VDD selection switch(SW5)
- PSoC 6 BLE power monitoring jumper(J8)²
- Arduino Uno R3 compatible ICSP header(J5)¹
- PSoC 6 user LED(LED8, LED9)
- RGB LED(LED5)
- Cypress 512-Mbit serial NOR flash memory(S25FL512S, U4)
- Cypress serial Ferroelectric RAM(U5)¹
- VBACKUP와 PMIC control selection switch(SW7)²
- Cypress PSoC 6 BLE(CY8C6347BZI-BLD53, U1)
- BLE antenna
- external antenna용 U.FL connector(J17)¹
- Cypress main voltage regulator(MB39C022G, U6)
- KitProg2(PSoC 5LP) programmer/debugger(CY8C5868LTI-LP039, U2)
- Battery connector(J15)¹,²
- USB PD output voltage(9 V/12 V) connector(J16)
하드웨어
PSoC 63 BLE MCU SoC와 CY8CKIT-062-BLE board의 자세한 정보는 다음 공식 자료를 참고하십시오.
- PSoC 63 BLE MCU SoC Website
- PSoC 63 BLE MCU Datasheet
- PSoC 63 BLE MCU Architecture Reference Manual
- PSoC 63 BLE MCU Register Reference Manual
- CY8CKIT-062-BLE Website
- CY8CKIT-062-BLE User Guide
- CY8CKIT-062-BLE Schematics
지원 기능
board configuration은 다음 hardware 기능을 지원합니다.
| Interface | Controller | Driver/Component |
|---|---|---|
| NVIC | on-chip | nested vectored interrupt controller |
| SYSTICK | on-chip | system clock |
| GPIO | on-chip | gpio |
| PINCTRL | on-chip | pin control |
| SPI | on-chip | spi |
| UART | on-chip | serial port-polling; serial port-interrupt |
기본 configuration은 Cortex-M0+의 boards/cypress/cy8ckit_062_ble/cy8ckit_062_ble_cy8c6347_m0_defconfig와 Cortex-M4의 boards/cypress/cy8ckit_062_ble/cy8ckit_062_ble_cy8c6347_m4_defconfig에서 확인할 수 있습니다.
System clock
PSoC 63 BLE MCU SoC는 internal IMO+FLL을 system clock source로 사용하도록 구성됩니다. CM0+는 50 MHz, CM4는 100 MHz로 동작합니다. system 요구 사항에 따라 SoC가 제공하는 다른 system clock source도 사용할 수 있습니다.
Serial port
PSoC 63 BLE MCU SoC에는 SCB block 8개가 있으며 각각 serial communication용 UART/SPI/I2C interface로 구성할 수 있습니다. 현재 SCB5의 UART5와 SCB6의 UART6가 구성되어 있습니다. SCB5는 serial console interface로 동작하는 on-board KitProg2 USB-UART Bridge에 연결됩니다. SCB6는 범용으로 Arduino Uno R3 compatible PSoC 6 I/O header J3의 P13_0·P13_1 pin에 연결됩니다.
OpenOCD 설치
OpenOCD package를 사용하려면 다음 절차를 따릅니다.
- ModusToolbox 3.1을 내려받습니다.
- 내려받은 뒤 ModusToolbox가 제공하는 Scripts folder에 접근할 수 있도록 path를 추가합니다.
export PATH=$PATH:/path/to/ModusToolbox/tools_3.1/openocd/scripts west flash/debug에 OpenOCD executable file path를 추가합니다.- 다음과 같이 flash합니다.
west flash --openocd path/to/infineon/openocd/bin/openocd - 다음과 같이 debug합니다.
west debug --openocd path/to/infineon/openocd/bin/openocd
프로그래밍과 디버깅
CY8CKIT-062-BLE에는 mass-storage programming을 지원하는 on-board KitProg2 programmer/debugger가 있어 USB로 debug, flash programming과 serial communication을 제공합니다. PSoC 6 program/debug header J11·J12에는 기본값인 SEGGER J-Link를 사용할 수 있습니다.
watchdog timer는 기본으로 enable됩니다. disable하려면 Cy_WDT_Unlock()과 Cy_WDT_Disable()을 호출합니다.
- Zephyr kernel과
hello_worldsample을 build합니다.west build -b cy8ckit_062_ble/cy8c6347/m0 samples/hello_world - terminal program으로 출력을 기다립니다. Linux에서는
/dev/ttyACM0입니다.$ minicom -D /dev/ttyACM0 -o-o는 minicom이 modem initialization string을 보내지 않도록 합니다. 연결 설정은 다음과 같습니다.- Speed: 115200
- Data: 8 bits
- Parity: None
- Stop bits: 1
- image를 flash합니다.
west flashterminal에
Hello World! cy8ckit_062_ble가 나타나야 합니다.
Dual core에서 실행
- Zephyr kernel과
buttonsample을 Cortex-M4용으로 build합니다.west build -b cy8ckit_062_ble/cy8c6347/m4 samples/basic/button - USB-Serial adapter가 있다면 Arduino header의 SCB[UART]-6에 연결합니다. 연결은 schematic으로 확인하십시오. Linux terminal은
/dev/ttyUSB0입니다.$ minicom -D /dev/ttyUSB0 -o-o는 modem initialization string 전송을 막습니다.- Speed: 115200
- Data: 8 bits
- Parity: None
- Stop bits: 1
- image를 flash합니다.
west flash - Cortex-M0+가 Cortex-M4를 enable하도록 구성합니다. 앞 단계는 M4 image를 flash에 기록할 뿐이며, 기본 Cortex-M0는 M4를 시작하지 않으므로 그대로는 아무 일도 일어나지 않습니다. programming/debug 절차를 반복하면서 M0 build에 다음 parameter를 추가합니다.
west build -b cy8ckit_062_ble/cy8c6347/m0 samples/hello_world -- \
  -DCONFIG_SOC_PSOC6_M0_ENABLES_M4=y
west flash
이제 SW2 button을 누르면 LED9가 깜박이고 terminal에는
Hello World! cy8ckit_062_ble가 표시됩니다.
Board revision
CY8CKIT-062-BLE KitProg2는 Arduino-R3 header와 연결을 공유합니다. 이 연결 때문에 shield가 올바르게 동작하지 않을 수 있습니다. 기본 board revision 0.0.0은 기본 연결을 사용합니다. Arduino header는 board를 rework하고 revision 1.0.0을 사용할 때만 이용할 수 있습니다.
revision 1.0.0용 hello_world를 build합니다.
west build -b [email protected]/cy8c6347/m0 samples/hello_worldversion 0.0.0과 1.0.0의 차이는 다음과 같습니다.
| Connection | 0.0.0 | 1.0.0 |
|---|---|---|
| CDC-COM RX | P5_0 | P9_0 |
| CDC-COM TX | P5_1 | P9_1 |
| R77 | X | |
| R78 | X |
P9 pin은 J2에서 사용할 수 있으며 해당 signal을 J6으로 routing해야 합니다.
- J2-2 → J6-14
- J2-4 → J6-13
가장 복잡한 작업은 U13의 pin 14와 15를 short-circuit하는 것입니다. 이렇게 하면 KitProg2의 UART_RTS와 UART_CTS가 연결됩니다.
참고 자료
Source
출처
영어 원문에는 문단, 문서 지시문, 표, 코드, 코드 심벌, 경로를 그대로 보존했습니다.