Part 1
요약·해설
SAM V71 Xplained Ultra는 SAMV71Q21A/B를 모두 지원합니다. USART1이 EDBG virtual COM console이며 OpenOCD 또는 external JTAG adapter를 사용합니다.
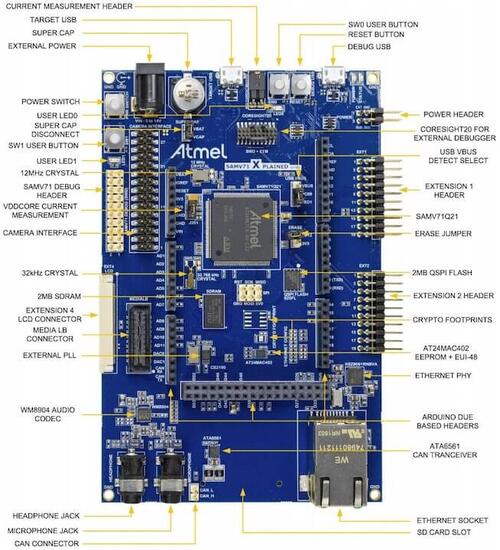
ATSAMV71Q21A/B Cortex-M7
12 MHz → PLL → 300 MHz
USART1 via EDBG
Part 2
접을 수 있는 영어 원문 전체
영어 원문 전체 펼치기
BDAB71C184A332F40FD12178492686EFC12ACBC7743E67EF4E40B51728952B61
.. _sam_v71_xplained_ultra:

SAM V71(B) Xplained Ultra
#########################

Overview
********

The SAM V71 Xplained Ultra evaluation kit is a development platform to
evaluate the Atmel SAM V71 series microcontrollers. The current version
allows to use both IC variations ATSAMV71Q21A(B).

.. image:: ../../../../../../../../boards/atmel/sam/sam_v71_xult/doc/img/sam_v71_xult.jpg
     :align: center
     :alt: SAM V71 Xplained Ultra

Hardware
********

- ATSAMV71Q21A(B) ARM Cortex-M7 Processor
- 12 MHz crystal oscillator
- 32.768 kHz crystal oscillator
- Supercap backup
- AT24MAC402 EEPROM
- IS42S16100E 16 Mb SDRAM
- S25FL116K 16 Mb QSPI
- WM8904 low power stereo audio codec
- ATA6561 CAN Transceiver
- SD card connector with SDIO support
- Camera interface connector
- MediaLB connector
- Ethernet port
- Micro-AB USB device
- Micro-AB USB debug interface supporting CMSIS-DAP, Virtual COM Port and Data
  Gateway Interface (DGI)
- JTAG interface connector
- One reset and two user pushbuttons
- Two yellow user LEDs

Supported Features
==================

The sam_v71_xplained_ultra board configuration supports the following hardware
features:

+-----------+------------+-------------------------------------+
| Interface | Controller | Driver/Component                    |
+===========+============+=====================================+
| NVIC      | on-chip    | nested vector interrupt controller  |
+-----------+------------+-------------------------------------+
| SYSTICK   | on-chip    | systick                             |
+-----------+------------+-------------------------------------+
| AFEC      | on-chip    | adc                                 |
+-----------+------------+-------------------------------------+
| CAN FD    | on-chip    | can                                 |
+-----------+------------+-------------------------------------+
| COUNTER   | on-chip    | counter                             |
+-----------+------------+-------------------------------------+
| ETHERNET  | on-chip    | ethernet                            |
+-----------+------------+-------------------------------------+
| GPIO      | on-chip    | gpio                                |
+-----------+------------+-------------------------------------+
| DAC       | on-chip    | dac                                 |
+-----------+------------+-------------------------------------+
| HWINFO    | on-chip    | Unique device serial number         |
+-----------+------------+-------------------------------------+
| I2C       | on-chip    | i2c                                 |
+-----------+------------+-------------------------------------+
| I2S       | on-chip    | i2s                                 |
+-----------+------------+-------------------------------------+
| PWM       | on-chip    | pwm                                 |
+-----------+------------+-------------------------------------+
| SPI       | on-chip    | spi                                 |
+-----------+------------+-------------------------------------+
| UART      | on-chip    | serial port                         |
+-----------+------------+-------------------------------------+
| USART     | on-chip    | serial port                         |
+-----------+------------+-------------------------------------+
| USB       | on-chip    | USB device                          |
+-----------+------------+-------------------------------------+
| WATCHDOG  | on-chip    | watchdog                            |
+-----------+------------+-------------------------------------+
| XDMAC     | on-chip    | dma                                 |
+-----------+------------+-------------------------------------+

Other hardware features are not currently supported by Zephyr.

The default configuration can be found in the Kconfig
:zephyr_file:`boards/atmel/sam/sam_v71_xult/sam_v71_xult_samv71q21_defconfig`.

Connections and IOs
===================

The `SAMV71-XULT User Guide`_ has detailed information about board
connections.

System Clock
============

The SAM V71 MCU is configured to use the 12 MHz external oscillator on the
board with the on-chip PLL to generate a 300 MHz system clock.

Serial Port
===========

The ATSAMV71Q21 MCU has five UARTs and three USARTs. USART1 is configured
for the console and is available as a Virtual COM Port via EDBG USB chip.

Programming and Debugging
*************************

Flashing the Zephyr project onto SAM V71 MCU requires the `OpenOCD tool`_.
By default a factory new SAM V71 chip will boot the `SAM-BA`_ boot loader
located in the ROM, not the flashed image. This is determined by the value
of GPNVM1 (General-Purpose NVM bit 1). The flash procedure will ensure that
GPNVM1 is set to 1 changing the default behavior to boot from Flash.

If your chip has a security bit GPNVM0 set you will be unable to program flash
memory or connect to it via a debug interface. The only way to clear GPNVM0
is to perform a chip erase procedure that will erase all GPNVM bits and the
full contents of the SAM V71 flash memory:

- With the board power off, set a jumper on the J200 header.
- Turn the board power on. The jumper can be removed soon after the power is
  on (flash erasing procedure is started when the erase line is asserted for
  at least 230ms)

Flashing
========

#. Run your favorite terminal program to listen for output. Under Linux the
   terminal should be :code:`/dev/ttyACM0`. For example:

   .. code-block:: console

      $ minicom -D /dev/ttyACM0 -o

   The -o option tells minicom not to send the modem initialization
   string. Connection should be configured as follows:

   - Speed: 115200
   - Data: 8 bits
   - Parity: None
   - Stop bits: 1

#. Connect the SAM V71 Xplained Ultra board to your host computer using the
   USB debug port. Then build and flash the :ref:`hello_world`
   application.

   .. zephyr-app-commands::
      :zephyr-app: samples/hello_world
      :board: sam_v71_xult/samv71q21
      :goals: build flash

   You should see "Hello World! sam_v71_xult" in your terminal.

#. To use the SoC variation B IC, you need type "sam_v71_xult/samv71q21b".

   .. zephyr-app-commands::
      :zephyr-app: samples/hello_world
      :board: sam_v71_xult/samv71q21b
      :goals: build flash

   You should see "Hello World! sam_v71_xult" in your terminal.

You can flash the image using an external debug adapter such as J-Link
or ULINK, connected to the 20-pin JTAG header. Supply the name of the
debug adapter (e.g., ``jlink``) via an OPENOCD_INTERFACE environment
variable. OpenOCD will look for the appropriate interface
configuration in an ``interface/$(OPENOCD_INTERFACE).cfg`` file on its
internal search path.

Debugging
=========

You can debug an application in the usual way.  Here is an example for the
:ref:`hello_world` application.

.. zephyr-app-commands::
   :zephyr-app: samples/hello_world
   :board: sam_v71_xult/samv71q21
   :maybe-skip-config:
   :goals: debug

References
**********

SAM V71 Product Page:
    https://www.microchip.com/design-centers/32-bit/sam-32-bit-mcus/sam-v-mcus

.. _SAMV71-XULT User Guide:
    http://ww1.microchip.com/downloads/en/DeviceDoc/Atmel-42408-SAMV71-Xplained-Ultra_User-Guide.pdf

.. _OpenOCD tool:
    http://openocd.org/

.. _SAM-BA:
    https://www.microchip.com/developmenttools/ProductDetails/PartNO/SAM-BA%20In-system%20Programmer
Part 3
한국어 전문 번역
개요
SAM V71 Xplained Ultra evaluation kit는 Atmel SAM V71 series microcontroller용 개발 platform이며 ATSAMV71Q21A와 ATSAMV71Q21B 두 IC variation을 지원합니다.
하드웨어
- ATSAMV71Q21A/B Arm Cortex-M7 processor
- 12 MHz와 32.768 kHz crystal, supercap backup
- AT24MAC402 EEPROM, IS42S16100E 16 Mb SDRAM, S25FL116K 16 Mb QSPI
- WM8904 low-power stereo audio codec, ATA6561 CAN transceiver
- SDIO 지원 SD card, camera interface, MediaLB, Ethernet
- Micro-AB USB device와 CMSIS-DAP·Virtual COM Port·DGI debug interface
- JTAG connector, reset button 1개, user pushbutton 2개, yellow user LED 2개
지원 기능
| Interface | Controller | Driver/Component |
|---|---|---|
| NVIC | on-chip | nested vector interrupt controller |
| SYSTICK | on-chip | systick |
| AFEC | on-chip | adc |
| CAN FD | on-chip | can |
| COUNTER | on-chip | counter |
| ETHERNET | on-chip | ethernet |
| GPIO | on-chip | gpio |
| DAC | on-chip | dac |
| HWINFO | on-chip | Unique device serial number |
| I2C | on-chip | i2c |
| I2S | on-chip | i2s |
| PWM | on-chip | pwm |
| SPI | on-chip | spi |
| UART | on-chip | serial port |
| USART | on-chip | serial port |
| USB | on-chip | USB device |
| WATCHDOG | on-chip | watchdog |
| XDMAC | on-chip | dma |
다른 hardware는 현재 지원하지 않습니다. 기본 구성은 boards/atmel/sam/sam_v71_xult/sam_v71_xult_samv71q21_defconfig입니다.
연결과 I/O
SAMV71-XULT User Guide에 board connection 세부 정보가 있습니다.
System clock
external 12 MHz oscillator와 on-chip PLL로 300 MHz system clock을 생성합니다.
Serial port
ATSAMV71Q21에는 UART 5개와 USART 3개가 있습니다. USART1이 console로 설정되고 EDBG USB chip의 Virtual COM Port로 제공됩니다.
프로그래밍과 디버깅
SAM V71 MCU에 Zephyr를 flash하려면 OpenOCD가 필요합니다. factory-new chip은 flash image가 아니라 ROM의 SAM-BA bootloader로 boot합니다. 이 동작은 General-Purpose NVM bit 1인 GPNVM1 값으로 정해지며, flash 절차가 이를 1로 설정해 기본 boot를 flash로 바꿉니다.
security bit GPNVM0가 설정되어 있으면 flash를 program할 수 없고 debug interface로 연결할 수도 없습니다. GPNVM0를 지우는 유일한 방법은 모든 GPNVM bit와 flash 전체 내용을 지우는 chip erase입니다.
- 보드 전원을 끄고
J200header에 jumper를 연결합니다. - 전원을 켭니다. erase line을 최소 230 ms assert하면 erase가 시작되므로 전원이 들어온 직후 jumper를 제거해도 됩니다.
Flashing
Linux terminal 예시는 /dev/ttyACM0이며 다음처럼 엽니다.
minicom -D /dev/ttyACM0 -o-o는 minicom이 modem initialization string을 보내지 않게 합니다. 연결은 115200 baud, 8 data bit, parity none, 1 stop bit로 설정합니다.
USB debug port로 연결합니다. A variation은 다음 target을 사용합니다.
west build -b sam_v71_xult/samv71q21 samples/hello_world
west flash
terminal에 Hello World! sam_v71_xult가 나타납니다. B variation은 다음 target을 사용합니다.
west build -b sam_v71_xult/samv71q21b samples/hello_world
west flash
20-pin JTAG header에 J-Link 또는 ULINK 같은 external debug adapter를 연결할 수도 있습니다. adapter 이름(예: jlink)을 OPENOCD_INTERFACE environment variable로 지정하면 OpenOCD가 내부 search path의 interface/$(OPENOCD_INTERFACE).cfg를 찾습니다.
Debugging
sam_v71_xult/samv71q21 target으로 일반 Zephyr debug 절차를 사용합니다.
참고 자료
Source
출처
영어 원문에는 문단, 문서 지시문, 표, 코드, 코드 심벌, 경로를 그대로 보존했습니다.