Part 1
요약·해설
SAM4S Xplained는 84 MHz Cortex-M4, 8 Mb SRAM과 J-Link OB를 제공합니다. 기본 JLink 외에 J25 erase와 SAM-BA/bossac 경로도 지원합니다.
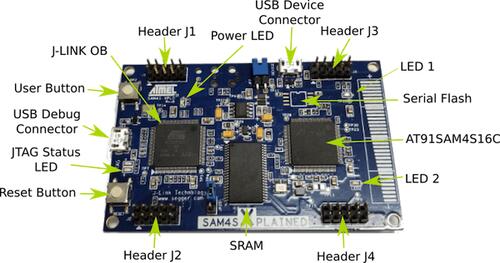
ATSAM4S16C Cortex-M4
12 MHz → PLL → 84 MHz
JLink 또는 SAM-BA/bossac
Part 2
접을 수 있는 영어 원문 전체
영어 원문 전체 펼치기
BD271A7BB35A1B436BD9AFDAE6104AB233D5219EED814DE1EA907175A203FD8C
.. _sam4s_xplained:

SAM4S Xplained
##############

Overview
********

The SAM4S Xplained evaluation kit is a development platform to evaluate the
Atmel SAM4S series microcontrollers.

.. image:: ../../../../../../../../boards/atmel/sam/sam4s_xplained/doc/img/sam4s_xplained.jpg
     :align: center
     :alt: SAM4S Xplained

Hardware
********

- ATSAM4S16C ARM Cortex-M4 Processor
- 12 MHz crystal oscillator
- internal 32.768 kHz crystal oscillator
- IS66WV51216DALL 8 Mb SRAM
- Micro-AB USB device
- Micro-AB USB debug interface supporting SEGGER OB and Virtual COM Port and
  Data
- One reset and one user pushbutton
- 2 yellow user LEDs
- IC pads for external flash chip

Supported Features
==================

The sam4s_xplained board configuration supports the following hardware
features:

+-----------+------------+-------------------------------------+
| Interface | Controller | Driver/Component                    |
+===========+============+=====================================+
| NVIC      | on-chip    | nested vector interrupt controller  |
+-----------+------------+-------------------------------------+
| SYSTICK   | on-chip    | systick                             |
+-----------+------------+-------------------------------------+
| ADC       | on-chip    | adc                                 |
+-----------+------------+-------------------------------------+
| COUNTER   | on-chip    | counter                             |
+-----------+------------+-------------------------------------+
| GPIO      | on-chip    | gpio                                |
+-----------+------------+-------------------------------------+
| HWINFO    | on-chip    | Unique device serial number         |
+-----------+------------+-------------------------------------+
| I2C       | on-chip    | i2c                                 |
+-----------+------------+-------------------------------------+
| PWM       | on-chip    | pwm                                 |
+-----------+------------+-------------------------------------+
| SPI       | on-chip    | spi                                 |
+-----------+------------+-------------------------------------+
| SMC       | on-chip    | memc (PSRAM)                        |
+-----------+------------+-------------------------------------+
| UART      | on-chip    | serial port                         |
+-----------+------------+-------------------------------------+
| USART     | on-chip    | serial port                         |
+-----------+------------+-------------------------------------+
| WATCHDOG  | on-chip    | watchdog                            |
+-----------+------------+-------------------------------------+

Other hardware features are not currently supported by Zephyr.

The default configuration can be found in the Kconfig
:zephyr_file:`boards/atmel/sam/sam4s_xplained/sam4s_xplained_defconfig`.

Connections and IOs
===================

Download the `SAM4S Xplained Design Files`_ for more information. It has
full schematic and gerbers files.

System Clock
============

The SAM4S MCU is configured to use the 12 MHz internal oscillator on the board
with the on-chip PLL to generate an 84 MHz system clock.

Serial Port
===========

The ATSAM4S16C MCU has 2 UARTs and 2 USARTs. One of the UARTs (UART0) is
connected to the Segger J-Link OB chip (the AT91SAM3U4 is programmed to be
Segger J-Link OB). Segger J-Link OB brings the UART out as a virtual COM port.
The section flashing uses the UART from the Segger USB debug connection.

Programming and Debugging
*************************

The SAM4S Xplained board comes with Segger
`J-Link OB <https://www.segger.com/jlink-ob.html>`_. This provides a debug
interface to the SAM4S16C chip. You can use Ozone or JLink to communicate with
the SAM4S16C.

Flashing
========

For flash the board Zephyr provides two paths.  One uses the default JLink
tool and the second one uses :ref:`atmel_sam_ba_bootloader`.

Using JLink
-------------

#. Download JLink from the Segger `JLink Downloads Page`_. Go to the section
   "J-Link Software and Documentation Pack" and install the "J-Link Software
   and Documentation pack for Linux". The application JLinkExe needs to be
   accessible from your path.

#. Connect the SAM4S Xplained board to your host computer using the USB debug
   port. Then build and flash the :ref:`hello_world` application.

   .. zephyr-app-commands::
      :zephyr-app: samples/hello_world
      :board: sam4s_xplained
      :goals: build flash


Using SAM-BA bootloader
-----------------------

#. Close the ``J25`` jumper on the SAM4S Xplained board.  Power on the board
   for 10s.

#. Open the ``J25`` jumper.

#. Connect the SAM4S Xplained board to your host computer using the SoC USB
   port. Then build and flash the :ref:`hello_world` application.

   .. zephyr-app-commands::
      :zephyr-app: samples/hello_world
      :board: sam4s_xplained
      :goals: build

   .. code-block:: console

      $ west flash -r bossac


Visualizing the message
-----------------------

#. Run your favorite terminal program to listen for output. Under Linux the
   terminal should be :code:`/dev/ttyACM0`. For example:

   .. code-block:: console

      $ minicom -D /dev/ttyACM0 -o

   The -o option tells minicom not to send the modem initialization string.
   Connection should be configured as follows:

   - Speed: 115200
   - Data: 8 bits
   - Parity: None
   - Stop bits: 1

#. Press reset button

   You should see "Hello World! sam4s_xplained" in your terminal.


Debugging
=========

You can debug an application in the usual way.  Here is an example for the
:ref:`hello_world` application.

.. zephyr-app-commands::
   :zephyr-app: samples/hello_world
   :board: sam4s_xplained
   :maybe-skip-config:
   :goals: debug

References
**********

.. target-notes::

.. _SAM4S Xplained Online User Guide:
    http://ww1.microchip.com/downloads/en/devicedoc/atmel-42075-sam4s-xplained-pro_user-guide.pdf

.. _JLink Downloads Page:
    https://www.segger.com/downloads/jlink

.. _SAM4S Xplained Design Files:
    http://ww1.microchip.com/downloads/en/DeviceDoc/SAM4S-XPLD__KitsFiles.zip
Part 3
한국어 전문 번역
개요
SAM4S Xplained evaluation kit는 Atmel SAM4S series microcontroller를 평가하는 개발 platform입니다.
하드웨어
- ATSAM4S16C Arm Cortex-M4 processor
- 12 MHz crystal과 internal 32.768 kHz crystal
- IS66WV51216DALL 8 Mb SRAM
- Micro-AB USB device
- SEGGER OB, Virtual COM Port와 Data를 지원하는 Micro-AB USB debug interface
- reset·user pushbutton 각 1개, yellow user LED 2개
- external flash chip용 IC pad
지원 기능
| Interface | Controller | Driver/Component |
|---|---|---|
| NVIC | on-chip | nested vector interrupt controller |
| SYSTICK | on-chip | systick |
| ADC | on-chip | adc |
| COUNTER | on-chip | counter |
| GPIO | on-chip | gpio |
| HWINFO | on-chip | Unique device serial number |
| I2C | on-chip | i2c |
| PWM | on-chip | pwm |
| SPI | on-chip | spi |
| SMC | on-chip | memc (PSRAM) |
| UART | on-chip | serial port |
| USART | on-chip | serial port |
| WATCHDOG | on-chip | watchdog |
다른 hardware는 현재 지원하지 않습니다. 기본 구성은 boards/atmel/sam/sam4s_xplained/sam4s_xplained_defconfig입니다.
연결과 I/O
SAM4S Xplained Design Files에는 전체 schematic과 Gerber file이 있습니다.
System clock
board의 12 MHz oscillator와 on-chip PLL로 84 MHz system clock을 생성합니다.
Serial port
ATSAM4S16C에는 UART 2개와 USART 2개가 있습니다. UART0은 AT91SAM3U4에 구현된 Segger J-Link OB에 연결되며 virtual COM port로 노출됩니다. flashing 절차는 Segger USB debug connection의 이 UART를 사용합니다.
프로그래밍과 디버깅
Segger J-Link OB가 SAM4S16C debug interface를 제공합니다. Ozone 또는 JLink로 통신할 수 있습니다.
Flashing
기본 JLink와 SAM-BA bootloader 두 경로가 있습니다.
JLink 사용
- J-Link Software and Documentation Pack을 설치하고
JLinkExe를 PATH에 둡니다. - USB debug port로 연결해 build·flash합니다.
west build -b sam4s_xplained samples/hello_world
west flash
SAM-BA bootloader 사용
J25jumper를 닫고 보드 전원을 10초 동안 켭니다.- J25 jumper를 엽니다.
- SoC USB port로 연결하고 application을 build합니다.
west build -b sam4s_xplained samples/hello_worldwest flash -r bossac출력 확인
Linux terminal 예시는 /dev/ttyACM0이며 다음처럼 엽니다.
minicom -D /dev/ttyACM0 -o-o는 minicom이 modem initialization string을 보내지 않게 합니다. 연결은 115200 baud, 8 data bit, parity none, 1 stop bit로 설정합니다.
reset button을 누르면 Hello World! sam4s_xplained가 나타납니다.
Debugging
sam4s_xplained target으로 일반 Zephyr debug 절차를 사용합니다.
참고 자료
Source
출처
영어 원문에는 문단, 문서 지시문, 표, 코드, 코드 심벌, 경로를 그대로 보존했습니다.