Part 1
요약·해설
MAX32690EVKIT는 complex algorithm용 120 MHz Cortex-M4F, Bluetooth 5.2 LE, 3 MB flash와 1 MB SRAM을 갖춘 advanced SoC를 평가합니다.
120 MHz Cortex-M4F, flash 3 MB, SRAM 1 MB
Bluetooth 5.2 LE, dedicated RISC-V coprocessor
HyperRAM, audio codec, CAN 2.0, USB HS
Part 2
접을 수 있는 영어 원문 전체
영어 원문 전체 펼치기
DB960BA91351F4C084FF54C09C1F6E48FE4ABC636D56362AA4DD0B7C81A0D9AC
.. _max32690_evkit:
MAX32690EVKIT
#############
Overview
********
The MAX32690 evaluation kit (EV kit) provides a platform for evaluating the capabilities
of the MAX32690 microcontroller, which is an advanced system-on-chip (SoC).
It features an Arm® Cortex®-M4F CPU for efficient computation of complex functions and
algorithms, and the latest generation Bluetooth® 5 Low Energy (Bluetooth LE) radio designed
for wearable and hearable fitness devices, portable and wearable wireless medical devices,
industrial sensors/networks, internet of things (IoT), and asset tracking.
The Zephyr port is running on the MAX32690 MCU.
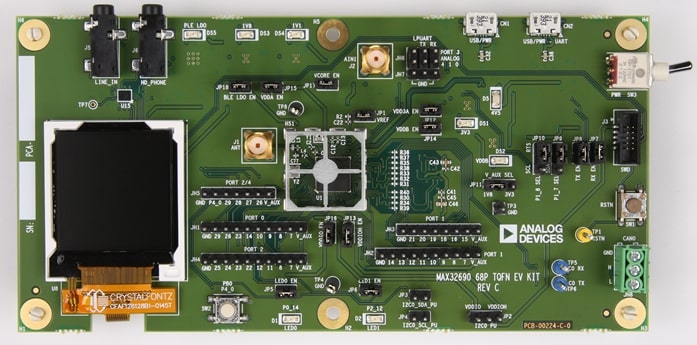
.. image:: ../../../../../../../boards/adi/max32690evkit/doc/img/max32690evkit_img1.jpg
:align: center
:alt: MAX32690 EVKIT Front
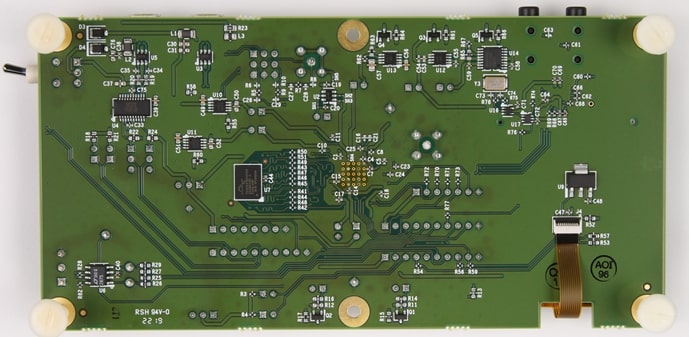
.. image:: ../../../../../../../boards/adi/max32690evkit/doc/img/max32690evkit_img2.jpg
:align: center
:alt: MAX32690 Back
Hardware
********
- MAX32690 MCU:
- Ultra-Efficient Microcontroller for Battery-Powered Applications
- 120MHz Arm Cortex-M4 Processor with FPU
- 7.3728MHz and 60MHz Low-Power Oscillators
- External Crystal Support (32MHz required for BLE)
- 32.768kHz RTC Clock (Requires External Crystal)
- 8kHz Always-On Ultra-Low Power Oscillator
- 3MB Internal Flash, 1MB Internal SRAM (832kB ECC ON)
- TBDμW/MHz Executing from Cache at 1.1V
- 1.8V and 3.3V I/O with No Level Translators
- External Flash & SRAM Expansion Interfaces
- Bluetooth 5.2 LE Radio
- Dedicated, Ultra-Low-Power, 32-Bit RISC-V Coprocessor to Offload Timing-Critical Bluetooth Processing
- Fully Open-Source Bluetooth 5.2 Stack Available
- Supports AoA, AoD, LE Audio, and Mesh
- High-Throughput (2Mbps) Mode
- Long-Range (125kbps and 500kbps) Modes
- Rx Sensitivity: -97.5dBm; Tx Power: +4.5dBm
- Single-Ended Antenna Connection (50Ω)
- Multiple Peripherals for System Control
- 16-Channel DMA
- Up To Five Quad SPI Master (60MHz)/Slave (48MHz)
- Up To Four 1Mbaud UARTs with Flow Control
- Up To Two 1MHz I2C Master/Slave
- I2S Master/Slave
- Eight External Channel, 12-bit 1MSPS SAR ADC w/ on-die temperature sensor
- USB 2.0 Hi-Speed Device
- 16 Pulse Train Engines
- Up To Six 32-Bit Timers with 8mA High Drive
- Up To Two CAN 2.0 Controllers
- Up To Four Micro-Power Comparators
- 1-Wire Master
- Security and Integrity
- ChipDNA Physically Un-clonable Function (PUF)
- Modular Arithmetic Accelerator (MAA), True Random Number Generator (TRNG)
- Secure Nonvolatile Key Storage, SHA-256, AES-128/192/256
- Secure Boot ROM
- External devices connected to the MAX32690EVKIT:
- Bluetooth SMA Connector with a Hinged 2.4GHz Whip Antenna
- 3-Pin Terminal Block for CAN Bus 2.0
- Selectable On-Board High-Precision Voltage Reference
- On-Board HyperRAM
- Stereo Audio Codec with Line-In and Line-Out 3.5mm Jacks
- 128 x 128 (1.45in) Color TFT Display
- USB 2.0 Micro-B Interface to the MAX32690
- USB 2.0 Micro-B to Serial UART
- Board Power Provided by either USB Port
- Jumpers to Enable Optional Pull-Up Resistors on I2C port
- All GPIOs Signals Accessed through 0.1in Headers
- Three Analog Inputs Accessed through 0.1in Headers with Optional Filtering
- SWD 10-Pin Header
- On-Board 3.3V, 1.8V, and 1.1V LDO Regulators
- Individual Power Measurement on All IC Rails through Jumpers
- Two General-Purpose LEDs and One GeneralPurpose Push Button Switch
Supported Features
==================
Below interfaces are supported by Zephyr on MAX32690EVKIT.
+-----------+------------+-------------------------------------+
| Interface | Controller | Driver/Component |
+===========+============+=====================================+
| NVIC | on-chip | nested vector interrupt controller |
+-----------+------------+-------------------------------------+
| SYSTICK | on-chip | systick |
+-----------+------------+-------------------------------------+
| CLOCK | on-chip | clock and reset control |
+-----------+------------+-------------------------------------+
| GPIO | on-chip | gpio |
+-----------+------------+-------------------------------------+
| UART | on-chip | serial |
+-----------+------------+-------------------------------------+
| SPI | on-chip | spi |
+--------------------------------------------------------------+
| I2C | on-chip | i2c |
+-----------+------------+-------------------------------------+
Connections and IOs
===================
+-----------+---------------+---------------+--------------------------------------------------------------------------------------------------+
| Name | Name | Settings | Description |
+===========+===============+===============+==================================================================================================+
| JP1 | VREF | | |
| | | +-----------+ | +-------------------------------------------------------------------------------+ |
| | | | 1-2 | | | Connects external voltage reference to VREF pin, must be enabled in software. | |
| | | +-----------+ | +-------------------------------------------------------------------------------+ |
| | | | Open | | | Disconnects external voltage reference. | |
| | | +-----------+ | +-------------------------------------------------------------------------------+ |
| | | | |
+-----------+---------------+---------------+--------------------------------------------------------------------------------------------------+
| JP2 | I2C0 PU | +-----------+ | +-------------------------------------------------------------------------------+ |
| | | | 2-1 | | | Connects VDDIO (1V8) to I2C0 pull-up resistors. | |
| | | +-----------+ | +-------------------------------------------------------------------------------+ |
| | | | 2-3 | | | Connects VDDIOH (3V3) to I2C0 pull-up resistors. | |
| | | +-----------+ | +-------------------------------------------------------------------------------+ |
| | | | Open | | | Disconnects power from I2C0 pull-up resistors. | |
| | | +-----------+ | +-------------------------------------------------------------------------------+ |
| | | | |
+-----------+---------------+---------------+--------------------------------------------------------------------------------------------------+
| JP3 | I2C0_SDA_PU | +-----------+ | +-------------------------------------------------------------------------------+ |
| | | | 1-2 | | | Connects pull-up to I2C0A_SDA (P2.7) sourced by I2C0 PU (JP2). | |
| | | +-----------+ | +-------------------------------------------------------------------------------+ |
| | | | Open | | | Disconnects pull-up from I2C0A_SDA (P2.7) sourced by I2C0 PU (JP2). | |
| | | +-----------+ | +-------------------------------------------------------------------------------+ |
| | | | |
+-----------+---------------+---------------+--------------------------------------------------------------------------------------------------+
| JP4 | I2C0_SCL_PU | +-----------+ | +-------------------------------------------------------------------------------+ |
| | | | 1-2 | | | Connects pull-up to I2C0A_SCL (P2.8) sourced by I2C0 PU (JP2). | |
| | | +-----------+ | +-------------------------------------------------------------------------------+ |
| | | | Open | | | Disconnects pull-up from I2C0A_SCL (P2.8) sourced by I2C0 PU (JP2). | |
| | | +-----------+ | +-------------------------------------------------------------------------------+ |
| | | | |
+-----------+---------------+---------------+--------------------------------------------------------------------------------------------------+
| JP5 | LED0 EN | +-----------+ | +-------------------------------------------------------------------------------+ |
| | | | 1-2 | | | Connects red LED D1 to P0.14. | |
| | | +-----------+ | +-------------------------------------------------------------------------------+ |
| | | | Open | | | Disconnects red LED D1 from P0.14. | |
| | | +-----------+ | +-------------------------------------------------------------------------------+ |
| | | | |
+-----------+---------------+---------------+--------------------------------------------------------------------------------------------------+
| JP6 | LED1 EN | +-----------+ | +-------------------------------------------------------------------------------+ |
| | | | 1-2 | | | Connects green LED D2 to P2.12. | |
| | | +-----------+ | +-------------------------------------------------------------------------------+ |
| | | | Open | | | Disconnects green LED D2 from P2.12. | |
| | | +-----------+ | +-------------------------------------------------------------------------------+ |
| | | | |
+-----------+---------------+---------------+--------------------------------------------------------------------------------------------------+
| JP7 | RX EN | +-----------+ | +-------------------------------------------------------------------------------+ |
| | | | 1-2 | | | Connects the USB - serial bridge to UART2A_RX (P1.9). | |
| | | +-----------+ | +-------------------------------------------------------------------------------+ |
| | | | Open | | | Disconnects the USB - serial bridge from UART2A_RX (P1.9). | |
| | | +-----------+ | +-------------------------------------------------------------------------------+ |
| | | | |
+-----------+---------------+---------------+--------------------------------------------------------------------------------------------------+
| JP8 | TX EN | +-----------+ | +-------------------------------------------------------------------------------+ |
| | | | 1-2 | | | Connects the USB - serial bridge to UART2A_TX (P1.10). | |
| | | +-----------+ | +-------------------------------------------------------------------------------+ |
| | | | Open | | | Disconnects the USB - serial bridge from UART2A_TX (P1.10). | |
| | | +-----------+ | +-------------------------------------------------------------------------------+ |
| | | | |
+-----------+---------------+---------------+--------------------------------------------------------------------------------------------------+
| JP9 | P1_7 SEL | +-----------+ | +-------------------------------------------------------------------------------+ |
| | | | 2-1 | | | Connects the USB - serial bridge to UART2A_CTS (P1.7). | |
| | | +-----------+ | +-------------------------------------------------------------------------------+ |
| | | | 2-3 | | | Connects I2C2C_SDA (P1.7) to the codec. | |
| | | +-----------+ | +-------------------------------------------------------------------------------+ |
| | | | |
+-----------+---------------+---------------+--------------------------------------------------------------------------------------------------+
| JP10 | P1_8 SEL | +-----------+ | +-------------------------------------------------------------------------------+ |
| | | | 2-1 | | | Connects the USB - serial bridge to UART2A_RTS (P1.8). | |
| | | +-----------+ | +-------------------------------------------------------------------------------+ |
| | | | 2-3 | | | Connects I2C2C_SCL (P1.8) to the codec. | |
| | | +-----------+ | +-------------------------------------------------------------------------------+ |
| | | | |
+-----------+---------------+---------------+--------------------------------------------------------------------------------------------------+
| JP11 | V_AUX SEL | +-----------+ | +-------------------------------------------------------------------------------+ |
| | | | 2-1 | | | Connects V_AUX to 1V8. | |
| | | +-----------+ | +-------------------------------------------------------------------------------+ |
| | | | 2-3 | | | Connects V_AUX to 3V3. | |
| | | +-----------+ | +-------------------------------------------------------------------------------+ |
| | | | |
+-----------+---------------+---------------+--------------------------------------------------------------------------------------------------+
| JP12 | VDD3A EN | +-----------+ | +-------------------------------------------------------------------------------+ |
| | | | 1-2 | | | Connects 3V3 to VDD3A. | |
| | | +-----------+ | +-------------------------------------------------------------------------------+ |
| | | | Open | | | Disconnects 3V3 from VDD3A. | |
| | | +-----------+ | +-------------------------------------------------------------------------------+ |
| | | | |
+-----------+---------------+---------------+--------------------------------------------------------------------------------------------------+
| JP13 | VDDIOH EN | +-----------+ | +-------------------------------------------------------------------------------+ |
| | | | 1-2 | | | Connects 3V3 to VDDIOH. | |
| | | +-----------+ | +-------------------------------------------------------------------------------+ |
| | | | Open | | | Disconnects 3V3 from VDDIOH. | |
| | | +-----------+ | +-------------------------------------------------------------------------------+ |
| | | | |
+-----------+---------------+---------------+--------------------------------------------------------------------------------------------------+
| JP14 | VDDB EN | +-----------+ | +-------------------------------------------------------------------------------+ |
| | | | 1-2 | | | Connects a 3V3 LDO sourced by USB_VBUS (CN1) to VDDB. | |
| | | +-----------+ | +-------------------------------------------------------------------------------+ |
| | | | Open | | | Disconnects a 3V3 LDO sourced by USB_VBUS (CN1) from VDDB. | |
| | | +-----------+ | +-------------------------------------------------------------------------------+ |
| | | | |
+-----------+---------------+---------------+--------------------------------------------------------------------------------------------------+
| JP15 | VDDA EN | +-----------+ | +-------------------------------------------------------------------------------+ |
| | | | 1-2 | | | Connects 1V8 to VDDA. | |
| | | +-----------+ | +-------------------------------------------------------------------------------+ |
| | | | Open | | | Disconnects 1V8 from VDDA. | |
| | | +-----------+ | +-------------------------------------------------------------------------------+ |
| | | | |
+-----------+---------------+---------------+--------------------------------------------------------------------------------------------------+
| JP16 | VDDIO EN | +-----------+ | +-------------------------------------------------------------------------------+ |
| | | | 1-2 | | | Connects 1V8 to VDDIO. | |
| | | +-----------+ | +-------------------------------------------------------------------------------+ |
| | | | Open | | | Disconnects 1V8 from VDDIO. | |
| | | +-----------+ | +-------------------------------------------------------------------------------+ |
| | | | |
+-----------+---------------+---------------+--------------------------------------------------------------------------------------------------+
| JP17 | VCORE EN | +-----------+ | +-------------------------------------------------------------------------------+ |
| | | | 1-2 | | | Connects 1V1 to VCORE. | |
| | | +-----------+ | +-------------------------------------------------------------------------------+ |
| | | | Open | | | Disconnects 1V1 from VCORE. | |
| | | +-----------+ | +-------------------------------------------------------------------------------+ |
| | | | |
+-----------+---------------+---------------+--------------------------------------------------------------------------------------------------+
| JP18 | BLE LDO EN | +-----------+ | +-------------------------------------------------------------------------------+ |
| | | | 1-2 | | | Connects 1V4 to BLE_LDO. | |
| | | +-----------+ | +-------------------------------------------------------------------------------+ |
| | | | Open | | | Disconnects 1V4 from BLE_LDO. | |
| | | +-----------+ | +-------------------------------------------------------------------------------+ |
| | | | |
+-----------+---------------+---------------+--------------------------------------------------------------------------------------------------+
| JH6 | ANALOG PORT3 | +-----------+ | +-------------------------------------------------------------------------------+ |
| | | | 1-2 | | | Connects LPUART0B_RX (P3.0) to the SWD connector. | |
| | | +-----------+ | +-------------------------------------------------------------------------------+ |
| | | | 3-4 | | | Connects LPUART0B_TX (P3.1) to the SWD connector. | |
| | | +-----------+ | +-------------------------------------------------------------------------------+ |
| | | | Open | | | Disconnects LPUART0B_RX (P3.0) and LPUART0B_TX (P3.1) from the SWD connector. | |
| | | +-----------+ | +-------------------------------------------------------------------------------+ |
| | | | |
+-----------+---------------+---------------+--------------------------------------------------------------------------------------------------+
Programming and Debugging
*************************
Flashing
========
The MAX32690 MCU can be flashed by connecting an external debug probe to the
SWD port. SWD debug can be accessed through the Cortex 10-pin connector, J3.
Logic levels are fixed to VDDIO (1.8V).
Once the debug probe is connected to your host computer, then you can simply run the
``west flash`` command to write a firmware image into flash.
.. note::
This board uses OpenOCD as the default debug interface. You can also use
a Segger J-Link with Segger's native tooling by overriding the runner,
appending ``--runner jlink`` to your ``west`` command(s). The J-Link should
be connected to the standard 2*5 pin debug connector (JW3) using an
appropriate adapter board and cable.
Debugging
=========
Please refer to the `Flashing`_ section and run the ``west debug`` command
instead of ``west flash``.
References
**********
- `MAX32690EVKIT web page`_
.. _MAX32690EVKIT web page:
https://www.analog.com/en/design-center/evaluation-hardware-and-software/evaluation-boards-kits/MAX32690EVKIT.html
Part 3
한국어 전문 번역
개요
MAX32690 EV kit는 advanced MAX32690 SoC를 평가합니다. 복잡한 function과 algorithm을 효율적으로 처리하는 Arm Cortex-M4F CPU와 wearable·hearable fitness, wireless medical device, industrial sensor/network, IoT, asset tracking용 Bluetooth 5 LE radio를 포함합니다.
Zephyr port는 MAX32690 MCU에서 실행됩니다.
하드웨어
MAX32690 MCU
- 고효율 MCU: 120 MHz FPU 포함 Cortex-M4, 7.3728/60 MHz low-power oscillator, BLE에 필요한 32 MHz external crystal, external crystal 기반 32.768 kHz RTC, always-on 8 kHz oscillator, flash 3 MB, SRAM 1 MB(ECC 사용 시 832 KB), 1.8/3.3 V I/O, external flash·SRAM expansion.
- Bluetooth 5.2 LE: timing-critical 처리를 맡는 ultra-low-power 32-bit RISC-V coprocessor, open-source stack, AoA·AoD·LE Audio·Mesh, 2 Mbit/s와 125/500 kbit/s mode, RX -97.5 dBm, TX +4.5 dBm, 50 Ω antenna.
- System peripheral: 16-channel DMA, Quad SPI master 최대 5개(60 MHz)/slave 48 MHz, 1 Mbaud flow-control UART 최대 4개, 1 MHz I2C 최대 2개, I2S, 8-channel 12-bit 1 Msps SAR ADC와 temperature sensor, USB 2.0 HS device, pulse-train engine 16개, 32-bit timer 최대 6개, CAN 2.0 최대 2개, comparator 최대 4개, 1-Wire master.
- 보안: ChipDNA PUF, MAA, TRNG, secure key storage, SHA-256, AES-128/192/256, secure boot ROM.
EV kit 외부 장치
- hinged 2.4 GHz antenna가 있는 Bluetooth SMA와 CAN 2.0 terminal block
- selectable precision voltage reference, HyperRAM, line-in/out 3.5 mm stereo audio codec
- 128 × 128 color TFT, MAX32690 USB Micro-B와 USB-UART Micro-B
- I2C optional pull-up jumper, 0.1-inch GPIO header와 optional filter analog input 3개
- 10-pin SWD, 3.3/1.8/1.1 V LDO, rail별 power measurement jumper
- LED 2개와 pushbutton 1개
지원 기능
| Interface | Controller | Driver/Component |
|---|---|---|
| NVIC | on-chip | nested vector interrupt controller |
| SYSTICK | on-chip | systick |
| CLOCK | on-chip | clock and reset control |
| GPIO | on-chip | gpio |
| UART | on-chip | serial |
| SPI | on-chip | spi |
| I2C | on-chip | i2c |
연결과 I/O
| Name | Signal | Setting | 설명 |
|---|---|---|---|
| JP1 | VREF | 1-2 | external voltage reference를 VREF에 연결. software enable 필요 |
| JP1 | VREF | Open | external voltage reference 분리 |
| JP2 | I2C0 PU | 2-1 | I2C0 pull-up을 VDDIO 1V8에 연결 |
| JP2 | I2C0 PU | 2-3 | I2C0 pull-up을 VDDIOH 3V3에 연결 |
| JP2 | I2C0 PU | Open | pull-up power 분리 |
| JP3 | I2C0_SDA_PU | 1-2 | JP2 기반 pull-up을 I2C0A_SDA(P2.7)에 연결 |
| JP3 | I2C0_SDA_PU | Open | pull-up 분리 |
| JP4 | I2C0_SCL_PU | 1-2 | JP2 기반 pull-up을 I2C0A_SCL(P2.8)에 연결 |
| JP4 | I2C0_SCL_PU | Open | pull-up 분리 |
| JP5 | LED0 EN | 1-2 | red LED D1을 P0.14에 연결 |
| JP5 | LED0 EN | Open | red LED D1 분리 |
| JP6 | LED1 EN | 1-2 | green LED D2를 P2.12에 연결 |
| JP6 | LED1 EN | Open | green LED D2 분리 |
| JP7 | RX EN | 1-2 | USB serial bridge를 UART2A_RX(P1.9)에 연결 |
| JP7 | RX EN | Open | bridge 분리 |
| JP8 | TX EN | 1-2 | USB serial bridge를 UART2A_TX(P1.10)에 연결 |
| JP8 | TX EN | Open | bridge 분리 |
| JP9 | P1_7 SEL | 2-1 | USB serial bridge를 UART2A_CTS(P1.7)에 연결 |
| JP9 | P1_7 SEL | 2-3 | I2C2C_SDA(P1.7)를 codec에 연결 |
| JP10 | P1_8 SEL | 2-1 | USB serial bridge를 UART2A_RTS(P1.8)에 연결 |
| JP10 | P1_8 SEL | 2-3 | I2C2C_SCL(P1.8)을 codec에 연결 |
| JP11 | V_AUX SEL | 2-1 | V_AUX를 1V8에 연결 |
| JP11 | V_AUX SEL | 2-3 | V_AUX를 3V3에 연결 |
| JP12 | VDD3A EN | 1-2 | 3V3을 VDD3A에 연결 |
| JP12 | VDD3A EN | Open | 3V3 분리 |
| JP13 | VDDIOH EN | 1-2 | 3V3을 VDDIOH에 연결 |
| JP13 | VDDIOH EN | Open | 3V3 분리 |
| JP14 | VDDB EN | 1-2 | CN1 USB_VBUS 기반 3V3 LDO를 VDDB에 연결 |
| JP14 | VDDB EN | Open | 3V3 LDO 분리 |
| JP15 | VDDA EN | 1-2 | 1V8을 VDDA에 연결 |
| JP15 | VDDA EN | Open | 1V8 분리 |
| JP16 | VDDIO EN | 1-2 | 1V8을 VDDIO에 연결 |
| JP16 | VDDIO EN | Open | 1V8 분리 |
| JP17 | VCORE EN | 1-2 | 1V1을 VCORE에 연결 |
| JP17 | VCORE EN | Open | 1V1 분리 |
| JP18 | BLE LDO EN | 1-2 | 1V4를 BLE_LDO에 연결 |
| JP18 | BLE LDO EN | Open | 1V4 분리 |
| JH6 | ANALOG PORT3 | 1-2 | LPUART0B_RX(P3.0)를 SWD connector에 연결 |
| JH6 | ANALOG PORT3 | 3-4 | LPUART0B_TX(P3.1)를 SWD connector에 연결 |
| JH6 | ANALOG PORT3 | Open | LPUART0B RX/TX를 SWD connector에서 분리 |
프로그래밍과 디버깅
external debug probe를 사용합니다. SWD는 J3 Cortex 10-pin connector에서 접근합니다. logic level은 VDDIO 1.8 V로 고정입니다.
debug probe를 host computer에 연결한 뒤 다음 명령으로 firmware image를 flash에 기록합니다.
west flash디버깅
flash 절차와 같은 연결을 사용하되 west flash 대신 다음 명령을 실행합니다.
west debug참고 자료
Source
출처
영어 원문에는 문단, 문서 지시문, 표, 코드, 코드 심벌, 경로를 그대로 보존했습니다.