Part 1
요약·해설
Grand Central M4 Express는 Arduino Mega form factor의 Arm board입니다. GPIO 70개, microSDHC slot, QSPI flash 8 MiB를 제공하며 120 MHz Cortex-M4F와 native USB를 사용합니다.
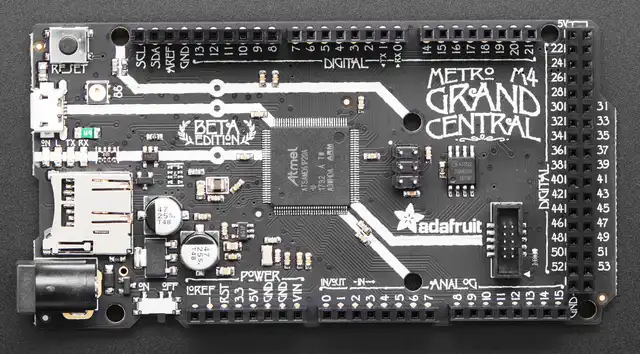
120 MHz ATSAMD51P20A Cortex-M4F
internal flash 1,024 KiB, RAM 256 KiB, QSPI 8 MiB
GPIO 70개, microSDHC, UART·SPI·I2C·USB
Part 2
접을 수 있는 영어 원문 전체
영어 원문 전체 펼치기
75108AFE6380BCECF0DA49B2FA3767423E9016C9AD84F862D15F3D2B7AB542EA
.. _adafruit_grand_central_m4_express:

Adafruit Grand Central M4 Express
#################################

Overview
********

The Adafruit Grand Central M4 Express is an ARM development board with the
form factor of an Arduino Mega.
It features 70 GPIO pins, a microSDHC slot and 8MiB of QSPI Flash.

.. figure:: ../../../../../../../boards/adafruit/grand_central_m4_express/doc/img/adafruit_grand_central_m4_express.webp
   :width: 800px
   :align: center
   :alt: Adafruit Grand Central M4 Express

   Adafruit Grand Central M4 Express (Credit: Kattni Rembor / Adafruit)

Hardware
********

- ATSAMD51P20A ARM Cortex-M4F processor at 120 MHz
- 1024 KiB of flash memory and 256 KiB of RAM
- 8 MiB of QSPI flash
- A red user LED
- A RGB "NeoPixel" / WS2812B LED
- A microSDHC slot (connected via SPI)
- Native USB port

Supported Features
==================

The adafruit_grand_central_m4_express board configuration supports the following
hardware features:

+-----------+------------+------------------------------------------+
| Interface | Controller | Driver/Component                         |
+===========+============+==========================================+
| NVIC      | on-chip    | Nested vector interrupt controller       |
+-----------+------------+------------------------------------------+
| SYSTICK   | on-chip    | SysTick                                  |
+-----------+------------+------------------------------------------+
| WDT       | on-chip    | Watchdog                                 |
+-----------+------------+------------------------------------------+
| GPIO      | on-chip    | I/O ports, User LED                      |
+-----------+------------+------------------------------------------+
| UART      | on-chip    | Serial ports, Console                    |
+-----------+------------+------------------------------------------+
| SPI       | on-chip    | SPI ports, microSDHC slot                |
+-----------+------------+------------------------------------------+
| TRNG      | on-chip    | True Random Number Generator             |
+-----------+------------+------------------------------------------+
| RTC       | on-chip    | Real-Time Counter                        |
+-----------+------------+------------------------------------------+
| USB       | on-chip    | USB device                               |
+-----------+------------+------------------------------------------+
| WDT       | on-chip    | Watchdog Timer                           |
+-----------+------------+------------------------------------------+

Other hardware features are not currently supported by Zephyr.

The default configuration can be found in the Kconfig file
:zephyr_file:`boards/adafruit/grand_central_m4_express/adafruit_grand_central_m4_express_defconfig`.

Connections and IOs
===================

The `Adafruit Learning System`_ has detailed information about
the board including `pinouts`_ and the `schematics`_.

System Clock
============

The SAMD51 MCU is configured to use the 32.768 kHz external oscillator
with the on-chip PLL generating the 120 MHz system clock.

Serial Port
===========

The SAMD51 MCU has 8 SERCOM based UARTs. On the Grand Central, SERCOM0 is
the Zephyr console and is available on RX(PB25) and TX(PB24).

SPI Port
========

The SAMD51 MCU has 8 SERCOM based SPIs. On the Grand Central, SERCOM7 has been
set into SPI mode to connect to devices over the SCK(PD09), MOSI(PD08), and MISO(PD11) pins.
Additionally SERCOM2 has been configured as SPI to access the microSDHC card.

I2C Port
========

The SAMD51 MCU has 8 SERCOM based I2Cs. On the Grand Central, SERCOM3 has been
configured as I2C to connect to devices over the SCL(PB21) and SDA(PB20) pins.

USB Device Port
===============

The SAMD51 MCU has a USB device port that can be used to communicate
with a host PC.  See the :ref:`usb-samples` sample applications for
more, such as the :zephyr:code-sample:`usb-cdc-acm` sample which sets up a virtual
serial port that echos characters back to the host PC.

Programming and Debugging
*************************

The Grand Central ships with a BOSSA compatible UF2 bootloader.
The bootloader can be entered by quickly tapping the reset button twice.

Flashing
========

#. Build the Zephyr kernel and the :ref:`hello_world` sample application:

   .. zephyr-app-commands::
      :zephyr-app: samples/hello_world
      :board: adafruit_grand_central_m4_express
      :goals: build
      :compact:

#. Connect the Grand Central to your host computer using USB.

#. Connect a 3.3 V USB to serial adapter to the board and to the
   host.  See the `Serial Port`_ section above for the board's pin
   connections.

#. Run your favorite terminal program to listen for output. Under Linux the
   terminal should be :code:`/dev/ttyUSB0`. For example:

   .. code-block:: console

      $ minicom -D /dev/ttyUSB0 -o

   The -o option tells minicom not to send the modem initialization
   string. Connection should be configured as follows:

   - Speed: 115200
   - Data: 8 bits
   - Parity: None
   - Stop bits: 1

#. Tap the reset button twice quickly to enter bootloader mode

#. Flash the image:

   .. zephyr-app-commands::
      :zephyr-app: samples/hello_world
      :board: adafruit_grand_central_m4_express
      :goals: flash
      :compact:

   You should see "Hello World! adafruit_grand_central_m4_express" in your terminal.

Debugging
=========

In addition to the built-in bootloader, the Grand Central can be flashed and
debugged using a SWD probe such as the Segger J-Link.

#. Connect the probe to the board using the 10-pin SWD interface.

#. Flash the image:

   .. zephyr-app-commands::
      :zephyr-app: samples/hello_world
      :board: adafruit_grand_central_m4_express
      :goals: flash
      :flash-args: -r openocd
      :compact:

#. Start debugging:

   .. zephyr-app-commands::
      :zephyr-app: samples/hello_world
      :board: adafruit_grand_central_m4_express
      :goals: debug
      :compact:

References
**********

.. target-notes::

.. _Adafruit Learning System:
    https://learn.adafruit.com/adafruit-grand-central

.. _pinouts:
    https://learn.adafruit.com/adafruit-grand-central/pinouts

.. _schematics:
    https://learn.adafruit.com/adafruit-grand-central/downloads

.. _J-Link:
    https://www.segger.com/products/debug-probes/j-link/technology/interface-description/
Part 3
한국어 전문 번역
개요
Adafruit Grand Central M4 Express는 Arduino Mega form factor의 Arm development board입니다. GPIO pin 70개, microSDHC slot과 QSPI flash 8 MiB를 제공합니다.
하드웨어
- 120 MHz ATSAMD51P20A Arm Cortex-M4F processor
- flash memory 1,024 KiB, RAM 256 KiB
- QSPI flash 8 MiB
- red user LED
- RGB NeoPixel/WS2812B LED
- SPI로 연결된 microSDHC slot
- native USB port
지원 기능
adafruit_grand_central_m4_express board configuration은 다음 hardware 기능을 지원합니다.
| Interface | Controller | Driver/Component |
|---|---|---|
| NVIC | on-chip | Nested vector interrupt controller |
| SYSTICK | on-chip | SysTick |
| WDT | on-chip | Watchdog |
| GPIO | on-chip | I/O ports, User LED |
| UART | on-chip | Serial ports, Console |
| SPI | on-chip | SPI ports, microSDHC slot |
| TRNG | on-chip | True Random Number Generator |
| RTC | on-chip | Real-Time Counter |
| USB | on-chip | USB device |
| WDT | on-chip | Watchdog Timer |
원문 표에는 WDT가 두 번 기재돼 있습니다. 그 밖의 hardware 기능은 현재 Zephyr에서 지원하지 않습니다. 기본 설정은 boards/adafruit/grand_central_m4_express/adafruit_grand_central_m4_express_defconfig에서 확인할 수 있습니다.
연결과 I/O
Adafruit Learning System에서 pinout과 schematic을 포함한 자세한 정보를 확인할 수 있습니다.
System clock
SAMD51 MCU는 32.768 kHz external oscillator를 사용하고 on-chip PLL로 120 MHz system clock을 생성합니다.
Serial port
SAMD51 MCU에는 SERCOM 기반 UART가 8개 있습니다. Grand Central에서는 SERCOM0이 Zephyr console이며 RX(PB25)와 TX(PB24)에서 사용할 수 있습니다.
SPI port
SAMD51 MCU에는 SERCOM 기반 SPI가 8개 있습니다. Grand Central은 SERCOM7을 SPI mode로 설정해 SCK(PD09), MOSI(PD08), MISO(PD11) pin으로 device를 연결합니다. SERCOM2도 microSDHC card에 접근하는 SPI로 설정됩니다.
I2C port
SAMD51 MCU에는 SERCOM 기반 I2C가 8개 있습니다. Grand Central은 SERCOM3을 I2C로 설정하며 SCL(PB21)과 SDA(PB20) pin을 사용합니다.
USB device port
SAMD51 MCU의 USB device port는 host PC와 통신하는 데 사용할 수 있습니다. USB sample, 특히 host에 character를 되돌려 보내는 virtual serial port를 구성하는 usb-cdc-acm sample을 참고합니다.
프로그래밍과 디버깅
Grand Central에는 BOSSA-compatible UF2 bootloader가 출하 시 설치돼 있습니다. reset button을 빠르게 두 번 누르면 bootloader에 진입합니다.
Flashing
Zephyr kernel과
hello_world를 build합니다.west build -b adafruit_grand_central_m4_express samples/hello_world- USB로 board를 host에 연결합니다.
- 3.3 V USB-to-serial adapter를 RX/TX와 host에 연결합니다.
Linux에서 보통
/dev/ttyUSB0을 엽니다.$ minicom -D /dev/ttyUSB0 -o-ooption은 minicom이 modem initialization string을 보내지 않게 합니다. 연결은 speed 115200, data 8 bit, parity none, stop bit 1로 설정합니다.- reset을 빠르게 두 번 눌러 bootloader mode로 들어갑니다.
image를 flash합니다.
west flash
terminal에 Hello World! adafruit_grand_central_m4_express가 표시돼야 합니다.
Debugging
내장 bootloader 외에도 Segger J-Link 같은 SWD probe로 Grand Central을 flash하고 debug할 수 있습니다.
- 10-pin SWD interface로 probe를 board에 연결합니다.
OpenOCD runner로 image를 flash합니다.
west flash -r openocddebugging을 시작합니다.
west debug
참고 자료
Source
출처
영어 원문에는 문단, 문서 지시문, 표, 코드, 코드 심벌, 경로를 그대로 보존했습니다.