Part 1
요약·해설
WisTrio는 STM32L151CB-A MCU, SX1276 LoRaWAN modem, GPS module을 RAK5205 chipset에 통합한 96Boards IoT Edition tracker입니다. console용 USART1과 GPS용 USART3을 분리하며, on-chip LoRa radio는 SPI1에 연결됩니다.
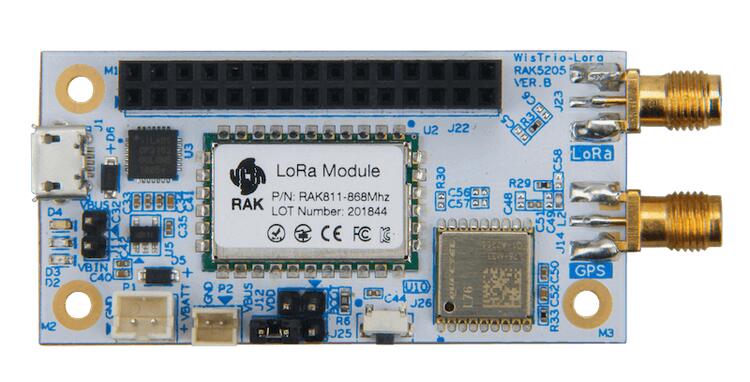
SX1276 LoRaWAN modem, GPS module과 antenna
STM32L151CB-A, flash 128 KB, SRAM 16 KB
LIS3DH accelerometer와 BME680 environmental sensor
Part 2
접을 수 있는 영어 원문 전체
영어 원문 전체 펼치기
BE0ED9CB0AFE8B830D7B22F74541E7AC034890B2222F3BD738BCB36799DE4F03
.. _96b_wistrio:

96Boards WisTrio
#################

Overview
********

96Boards WisTrio LoRa Tracker board is based on the RAK Wireless RAK5205
chipset integrating SX1276 LoRaWAN Modem, STM32L151CB-A MCU and GPS module.
Zephyr applications use the 96b_wistrio configuration to run on these
boards.

.. figure:: ../../../../../../../boards/96boards/wistrio/doc/img/96b-wistrio.jpg
     :align: center
     :alt: 96Boards WisTrio

     96Boards WisTrio

This board is one of the `96Boards IoT Edition`_ platforms providing LoRa
connectivity.

Hardware
********

96Boards WisTrio provides the following hardware components:

- RAK5205 Chipset
- 3.3V work voltage
- 128 KB Flash
- 16 KB SRAM
- On board sensors:

  - Accelerometer: STMicro LIS3DH
  - Integrated Environmental sensor: Bosch BME680

- 2 User LEDs
- GPIO with external interrupt capability
- UART (2)
- I2C (1)
- GPS Module
- GPS Antenna
- LoRa Antenna

Supported Features
==================

The Zephyr 96b_wistrio board configuration supports the following hardware
features:

+-----------+------------+-------------------------------------+
| Interface | Controller | Driver/Component                    |
+===========+============+=====================================+
| NVIC      | on-chip    | nested vector interrupt controller  |
+-----------+------------+-------------------------------------+
| SYSTICK   | on-chip    | system clock                        |
+-----------+------------+-------------------------------------+
| UART      | on-chip    | serial port                         |
+-----------+------------+-------------------------------------+
| GPIO      | on-chip    | gpio                                |
+-----------+------------+-------------------------------------+
| PINMUX    | on-chip    | pinmux                              |
+-----------+------------+-------------------------------------+
| I2C       | on-chip    | i2c                                 |
+-----------+------------+-------------------------------------+
| SPI       | on-chip    | spi                                 |
+-----------+------------+-------------------------------------+
| RTC       | on-chip    | rtc                                 |
+-----------+------------+-------------------------------------+
| EEPROM    | on-chip    | eeprom                              |
+-----------+------------+-------------------------------------+

The default board configuration can be found in
:zephyr_file:`boards/96boards/wistrio/96b_wistrio_defconfig`

Connections and IOs
===================

LED
---

- LED1 / User1 LED = PA12
- LED2 / User2 LED = PB4

Push buttons
------------

- BUTTON = RST (BT1)

Serial Port
===========

96Boards WisTrio board has 2 UARTs. Zephyr console output is assigned
to USART1 with 115200 8N1 as the default setting and USART3 is used for
GPS module.

I2C
---

96Boards WisTrio board has 1 I2C connected to on-board sensors.
The default I2C mapping is:

- I2C1_SCL  : PB8
- I2C1_SDA  : PB9

I2C1 also goes to the J22 connector and can be used to attach external
sensors.

SPI
---

96Boards WisTrio board has 1 SPI connected to on-chip LoRa Radio.
The default SPI mapping is:

- SPI1_SCLK  : PA5
- SPI1_MISO  : PA6
- SPI1_MOSI  : PA7
- SPI1_NSS   : PB0

Programming and Debugging
*************************

Flashing
========

96Boards WisTrio can be flashed by two methods, one using the ROM
bootloader and another using the SWD debug port (which requires additional
hardware).

Flashing using the ROM bootloader requires a special activation pattern,
which can be triggered by using the BOOT0 pin. The ROM bootloader supports
flashing via UART, and I2C but this document describes the UART case only.
You can read more about how to enable and use the ROM bootloader by
checking the application note `AN2606`_ .

Using ROM bootloader:
---------------------

1. Connect 96Boards WisTrio to your Linux PC using, USB-Micro to USB-A
   cable.

2. ROM bootloader can be triggered by the following pattern:

   - Connect BOOT0 to VDD (link pin 1 and 2 on J12)
   - Press and release the RST button

More detailed information on activating the ROM bootloader can be found in
Chapter 29 of Application note `AN2606`_. The ROM bootloader supports flashing
via UART, and I2C protocols.

Here is an example for building and flashing the :ref:`hello_world` application using `stm32flash`_ command line utility:

.. zephyr-app-commands::
   :zephyr-app: samples/hello_world
   :board: 96b_wistrio
   :goals: build flash

Using SWD debugger:
-------------------

Use the `Black Magic Debug Probe`_ as an SWD programmer, which can
be connected to the SWD pins exposed on the J22 header using its flying
leads and its 20 Pin JTAG Adapter Board Kit. When plugged into your host
PC, the Black Magic Debug Probe enumerates as a USB serial device as
documented on its `Getting started page`_.

It also uses the GDB binary provided with the Zephyr SDK,
``arm-zephyr-eabi-gdb``. Other GDB binaries, such as the GDB from GCC
ARM Embedded, can be used as well.

.. code-block:: console

   $ arm-zephyr-eabi-gdb -q zephyr.elf
   (gdb) target extended-remote /dev/ttyACM0
   Remote debugging using /dev/ttyACM0
   (gdb) monitor swdp_scan
   Target voltage: 3.3V
   Available Targets:
   No. Att Driver

Debugging
=========

After flashing 96Boards WisTrio, it can be debugged using the same
GDB instance. To reattach, just follow the same steps above, till
"attach 1". You can then debug as usual with GDB. In particular, type
"run" at the GDB prompt to restart the program you've flashed.

References
**********

.. _AN2606:
   https://www.st.com/resource/en/application_note/cd00167594.pdf

.. _stm32flash:
   https://sourceforge.net/p/stm32flash/wiki/Home/

.. _Black Magic Debug Probe:
   https://github.com/blacksphere/blackmagic/wiki

.. _Getting started page:
   https://github.com/blacksphere/blackmagic/wiki/Getting-Started

.. _96Boards IoT Edition:
    https://linaro.co/ie-specification
Part 3
한국어 전문 번역
개요
96Boards WisTrio LoRa Tracker 보드는 SX1276 LoRaWAN modem, STM32L151CB-A MCU, GPS module을 통합한 RAK Wireless RAK5205 chipset 기반입니다. Zephyr 애플리케이션은 96b_wistrio 설정을 사용해 이 보드에서 실행됩니다.
이 보드는 LoRa 연결을 제공하는 96Boards IoT Edition platform 중 하나입니다.
하드웨어
- RAK5205 chipset
- 동작 전압 3.3 V
- flash 128 KB, SRAM 16 KB
- 내장 sensor: STMicro LIS3DH accelerometer, Bosch BME680 integrated environmental sensor
- user LED 2개
- 외부 interrupt 기능의 GPIO
- UART 2개, I2C 1개
- GPS module과 GPS antenna
- LoRa antenna
지원 기능
| Interface | Controller | Driver/Component |
|---|---|---|
| NVIC | on-chip | nested vector interrupt controller |
| SYSTICK | on-chip | system clock |
| UART | on-chip | serial port |
| GPIO | on-chip | gpio |
| PINMUX | on-chip | pinmux |
| I2C | on-chip | i2c |
| SPI | on-chip | spi |
| RTC | on-chip | rtc |
| EEPROM | on-chip | eeprom |
기본 설정 파일은 boards/96boards/wistrio/96b_wistrio_defconfig입니다.
연결과 I/O
LED
LED1 / User1 LED = PA12LED2 / User2 LED = PB4
Push button
BUTTON = RST (BT1)
Serial port
WisTrio에는 UART가 2개 있습니다. Zephyr console output은 기본 115200 8N1 설정의 USART1에 할당되며, USART3은 GPS module에 사용됩니다.
I2C
보드의 I2C 하나는 내장 sensor에 연결됩니다. 기본 mapping은 I2C1_SCL: PB8, I2C1_SDA: PB9입니다. I2C1은 J22 connector에도 연결되어 외부 sensor를 부착할 수 있습니다.
SPI
SPI 하나는 on-chip LoRa radio에 연결됩니다.
SPI1_SCLK: PA5SPI1_MISO: PA6SPI1_MOSI: PA7SPI1_NSS: PB0
프로그래밍과 디버깅
Flashing
WisTrio는 ROM bootloader 또는 별도 하드웨어가 필요한 SWD debug port로 flash할 수 있습니다. ROM bootloader는 BOOT0 pin의 활성화 pattern으로 진입하며 UART와 I2C flashing을 지원합니다. 이 문서는 UART 방식만 설명하며 자세한 내용은 AN2606을 참고합니다.
ROM bootloader 사용
- USB-Micro to USB-A cable로 WisTrio를 Linux PC에 연결합니다.
- J12의 pin 1과 2를 연결해 BOOT0를 VDD에 연결한 뒤 RST button을 눌렀다 놓습니다.
AN2606 Chapter 29에 bootloader 활성화 방법이 있으며 UART와 I2C protocol을 지원합니다. stm32flash를 사용해 hello_world를 빌드하고 flash하는 예는 다음과 같습니다.
# Zephyr 저장소 루트에서
west build -b 96b_wistrio samples/hello_world
west flash
SWD debugger 사용
Black Magic Debug Probe를 SWD programmer로 사용하며, flying lead와 20 Pin JTAG Adapter Board Kit로 J22 header에 노출된 SWD pin에 연결합니다. PC에 연결하면 USB serial device로 인식됩니다.
Zephyr SDK의 arm-zephyr-eabi-gdb 또는 다른 Arm GDB를 사용할 수 있습니다.
$ arm-zephyr-eabi-gdb -q zephyr.elf
(gdb) target extended-remote /dev/ttyACM0
Remote debugging using /dev/ttyACM0
(gdb) monitor swdp_scan
Target voltage: 3.3V
Available Targets:
No. Att Driver
Debugging
flash 후 같은 GDB instance로 debug할 수 있습니다. 다시 연결할 때는 위 절차를 attach 1까지 반복한 뒤 일반적인 GDB 명령을 사용합니다. run을 입력하면 flash한 program을 다시 시작합니다.
참고 자료
- AN2606
- stm32flash
- Black Magic Debug Probe
- Getting started page
- 96Boards IoT Edition specification
Source
출처
영어 원문에는 문단, 문서 지시문, 표, 코드, 코드 심벌, 경로를 그대로 보존했습니다.